Matlab R2017b 自动驾驶工具箱学习笔记(2)_Tutorials_Visual Perception Using Monocular Camera
Visual Perception Using Monocular Camera
基于单目摄像头的视觉感知
本示例展示了如何构建基于单目摄像头的车道线检测和车辆检测的仿真。摄像头将反馈基于车体坐标系的检测结果。本例中,你将学到本工具箱中所使用到的坐标系统和单目摄像头使用中所用到的机器视觉相关的技术。
综述
包含ADAS功能或全自动驾驶的车辆需依靠各类传感器。这些传感器包括声呐,雷达,激光雷达和摄像头。本例说明了一些单目摄像头系统设计中用到的一些概念。只此一种传感器就可以实现众多功能,包括:
- 车道线检测
- 车辆、行人和各类物体的检测
- 障碍物的距离估计
这样,单目摄像头返回的检测结果既可用于车道偏离预警,防碰撞预警,或者车道保持中。结合其他传感器,摄像头也可以实现紧急刹车辅助系统等其他安全相关的功能。
本例实现一个完整开发的单目摄像头系统的部分功能:车道线检测和车辆检测,并返回他们分别在车体坐标系中的位置。
配置摄像头
摄像的内,外参数对精确的坐标转换(图像坐标系和车体坐标系)至关重要。
首先定义摄像头的内参。下面的参数是由前一步利用棋盘图标定摄像头后产生的,你可以利用cameraCalibrator标定你自己的摄像头:
focalLength    = [309.4362, 344.2161]; % [fx, fy] in pixel units
principalPoint = [318.9034, 257.5352]; % [cx, cy] optical center in pixel coordinates
imageSize      = [480, 640];           % [nrows, mcols]
请注意因为畸变很小,所以本例中的畸变参数是被省略的,这些参数存储在cameraIntrinsics对象内。
camIntrinsics = cameraIntrinsics(focalLength, principalPoint, imageSize);接下来,定义相对于车辆底盘的摄像头方向,这些信息既摄像头外部参数,摄像头外参定义了相对于车体坐标系的3D相机坐标系的位置
height = 2.1798;    % mounting height in meters from the ground
pitch  = 14;        % pitch of the camera in degrees
上述参数可以从extrinsics方程返回的旋转和平移矩阵中得到,Pitch定义了摄像机在水平方向的倾斜角度。本例中,摄像机的roll和yaw均为0.配置定义的内外参数存储在monoCamera对象中。
sensor = monoCamera(camIntrinsics, height, 'Pitch', pitch);
注意,monocamera对象定义了一个特定的车体坐标系,x轴指向车辆前方,y轴指向车辆左侧。

坐标系的原点在地面上,位于摄像机焦点定义的的摄像机中心的正下方。另外,monoCamera提供图像到车辆坐标系的相互转换的imageToVehicle和vehicleToImage两种方法。
注:坐标系转换假设道路为平坦道路,它是是基于图像平面到路面的单应性映射矩阵计算得到。不平坦的路面会影响检测到的物体的距离,尤其是距离车辆较远的物体。
加载单帧视频
在处理整个视频之前,先处理视频的某一帧,以说明单目摄像头设计中所涉及的概念。
首先创建一个VideoReader对象打开一个视频文件。为了合理利用内存,VideoReader一次只加载一帧视频。
videoName = 'caltech_cordova1.avi';
videoReader = VideoReader(videoName);
读取一帧一帧包含车道线和车辆的图像
timeStamp = 0.06667;                   % time from the beginning of the video
videoReader.CurrentTime = timeStamp;   % point to the chosen frame

frame = readFrame(videoReader); % read frame at timeStamp seconds
imshow(frame) % display frame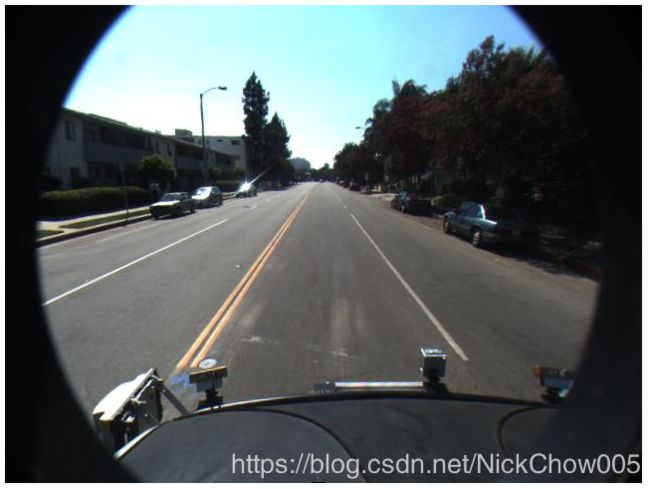
注:本例忽略镜头畸变。如果考虑由镜头畸变引起物体距离检测的误差,这里可使用undistortImage函数消除畸变影响。
创建鸟瞰图
车道线检测和分割的实现方法很多,其中一个方法就是鸟瞰图变换。尽管会消耗计算资源,鸟瞰图变换有一个很大的优点:鸟瞰图中的车道线的宽度是均匀的,这样就简化了分割处理的程序;同一车道线的标识将会是平行的,这样也是后续的分析处理更简便。
摄像头配置完成后,birdsEyeView对象将原始图像转换为鸟瞰图。该对象可定义车体坐标系下的转换区域。请注意,车体坐标系单元是基于monoCamera对象,并且摄像头的安装高度单位定义为米。例如:如果安装高度单位定义为毫米,仿真的其他部分均会使用毫米。
% Using vehicle coordinates, define area to transform
distAheadOfSensor = 30; % in meters, as previously specified in monoCamera height input
spaceToOneSide    = 6;  % all other distance quantities are also in meters
bottomOffset      = 3;

outView   = [bottomOffset, distAheadOfSensor, -spaceToOneSide, spaceToOneSide]; % [xmin, xmax, ymin, ymax]
imageSize = [NaN, 250]; % output image width in pixels; height is chosen automatically to preserve units per pixel ratio

birdsEyeConfig = birdsEyeView(sensor, outView, imageSize);
生成鸟瞰图
birdsEyeImage = transformImage(birdsEyeConfig, frame);
figure
imshow(birdsEyeImage)

远离传感器的区域会很模糊,因为这部分区域内的像素点少需要大量的插值。
请注意,只要可以在车体坐标系中定位到车道线的像素点,后续的处理可以不使用鸟瞰图。
寻找车辆坐标系中的车道线
得到鸟瞰图之后,使用segmentLaneMarkerRidge函数分离路面上的车道线像素,选用此方法是因为该方法的简便性和高效性。相类似的分割算法有语义分割(深度学习)和steerable滤波。使用下面的算法得到后续所需要的二值图。
大部分传入下面方程的参数是基于世界坐标系的,例如,传入segmentLaneMarkerRidge的车道线宽度。使用世界坐标系后使得后期可方便的更换传感器,即使输入图片的尺寸有所改变。这对提高系统设计的鲁棒性和更改摄像头硬件或处理不同国家的不同标准的灵活性来说很重要。
% Convert to grayscale
birdsEyeImage = rgb2gray(birdsEyeImage);

% Lane marker segmentation ROI in world units
vehicleROI = outView - [-1, 2, -3, 3]; % look 3 meters to left and right, and 4 meters ahead of the sensor
approxLaneMarkerWidthVehicle = 0.25; % 25 centimeters

% Detect lane features
laneSensitivity = 0.25;
birdsEyeViewBW = segmentLaneMarkerRidge(birdsEyeImage, birdsEyeConfig, approxLaneMarkerWidthVehicle,'ROI', vehicleROI, 'Sensitivity', laneSensitivity);

figure
imshow(birdsEyeViewBW)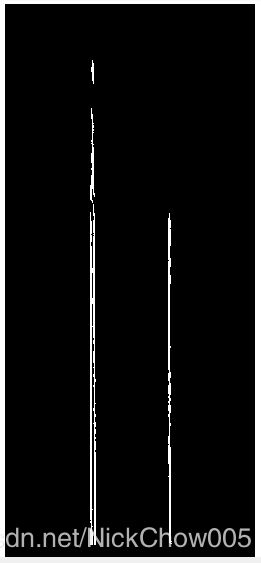
定位锚定到摄像头坐标的车体坐标系内的车道线。本例使用二次车道线模型代表车道线,ax^2 + bx + c。其他的车道线模型包括:三次多项式模型或样条曲线模型。车道线图像坐标转换成车体坐标系可以消除透视畸变所引起的车道线曲率误差。
车道线模型适用于车辆行驶途径中车道线标识,行驶途径中的车道线或道路上画的标识不会被识别为车道线。
% Obtain lane candidate points in vehicle coordinates
[imageX, imageY] = find(birdsEyeViewBW);
xyBoundaryPoints = imageToVehicle(birdsEyeConfig, [imageY, imageX]);
由于分割点包含不属于实际车道线的异常点,这里需要使用RANSAC拟合曲线,返回车道线的边缘和二次模型的参数(a,b,c),参数存储于parabolicLaneBoundary对象boundaries。
maxLanes      = 2; % look for maximum of two lane markers
boundaryWidth = 3*approxLaneMarkerWidthVehicle; % expand boundary width to search for double markers

[boundaries, boundaryPoints] = findParabolicLaneBoundaries(xyBoundaryPoints,boundaryWidth, ...
    'MaxNumBoundaries', maxLanes, 'validateBoundaryFcn', @validateBoundaryFcn);
请注意:findParabolicLaneBoundaries需要函数句柄,validateBoundaryFcn。示例函数在本例的结尾处。使用此句柄使函数可以根据a,b,c的值判定车道线。同时,也使得函数可以根据前几帧的集合信息得到a,b,c值。
自身车道线
前面步骤处理的曲线也许一样无效。例如人行横道的车道线拟合,使用额外的启发式方法拒绝这些曲线。
% Establish criteria for rejecting boundaries based on their length
maxPossibleXLength = diff(vehicleROI(1:2));
minXLength         = maxPossibleXLength * 0.60; % establish a threshold

% Reject short boundaries
isOfMinLength = arrayfun(@(b)diff(b.XExtent) > minXLength, boundaries);
boundaries    = boundaries(isOfMinLength);
根据findParabolicLaneBoundaries计算的强度指标移除额外的边缘。根据ROI和图像尺寸设置车道线强度阈值。
% To compute the maximum strength, assume all image pixels within the ROI
% are lane candidate points
birdsImageROI = vehicleToImageROI(birdsEyeConfig, vehicleROI);
[laneImageX,laneImageY] = meshgrid(birdsImageROI(1):birdsImageROI(2),birdsImageROI(3):birdsImageROI(4));

% Convert the image points to vehicle points
vehiclePoints = imageToVehicle(birdsEyeConfig,[laneImageX(:),laneImageY(:)]);

% Find the maximum number of unique x-axis locations possible for any lane
% boundary
maxPointsInOneLane = numel(unique(vehiclePoints(:,1)));

% Set the maximum length of a lane boundary to the ROI length
maxLaneLength = diff(vehicleROI(1:2));

% Compute the maximum possible lane strength for this image size/ROI size
% specification
maxStrength   = maxPointsInOneLane/maxLaneLength;

% Reject weak boundaries
isStrong      = [boundaries.Strength] > 0.4*maxStrength;
boundaries    = boundaries(isStrong);
将车道线分类为单/双,实心/虚线的启发方法在示例后方列出的辅助函数中。识别车道线的种类对车辆的自动转向是很重要的,例如,双实线车道线上超车时被禁止的。
boundaries = classifyLaneTypes(boundaries, boundaryPoints);

% Locate two ego lanes if they are present
xOffset    = 0;   %  0 meters from the sensor
distanceToBoundaries  = boundaries.computeBoundaryModel(xOffset);

% Find candidate ego boundaries
leftEgoBoundaryIndex  = [];
rightEgoBoundaryIndex = [];
minLDistance = min(distanceToBoundaries(distanceToBoundaries>0));
minRDistance = max(distanceToBoundaries(distanceToBoundaries<=0));
if ~isempty(minLDistance)
    leftEgoBoundaryIndex  = distanceToBoundaries == minLDistance;
end
if ~isempty(minRDistance)
    rightEgoBoundaryIndex = distanceToBoundaries == minRDistance;
end
leftEgoBoundary       = boundaries(leftEgoBoundaryIndex);
rightEgoBoundary      = boundaries(rightEgoBoundaryIndex);
鸟瞰图和常规图中显示检测的车道线
xVehiclePoints = bottomOffset:distAheadOfSensor;
birdsEyeWithEgoLane = insertLaneBoundary(birdsEyeImage, leftEgoBoundary , birdsEyeConfig, xVehiclePoints, 'Color','Red');
birdsEyeWithEgoLane = insertLaneBoundary(birdsEyeWithEgoLane, rightEgoBoundary, birdsEyeConfig, xVehiclePoints, 'Color','Green');

frameWithEgoLane = insertLaneBoundary(frame, leftEgoBoundary, sensor, xVehiclePoints, 'Color','Red');
frameWithEgoLane = insertLaneBoundary(frameWithEgoLane, rightEgoBoundary, sensor, xVehiclePoints, 'Color','Green');

figure
subplot('Position', [0, 0, 0.5, 1.0]) % [left, bottom, width, height] in normalized units
imshow(birdsEyeWithEgoLane)
subplot('Position', [0.5, 0, 0.5, 1.0])
imshow(frameWithEgoLane)
车辆坐标系中的车辆定位
车辆检测和跟踪在FCW和AEB系统中至关重要。加载已训练过得ACF检测算子用以检测车头和车尾。这样的检测算子可以处理重要的碰撞警报。然而这类算法检测效果存在局限性例如前方有车辆横穿过马路的情况下。
detector = vehicleDetectorACF();

% Width of a common vehicles is between 1.5 to 2.5 meters
vehicleWidth = [1.5, 2.5];
configureDetectorMonoCamera函数在考虑典型汽车的形状下,具化通用ACF检测算子。传入摄像头配置后,检测算子只检测沿路面上的车辆,因为检测消失点上方区域没有任何意义。这样也节省了计算时间并减少了误判。
monoDetector = configureDetectorMonoCamera(detector, sensor, vehicleWidth);

[bboxes, scores] = detect(monoDetector, frame);
因本例为演示目的只展示单帧图像的处理过程,因此不能在原始检测上实现追踪。增加追踪算法之后,返回到的检测车辆的位置会更稳健,因为在车辆被遮挡时,追踪器也可以返回车辆位置。更多详情,请参见:Tracking Multiple Vehicles From a Camera示例。
接下来是将车辆检测位置转换到车辆坐标系中。computeVehicleLocations函数(请参见例程结尾处)通过图像坐标系中的检测算法检测到的车辆边框后计算车辆坐标系下的车辆位置。函数返回车辆坐标系下的检测边框的底部中心位置。因为我们只使用到单目摄像头和简单的单应性变换,所以只有沿着路面的距离信息才可以被精确的计算得到。三维空间中任意位置的计算需要景深摄像头或者其他类型的传感器。
locations = computeVehicleLocations(bboxes, sensor);

% Overlay the detections on the video frame
imgOut = insertVehicleDetections(frame, locations, bboxes);
figure;
imshow(imgOut);
视频流算法仿真
现在我们已了解每一处理步骤的细节,现在联合各步骤并将算法应用于视频流上。视频开始后,算法将处理视频的每一帧。下面的代码已做精简,因为所有的关键参数已在上文步骤中定义。
videoReader.CurrentTime = 0;

isPlayerOpen = true;
snapshot     = [];
while hasFrame(videoReader) && isPlayerOpen

    % Grab a frame of video
    frame = readFrame(videoReader);

    % Compute birdsEyeView image
    birdsEyeImage = transformImage(birdsEyeConfig, frame);
    birdsEyeImage = rgb2gray(birdsEyeImage);

    % Detect lane boundary features
    birdsEyeViewBW = segmentLaneMarkerRidge(birdsEyeImage, birdsEyeConfig, ...
        approxLaneMarkerWidthVehicle, 'ROI', vehicleROI, ...
        'Sensitivity', laneSensitivity);

    % Obtain lane candidate points in vehicle coordinates
    [imageX, imageY] = find(birdsEyeViewBW);
    xyBoundaryPoints = imageToVehicle(birdsEyeConfig, [imageY, imageX]);

    % Find lane boundary candidates
    [boundaries, boundaryPoints] = findParabolicLaneBoundaries(xyBoundaryPoints,boundaryWidth, ...
        'MaxNumBoundaries', maxLanes, 'validateBoundaryFcn', @validateBoundaryFcn);

    % Reject boundaries based on their length and strength
    isOfMinLength = arrayfun(@(b)diff(b.XExtent) > minXLength, boundaries);
    boundaries    = boundaries(isOfMinLength);
    isStrong      = [boundaries.Strength] > 0.2*maxStrength;
    boundaries    = boundaries(isStrong);

    % Classify lane marker type
    boundaries = classifyLaneTypes(boundaries, boundaryPoints);

    % Find ego lanes
    xOffset    = 0;   %  0 meters from the sensor
    distanceToBoundaries  = boundaries.computeBoundaryModel(xOffset);
    % Find candidate ego boundaries
    leftEgoBoundaryIndex  = [];
    rightEgoBoundaryIndex = [];
    minLDistance = min(distanceToBoundaries(distanceToBoundaries>0));
    minRDistance = max(distanceToBoundaries(distanceToBoundaries<=0));
    if ~isempty(minLDistance)
        leftEgoBoundaryIndex  = distanceToBoundaries == minLDistance;
    end
    if ~isempty(minRDistance)
        rightEgoBoundaryIndex = distanceToBoundaries == minRDistance;
    end
    leftEgoBoundary       = boundaries(leftEgoBoundaryIndex);
    rightEgoBoundary      = boundaries(rightEgoBoundaryIndex);

    % Detect vehicles
    [bboxes, scores] = detect(monoDetector, frame);
    locations = computeVehicleLocations(bboxes, sensor);

    % Visualize sensor outputs and intermediate results. Pack the core
    % sensor outputs into a struct.
    sensorOut.leftEgoBoundary  = leftEgoBoundary;
    sensorOut.rightEgoBoundary = rightEgoBoundary;
    sensorOut.vehicleLocations = locations;

    sensorOut.xVehiclePoints   = bottomOffset:distAheadOfSensor;
    sensorOut.vehicleBoxes     = bboxes;

    % Pack additional visualization data, including intermediate results
    intOut.birdsEyeImage   = birdsEyeImage;
    intOut.birdsEyeConfig  = birdsEyeConfig;
    intOut.vehicleScores   = scores;
    intOut.vehicleROI      = vehicleROI;
    intOut.birdsEyeBW      = birdsEyeViewBW;

    closePlayers = ~hasFrame(videoReader);
    isPlayerOpen = visualizeSensorResults(frame, sensor, sensorOut, ...
        intOut, closePlayers);

    timeStamp = 7.5333; % take snapshot for publishing at timeStamp seconds
    if abs(videoReader.CurrentTime - timeStamp) < 0.01
        snapshot = takeSnapshot(frame, sensor, sensorOut);
    end
end
显示视频某一帧,截图在timeStamp处截取。
if ~isempty(snapshot)
    figure
    imshow(snapshot)
end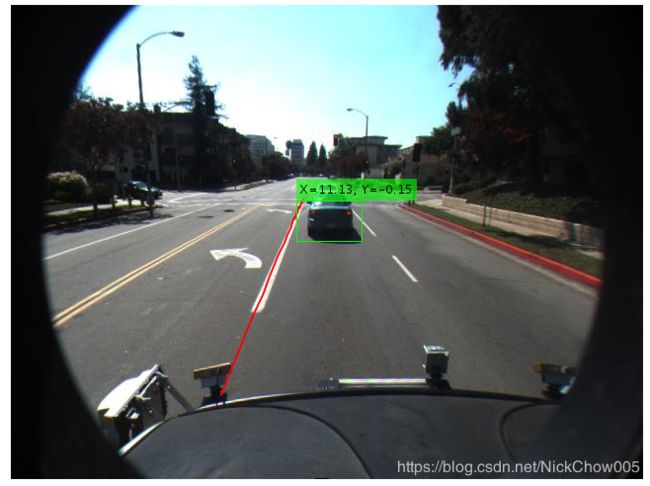
算法应用于验证视频
helperMonoSensor类封装了仿真单目摄像头算法的配置和处理各步骤,以适应不同视频的处理。因为传感器算法设计的大部分参数是基于世界单位(米、毫米等),所以算法对包括图形尺寸等的摄像头参数变化具有很高的稳定性。请注意,helperMonoSensor类内部的代码与上文中的代码略有不同,上文代码只是为代表基本概念。
提供一份新视频的同时,也必须提供配套的摄像头参数。过程如下。
% Sensor configuration
focalLength    = [309.4362, 344.2161];
principalPoint = [318.9034, 257.5352];
imageSize      = [480, 640];
height         = 2.1798;    % mounting height in meters from the ground
pitch          = 14;        % pitch of the camera in degrees

camIntrinsics = cameraIntrinsics(focalLength, principalPoint, imageSize);
sensor        = monoCamera(camIntrinsics, height, 'Pitch', pitch);

videoReader = VideoReader('caltech_washington1.avi');
创建helperMonoSensor对象并应用于视频。
monoSensor   = helperMonoSensor(sensor);
monoSensor.LaneXExtentThreshold = 0.5;
% To remove false detections from shadows in this video, we only return
% vehicle detections with higher scores.
monoSensor.VehicleDetectionThreshold = 20;

isPlayerOpen = true;
snapshot     = [];
while hasFrame(videoReader) && isPlayerOpen

    frame = readFrame(videoReader); % get a frame

    sensorOut = processFrame(monoSensor, frame);

    closePlayers = ~hasFrame(videoReader);

    isPlayerOpen = displaySensorOutputs(monoSensor, frame, sensorOut, closePlayers);

    timeStamp = 11.1333; % take snapshot for publishing at timeStamp seconds
    if abs(videoReader.CurrentTime - timeStamp) < 0.01
        snapshot = takeSnapshot(frame, sensor, sensorOut);
    end

end
显示视频某一帧,截图在timeStamp处截取。
if ~isempty(snapshot)
    figure
    imshow(snapshot)
end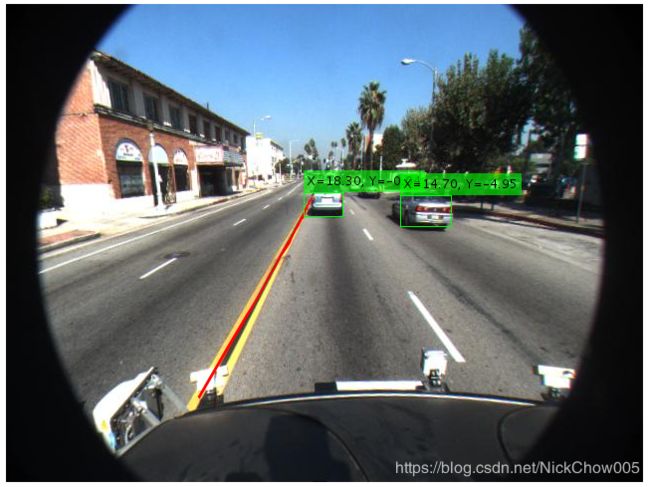
辅助函数
visualizeSensorResults显示单目摄像头仿真的关键的信息和过程结果。
function isPlayerOpen = visualizeSensorResults(frame, sensor, sensorOut,...
    intOut, closePlayers)

    % Unpack the main inputs
    leftEgoBoundary  = sensorOut.leftEgoBoundary;
    rightEgoBoundary = sensorOut.rightEgoBoundary;
    locations        = sensorOut.vehicleLocations;

    xVehiclePoints   = sensorOut.xVehiclePoints;
    bboxes           = sensorOut.vehicleBoxes;

    % Unpack additional intermediate data
    birdsEyeViewImage = intOut.birdsEyeImage;
    birdsEyeConfig          = intOut.birdsEyeConfig;
    vehicleROI        = intOut.vehicleROI;
    birdsEyeViewBW    = intOut.birdsEyeBW;

    % Visualize left and right ego-lane boundaries in bird's-eye view
    birdsEyeWithOverlays = insertLaneBoundary(birdsEyeViewImage, leftEgoBoundary , birdsEyeConfig, xVehiclePoints, 'Color','Red');
    birdsEyeWithOverlays = insertLaneBoundary(birdsEyeWithOverlays, rightEgoBoundary, birdsEyeConfig, xVehiclePoints, 'Color','Green');

    % Visualize ego-lane boundaries in camera view
    frameWithOverlays = insertLaneBoundary(frame, leftEgoBoundary, sensor, xVehiclePoints, 'Color','Red');
    frameWithOverlays = insertLaneBoundary(frameWithOverlays, rightEgoBoundary, sensor, xVehiclePoints, 'Color','Green');

    frameWithOverlays = insertVehicleDetections(frameWithOverlays, locations, bboxes);

    imageROI = vehicleToImageROI(birdsEyeConfig, vehicleROI);
    ROI = [imageROI(1) imageROI(3) imageROI(2)-imageROI(1) imageROI(4)-imageROI(3)];

    % Highlight candidate lane points that include outliers
    birdsEyeViewImage = insertShape(birdsEyeViewImage, 'rectangle', ROI); % show detection ROI
    birdsEyeViewImage = imoverlay(birdsEyeViewImage, birdsEyeViewBW, 'blue');

    % Display the results
    frames = {frameWithOverlays, birdsEyeViewImage, birdsEyeWithOverlays};

    persistent players;
    if isempty(players)
        frameNames = {'Lane marker and vehicle detections', 'Raw segmentation', 'Lane marker detections'};
        players = helperVideoPlayerSet(frames, frameNames);
    end
    update(players, frames);

    % Terminate the loop when the first player is closed
    isPlayerOpen = isOpen(players, 1);

    if (~isPlayerOpen || closePlayers) % close down the other players
        clear players;
    end
end
computeVehicleLocations函数通过图像坐标系中的检测算法检测到的车辆边框后计算车辆坐标系下的车辆位置。函数返回车辆坐标系下的检测边框的底部中心位置。因为我们只使用到单目摄像头和简单的单应性变换,所以只有沿着路面的距离信息才可以被精确的计算得到。三维空间中任意位置的计算需要景深摄像头或者其他类型的传感器。
function locations = computeVehicleLocations(bboxes, sensor)

locations = zeros(size(bboxes,1),2);
for i = 1:size(bboxes, 1)
    bbox  = bboxes(i, :);

    % Get [x,y] location of the center of the lower portion of the
    % detection bounding box in meters. bbox is [x, y, width, height] in
    % image coordinates, where [x,y] represents upper-left corner.
    yBottom = bbox(2) + bbox(4) - 1;
    xCenter = bbox(1) + (bbox(3)-1)/2; % approximate center

    locations(i,:) = imageToVehicle(sensor, [xCenter, yBottom]);
end
end
insertVehicleDetections插入检测车辆的边框并显示(x,y)坐标。
function imgOut = insertVehicleDetections(imgIn, locations, bboxes)

imgOut = imgIn;

for i = 1:size(locations, 1)
    location = locations(i, :);
    bbox     = bboxes(i, :);

    label = sprintf('X=%0.2f, Y=%0.2f', location(1), location(2));

    imgOut = insertObjectAnnotation(imgOut, ...
        'rectangle', bbox, label, 'Color','g');
end
end
vehicleToImageROI转换车辆坐标系下的ROI到鸟瞰图上的图像坐标系。
function imageROI = vehicleToImageROI(birdsEyeConfig, vehicleROI)

vehicleROI = double(vehicleROI);

loc2 = abs(vehicleToImage(birdsEyeConfig, [vehicleROI(2) vehicleROI(4)]));
loc1 = abs(vehicleToImage(birdsEyeConfig, [vehicleROI(1) vehicleROI(4)]));
loc4 =     vehicleToImage(birdsEyeConfig, [vehicleROI(1) vehicleROI(4)]);
loc3 =     vehicleToImage(birdsEyeConfig, [vehicleROI(1) vehicleROI(3)]);

[minRoiX, maxRoiX, minRoiY, maxRoiY] = deal(loc4(1), loc3(1), loc2(2), loc1(2));

imageROI = round([minRoiX, maxRoiX, minRoiY, maxRoiY]);

end
validateBoundaryFcn利用RANSAC算法拒绝所计算的部分车道曲线。
function isGood = validateBoundaryFcn(params)

if ~isempty(params)
    a = params(1);

    % Reject any curve with a small 'a' coefficient, which makes it highly
    % curved.
    isGood = abs(a) < 0.003; % a from ax^2+bx+c
else
    isGood = false;
end
end
classifyLaneTypes检测车道线是实线还是虚线等等。
function boundaries = classifyLaneTypes(boundaries, boundaryPoints)

for bInd = 1 : numel(boundaries)
    vehiclePoints = boundaryPoints{bInd};
    % Sort by x
    vehiclePoints = sortrows(vehiclePoints, 1);

    xVehicle = vehiclePoints(:,1);
    xVehicleUnique = unique(xVehicle);

    % Dashed vs solid
    xdiff  = diff(xVehicleUnique);
    % Sufficiently large threshold to remove spaces between points of a
    % solid line, but not large enough to remove spaces between dashes
    xdifft = mean(xdiff) + 3*std(xdiff);
    largeGaps = xdiff(xdiff > xdifft);

    % Safe default
    boundaries(bInd).BoundaryType= LaneBoundaryType.Solid;
    if largeGaps>2
        % Ideally, these gaps should be consistent, but you cannot rely
        % on that unless you know that the ROI extent includes at least 3 dashes.
        boundaries(bInd).BoundaryType = LaneBoundaryType.Dashed;
    end
end

end
takeSnapshot捕捉HTML发布报告的输出
function I = takeSnapshot(frame, sensor, sensorOut)

    % Unpack the inputs
    leftEgoBoundary  = sensorOut.leftEgoBoundary;
    rightEgoBoundary = sensorOut.rightEgoBoundary;
    locations        = sensorOut.vehicleLocations;
    xVehiclePoints   = sensorOut.xVehiclePoints;
    bboxes           = sensorOut.vehicleBoxes;

    frameWithOverlays = insertLaneBoundary(frame, leftEgoBoundary, sensor, xVehiclePoints, 'Color','Red');
    frameWithOverlays = insertLaneBoundary(frameWithOverlays, rightEgoBoundary, sensor, xVehiclePoints, 'Color','Green');
    frameWithOverlays = insertVehicleDetections(frameWithOverlays, locations, bboxes);

    I = frameWithOverlays;

end