Java基础学习总结:NIO之(三)NIO网络编程与Selector
一、使用NIO实现阻塞式网络编程
java.nio中与网络编程(TCP、UDP)相关的类有 ServerSocketChannel、SocketChannel 和 DatagramChannel。
1、ServerSocketChannel和SocketChannel
(1)ServerSocketChannel:
Java NIO 中的 ServerSocketChannel 是一个可以监听新进来的 TCP 连接的通道, 就像标准 IO 中的 ServerSocket 一样。
打开ServerSocketChannel:
ServerSocketChannel listener = ServerSocketChannel.open();关闭ServerSocketChannel:
server.close();绑定端口号:
server.bind(new InetSocketAddress("localhost",9999));InetSocketAddress是一个 “IP地址+端口号“ 的类,后面再介绍。
监听新进来的连接:
通过 ServerSocketChannel.accept() 方法监听新进来的连接。当 accept() 方法返回的时候, 它返回一个包含新进来的连接的 SocketChannel。因此, accept() 方法会一直阻塞到有新连接到达。通常不会仅仅只监听一个连接, 在 while 循环中调用 accept() 方法. 如下面的例子:
while(true){
    SocketChannel socketChannel = serverSocketChannel.accept();
    //do something with socketChannel...
}
(2)SocketChannel
Java NIO中的SocketChannel是一个连接到TCP网络套接字的通道。
创建
打开SocketChannel:
可以通过以下2种方式创建SocketChannel:
- 调用SocketChannel的open()方法,会创建一个SocketChannel的实例。
- 一个新连接到达ServerSocketChannel时,会创建一个SocketChannel。
打开一个SocketChannel并传入服务器地址:
SocketChannel client = SocketChannel.open(new InetSocketAddress("localhost",9999));关闭SocketChannel:
client.close();读取服务器或客户端信息:
socketChannel.read(buffer)向服务器或客户端写入信息:
client.write(buffer);2、使用NIO编写TCP服务器和客户端并实现通信
服务器端:
package basis.stuNIONet.stu_1;

import java.io.IOException;
import java.net.InetSocketAddress;
import java.nio.ByteBuffer;
import java.nio.channels.ServerSocketChannel;
import java.nio.channels.SocketChannel;

public class B_NIOTCPServer {
    public static void main(String[] args) {
        //NIO实现CP的服务器端(阻塞)
        //1:创建ServerSocketChannel
        try {
            ServerSocketChannel listener = ServerSocketChannel.open();
            //2:绑定端口号 SocketAddress(抽象类)(相当于套接字地址+端口号)
            //默认是本机
            listener.bind(new InetSocketAddress("localhost",9999));
            //3:监听
            System.out.println("服务器已启动");
            SocketChannel socketChannel = listener.accept();
            //4:读取数据
            ByteBuffer buffer = ByteBuffer.allocate(1024*4);
            while (socketChannel.read(buffer)>0){
                buffer.flip();//切换为读模式
                String data = new String(buffer.array(),0,buffer.limit());
                System.out.println(socketChannel.getRemoteAddress()+"说:"+data);
                buffer.clear();
            }
            //5:关闭
            socketChannel.close();
            listener.close();
        } catch (IOException e) {
            e.printStackTrace();
        }
    }
}
客户端:
package basis.stuNIONet.stu_1;

import java.net.InetSocketAddress;
import java.nio.ByteBuffer;
import java.nio.channels.SocketChannel;
import java.util.Scanner;

public class B_NIOTCPClient {
    //NIO实现CP的客户端(阻塞)
    public static void main(String[] args) throws Exception{
        //1:创建客户端套接字通道
        SocketChannel client = SocketChannel.open(new InetSocketAddress("localhost",9999));//可以创建时传入服务器地址
        //2:连接
        //3
        ByteBuffer buffer = ByteBuffer.allocate(1024*4);
        Scanner input = new Scanner(System.in);
        while (true){
            String d = input.next();
            if (d.equals("baibai")||d.equals("over")||d.equals("end")){
                break;
            }
            buffer.put(d.getBytes());
            buffer.flip();
            client.write(buffer);
            buffer.clear();
        }
        client.close();
    }
}
二、使用NIO实现非阻塞式网络编程
ServerSocketChannel 可以设置成非阻塞模式。在非阻塞模式下,accept() 方法会立刻返回,如果还没有新进来的连接,返回的将是 null。 因此,需要检查返回的 SocketChannel 是否是 null。 如:
ServerSocketChannel serverSocketChannel = ServerSocketChannel.open();
serverSocketChannel.socket().bind(new InetSocketAddress(9999));
serverSocketChannel.configureBlocking(false);
while(true){
    SocketChannel socketChannel =
            serverSocketChannel.accept();
    if(socketChannel != null){
        //do something with socketChannel...
    }
}
同样可以设置 SocketChannel 为非阻塞模式(non-blocking mode)。设置之后,就可以在异步模式下调用connect(),read() 和 write()了。
connect()
如果 SocketChannel 在非阻塞模式下,此时调用connect(),该方法可能在连接建立之前就返回了。为了确定连接是否建立,可以调用 finishConnect() 的方法。像这样:
socketChannel.configureBlocking(false);
socketChannel.connect(new InetSocketAddress("localhost", 9999));

while(! socketChannel.finishConnect() ){
    //wait, or do something else...
}
非阻塞模式下,write()方法在尚未写出任何内容时可能就返回了。所以需要在循环中调用 write() :
while(buf.hasRemaining()) {
    channel.write(buf);
}
read()
非阻塞模式下,read()方法在尚未读取到任何数据时可能就返回了。所以需要关注它的 int 返回值,它会告诉你读取了多少字节。
服务器:
package basis.stuNIONet.stu_3;

import java.net.InetSocketAddress;
import java.nio.ByteBuffer;
import java.nio.channels.ServerSocketChannel;
import java.nio.channels.SocketChannel;

public class NB_NIOTCPServer {
    public static void main(String[] args) throws Exception{
        //NIO实现CP的服务器端(非阻塞)
        //1:创建ServerSocketChannel
        ServerSocketChannel server = ServerSocketChannel.open();
        //2:绑定端口号 SocketAddress(抽象类)
        server.bind(new InetSocketAddress("localhost",9999));
        //3:监听
        System.out.println("服务器已启动");
        server.configureBlocking(false);

        while (true){
            SocketChannel socketChannel = server.accept();
            if (socketChannel!=null){
                //4:读取数据
                ByteBuffer buffer = ByteBuffer.allocate(1024*4);
                while (socketChannel.read(buffer)>0){
                    buffer.flip();//切换为读模式
                    String data = new String(buffer.array(),0,buffer.limit());
                    System.out.println(socketChannel.getRemoteAddress()+"说:"+data);
                    buffer.clear();
                }
            }
        }
    }
}
客户端:
package basis.stuNIONet.stu_3;

import java.net.InetSocketAddress;
import java.nio.ByteBuffer;
import java.nio.channels.SocketChannel;
import java.util.Scanner;

public class NB_NIOTCPClient {
    //NIO实现CP的客户端(非阻塞)
    public static void main(String[] args) throws Exception{
        //创建客户端套接字通道
        SocketChannel client = SocketChannel.open();//可以创建时传入服务器地址
        //设置非阻塞式
        client.configureBlocking(false);
        //连接
        client.connect(new InetSocketAddress("localhost",9999));
        //缓冲区
        ByteBuffer buffer = ByteBuffer.allocate(1024*4);
        Scanner input = new Scanner(System.in);
        System.out.println("客户端已启动。。。");
        //写数据
        while (client.finishConnect()){
            String data = input.next();
            if (data.equals("baibai")||data.equals("over")||data.equals("end")){
                break;
            }
            buffer.put(data.getBytes());
            buffer.flip();
            client.write(buffer);
            buffer.clear();
        }
        client.close();
    }
}
三、非阻塞式NIO和Selector(轮询器)
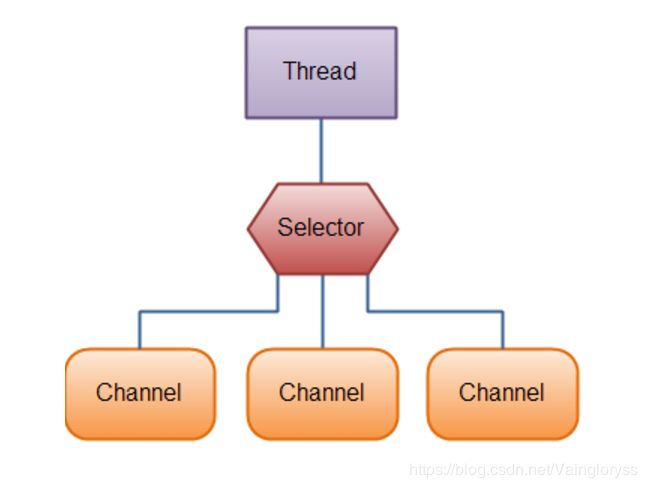
Selector 一般称 为选择器或轮询器,当然你也可以翻译为多路复用器 。它是Java NIO核心组件中的一个,用于检查一个或多个NIO Channel(通道)的状态是否处于可读、可写。如此可以实现单线程管理多个channel,也就是可以管理多个网络链接。
使用Selector的好处在于:使用更少的线程来就可以来处理通道了, 相比使用多个线程,避免了线程上下文切换带来的开销。
1、Selector
(1)Selector
使用Selector,得向Selector注册Channel,然后调用它的select()方法。这个方法会一直阻塞到某个注册的通道有事件就绪。一旦这个方法返回,线程就可以处理这些事件,事件的例子有如新连接进来,数据接收等。选择器提供选择执行已经就绪的任务的能力。从底层来看,Selector提供了询问通道是否已经准备好执行每个I/O操作的能力。
(2)Selector源码
package java.nio.channels;
/*
 * @author Mark Reinhold
 * @author JSR-51 Expert Group
 * @since 1.4
 *
 * @see SelectableChannel
 * @see SelectionKey
 */
public abstract class Selector implements Closeable {

    protected Selector() { }

    public static Selector open() throws IOException {
        return SelectorProvider.provider().openSelector();
    }

    public abstract boolean isOpen();

    public abstract SelectorProvider provider();

    public abstract Set keys();

    public abstract Set selectedKeys();

    public abstract int selectNow() throws IOException;

    public abstract int select(long timeout) throws IOException;

    public abstract int select() throws IOException;

    public abstract Selector wakeup();

    public abstract void close() throws IOException;

}
(3)要想使用Selector我们先要明确一下概念:
选择器(Selector):Selector选择器类管理着一个被注册的通道集合的信息和它们的就绪状态。通道是和选择器一起被注册的,并且使用选择器来更新通道的就绪状态。
可选择通道(SelectableChannel):SelectableChannel这个抽象类提供了实现通道的可选择性所需要的公共方法。它是所有支持就绪检查的通道类的父类。因为FileChannel类没有继承SelectableChannel因此是不是可选通道,而所有socket通道都是可选择的,SocketChannel和ServerSocketChannel是SelectableChannel的子类。
选择键(SelectionKey):选择键封装了特定的通道与特定的选择器的注册关系。选择键对象被SelectableChannel.register()返回并提供一个表示这种注册关系的标记。选择键包含了两个比特集(以整数的形式进行编码),选择键支持四种操作类型:
- Connect 连接
- Accept 接受请求
- Read 读
- Write 写
Java中定义了四个常量来表示这四种操作类型:
- SelectionKey.OP_CONNECT
- SelectionKey.OP_ACCEPT
- SelectionKey.OP_READ
- SelectionKey.OP_WRITE
(4)SelectorKey
package java.nio.channels;
/**
 * @author Mark Reinhold
 * @author JSR-51 Expert Group
 * @since 1.4
 *
 * @see SelectableChannel
 * @see Selector
 */
public abstract class SelectionKey {

    protected SelectionKey() { }

    public abstract SelectableChannel channel();

    public abstract Selector selector();

    public abstract boolean isValid();

    public abstract void cancel();

    public abstract SelectionKey interestOps(int ops);

    public abstract int readyOps();

    public static final int OP_READ = 1 << 0;
    public static final int OP_WRITE = 1 << 2;
    public static final int OP_CONNECT = 1 << 3;
    public static final int OP_ACCEPT = 1 << 4;

    public final boolean isReadable() {
        return (readyOps() & OP_READ) != 0;
    }

    public final boolean isWritable() {
        return (readyOps() & OP_WRITE) != 0;
    }

    public final boolean isConnectable() {
        return (readyOps() & OP_CONNECT) != 0;
    }

    public final boolean isAcceptable() {
        return (readyOps() & OP_ACCEPT) != 0;
    }

    private volatile Object attachment = null;

    private static final AtomicReferenceFieldUpdater
        attachmentUpdater = AtomicReferenceFieldUpdater.newUpdater(
            SelectionKey.class, Object.class, "attachment"
        );

    public final Object attach(Object ob) {
        return attachmentUpdater.getAndSet(this, ob);
    }

    public final Object attachment() {
        return attachment;
    }

}
2、使用Selector实现单线程处理多个客户端连接
使用Selector实现多路复用即用一个服务器线程管理多个客户端连接,可以粗略的分为三个步骤:
- 第一步:创建ServerSocketChannel 绑定端口号并设置为非阻塞模式;
- 第二步:创建Selector并注册到ServerSocketChannel上
- 第三步:循环处理Selector上的发生的事件,并关闭已处理的连接
(1)服务器端:
package basis.stuNIONet.stu_3;

import java.net.InetSocketAddress;
import java.nio.ByteBuffer;
import java.nio.channels.SelectionKey;
import java.nio.channels.Selector;
import java.nio.channels.ServerSocketChannel;
import java.nio.channels.SocketChannel;
import java.util.Iterator;
import java.util.Set;

public class NB_NIOTCPServer {
    public static void main(String[] args) throws Exception {
        //NIO实现CP的服务器端(非阻塞)
        //单线程处理多个客户端请求
        //1:创建ServerSocketChannel
        ServerSocketChannel server = ServerSocketChannel.open();
        //2:绑定端地址
        server.bind(new InetSocketAddress("localhost",9999));
        //3:设置模式为非阻塞式
        server.configureBlocking(false);
        //4: 创建轮询器 Selector抽象类
        Selector selector = Selector.open();
        //5:注册轮询器,使用通道注册选择器
        server.register(selector, SelectionKey.OP_ACCEPT);

        //6:轮询处理
        while (selector.select()>0){
            //获取所有的事件
            Set keys =  selector.selectedKeys();
            Iterator it = keys.iterator();
            while (it.hasNext()){
                SelectionKey key = it.next();
                //判断事件的类型(isAcceptable:注册,表示新的客户连接)
                if (key.isAcceptable()){
                    SocketChannel socketChannel = server.accept();
                    //9:设置非阻塞模式
                    socketChannel.configureBlocking(false);
                    //10:注册轮询器
                    socketChannel.register(selector,SelectionKey.OP_READ);
                }else if (key.isReadable()){//读事件,isReadable
                    //接收数据
                    //获取发生读取事件的SocketChannel
                    SocketChannel channel =  (SocketChannel) key.channel();
                    //创建Buffer
                    ByteBuffer buffer = ByteBuffer.allocate(1024*4);
                    int len = -1;
                    //read()不会阻塞,没数据 返回0;客户端关闭或结束 返回-1;有数据 返回数据个数
                    while ((len = channel.read(buffer))>0){
                        buffer.flip();//读模式
                        String data = new String(buffer.array(),0,buffer.limit());
                        InetSocketAddress isa =  (InetSocketAddress) channel.getRemoteAddress();
                        System.out.println(isa.getAddress()+"说:"+data);
                        buffer.clear();
                    }
                    if(len==-1){
                        channel.close();//客户端关闭时,关闭channel
                    }
                }
            }
            //把处理过的事件删除掉
            it.remove();
        }
    }
}
(2)客户端:
package basis.stuNIONet.stu_3;

import java.net.InetSocketAddress;
import java.nio.ByteBuffer;
import java.nio.channels.SocketChannel;
import java.util.Scanner;

public class NB_Selector_NIOTCPClient {
    //NIO实现CP的客户端(阻塞)
    public static void main(String[] args) throws Exception{
        //1:创建客户端套接字通道
        SocketChannel client = SocketChannel.open(new InetSocketAddress("localhost",9999))
        //2:设置为非阻塞式(无所谓)
        client.configureBlocking(false);
        Scanner input = new Scanner(System.in);
        ByteBuffer buffer = ByteBuffer.allocate(1024*4);
        while (true){
            String d = input.next();
            if (d.equals("baibai")||d.equals("over")||d.equals("end")){
                break;
            }
            buffer.put(d.getBytes());
            buffer.flip();
            client.write(buffer);
            buffer.clear();
        }
        client.close();
    }
}
