Android 安卓开发板 读取串口
本文转发自 https://www.logcg.com/archives/2831.html#comments
最近接了个工程,需求是给特制的工程安卓板子做串口读写以实现一些特定外接设备的互动——是的你没有看错,安卓板子也是可以有串口的!
很多做移动开发的朋友可能没接触过——其实在这之前我也没接触过。踩了七八个小时的坑,终于爬出来了,这里做一个总结,可能各个工程板子具体情况不同,大家一定要随机应变。
**
首先你要知道的
**
跳线,工程板子为了节约 USB 接口,默认的 USB 接口都是对外的不能接电脑调试,根据我上手的这个板子来说,在接近 RJ45 也就是网线口的那个 USB 旁边就有一个跳线,可以把它改为连接电脑的专用口。——当然了,别忘记开调试模式。
找对你的串口号,一般板子的说明书上会有,或者在示例程序里查看也行。
Java 不能直接对安卓的串口进行读写,要用 C 或者 C++ 才行,所以要用到比较高级的 JNI 来桥接,把对串口读写的部分做成链接库。
读取串口不需要 root,至少我没有遇到,之前踩坑的过程中有几次是提示没有权限的,但最后证明是我当时写错了路径。
多个进程(线程)或者app是可以同时访问同一个串口的,造成的结果就是串口的数据可能会丢失,体现为“丢包”。
任务目标
我的目标很简单,甚至都不需要发送信息,只需要从外接设备读取需要的信号变化即可,具体到项目,就理解为0和1就好了。
具体过程
我的板子系统是 4.4.4,我用 Android Studio 来做,首先还是来创建一个空项目。
添加 NDK
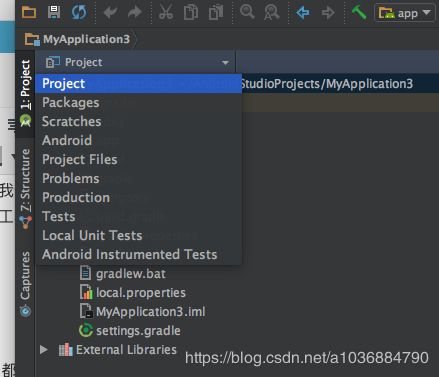
自动下载安装后,as会为你配置好一切,接下来在你工程的左上角把项目选为 “Project”:
切换显示模式
然后在 app/main 上点击鼠标右键,新建 JNI 目录:

新建 JNI 目录
然后在目录里放入以下五个文件:
JNI 里需要的五个文件
jni下载 ←点击下载
这里边包含了桥接需要的文件,稍后会用到,接下来在 java 目录下新建一个名为 android_serialport_api 的包,注意名称一定要是这个。在这个包内新建一个 java 类,名字为 SerialPort ,内容如下:
/*
 * Copyright 2009 Cedric Priscal
 *
 * Licensed under the Apache License, Version 2.0 (the "License");
 * you may not use this file except in compliance with the License.
 * You may obtain a copy of the License at
 *
 * http://www.apache.org/licenses/LICENSE-2.0
 *
 * Unless required by applicable law or agreed to in writing, software
 * distributed under the License is distributed on an "AS IS" BASIS,
 * WITHOUT WARRANTIES OR CONDITIONS OF ANY KIND, either express or implied.
 * See the License for the specific language governing permissions and
 * limitations under the License.
 */

package android_serialport_api;

import java.io.File;
import java.io.FileDescriptor;
import java.io.FileInputStream;
import java.io.FileOutputStream;
import java.io.IOException;
import java.io.InputStream;
import java.io.OutputStream;

import android.util.Log;

public class SerialPort
{
	private static final String TAG = "SerialPort";

	/*
	 * Do not remove or rename the field mFd: it is used by native method close();
	 */
	private FileDescriptor mFd;
	private FileInputStream mFileInputStream;
	private FileOutputStream mFileOutputStream;

	public SerialPort(File device, int baudrate, int flags) throws SecurityException, IOException
	{
		/* Check access permission */
		if (!device.canRead() || !device.canWrite())
		{
			try
			{
				/* Missing read/write permission, trying to chmod the file */
				Process su;
				su = Runtime.getRuntime().exec("/system/bin/su");
				String cmd = "chmod 777 " + device.getAbsolutePath() + "\n"
						+ "exit\n";
				su.getOutputStream().write(cmd.getBytes());

				if ((su.waitFor() != 0) || !device.canRead() || !device.canWrite())
				{
					throw new SecurityException();
				}
			}
			catch (Exception e)
			{
				e.printStackTrace();
				throw new SecurityException();
			}
		}

		mFd = open(device.getAbsolutePath(), baudrate, flags);

		if (mFd == null)
		{
			Log.e(TAG, "native open returns null");
			throw new IOException();
		}

		mFileInputStream = new FileInputStream(mFd);
		mFileOutputStream = new FileOutputStream(mFd);
	}

	// Getters and setters
	public InputStream getInputStream()
	{
		return mFileInputStream;
	}

	public OutputStream getOutputStream()
	{
		return mFileOutputStream;
	}

	// JNI
	private native static FileDescriptor open(String path, int baudrate, int flags);
	public native void close();

	static
	{
		System.loadLibrary("serial_port");
	}
}
添加之后即可给 Gradle 链接 C++ 了,这时候 as 会要你选构建系统,选择 ndk-build ,然后根据提示去找刚才我们下载的五个文件中的 Android.mk
给 Gradle 链接 C++
链接之后,你就可以在 Build 菜单选择 Make Project ,make 之后,检查目录看有没有成功生成链接库:
生成动态链接库
确认成功后,即可 clean 和 rebuild 整个项目了,哦对了,作为测试的话, MainActivity 可以这么写:
import java.io.File;
import java.io.IOException;
import java.io.InputStream;
import java.io.OutputStream;

import android.app.Activity;
import android.os.Bundle;
import android.util.Log;
import android_serialport_api.SerialPort;

public class MainActivity extends Activity {
    protected SerialPort mSerialPort;
    protected InputStream mInputStream;
    protected OutputStream mOutputStream;
    private ReadThread mReadThread;

    private class ReadThread extends Thread
    {
        @Override
        public void run()
        {
            super.run();

            while(!isInterrupted())
            {
                int size;
                Log.v("debug", "接收线程已经开启");
                try
                {
                    byte[] buffer = new byte[64];

                    if (mInputStream == null)
                        return;

                    size = mInputStream.read(buffer);

                    if (size > 0)
                    {
                        onDataReceived(buffer, size);
                    }
                }
                catch (IOException e)
                {
                    e.printStackTrace();
                    return;
                }
            }
        }
    }

    @Override
    protected void onCreate(Bundle savedInstanceState) {
        super.onCreate(savedInstanceState);
        setContentView(R.layout.activity_main);

        try {
            mSerialPort = new SerialPort(new File("/dev/ttyS3"), 9600, 0);//这里串口地址和比特率记得改成你板子要求的值。
            mInputStream = mSerialPort.getInputStream();
            mOutputStream = mSerialPort.getOutputStream();
            mReadThread = new ReadThread();
            mReadThread.start();
        } catch (SecurityException e) {
            e.printStackTrace();
        } catch (IOException e) {
            Log.v("test", "启动失败");
            e.printStackTrace();
        }
    }

    protected void onDataReceived(final byte[] buffer, final int size) {
        runOnUiThread(new Runnable(){
            public void run(){
                String recinfo = new String(buffer, 0, size);
                Log.v("debug", "接收到串口信息======>" + recinfo.getBytes());
            }
        });
    }
}
值得注意的地方
这个项目看起来简单,但实际上最坑的地方在于那个 C 库写的有问题,可偏偏在网上几乎都是这一个文件……在 SerialPort.c 的第 116 行,还有 128 行,你会看到我的版本里注释掉了这两个检测,事实上这个问题坑了我三个小时!
在我拿到手的这个板子上,就是返回 -1 的!他就返回 -1 没毛病!所以直到我怀疑人生……拼死一搏……才发现了人生的真蒂。
总之,如果你发现在实现过程中出现了奇怪的问题,那么就把 这两个if的语句块反注释就好了。
如果一次通过,那你得感谢我。 :)


