学一项技术最好的方法就是用这个技术做点什么。
学习node的时候,看完一遍觉得自己能打能抗,第二天就做回了从前那个少年。可惜不是张无忌,太极剑法看完忘了就吊打倚天剑。在下看完忘了,那便是忘了。故决定做个项目巩固一下知识
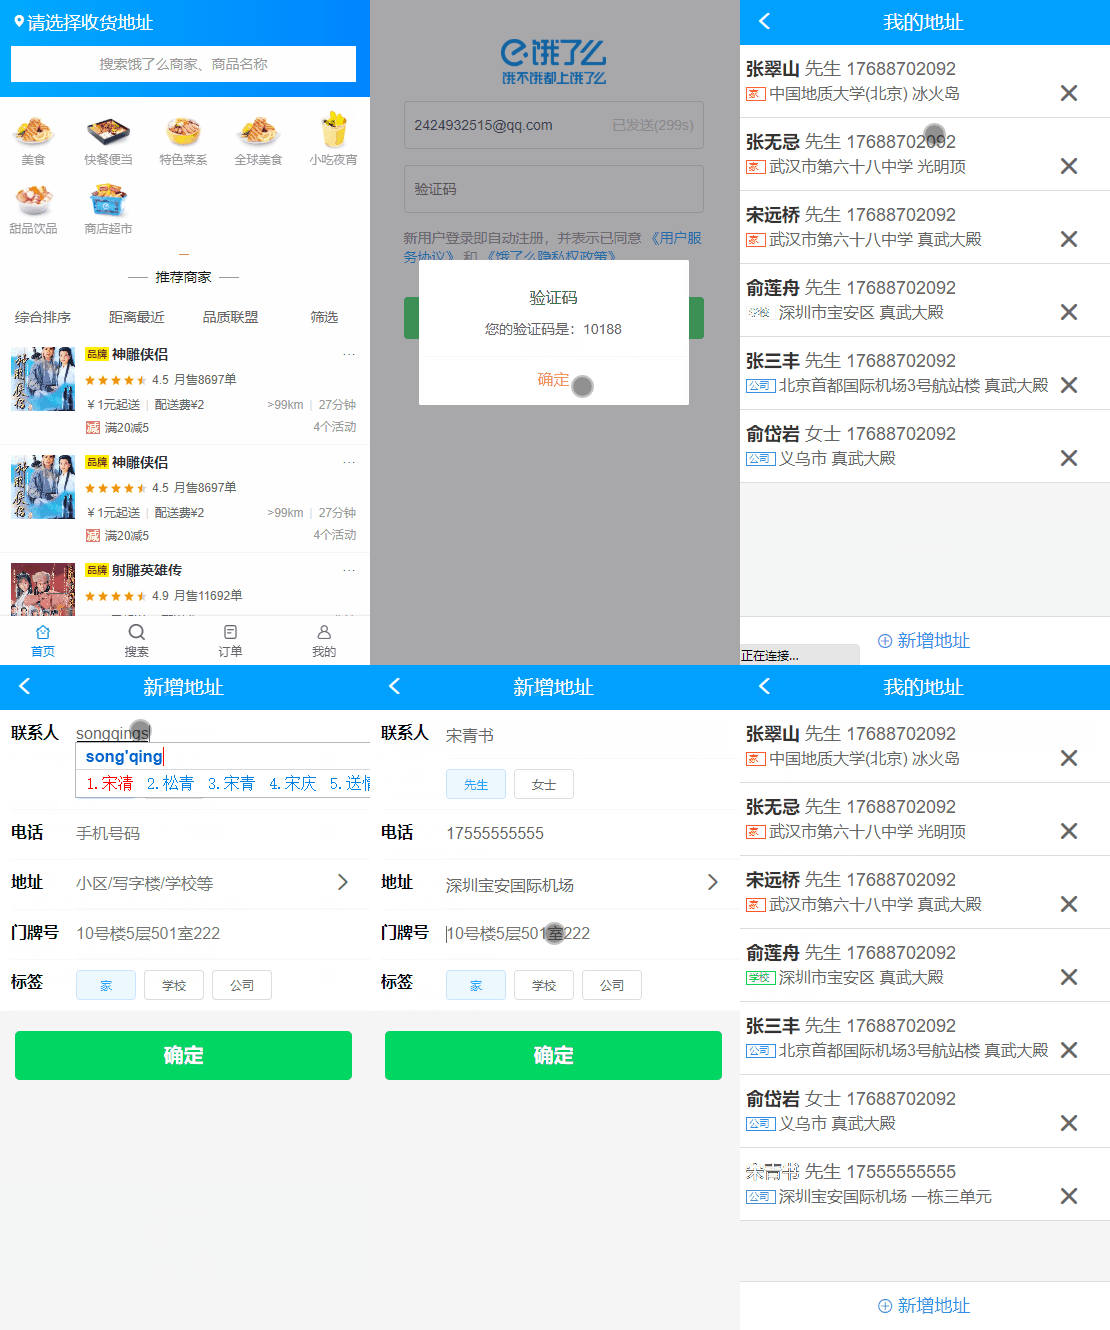
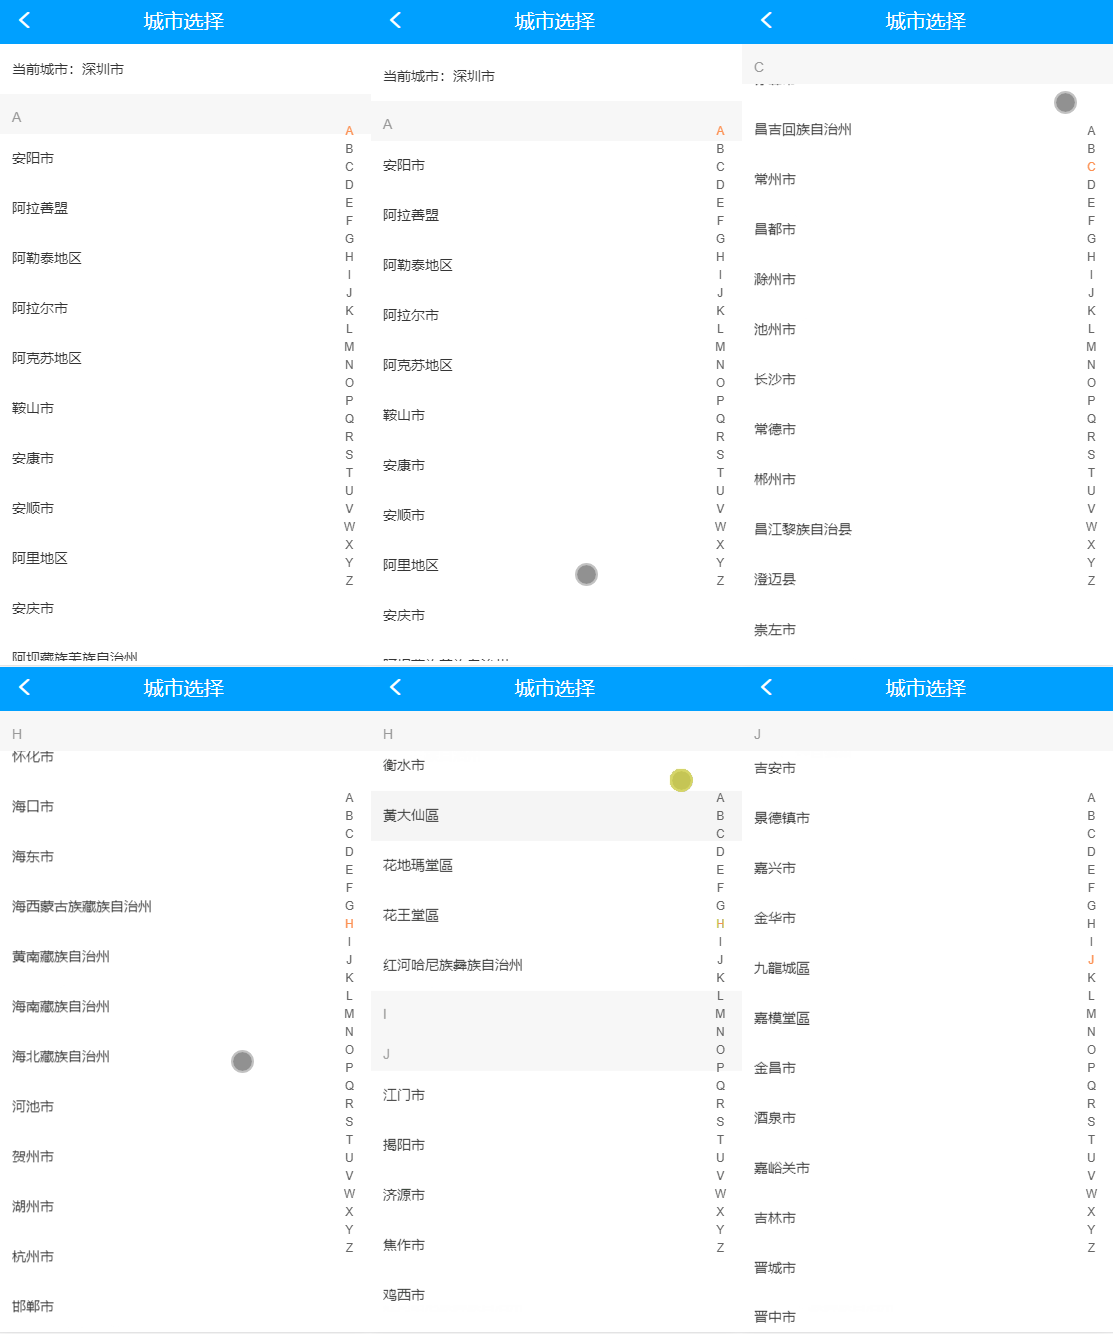
先看下部分效果图
整个项目是完全前后端分离的项目,包含后台接口,后台页面,前端页面三个仓库。
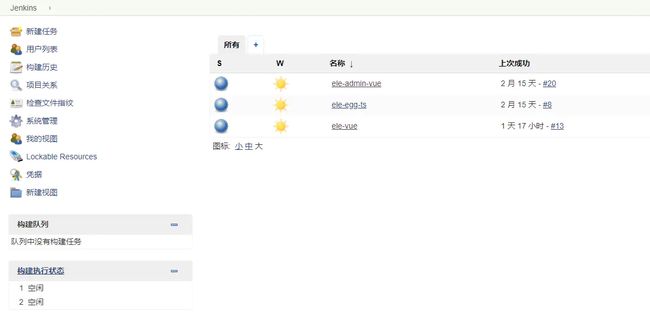
用户通过注册后台管理员,对店铺和店铺食品进行增删改查操作,相应的店铺和食品会在前端进行展示。整个后台项目以egg为框架,mysql作为数据库,用typescript进行开发,涉及数据库表十一张,接口四十个左右。后台和前端页面使用常规的vue+element-ui+vuex+vue-router进行开发。在部署方面,由于这是个人项目,所以我决定用自己没有用过的技术,自建了个Jenkins,通过jenkins自动拉取和执行脚本建立Docker镜像对vue项目进行自动化部署。整个流程对于个人项目还算完整。
在线地址:
前端地址
后端地址
项目参考
慕课网饿了吗课程
基于 vue + element-ui 的后台管理系统
注:对于后台管理系统,我这边只参考了 基于 vue + element-ui 的后台管理系统 的业务逻辑,代码方面没有深究,因为用的技术栈不太一样。由于这是我第一次用node做项目,平常在公司也没有用到node,参考了一些零零碎碎的文章,但初学者肯定是会有东施效颦的丑态,哪里做的不合理的还请斧正,程序员最大的优点的就是知错就改,我不外乎如是。
后台
所用技术
- Node
- Egg
- MySql
- Redis
- TypeScript
实现功能
- 管理员注册登录
- 添加和修改店铺
- 添加和修改店铺食品
- 查看食品列表
- 查看商家列表
- 查看当天数据和整体数据
- 管理员信息设置
- ...
整体项目构建可以参照egg官网提供的教程,里面有详细的教程和目录详解,这里不讲常规的增删改查功能,我们关注整个项目的通用性和比较麻烦的功能实现
通用功能的封装
- 请求响应封装
   /*
 * @Descripttion: controller基类
 * @version:
 * @Author: 笑佛弥勒
 * @Date: 2019-08-06 16:46:01
 * @LastEditors: 笑佛弥勒
 * @LastEditTime: 2020-03-09 10:43:37
 */
import { Controller } from "egg"
export class BaseController extends Controller {

  /**
   * @Descripttion: 请求成功
   * @Author: 笑佛弥勒
   * @param {status} 状态
   * @param {data} 响应数据
   * @return:
   */

  success(status: number, message: string, data?: any) {
    if (data) {
      this.ctx.body = {
        status: status,
        message: message,
        data: data
      }
    } else {
      this.ctx.body = {
        status: status,
        message: message
      }
    }
  }

  /**
   * @Descripttion: 失败
   * @Author: 笑佛弥勒
   * @param {status} 状态
   * @param {data} 错误提示
   * @return:
   */
  fail(status: number, message: string) {
    this.ctx.body = {
      status: status || 500,
      message: message,
    };
  }
- 枚举类
/*
 * @Descripttion: 枚举类
 * @version: 1.0
 * @Author: 笑佛弥勒
 * @Date: 2020-03-14 10:07:36
 * @LastEditors: 笑佛弥勒
 * @LastEditTime: 2020-03-28 23:02:47
 */
export enum Status {
  Success = 200, // 成功
  SystemError = 500, // 系统错误
  InvalidParams = 1001, // 参数错误
  LoginOut = 1003, // 未登录
  LoginFail = 1004, // 登录失效
  CodeError = 1005, // 验证码错误
  InvalidRequest = 1006, // 无效请求
  TokenError = 1007 // token失效
}
由于现在公司项目的历史原因,后台返回的响应格式有多种,状态码也分散在各处,对前端不是很友好,在这里我就把整个项目的响应做了封装,所有的controller继承于这个基类,这样后台开发也方便,前端也能更好的写一些通用的代码。
- 通用代码的封装
对于很多通用的功能,比如这个项目里的图片上传功能,创建文件夹功能,随机生成商铺评分和食品评分等等,这些和业务没有太大关系又重复的代码,都是需要做一个封装以便维护,egg为我们提供了很好的helper拓展,在helper拓展中写的功能,能在项目的全局范围内通过this.ctx.helper调用,比如生成随机商铺销售量
/**
 * @Descripttion: 生成范围内随机数,[lower, upper)
 * @Author: 笑佛弥勒
 * @param {lower} 最小值
 * @param {upper} 最大值
 * @return:
 */
export function random(lower, upper) {
  return Math.floor(Math.random() * (upper - lower)) + lower;
}
在一个请求过程中就可以通过egg提供的方法来调用
mon_sale: this.ctx.helper.random(1000, 20000)
- 前端请求参数的校验
对于前端传参的校验,如果参数很多,那我们业务代码里面的校验就会有一大坨关于校验相关的检测代码,比如创建商铺的时候,前端传来的相关参数就有十几个,这种看着还是挺不爽的,我这边自己开发的时候把参数校验通过egg提供的validate做了统一管理,这里的validate插件需要在启动的时候自己加载。
    /**
     * @Descripttion: 插件加载完成后加入校验规则
     * @Author: 笑佛弥勒
     * @param {type}
     * @return:
     */
    public async willReady() {
        const directory = path.join(this.app.config.baseDir, 'app/validate');
        this.app.loader.loadToApp(directory, 'validate');
    }
加载完之后就能在代码里使用自定义规则了,比如这段创建商铺的代码里使用校验规则,逻辑看起来就比较清晰,不会说看了很久没看出重点。
public async createMerchants() {
    let params = this.ctx.request.body
    console.log(params)
    try {
      this.ctx.validate({ params: "addMerchants" }, { params: params })
    } catch (error) {
      this.fail(Status.InvalidParams, error)
      return
    }
    try {
      await this.ctx.service.merchants.createMerchants(params)
      this.success(Status.Success, '创建商户成功')
    } catch (error) {
      this.ctx.logger.error(`-----创建商户错误------`, error)
      this.ctx.logger.error(`入参params:${params}`)
      this.fail(Status.SystemError, error)
    }
  }
功能实现
- 管理员注册登录功能
登录注册功能是一个很常见的功能,逻辑实现上都差不多,首先拿到用户账号,查看数据库里是否有这条记录,有则对比密码是否正确,无则执行新增操作,将用户密码进行加密储存。对于生成的登录态cookie,这边是通过egg-jwt插件生成加密串,然后通过redis把加密串存起来,用户请求需要登录的接口的时候,后台会将egg中的cookie取出来和redis中的做对比,做一个登录态的校验,这里有个不同的点,egg里,cookie是以毫秒为单位的,我没认真看,导致开发的时候找不到bug的我捏碎了好几个鼠标,下面是具体的实现逻辑
public async login() {
    const { ctx } = this
    let { mobile, password } = this.ctx.request.body
    try {
      ctx.validate({ mobile: "mobile" })
      ctx.validate({ password: { type: "string", min: 1, max: 10 } })
    } catch (error) {
      this.fail(Status.InvalidParams, error)
      return
    }

    let res = await ctx.service.admin.hasUser(mobile)
    // 加密密码
    password = utility.md5(password)
    let token = ''
    if (!res) {
      try {
        await ctx.service.admin.createUser(mobile, password)
        // 生成token
        await this.ctx.helper.loginToken({ mobile: mobile, password: password }).then((res) => token = res) // 取到生成token
        await this.app.redis.set(mobile, token, 'ex', 7200) // 保存到redis
        ctx.cookies.set('authorization', token, {
          httpOnly: true, // 默认就是 true
          maxAge: 1000 * 60 * 60, // egg中是以毫秒为单位的
          domain: this.app.config.env == 'prod' ? '120.79.131.113' : 'localhost'
        }) // 保存到cookie
        this.success(Status.Success, '注册成功')
      } catch (error) {
        ctx.logger.error(`-----用户注册失败------`, error)
        ctx.logger.error(`入参params:mobile:${mobile}、password:${password}`)
        this.fail(Status.SystemError, "用户注册失败")
      }
    } else {
      if (res.password == password) {
        await this.ctx.helper.loginToken({ mobile: mobile, password: password }).then((res) => token = res) // 取到生成token
        await this.app.redis.set(mobile, token, 'ex', 7200) // 保存到redis
        ctx.cookies.set('authorization', token, {
          httpOnly: true, // 默认就是 true
          maxAge: 1000 * 60 * 60, // egg中是以毫秒为单位的
          domain: this.app.config.env == 'prod' ? '120.79.131.113' : 'localhost'
        }) // 保存到cookie
        ctx.body = { data: { token, expires: this.config.login_token_time }, code: 1, msg: '登录成功' } // 返回
        this.success(Status.Success, '登录成功')
      } else {
        this.fail(Status.SystemError, "密码错误")
      }
    }
  }
不过这种实现方式还是有点问题的,用户验证主要有两种方式
- session+cookie
- token令牌
两种方式实现的优劣就是session需要将sessionId保存在服务器,前端传来的cookie和服务器上存储的sessionId做对比来实现用户验证,而token令牌的验证方式通常来说就是通过jwt生成加密串,前端请求的时候将加密串传给后台,后台去验证这个加密串的合法性,jwt方式就是后台不需要去存储加密串,而上面这种方式,用jwt生成加密串,再来验证一遍,是有点奇怪的,我有时间会把他改过来。
- 登录中间件
开发过程中很多接口是需要登录才能访问的,不可能说在所有需要登录的接口里给他加上登录校验,我们可以为接口加个中间件,egg是基于洋葱模型,中间件能在接口访问前做一些拦截限制。
/*
 * @Descripttion: 登陆验证
 * @version: 1.0
 * @Author: 笑佛弥勒
 * @Date: 2019-12-31 23:59:22
 * @LastEditors: 笑佛弥勒
 * @LastEditTime: 2020-03-28 23:06:09
 */
module.exports = (options, app) => {
  return async function userInterceptor(ctx, next) {
    let authToken = ctx.cookies.get('authorization') // 获取header里的authorization
    if (authToken) {
      const res = ctx.helper.verifyToken(authToken) // 解密获取的Token
      if (res) {
        // 此处使用redis进行保存
        let redis_token = ''
        res.email ? redis_token = await app.redis.get(res.email) : redis_token = await app.redis.get(res.mobile) // 获取保存的token
        if (authToken === redis_token) {
          res.email ? app.redis.expire(res.email, 7200) : app.redis.expire(res.mobile, 7200) // 重置redis过期时间
          await next()
        } else {
          ctx.body = { status: 1004, message: '登录态失效' }
        }
      } else {
        ctx.body = { status: 1004, message: '登录态失效' }
      }
    } else {
      ctx.body = { status: 1003, message: '请登陆后再进行操作' }
    }
  }
}
而后就可以在需要登录的路由里使用
export function admin(app) {
    const { router, controller } = app
    const jwt = app.middleware.jwt({}, app)

    router.post('/api/admin/login', controller.admin.login)
    router.post('/api/admin/logOut', jwt, controller.admin.logOut)
    router.post('/api/admin/updateAvatar', jwt, controller.admin.updateAvatar)
    router.post('/api/admin/getAdminCount', jwt, controller.admin.getAdminCount)
    router.get('/api/admin/findAdminByPage', jwt, controller.admin.findAdminByPage)
    router.get('/api/admin/totalData', jwt, controller.admin.totalData)
    router.get('/api/admin/getShopCategory', jwt, controller.admin.getShopCategory)
    router.get('/api/admin/getCurrentAdmin', jwt, controller.admin.getCurrentAdmin)
    router.get('/api/admin/isLogin', controller.admin.isLogin)
}
- 全国城市获取并分类
前端这边城市选择时是需要根据首写字母对城市进行划分
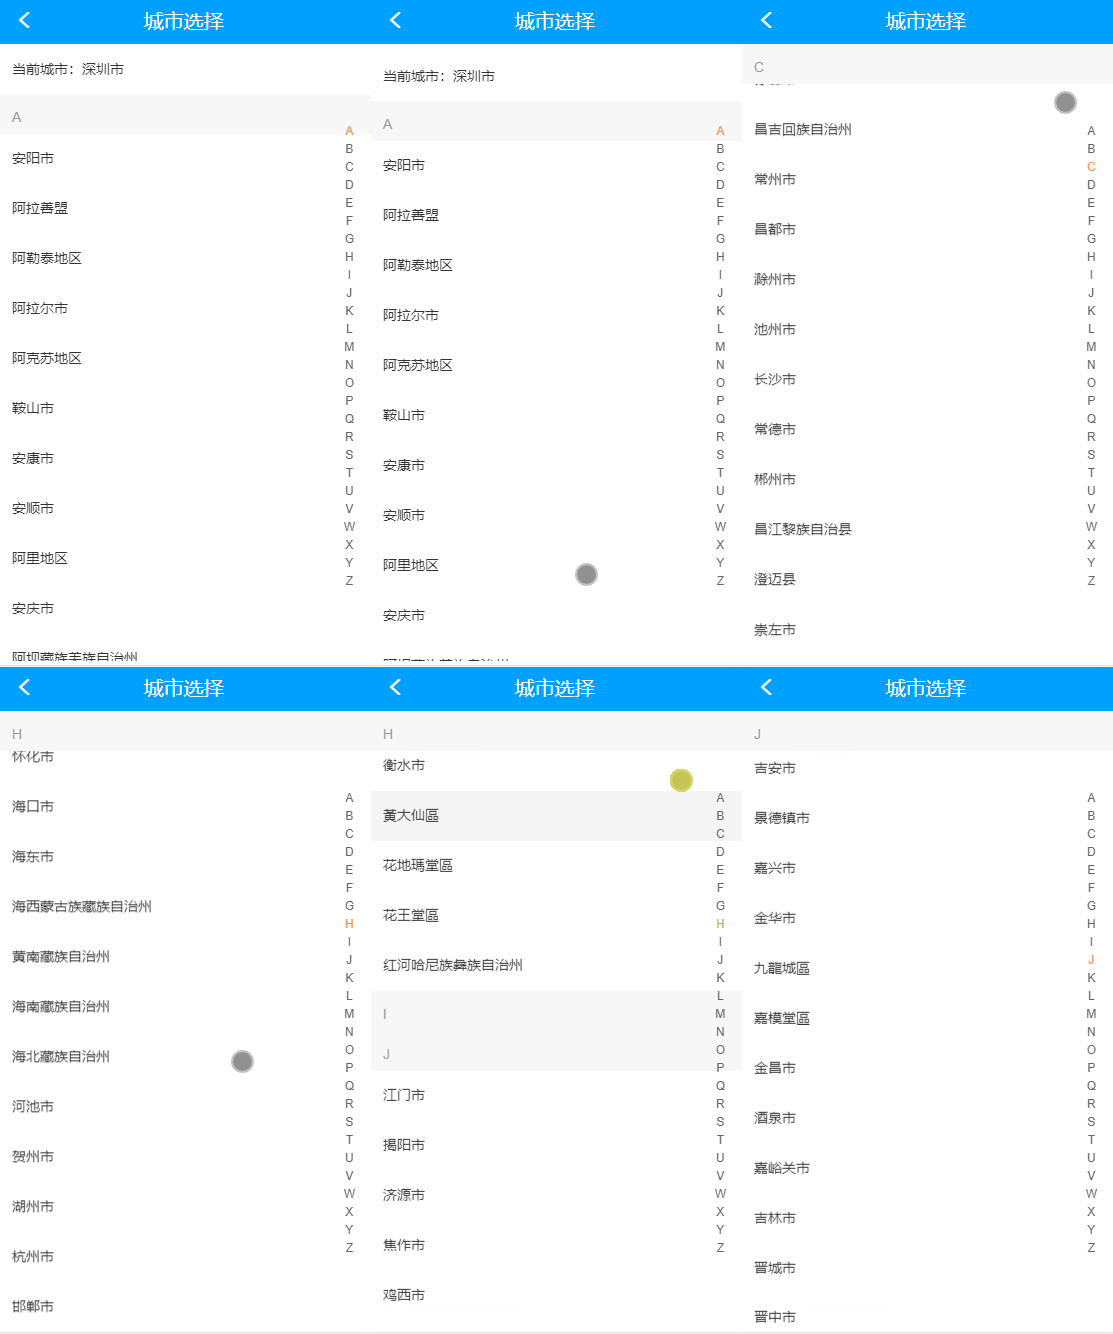
实现方面首先是通过高德提供的api获取全国所有的城市,然后再根据第三方库pinyin,将城市首字母提取出来并分类,这边为了防止请求次数过多,导致我的服务器ip被高德封掉,将结果用redis储存起来,redis没有再去请求数据。
/**
* @Descripttion: 获取全国所有城市
* @Author: 笑佛弥勒
* @param {type}
* @return:
*/
export async function getAllCity() {
let url = `https://restapi.amap.com/v3/config/district?keywords=&subdistrict=2&key=44b1b802a3d72663f2cb9c3288e5311e`;
var options = {
method: "get",
url: url,
headers: {
"Content-Type": "application/json",
Accept: "application/json" // 需指定这个参数 否则 在特定的环境下 会引起406错误
}
};
return await new Promise((resolve, reject) => {
request(options, function(err, res, body) {
if (err) {
reject(err);
} else {
body = JSON.parse(body);
if (body.status == 0) {
reject(err);
} else {
let cityList: Array还有一些功能,感兴趣的可以把项目clone下来自己瞅瞅。
前端
所用技术
- Vue
- Vuex
- Vue-Router
- Cube-Ui
- Axios
实现功能
- 用户注册登录功能
- 用户地址增删改查功能
- 商户列表展示
- 商户详情页展示
- 食品列表
- 食品详情页
- 商户搜索
- ...
项目详情
- 移动端布局方案
项目使用amfe-flexible+px2rem-loader适配移动端。
package.json里添加
"plugins": {
      "autoprefixer": {},
      "postcss-px2rem": {
        "remUnit": 37.5
      }
    }
- axios做统一请求和拦截
这边主要是对响应做了拦截,请求发生异常toast提醒,用户态异常时跳转到登录页,并添加redirect参数,确保登录后能返回上一个页面
// 添加响应拦截器
AJAX.interceptors.response.use(
  function(response) {
    const loginError = [10003, 10004]
    if (loginError.includes(response.data.status)) {
      router.push({
        path: '/vue/login/index.html',
        query: { redirect: location.href.split('/vue')[1] }
      })
    } else if (response.data.status != 200) {
      Toast.$create({
        time: 2000,
        type: 'txt',
        txt: response.data.message
      }).show()
    } else {
      return response.data
    }
  },
  function(error) {
    // 对响应错误做点什么,比如400、401、402等等
    if (error && error.response) {
      console.log(error.response)
    }
    return Promise.reject(error)
  }
)
- 集成高德地图api
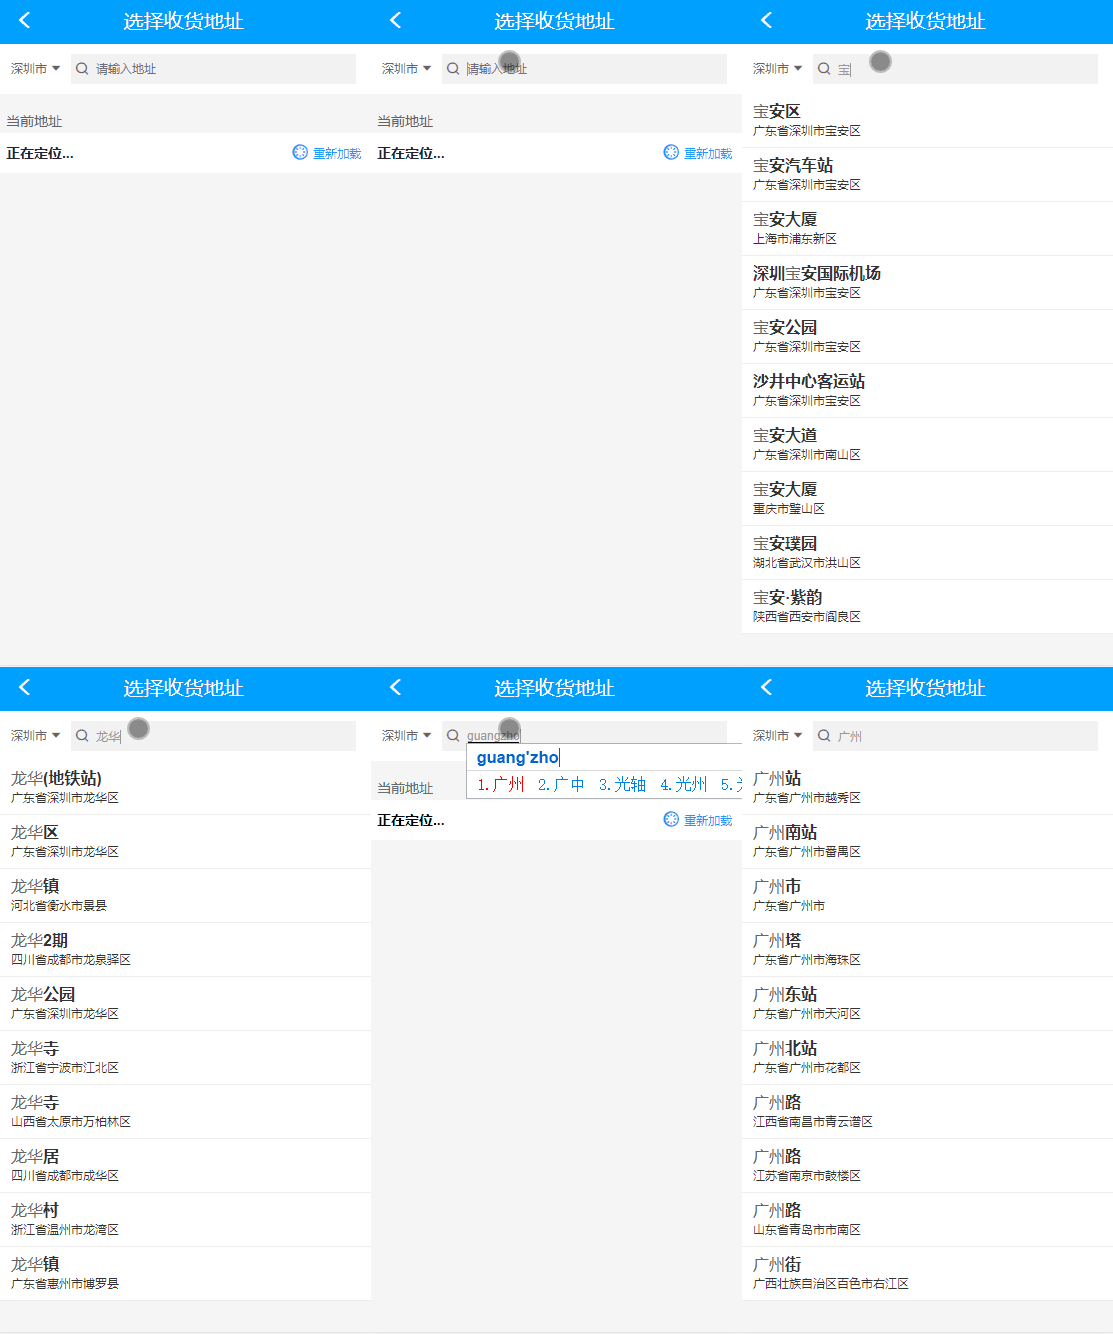
像这种地址搜索都是通过调用高德地图api返回的数据,这边通过mixins做了封装
/*
 * @Descripttion: 高德地图mixins
 * @version: 1.0
 * @Author: 笑佛弥勒
 * @Date: 2020-01-20 20:41:57
 * @LastEditors: 笑佛弥勒
 * @LastEditTime: 2020-03-07 21:04:19
 */
import { mapGetters } from 'vuex'
// 高德地图定位
export const AMapService = {
  data() {
    return {
      mapObj: '',
      positionFinallyFlag: false,
      currentPosition: '正在定位...', // 当前地址
      locationFlag: false, // 定位结果
      longitude: '', // 经度
      latitude: '', // 纬度
      searchRes: [] // 搜索结果
    }
  },
  computed: {
    // 当前城市
    currentCity() {
      return this.getCurrentCity()
    }
  },
  methods: {
    ...mapGetters('address', ['getCurrentCity']),
    initAMap() {
      this.mapObj = new AMap.Map('iCenter')
    },
    // 定位
    geoLocation() {
      const that = this
      this.initAMap()
      this.mapObj.plugin('AMap.Geolocation', function() {
        const geolocation = new AMap.Geolocation({
          enableHighAccuracy: true, // 是否使用高精度定位,默认:true
          timeout: 5000, // 超过5秒后停止定位,默认:无穷大
          noIpLocate: 0
        })
        geolocation.getCurrentPosition((status, result) => {
          if (status === 'complete') {
            that.longitude = result.position.lng
            that.latitude = result.position.lat
            that.currentPosition = result.formattedAddress
            that.locationFlag = true
          } else {
            that.locationFlag = false
            that.currentPosition = '定位失败'
            const toast = that.$createToast({
              time: 2000,
              type: 'txt',
              txt: '定位失败'
            })
            toast.show()
          }
          that.positionFinallyFlag = true
        })
      })
    },
    // 高德地图搜索服务
    searchPosition(keyword) {
      const that = this
      AMap.plugin('AMap.Autocomplete', function() {
        // 实例化Autocomplete
        var autoOptions = {
          // city 限定城市,默认全国
          city: that.currentCity || '全国',
          citylimit: false
        }
        var autoComplete = new AMap.Autocomplete(autoOptions)
        autoComplete.search(keyword, function(status, result) {
          // 搜索成功时,result即是对应的匹配数据
          if (status === 'complete' && result.info === 'OK') {
            that.$nextTick(() => {
              that.searchRes = []
              that.searchRes = result.tips
            })
          }
        })
      })
    }
  }
}
这边还有一个小小的点,我们将返回的结果根据我们输入数据进行高亮,比如上图我输入了宝安,结果列表里宝安进行了高亮,这边我是用正则匹配了下
filters: {
    format(text, stress, keyword) {
      if (stress) {
        const reg = new RegExp(keyword, 'ig')
        return text.replace(reg, item => {
          return `${item}`
        })
      } else {
        return text
      }
    }
  },
- api、router、vuex统一管理
这边我是沿用了我司项目的管理方式,通过功能将接口路由和vuex数据进行了划分,然后通过一个index.js来向外暴露
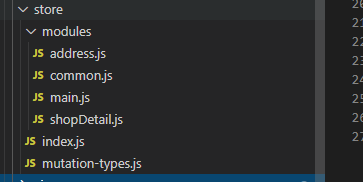
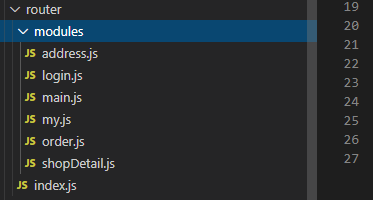
有些页面是需要登录才能访问的,这边在路由守卫这边也做了限制,只要在路由的 meat里加上needLogin就能加以控制
router.beforeEach(async(to, from, next) => {
  // 做些什么,通常权限控制就在这里做哦
  // 必须写next()哦,不然你的页面就会白白的,而且不报错,俗称"代码下毒"
  if (to.meta.needLogin) {
    const res = await api.isLogin()
    if (!res.data) {
      router.push({
        path: '/vue/login/index.html',
        query: { redirect: to.path.split('/vue')[1] }
      })
    }
    store.commit('common/SETUSERINFO', res.data || {})
  }
  next()
})
- 图标管理
项目中的图标都是引入的阿里矢量图标,在阿里矢量图标库官网里注册完账号后新建一个仓库,将你需要的图标都加到你的新建仓库里,然后在vue项目中引入在线链接就能直接使用了,没有很麻烦,甚至都不用花钱。
@font-face {
  font-family: 'iconfont';  /* project id 1489393 */
  src: url('//at.alicdn.com/t/font_1489393_8te3wqguyau.eot');
  src: url('//at.alicdn.com/t/font_1489393_8te3wqguyau.eot?#iefix') format('embedded-opentype'),
  url('//at.alicdn.com/t/font_1489393_8te3wqguyau.woff2') format('woff2'),
  url('//at.alicdn.com/t/font_1489393_8te3wqguyau.woff') format('woff'),
  url('//at.alicdn.com/t/font_1489393_8te3wqguyau.ttf') format('truetype'),
  url('//at.alicdn.com/t/font_1489393_8te3wqguyau.svg#iconfont') format('svg');
}
.iconfont{
  font-family:"iconfont" !important;
  font-size:16px;font-style:normal;
  -webkit-font-smoothing: antialiased;
  -webkit-text-stroke-width: 0.2px;
  -moz-osx-font-smoothing: grayscale;
}
- 下拉刷新封装
下拉刷新是最常见的功能,几乎每个用到的页面的逻辑都是一样的,这边也做了个封装,避免重复开发
/*
 * @Descripttion: 加载更多Mixins
 * @version: 1.0
 * @Author: 笑佛弥勒
 * @Date: 2020-01-26 15:39:12
 * @LastEditors  : 笑佛弥勒
 * @LastEditTime : 2020-02-10 23:15:57
 */
export default {
  data() {
    return {
      page: 1,
      pageSize: 20,
      requireFinallyFlag: true, // 当次请求是否完成
      totalPage: 1,
      allLoaded: false // 数据是否全部加载完成
    }
  },
  mounted() {
    document.addEventListener('scroll', this.handleScroll)
  },
  destroyed() {
    document.removeEventListener('scroll', this.handleScroll)
  },
  methods: {
    handleScroll() {
      const windowHeight = document.documentElement.clientHeight
      const scrollTop = document.documentElement.scrollTop
      const bodyHeight = document.body.scrollHeight
      const totalHeight = parseFloat(windowHeight + scrollTop, 10)
      // 考虑不同浏览器的交互,可能顶部条隐藏之类的,导致页面高度变高
      const browserOffset = 60
      if (bodyHeight < totalHeight + browserOffset && this.page <= this.totalPage && this.requireFinallyFlag) {
        this.page++
        if (this.page > this.totalPage) {
          this.allLoaded = true
        } else {
          this.requireFinallyFlag = false
          this.loadingMore()
        }
      }
    }
  }
}
- 页面A,B,C之间切换,数据保存问题
以页面B为中间页面,A->B,B页面应该是全新的页面,B->C->B,B页面应该保存之前的内容,这个项目为例就是地址添加的时候,首次进入新建地址需要全新的页面,选择地址过程中跳转到地址搜索页,跳回来之后新增页面保存之前填写的信息。这种需求之前我是先把B页面keep-align下来,然后判断下一个路由的name,看是否需要重置参数,当然这种还是比较low的,这边提供另外的思路,keep提供了一个include ,只有名称匹配的组件会被缓存,我们通过vuex去动态的去删减这个变量,就能达到我们想要的效果,如果下一个页面是地址选择页,就把组件缓存,否则就删除这个组件缓存。
beforeRouteLeave(to, from, next) {
    console.log('--------------beforeRouteLeave----------')
    if (to.name == 'searchAddress') {
      this.ADDCACHE('AddAddress')
    } else {
      this.DELCACHE('AddAddress')
    }
    next()
  },
项目部署
准备工作:
- 申请域名
- 购买个服务器
- 装好必备软件(git、node、mysql、nginx、docker...)
- 做好踩坑的打算...
具体步骤:
- 域名和服务器我这边都是在阿里云上买的,比较麻烦的是域名需要备份,要等一阵子,本来我不打算买域名的,但是这样就会有一个问题,后台管理系统和前端共用一个ip,这样cookie会互串,最后还是被迫买了个域名。
- 域名配置,这个需要在阿里云后台对你服务器ip和你的域名进行配置,接下来是nginx配置,有两个点,首先是访问域名时将域名指向你的服务器地址,其次是直接访问域名时需要将域名改成你的首页地址
        server{
                listen 80;
                server_name www.smileele.net;
                rewrite ^/$ http://$host/vue/main/index.html$1 break;
                location / {
                        proxy_pass   http://120.79.131.113:9529/;
                }
        }
由于是http,监听80端口,访问www.smileele.net 时改成 www.smileele.net/vue/main/index.html,www.smileele.net和ip做对应
- Dockerfile文件编写,我只把vue项目做了docker容器化,所以docker容器中需要下载的软件只有node和nginx,文件内容如下
FROM node:12.14.0
WORKDIR /app
COPY package*.json ./
RUN npm install -g cnpm --registry=https://registry.npm.taobao.org
RUN cnpm install
COPY ./ /app

RUN npm run build

FROM nginx
RUN mkdir /app
COPY --from=0 /app/dist /app
COPY nginx.conf /etc/nginx/nginx.conf
指定node版本并下载,工作目录设置为/app目录,安装依赖并打包。下载nginx,将刚才够贱的dist里的内容复制到app目录下,替换nginx配置目录。
nginx里的配置文件如下,跨域也是在这里解决的
server{
		listen 8080;
		server_name 120.79.131.113;
		root   /app;  # 指向目录
		index index.html;
		location /api {
			proxy_pass http://120.79.131.113:7001;
		}
		location / {
			index  index.html index.htm;
			try_files $uri $uri/ /index.html;
		}
	}
- docker构建,为了方便Jenkins的自动部署,提供了个脚本文件
#!/usr/bin/env bash
image_version=`date +%Y%m%d%H%M`;
# 关闭ele_admin_ts容器
docker stop ele_admin_ts || true;
# 删除ele_admin_ts容器
docker rm ele_admin_ts || true;
# 删除ele/index/vue镜像
docker rmi --force $(docker images | grep ele/admin/ts | awk '{print $3}')
# 构建ele/index/vue:$image_version镜像
docker build . -t ele/admin/ts:$image_version;
# 查看镜像列表
docker images;
# 基于ele/index/vue 镜像 构建一个容器 ele_admin_ts
docker run -p 9528:7001 -d --name ele_admin_ts ele/admin/ts:$image_version;
# 查看日志
docker logs ele_admin_ts;
#删除build过程中产生的镜像    #docker image prune -a -f
docker rmi $(docker images -f "dangling=true" -q)
# 对空间进行自动清理
docker system prune -a -f
对容器内的端口和宿主机端口做了映射,宿主机访问9529就能访问到镜像的内容。
- Jenkins方面,推荐大家可以去看下腾讯云实验室的教程,可以在线实验,腾讯良心之作。
腾讯开发者实验室
注: 部署方面,有问题的可以直接看这篇文章,写的很清楚:https://juejin.im/post/5d369d6e5188253a2e1b93ff#heading-16
以上就是项目的简介,大家感兴趣的可以把项目download下来看一下,需要数据库表设计的可以加我一下,我可以发你,微信:smile_code_0312
github地址:
后台接口
后台管理页面
前端页面
最后,最近有跳槽的打算,跪求各位大佬介绍,19届菜鸡前端,卑微求职
