黑马程序员--第二阶段--图形用户界面--第22天(2)
Container类
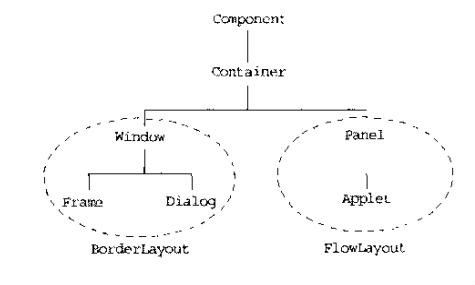
组件不能独立地显示出来,必须将组件放在一定的窗口中才可以显示出来。Container是所有容器的父类,容器(Container)实际上是Component的子类,因此容器类对象本身也是一个组件,具有组件的所有性质,另外还具有容纳其他组件和容器的功能。容器类的类层次图如下:
Window类
Window类是可以自由停泊的顶级窗口,它没有边框和和菜单条,我们很少直接使用Window类,而是使用它的两个子类:Frame类和Dialog类。
Dialog与FileDialog
对话框不能单独存在,它必须有一个上级窗口(即拥对话框的有者)
Dialog类用于产生对话框
Dialog分为模太对话框和非模态对话框两种
Dialog类的两个常用构造方法:
public Dialog(Frame owner,String title)//默认使用非模态对话框
public Dialog(Frame owner,String title,Boolean model)//model指定是否模态对话框
实例:主框架窗口通过两个按钮分别打开一个模态对话框和一个非模态对话框,并与这两个对话框进行数据交换。
package com.itheima;
import java.awt.*;
import java.awt.event.*;
public class MyFrame extends Frame
{
private TextField textField = new TextField();
MyDialog modal = new MyDialog(this,"模态对话框",true);
MyDialog modeless = new MyDialog(this,"非模态对话框",false);
public String getText()
{
return textField.getText();
}
public void setText(String str)
{
textField.setText(str);
}
public MyFrame()
{
addWindowListener(new WindowAdapter()
{
public void windowClosing(WindowEvent e)
{
dispose();
System.exit(0);
}
});
Button btn1 = new Button("打开模态对话框");
Button btn2 = new Button("打开非模态对话框");
add(textField,"North");
add(btn1,"Center");
add(btn2,"East");
btn1.addActionListener(new ActionListener()
{
public void actionPerformed(ActionEvent e)
{
modal.setText(getText());
modal.setVisible(true);//这这个模态对话框显示以后,则在这个对话框没有关闭之前
//这个语句后面的代码都不会被执行。
setText(modal.getText());
}
});
btn2.addActionListener(new ActionListener()
{
public void actionPerformed(ActionEvent e)
{
modal.setText(getText());
modeless.setVisible(true);
}
});
setBounds(400,200,500,400);
setVisible(true);
}
public static void main(String[] args)
{
new MyFrame();
}
}
package com.itheima;
import java.awt.*;
import java.awt.event.*;
public class MyDialog extends Dialog
{
private TextField textField = new TextField();
public String getText()
{
return textField.getText();
}
public void setText(String str)
{
textField.setText(str);
}
public MyDialog(Frame owner, String title, boolean modal)
{
super(owner,title,modal);
addWindowListener(new WindowAdapter()
{
public void windowClosing(WindowEvent e)
{
dispose();
}
});
Button btn1 = new Button("应用");
Button btn2 = new Button("确定");
add(textField,"North");
add(btn1,"Center");
add(btn2,"East");
setBounds(500,500,300,200);
if(isModal())
btn1.setEnabled(false);
btn1.addActionListener(new ActionListener()
{
public void actionPerformed(ActionEvent e)
{
((MyFrame)getOwner()).setText(getText());//getOwner返回类型为Window
}
});
btn2.addActionListener(new ActionListener()
{
public void actionPerformed(ActionEvent e)
{
if(!isModal())
((MyFrame)getOwner()).setText(getText());
dispose();
}
});
}
}
FileDialog类是Dialog类的一个子类,能够产生标准的文件存取对话框。它由于安全性限制,它不能在Applet中使用,只有在Application中才能使用。它典型的构造方法如下:
Public FileDialog(Frame owner,String title,int mode);
第三个参数有两个值,分别是FileDialog.LOAD或FileDialog.SAVE,这个参数用来确定生产的是读文件对话框还是写文件对话框。
Panel类
Panel可作为容器容纳其他组件,但不能独立存在,必须被添加到其他容器中(如Window或Applet)。Panel是一个空白容器类,提供容纳组件的空间,通常用于集成其他的若干组件,使这些组件形成一个有机的整体,再增加到别的容器上。
ScrollPane
有时候需要在一个较小的容器窗口中显示较大的子部件,这时就需要用到ScrollPane类,它可以产生滚动条,ScrollPane也是一种容器,不能单独使用。ScrollPane中只能放置一个组件,无布局管理器。如果想将多个组件添加到ScrollPane上,只能先将多个组件嵌套在一个Panel容器中,然后将这个Panel作为一个组件放置到ScrollPane上。
实例:
package com.itheima;
import java.awt.*;
import java.awt.event.*;
class PainText extends Frame
{
private TextArea ta= new TextArea("", 15, 30, TextArea.SCROLLBARS_NONE);
private ScrollPane sp = new ScrollPane();
public PainText()
{
sp.add(ta);
add(sp);
setBounds(500,200,200,200);
setVisible(true);
}
public static void main(String[] args) {
new PainText();
}
}
布局管理器
为了简化编程者对容器上的组件的布局控制,一个容器内的所有组件的显示位置可以由一个“布局管理器”自动管理。每个容器都有一个布局管理器,当窗口需要对某个组件进行定位或判断其大小尺寸时,就会调用其对应的布局管理器。
一个容器中的各个组件之间的位置和大小关系就称之为布局。
Java语言提供了布局管理器来管理组件在容器中的布局,而不是直接使用位置坐标来设置各个组件的位置和大小。
AWT中的布局管理器类:
BorderLayout
FlowLayout
GridLayout
CardLayout
GridBagLayout
BorderLayout
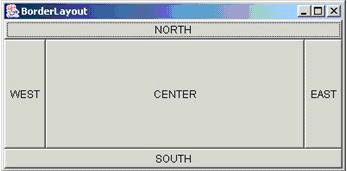
Window类默认使用BorderLayout布局(则其子类Frame和Dialog也是一样)
该布局管理器将容器划分为东、南、西、北、中5个区域,其中北、南的组件的高度是固定的不变的,西、东的组件的宽度是固定不变的。其他的宽度或高度会随窗口大小的变化而变化。
import java.awt.*;
public class BorderLayoutText extends Frame {
public BorderLayoutText()
{
add(new Button("North"),"North");
add(new Button("South"),"South");
add(new Button("Center");//不加后面的参数,则默认使用"Center"
add(new Button("West"),"West");
add(new Button("East"),"East");
setBounds(500,200,300,200);
setVisible(true);
}
public static void main(String[] args) {
new BorderLayoutText();
}
}
FlowLayout
Panel和applet默认使用该布局管理器。
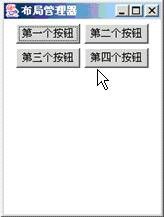
这是一个简单的布局风格,组件先从左到右、然后从上到下依次排列。在该布局中,Java将忽略我们在Container.add方法中指定的位置参数)
GridLayout
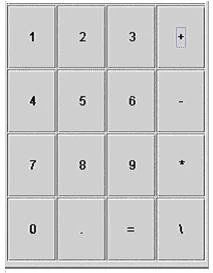
这个布局管理器将容器划分成若干行列的网格,在容器上添加组件时,它们会按从左到右,从上到下的顺序在风格中排列。需在构造函数中指定行、列数量。GridLayout布局管理器总是忽略组件的最佳大小,所有单元的宽度和高度都是相同的。
CardLayout
该布局管理器能够实现将多个组件放在同一容器区域内的交替显示,相当于多张卡片摞在一起,在任何时候都只有最上面的一个可见。
只有用一个布局管理器来实现上面组件的布局是相当困难的。
实例:创建两个Panel对象,每个Panel上都能拥有一个布局管理器,左边的Panel使用GridLayout布局管理器放置了3个按钮,右边的Panel使用CardLayout布局管理器来放置卡片,最后在窗口上使用BorderLayout放置这两个Panel面板。右边的Panel中带有5张卡片(用5个按钮模拟),按下左边Panel中的prev按钮,依次向前显示,按下next按钮,依次向后显示,按下three按钮,显示第三张卡片。
import java.awt.*;
import java.awt.event.*;
class CardLayoutText extends Frame {
CardLayout cardLayout = new CardLayout();
Panel plCenter = new Panel();
public CardLayoutText()
{
Button cardPrev = new Button("Prev");
Button cardNext = new Button("Next");
Button cardThird = new Button("Third");
Panel plWest = new Panel();
plWest.setLayout(new GridLayout(3,1));
plWest.add(cardPrev);
plWest.add(cardNext);
plWest.add(cardThird);
MyActionListener listener = new MyActionListener();
cardPrev.addActionListener(listener);
cardNext.addActionListener(listener);
cardThird.addActionListener(listener);
Button oneBtn = new Button("One");
Button twoBtn = new Button("Two");
Button threeBtn = new Button("Three");
Button fourBtn = new Button("Four");
Button fiveBtn = new Button("Five");
plCenter.setLayout(cardLayout);
plCenter.add(oneBtn,"1");
plCenter.add(twoBtn,"2");
plCenter.add(threeBtn,"3");
plCenter.add(fourBtn,"4");
plCenter.add(fiveBtn,"5");
add(plWest,"West");
add(plCenter);//默认为Center
setBounds(500,200,250,200);
setVisible(true);
}
class MyActionListener implements ActionListener
{
public void actionPerformed(ActionEvent e)
{
if(e.getActionCommand().equals("Prev"))
{
cardLayout.previous(plCenter);
}else if(e.getActionCommand().equals("Next"))
{
cardLayout.next(plCenter);
}else
{
cardLayout.show(plCenter,"3");
}
}
}
public static void main(String[] args) {
new CardLayoutText();
}
}
GridBagLayout
前面的布局管理器的功能还是相当有限的,只能满足一些简单的需要。在复杂的布局要求下,我们需要使用GridBagLayout布局管理器,GridBagLayout有布局管理器之王的说法,其功能非常强大,使用是也比较复杂,可以在JDK文档中了解到其详细说明及例子程序,一般很少会使用到这种布局管理器,而且在Swing中有更简单的办法来实现GridBagLayout布局管理器的功能。如果真要进行这种复杂的布局设计,建议使用JBuilder这样的集成开发环境,它有一种所见即所得的设计功能。
取消而已管理器
可以用Component.setBounds方法来用绝对坐标设置组件在容器上的位置和大小。这时需要先调用Container.setLayout(null)方法取消布局。不使用布局管理器将会给程序带来一个潜在的问题,当容器大小改变时,所有组件仍保持原来的位置和大小,解决方法,一是限定用户改变容器的大小,二是让所有的组件按相等的比例改变自己的大小和位置。
如果我们拥有一个类似JBuilder的集成开发环境,它都会为我们提供“所见即所得”的而已功能,可以在设计阶段通过图形操作界面,直接用鼠标操作。通过这种集成开发环境,能够方便地设计出布局管理器难以实现的各种布局结构。所以对布局管理器只要有个大致了解,明白其中的概念和属性就行了,在实际的GUI程序开发中,一般都是在诸如JBuilder的集成开发环境中进行的。
Swing和JFC
图形用户接口(GUI)库最初的设计目标是让程序员构建一个通用的GUI,使其在所有平台上都能正常显示。但遗憾的是,AWT产生的是在各系统看来都同样欠佳的图形用户接口。Java1.2为老的Java1.0AWT添加了Java基础类(AWT),这是一个被称为“Swing”的GUI的一部分。Swing是第二代GUI开发工具集,AWT采用了与特定平台相关的实现,而绝大多数Swing组件却不是。Swing是构筑在AWT上层的一组GUI组件的集合,为保证可移植性,它完全用Java语言编写,和AWT相比,Swing提供了更完整的组件,引入了许多新的特性和功能。Swing提供更多的组件库,如JTable,JTree,JComboBox。Swing也增加了AWT中组件的功能,这些增加的组件在Swing中的名称通常都是在AWT组件名前增加了一个“J”字母,如JButton,JFrame。
所有的Swing组件都位于javax.swing包中,它们是构筑在AWT上层的GUI组件,所有的Swing组件都是JComponent类的子类,而JComponent又是java.awt.Container的子类。Container又是Component的子类。Swing在应用原理和方式上与AWT并没有多大的区别,我们学会了使用AWT,基本上也就会了Swing,关键是要学会自己查JDK文档帮助。
为了保证可移植性,Swing完全用Java语言编写。
Swing提供了比AWT更多的组件库,例如,JTable,JTree,JComboBox。
Swing也增加了AWT中原有组件的功能,例如,与AWT中的Button对应的Swing组件是JButton
JFC(Java Foundation Class)是指Sun对早期的JDK进行扩展的部分,集合了Swing组件和其他能简化开发的API类,包括Swing,java 2D,accessibility,internationalization.
实例:从AWT过渡到Swing
JFrame
JFrame是与AWT中的Frame相对应的Swing组件
JFrame上面只能有一个唯一的组件,这个组件为JRootPane,调用JFrame.getContentPane()方法可获得JFrame中内置的JRootPane对象。
应用程序不能直接在JFrame实例对象上增加组件和设置布局管理器,而应该在JRootPane对象上增加子组件和设置布局管理器。
调用JFrame的setDefaultCloseOperation方法,可以设置单击窗口上的关闭按钮时事件处理方式,例如,当设置值为JFrame.EXIT_ON_CLOSE时,单击JFrame窗口上的关闭按钮即可关闭JFrame框架窗口并结束程序运行。
import javax.swing.*;
import java.awt.*;
public class JFrameTest extends JFrame {
public JFrameTest()
{
setDefaultCloseOperation(JFrame.EXIT_ON_CLOSE);//调用了这个方法窗口就不需要再设置关闭事件了
JButton jb = new JButton("OK");
Container jrp = getContentPane();
jrp.add(jb);
setBounds(500,200,200,200);
setVisible(true);
}
public static void main(String[] args) {
new JFrameTest();
}
}
JScrollPane
JScrollPane是与AWT中的ScrollPane相对应的Swing组件。
最基本的JScrollPane由水平和垂直方向上的JScrollBar、以及一个JViewport组成。
调用JScrollPane.getViewport方法,可以获得代表滚动窗口中的视图区域的JViewport。
调用JViewport.setView方法,可以将滚动窗口中要显示的内容作为子组件增加到JViewport上。
《Java指南》(可从SUN公司的网站上下载,英文名为The Java Tutorial)中,有关于JScrollPane使用的详细指导。
import javax.swing.*;
import java.awt.*;
public class JFrameTest extends JFrame {
public JFrameTest()
{
setDefaultCloseOperation(JFrame.EXIT_ON_CLOSE);
JScrollPane jsp = new JScrollPane();
JTextArea jta = new JTextArea(50,50);
jsp.getViewport().add(jta);
Container jrp = getContentPane();
jrp.add(jsp);
setBounds(500,200,200,200);
setVisible(true);
}
public static void main(String[] args) {
new JFrameTest();
}
}
Swing中的标准对话框
在AWT中,我们必须自己完全实现对话框界面和处理相关事件,而Swing为我们提供了一个JOptionPane类,JOptionPane类提供了若干个showXxxDialog静态方法,可用来产生简单的标准对话框。
showConfirmDialog(Component parentComponent,
Object message,
String title,
int optionType,
int messageType)
parentComponent - 确定在其中显示对话框的 Frame;如果为 null 或者 parentComponent 不具有 Frame,则使用默认的 Frame
message - 要显示的 Object
title - 对话框的标题字符串
optionType - 指定可用于对话框的选项的 int:YES_NO_OPTION、YES_NO_CANCEL_OPTION 或 OK_CANCEL_OPTION
messageType - 指定此消息种类的 int,主要用于确定来自可插入外观的图标:ERROR_MESSAGE、INFORMATION_MESSAGE、WARNING_MESSAGE、QUESTION_MESSAGE 或 PLAIN_MESSAGE
编程举例:使用JOptionPane类,在程序开始运行时,弹出一个对话框提示用户程序正在运行。在主框加窗口的关闭按钮被单击时,弹出一个对话框询问用户是否真的要结束程序运行。
import javax.swing.*;
import java.awt.*;
import java.awt.event.*;
public class JFrameTest extends JFrame {
public JFrameTest()
{
setDefaultCloseOperation(WindowConstants.DO_NOTHING_ON_CLOSE);
setBounds(500,200,200,200);
setVisible(true);
JOptionPane.showMessageDialog(null,
"运程正在运行...",
"温馨提示",
JOptionPane.WARNING_MESSAGE);
addWindowListener(new WindowAdapter(){
public void windowClosing(WindowEvent e)
{
int selectOption = JOptionPane.showConfirmDialog(null,
"确定要退出程序吗?",
"确认退出",
JOptionPane.OK_CANCEL_OPTION,
JOptionPane.QUESTION_MESSAGE);
if(selectOption == JOptionPane.OK_OPTION)
{
dispose();
System.exit(0);
}
}
});
}
public static void main(String[] args) {
new JFrameTest();
}
}
JFileChooser类专门用来实现文件存取对话框。可以在JDK查看其帮助与相关例子。在
计算机界面的程序实现
注:在AWT中的TextField是没有办法让文本右对齐的,而在Swing中的JTextField中,可能用setHorizontalAlignment设置右对齐。
package com.itheima;
import javax.swing.*;
import java.awt.*;
import java.awt.event.*;
public class Calculator extends JFrame implements ActionListener
{
private JButton btn1 = new JButton("1");
private JButton btn2 = new JButton("2");
private JButton btn3 = new JButton("3");
private JButton btnAdd = new JButton("+");
private JButton btn4 = new JButton("4");
private JButton btn5 = new JButton("5");
private JButton btn6 = new JButton("6");
private JButton btnMinus = new JButton("-");
private JButton btn7 = new JButton("7");
private JButton btn8 = new JButton("8");
private JButton btn9 = new JButton("9");
private JButton btnMultiply = new JButton("*");
private JButton btn0 = new JButton("0");
private JButton btnDot = new JButton(".");
private JButton btnEqualTo = new JButton("=");
private JButton btnDividedBy = new JButton("/");
private JTextField text = new JTextField();
private JPanel buttonPanel = new JPanel();
public Calculator()
{
btn1.addActionListener(this);
btn2.addActionListener(this);
btn3.addActionListener(this);
btnAdd.addActionListener(this);
btn4.addActionListener(this);
btn5.addActionListener(this);
btn6.addActionListener(this);
btnMinus.addActionListener(this);
btn7.addActionListener(this);
btn8.addActionListener(this);
btn9.addActionListener(this);
btnMultiply.addActionListener(this);
btn0.addActionListener(this);
btnDot.addActionListener(this);
btnEqualTo.addActionListener(this);
btnDividedBy.addActionListener(this);
buttonPanel.setLayout(new GridLayout(4,4));
buttonPanel.add(btn1);
buttonPanel.add(btn2);
buttonPanel.add(btn3);
buttonPanel.add(btnAdd);
buttonPanel.add(btn4);
buttonPanel.add(btn5);
buttonPanel.add(btn6);
buttonPanel.add(btnMinus);
buttonPanel.add(btn7);
buttonPanel.add(btn8);
buttonPanel.add(btn9);
buttonPanel.add(btnMultiply);
buttonPanel.add(btn0);
buttonPanel.add(btnDot);
buttonPanel.add(btnEqualTo);
buttonPanel.add(btnDividedBy);
text.setHorizontalAlignment(text.RIGHT);
Container c = getContentPane();
c.add(text,"North");
c.add(buttonPanel);
setTitle("计算器");
setDefaultCloseOperation(JFrame.EXIT_ON_CLOSE);
setBounds(500,200,200,300);
setVisible(true);
}
public void actionPerformed(ActionEvent e)
{
text.setText(text.getText() + e.getActionCommand());
}
public static void main(String[] args)
{
new Calculator();
}
}
第二种简便方法
public class Calculator extends JFrame implements ActionListener
{
private JTextField text = new JTextField();
private JPanel buttonPanel = new JPanel();
private JButton[] btn = new JButton[]{
new JButton("1"),new JButton("2"),new JButton("3"),new JButton("+"),
new JButton("4"),new JButton("5"),new JButton("6"),new JButton("-"),
new JButton("7"),new JButton("8"),new JButton("9"),new JButton("*"),
new JButton("0"),new JButton("."),new JButton("="),new JButton("/")
};
public Calculator()
{
buttonPanel.setLayout(new GridLayout(4,4));
for(int i = 0;i
setButton(btn[i]);
text.setHorizontalAlignment(text.RIGHT);
Container c = getContentPane();
c.add(text,"North");
c.add(buttonPanel);
setTitle("计算器");
setDefaultCloseOperation(JFrame.EXIT_ON_CLOSE);
setBounds(500,200,200,300);
setVisible(true);
}
public void setButton(JButton btn)
{
buttonPanel.add(btn);
btn.addActionListener(this);
}
public void actionPerformed(ActionEvent e)
{
text.setText(text.getText() + e.getActionCommand());
}
public static void main(String[] args)
{
new Calculator();
}
}
BoxLayout布局管理器
BoxLayout是在Swing中新增加的一种布局管理器,它允许多个组件全部垂直摆放或全部水平摆放。嵌套组合多个使用BoxLayout布局管理器的Panel,可以帮我们实现类似GridBagLayout的功能,但却要比直接使用GridBagLayout简单许多。
使用BoxLayout实现计算器界面:
学习和开发GUI程序的建议
重在掌握GUI程序的一些基本原理和开发过程,通过学习AWT组件可以更容易掌握GUI程序的基本原理和开发过程,但在GUI程序开发中,应以尽量使用Swing组件。
查阅JDK文档中的Swing包,通读一下其中所包含的组件,以了解Swing提供了哪些GUI组件,但不必去仔细阅读每个组件的具体使用帮助。
只要用到某个GUI组件时,才有必要仔细阅读这个组件的具体使用帮助。如果要快速掌握某个新遇到的组件的用法,最好是能够找到并参阅该组件的例子程序。
在JDK的demo程序目录中,或是《Java指南》(可从SUN公司的网站上下载,英文名为The Java Tutorial)中,都能找到某些组件的应用范例。
参考别从成功的应用,是快速学习和完成工作的有效方式。
思考与实践(1)
1、 什么是事件、事件源和事件处理器,并描述三者的工作关系。
2、 描述事件处理的编码实现过程。
3、 描述事件监听器接口和事件适配器类的关系与区别。
4、 描述在窗口上画直线的程序编写过程和组件重绘的原理。
5、 为课程中所讲的自定义计时器组件增加如下功能:允许程序设置计时器显示文本的颜色,时间显示文本的字体大小随组件的大小的改变而改变。
思考与实践(2)
6、 结合JDK文档帮助,编写一个使用FileDialog选择文件名的例子程序。单击主窗口上的“打开”按钮,打开一个文件对话框,并将选择的文件路径显示在主窗口上的“打开”按钮左边的文本框中。在文件对话框中可以对文件类型进行过滤,每次打开文件对话框时,对话框中的初始显示目录为上次选择的文件所在的目录。
7、 修改前面实现计算器界面的程序代码,将增加单个按钮的代码用一个函数来实现,然后在一个循环语句中调用这个函数来增加所有的按钮。


