OpenVINO FPS也可以达100帧
open_model_zoo:
https://github.com/opencv/open_model_zoo
这两个是安装教程:
https://blog.csdn.net/shanglianlm/article/details/89286218
https://blog.csdn.net/qq_36556893/article/details/89532728
英特尔从去年推出OpenVINO开发框架,从此以后几乎每三个月就更新一个版本,最新版本2019R03,但是此版本跟之前的版本改动比较大,所以在配置Python SDK支持与开发API层面跟之前都有所不同。这里假设你已经正确安装好OpenVINO框架。如果不知道如何安装与配置OpenVINO可以看我在B站视频教程:
https://www.bilibili.com/video/av71979782Python语言支持
01
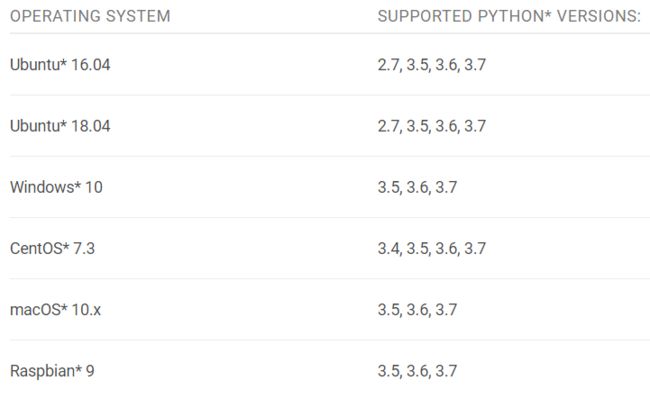
OpenVINO支持的Python版本SDK与系统列表如下:
首先需要配置好OpenVINO的python SDK支持,这个步骤其实很简单,只需要把安装好的OpenVINO目录下:
openvino_2019.3.334\python\python3.6下的openvino文件夹copy到安装好的python3.6.5的 site-packages 目录下面,然后就可以正常使用啦。注意,上述的配置方式只对Windows下面有效。
推理引擎SDK API
02
API函数列表与说明
其中最重要的是IECore与IENetwork。
在Python语言中导入SDK支持的python代码如下:
from openvino.inference_engine import IENetwork, IECore初始化IE(inference Engine)插件,查询设备支持的代码如下:
ie = IECore()
for device in ie.available_devices:
         print("Device: {}".format(device))
执行结果截图如下:
可以看到,在我的电脑上支持的设备还是挺多的,计算棒支持没问题!
在通过ie创建可执行网络的时候,会需要你指定可执行网络运行的目标设备。我们就可以从上述支持的设备中选择支持。这里需要注意的是CPU需要扩展支持,添加扩展支持的代码如下:
ie.add_extension(cpu_extension, "CPU")
创建可执行的网络的代码如下:
# CPU 执行
exec_net = ie.load_network(network=net, device_name="CPU", num_requests=2)
# 计算棒执行
lm_exec_net = ie.load_network(network=landmark_net, device_name="MYRIAD")
这里我们创建了两个可执行网络,两个深度学习模型分别在CPU与计算棒上执行推理,其中第一个可执行网络的推理请求数目是2个,执行异步推理。
人脸检测演示
03
基于OpenVINO的人脸检测模型与landmark检测模型,实现了一个CPU级别高实时人脸检测与landmark提取的程序,完整的代码实现如下:
def face_landmark_demo():
    # query device support
    ie = IECore()
    for device in ie.available_devices:
        print("Device: {}".format(device))
    ie.add_extension(cpu_extension, "CPU")

    # LUT
    lut = []
    lut.append((0, 0, 255))
    lut.append((255, 0, 0))
    lut.append((0, 255, 0))
    lut.append((0, 255, 255))
    lut.append((255, 0, 255))


    # Read IR
    log.info("Reading IR...")
    net = IENetwork(model=model_xml, weights=model_bin)
    landmark_net = IENetwork(model=landmark_xml, weights=landmark_bin)


    # 获取输入输出
    input_blob = next(iter(net.inputs))
    out_blob = next(iter(net.outputs))

    lm_input_blob = next(iter(landmark_net.inputs))
    lm_output_blob = next(iter(landmark_net.outputs))

    log.info("create exec network with target device...")
    exec_net = ie.load_network(network=net, device_name="CPU", num_requests=2)
    lm_exec_net = ie.load_network(network=landmark_net, device_name="MYRIAD")
    # Read and pre-process input image
    n, c, h, w = net.inputs[input_blob].shape
    mn, mc, mh, mw = landmark_net.inputs[lm_input_blob].shape

    # 释放网络
    del net
    del landmark_net

    cap = cv2.VideoCapture("D:/images/video/SungEun.avi")

    cur_request_id = 0
    next_request_id = 1

    log.info("Starting inference in async mode...")
    log.info("To switch between sync and async modes press Tab button")
    log.info("To stop the demo execution press Esc button")
    is_async_mode = True
    render_time = 0
    ret, frame = cap.read()

    print("To close the application, press 'CTRL+C' or any key with focus on the output window")
    while cap.isOpened():
        if is_async_mode:
            ret, next_frame = cap.read()
        else:
            ret, frame = cap.read()
        if not ret:
            break
        initial_w = cap.get(3)
        initial_h = cap.get(4)

        # 开启同步或者异步执行模式
        inf_start = time.time()
        if is_async_mode:
            in_frame = cv2.resize(next_frame, (w, h))
            in_frame = in_frame.transpose((2, 0, 1))  # Change data layout from HWC to CHW
            in_frame = in_frame.reshape((n, c, h, w))
            exec_net.start_async(request_id=next_request_id, inputs={input_blob: in_frame})
        else:
            in_frame = cv2.resize(frame, (w, h))
            in_frame = in_frame.transpose((2, 0, 1))  # Change data layout from HWC to CHW
            in_frame = in_frame.reshape((n, c, h, w))
            exec_net.start_async(request_id=cur_request_id, inputs={input_blob: in_frame})
        if exec_net.requests[cur_request_id].wait(-1) == 0:
            # 获取网络输出
            res = exec_net.requests[cur_request_id].outputs[out_blob]

            # 解析DetectionOut
            for obj in res[0][0]:
                if obj[2] > 0.5:
                    xmin = int(obj[3] * initial_w)
                    ymin = int(obj[4] * initial_h)
                    xmax = int(obj[5] * initial_w)
                    ymax = int(obj[6] * initial_h)
                    if xmin > 0 and ymin > 0 and (xmax < initial_w) and (ymax < initial_h):
                        roi = frame[ymin:ymax,xmin:xmax,:]
                        rh, rw = roi.shape[:2]
                        face_roi = cv2.resize(roi, (mw, mh))
                        face_roi = face_roi.transpose((2, 0, 1))
                        face_roi = face_roi.reshape((mn, mc, mh, mw))
                        lm_exec_net.infer(inputs={'0':face_roi})
                        landmark_res = lm_exec_net.requests[0].outputs[lm_output_blob]
                        landmark_res = np.reshape(landmark_res, (5, 2))
                        for m in range(len(landmark_res)):
                            x = landmark_res[m][0] * rw
                            y = landmark_res[m][1] * rh
                            cv2.circle(roi, (np.int32(x), np.int32(y)), 3, lut[m], 2, 8, 0)
                    cv2.rectangle(frame, (xmin, ymin), (xmax, ymax), (0, 0, 255), 2, 8, 0)

            inf_end = time.time()
            det_time = inf_end - inf_start
            # Draw performance stats
            inf_time_message = "Inference time: {:.3f} ms, FPS:{:.3f}".format(det_time * 1000, 1000 / (det_time*1000 + 1))
            render_time_message = "OpenCV rendering time: {:.3f} ms".format(render_time * 1000)
            async_mode_message = "Async mode is on. Processing request {}".format(cur_request_id) if is_async_mode else \
                "Async mode is off. Processing request {}".format(cur_request_id)

            cv2.putText(frame, inf_time_message, (15, 15), cv2.FONT_HERSHEY_COMPLEX, 0.5, (200, 10, 10), 1)
            cv2.putText(frame, render_time_message, (15, 30), cv2.FONT_HERSHEY_COMPLEX, 0.5, (10, 10, 200), 1)
            cv2.putText(frame, async_mode_message, (10, int(initial_h - 20)), cv2.FONT_HERSHEY_COMPLEX, 0.5,
                        (10, 10, 200), 1)

        #
        render_start = time.time()
        cv2.imshow("face detection", frame)
        render_end = time.time()
        render_time = render_end - render_start

        if is_async_mode:
            cur_request_id, next_request_id = next_request_id, cur_request_id
            frame = next_frame

        key = cv2.waitKey(1)
        if key == 27:
            break

    cv2.waitKey(0)
    # 释放资源
    cv2.destroyAllWindows()
    del exec_net
    del lm_exec_net
    del ie
1920x1080大小的视频画面检测,超高实时无压力!有图为证:


