coreseek 中文分词 and sphinx
1, 解压coreseek-3.2.14.tar.gz 源码包
解压生成三个文件包
csft ;mmseq 中文分词;testpack pdp/pyson 链接sphinx或者使用的api文件
tar xzf coreseek-3.2.14.tar.gzcd mmseg-3.2.14/./configure --prefix=/data/app/appserver/mmseq/ 编译位置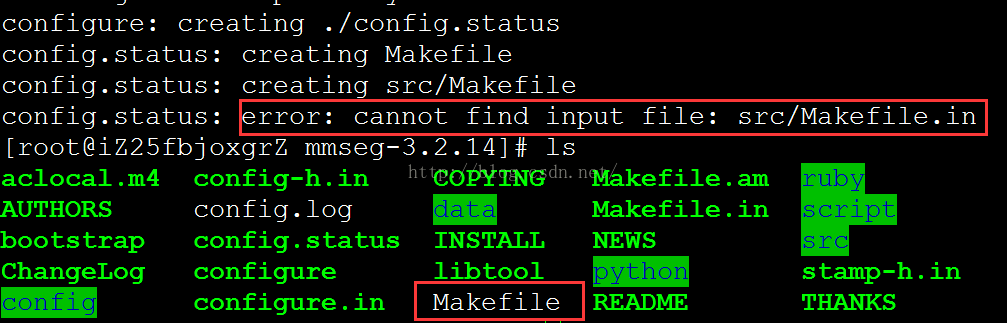
3,出现错误后运行一下指令再重新编译就可以通过 automake
automake如果automake编译不通过可使用以下代码(处理configure报错)
aclocal
libtoolize --force
automake --add-missing
autoconf
autoheader
make clean
4,重新编译即可通过 然后进行编译和安装
make && make install
接下来我们要把sphinx和mmseq结合起来
1,进入coreseek目录进行安装
cd csft-3.2.14/./configure --prefix=/data/app/appserver/coreseek/ --with-mysql=/usr/ --with-mmseg=/data/app/appserver/mmseq/ --with-mmseg-includes=/data/app/appserver/mmseq/include/mmseg/ --with-mmseg-libs=/data/app/appserver/mmseq/lib/make && make install2,配置带有中文分词的sphinx配置文件
配置文件和sphinx.conf一样,只不过是在coreseek中,有几个地方需要注意
注意:coreseek中的配置文件是 csft.conf ,而不是sphinx.conf
进入 coreseek安装目录
cd /data/app/appserver/coreseek/etc/cp sphinx.conf.dist csft.conf3,配置coreseek配置文件
vim csft.conf英文分词的一些配置在中文分词配置里同样可用 ,一下列出的是不同的配置
index test1
{
#stopwords			= G:\data\stopwords.txt
#wordforms			= G:\data\wordforms.txt
#exceptions		= /data/exceptions.txt
#charset_type		= sbcs
#添加下面两行
charset_type     =zh_cn.utf-8 #中文编码的utf8格式
charset_dictpath =/data/app/appserver/mmseq/etc  #安装mmseg的目录
}
4,测试搜索数据
cd /data/app/appserver/coreseek/bin
./search this is 图片
Coreseek Fulltext 3.2 [ Sphinx 0.9.9-release (r2117)]
Copyright (c) 2007-2011,
Beijing Choice Software Technologies Inc (http://www.coreseek.com)

 using config file '/data/app/appserver/coreseek/etc/csft.conf'...
index 'test1': query 'this is 图片 ': returned 1 matches of 1 total in 0.002 sec

displaying matches:
1. document=1, weight=4
	feed_id=1
	feed_data=this is a test
	client_ip=123.121.29.12
	client_port=(NULL)
	feed_content=this is a test , my name is hahah
	from_data=(NULL)

words:
1. 'this': 1 documents, 2 hits
2. 'is': 1 documents, 3 hits
如何用php操作sphinx技术
sphinx集成到php程序中有两种方式
sphinx php 模块
sphinx api类
我们使用sphinx需要做一下几件事情
1,首先得有数据
2,建立sphinx配置文件
3,生成索引
4,启动sphinx的searchd服务进程,并打开端口9312
5,使用php客户端程序链接sphinx服务
安装php sphinx 扩展
下载 sphinx扩展源码包 sphinx-1.1.0.tgz
第一步:安装依赖 libsphinxclient
cd /data/app/temp/coreseek-3.2.14/csft-3.2.14/api/libsphinxclient./configure -- prefix=/data/app/appserver/libsphinxclient/make && make installtar zxf sphinx-1.1.0.tgz #解压缩cd /data/app/temp/sphinx-1.1.0 #进入解压缩包/usr/bin/phpize #生成一个脚本文件 configure
./configure --with-php-config=/usr/bin/php-config --with-sphinx= /data/app/appserver/libsphinxclient/make && make install #生成sphinx.so 文件
添加 extension=sphinx.so 扩展不是加载sphinxapi 类就可以直接使用
require ( "sphinxapi.php" );
		$cl 	= new SphinxClient ();
		$mode 	= SPH_MATCH_EXTENDED;
		$host 	= "123.57.242.35";
		$port 	= 9312;

		$cl->SetServer ( $host, $port );
		$cl->SetMatchMode ( $mode );
		$keys = $cl->EscapeString('this');
		$res = $cl->Query('1', '*');
		$err = $cl->IsConnectError();
		dump($err);
		dump($res);exit();