Springcloud+ Springsecurity oauth2.0 + jwt简单实现认证
基于Springcloud+ Springsecurity oauth2.0 + jwt 实现一个认证授权手脚架
一.用户的认证与授权
什么是用户身份认证?
用户身份认证即用户去访问系统资源时系统要求验证用户的身份信息,身份合法方可继续访问。常见的用户身份认 证表现形式有:用户名密码登录,指纹打卡等方式。
什么是用户授权?
用户认证通过后去访问系统的资源,系统会判断用户是否拥有访问资源的权限,只允许访问有权限的系统资源,没 有权限的资源将无法访问,这个过程叫用户授权。
在现在市面上一般使用较多的分布式认证授权解决方案:
1.sso单点登录,分布式系统实现单点登录,通常要将认证系统抽取出来,并将用户信息存储的独立的介质中,比如redis或者数据库中,考虑性能要求,大多数会选择redis
单点登录的特点是:
1、认证系统为独立的系统。
2、各子系统通过Http或其它协议与认证系统通信,完成用户认证。
3、用户身份信息存储在Redis集群(或者别的存储介质中)
sso用的比较多的就是cas,网上也有许多关于shiro +cas,springsecurity+cas的整合 或者是自己写认证授权业务逻辑
2.Oauth2认证流程
第三方认证技术方案最主要是解决认证协议的通用标准 问题,因为要实现 跨系统认证,各系统之间要遵循一定的 接口协议。
OAUTH协议为用户资源的授权提供了一个安全的、开放而又简易的标准。同时,任何第三方都可以使用OAUTH认 证服务,任何服务提供商都可以实现自身的OAUTH认证服务,因而OAUTH是开放的。业界提供了OAUTH的多种实 现如PHP、JavaScript,Java,Ruby等各种语言开发包,大大节约了程序员的时间,因而OAUTH是简易的。互联网 很多服务如Open API,很多大公司如Google,Yahoo,Microsoft等都提供了OAUTH认证服务,这些都足以说明 OAUTH标准逐渐成为开放资源授权的标准。
Oauth协议目前发展到2.0版本,1.0版本过于复杂,2.0版本已得到广泛应用。 参考:https://baike.baidu.com/item/oAuth/7153134?fr=aladdin
Oauth协议:https://tools.ietf.org/html/rfc6749
 整个流程如下(画的不是很好。。)
Oauth2有以下授权模式: 授权码模式(Authorization Code) 隐式授权模式(Implicit) 密码模式(Resource Owner Password Credentials) 客户端模式(Client Credentials)
其中授权码模式和密码模式应用较多,本次介绍密码模式。
首先在你的springcloud 项目中创建一个认证微服务

认证服务pom文件其中主要是
org.springframework.cloud
spring-cloud-starter-oauth2
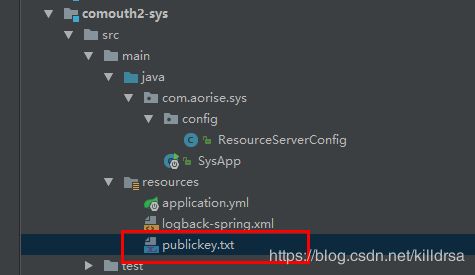
首先要在认证微服务的资源文件包中加入一个秘钥文件

使用jwt rsa算法加密
JWT令牌生成采用非对称加密算法
在相应的需要认证的微服务中加入公钥,与ResourceServerConfig 配置文件
package com.aorise.sys.config;
import org.springframework.context.annotation.Bean;
import org.springframework.context.annotation.Configuration;
import org.springframework.core.io.ClassPathResource;
import org.springframework.core.io.Resource;
import org.springframework.security.config.annotation.method.configuration.EnableGlobalMethodSecurity;
import org.springframework.security.config.annotation.web.builders.HttpSecurity;
import org.springframework.security.oauth2.config.annotation.web.configuration.EnableResourceServer;
import org.springframework.security.oauth2.config.annotation.web.configuration.ResourceServerConfigurerAdapter;
import org.springframework.security.oauth2.provider.token.TokenStore;
import org.springframework.security.oauth2.provider.token.store.JwtAccessTokenConverter;
import org.springframework.security.oauth2.provider.token.store.JwtTokenStore;
import java.io.BufferedReader;
import java.io.IOException;
import java.io.InputStreamReader;
import java.util.stream.Collectors;
/**
-
@Author:chaoqing.zhang
-
@Desicription:
-
@Date:Created on 2019/4/8.
-
@Modified By:
*/
@Configuration
@EnableResourceServer
@EnableGlobalMethodSecurity(prePostEnabled = true, securedEnabled = true)//激活方法上的PreAuthorize注解
public class ResourceServerConfig extends ResourceServerConfigurerAdapter {//公钥
private static final String PUBLIC_KEY = “publickey.txt”;//定义JwtTokenStore,使用jwt令牌
@Bean
public TokenStore tokenStore(JwtAccessTokenConverter jwtAccessTokenConverter) {
return new JwtTokenStore(jwtAccessTokenConverter);
}//定义JJwtAccessTokenConverter,使用jwt令牌
@Bean
public JwtAccessTokenConverter jwtAccessTokenConverter() {
JwtAccessTokenConverter converter = new JwtAccessTokenConverter();
converter.setVerifierKey(getPubKey());
return converter;
}
/**- 获取非对称加密公钥 Key
- @return 公钥 Key
*/
private String getPubKey() {
Resource resource = new ClassPathResource(PUBLIC_KEY);
try {
InputStreamReader inputStreamReader = new InputStreamReader(resource.getInputStream());
BufferedReader br = new BufferedReader(inputStreamReader);
return br.lines().collect(Collectors.joining("\n"));
} catch (IOException ioe) {
return null;
}
}
//Http安全配置,对每个到达系统的http请求链接进行校验
@Override
public void configure(HttpSecurity http) throws Exception {
//所有请求必须认证通过
http.authorizeRequests()
//下边的路径放行
.antMatchers("/v2/api-docs", “/swagger-resources/configuration/ui”,
“/swagger-resources”,"/swagger-resources/configuration/security",
“/swagger-ui.html”,"/webjars/**").permitAll()
.anyRequest().authenticated();
}
}
在自己的认证服务器auth中 也要加入配置文件
package com.aorise.auth.config;
import org.springframework.beans.factory.annotation.Autowired;
import org.springframework.cloud.bootstrap.encrypt.KeyProperties;
import org.springframework.context.annotation.Bean;
import org.springframework.context.annotation.Configuration;
import org.springframework.security.authentication.AuthenticationManager;
import org.springframework.security.core.userdetails.UserDetailsService;
import org.springframework.security.crypto.bcrypt.BCryptPasswordEncoder;
import org.springframework.security.oauth2.config.annotation.configurers.ClientDetailsServiceConfigurer;
import org.springframework.security.oauth2.config.annotation.web.configuration.AuthorizationServerConfigurerAdapter;
import org.springframework.security.oauth2.config.annotation.web.configuration.EnableAuthorizationServer;
import org.springframework.security.oauth2.config.annotation.web.configurers.AuthorizationServerEndpointsConfigurer;
import org.springframework.security.oauth2.config.annotation.web.configurers.AuthorizationServerSecurityConfigurer;
import org.springframework.security.oauth2.provider.ClientDetailsService;
import org.springframework.security.oauth2.provider.client.JdbcClientDetailsService;
import org.springframework.security.oauth2.provider.token.DefaultAccessTokenConverter;
import org.springframework.security.oauth2.provider.token.TokenStore;
import org.springframework.security.oauth2.provider.token.store.JwtAccessTokenConverter;
import org.springframework.security.oauth2.provider.token.store.JwtTokenStore;
import org.springframework.security.oauth2.provider.token.store.KeyStoreKeyFactory;
import javax.annotation.Resource;
import javax.sql.DataSource;
import java.security.KeyPair;
@Configuration
@EnableAuthorizationServer
class AuthorizationServerConfig extends AuthorizationServerConfigurerAdapter {
@Autowired
private DataSource dataSource;
//jwt令牌转换器
@Autowired
private JwtAccessTokenConverter jwtAccessTokenConverter;
@Autowired
UserDetailsService userDetailsService;
@Autowired
AuthenticationManager authenticationManager;
@Autowired
TokenStore tokenStore;
@Autowired
private CustomUserAuthenticationConverter customUserAuthenticationConverter;
//读取密钥的配置
@Bean("keyProp")
public KeyProperties keyProperties(){
    return new KeyProperties();
}

@Resource(name = "keyProp")
private KeyProperties keyProperties;


//客户端配置
@Bean
public ClientDetailsService clientDetails() {
    return new JdbcClientDetailsService(dataSource);
}
@Override
public void configure(ClientDetailsServiceConfigurer clients) throws Exception {
    clients.jdbc(this.dataSource).clients(this.clientDetails());
   /* clients.inMemory()
            .withClient("XcWebApp")//客户端id
            .secret("XcWebApp")//密码,要保密
            .accessTokenValiditySeconds(60)//访问令牌有效期
            .refreshTokenValiditySeconds(60)//刷新令牌有效期
            //授权客户端请求认证服务的类型authorization_code:根据授权码生成令牌,
            // client_credentials:客户端认证,refresh_token:刷新令牌,password:密码方式认证
            .authorizedGrantTypes("authorization_code", "client_credentials", "refresh_token", "password")
            .scopes("app");//客户端范围,名称自定义,必填*/
}

//token的存储方法
// @Bean
// public InMemoryTokenStore tokenStore() {
// //将令牌存储到内存
// return new InMemoryTokenStore();
// }
// @Bean
// public TokenStore tokenStore(RedisConnectionFactory redisConnectionFactory){
// RedisTokenStore redisTokenStore = new RedisTokenStore(redisConnectionFactory);
// return redisTokenStore;
// }
@Bean
@Autowired
public TokenStore tokenStore(JwtAccessTokenConverter jwtAccessTokenConverter) {
return new JwtTokenStore(jwtAccessTokenConverter);
}
@Bean
public JwtAccessTokenConverter jwtAccessTokenConverter(CustomUserAuthenticationConverter customUserAuthenticationConverter) {
JwtAccessTokenConverter converter = new JwtAccessTokenConverter();
KeyPair keyPair = new KeyStoreKeyFactory
(keyProperties.getKeyStore().getLocation(), keyProperties.getKeyStore().getSecret().toCharArray())
.getKeyPair(keyProperties.getKeyStore().getAlias(),keyProperties.getKeyStore().getPassword().toCharArray());
converter.setKeyPair(keyPair);
//配置自定义的CustomUserAuthenticationConverter
DefaultAccessTokenConverter accessTokenConverter = (DefaultAccessTokenConverter) converter.getAccessTokenConverter();
accessTokenConverter.setUserTokenConverter(customUserAuthenticationConverter);
return converter;
}
//授权服务器端点配置
@Override
public void configure(AuthorizationServerEndpointsConfigurer endpoints) throws Exception {
    endpoints.accessTokenConverter(jwtAccessTokenConverter)
            .authenticationManager(authenticationManager)//认证管理器
            .tokenStore(tokenStore)//令牌存储
            .userDetailsService(userDetailsService);//用户信息service
}

//授权服务器的安全配置
@Override
public void configure(AuthorizationServerSecurityConfigurer oauthServer) throws Exception {
// oauthServer.checkTokenAccess(“isAuthenticated()”);//校验token需要认证通过,可采用http basic认证
oauthServer.allowFormAuthenticationForClients()
.passwordEncoder(new BCryptPasswordEncoder())
.tokenKeyAccess(“permitAll()”)
.checkTokenAccess(“isAuthenticated()”);
}
}
自己实现的类
package com.aorise.auth.config;
import com.aorise.auth.service.UserJwt;
import org.springframework.beans.factory.annotation.Autowired;
import org.springframework.security.core.Authentication;
import org.springframework.security.core.authority.AuthorityUtils;
import org.springframework.security.core.userdetails.UserDetails;
import org.springframework.security.core.userdetails.UserDetailsService;
import org.springframework.security.oauth2.provider.token.DefaultUserAuthenticationConverter;
import org.springframework.stereotype.Component;
import java.util.LinkedHashMap;
import java.util.Map;
@Component
public class CustomUserAuthenticationConverter extends DefaultUserAuthenticationConverter {
@Autowired
UserDetailsService userDetailsService;
@Override
public Map convertUserAuthentication(Authentication authentication) {
    LinkedHashMap response = new LinkedHashMap();
    String name = authentication.getName();
    response.put("user_name", name);

    Object principal = authentication.getPrincipal();
    UserJwt userJwt = null;
    if(principal instanceof  UserJwt){
        userJwt = (UserJwt) principal;
    }else{
        //refresh_token默认不去调用userdetailService获取用户信息,这里我们手动去调用,得到 UserJwt
        UserDetails userDetails = userDetailsService.loadUserByUsername(name);
        userJwt = (UserJwt) userDetails;
    }
    response.put("name", userJwt.getName());
    response.put("id", userJwt.getId());
    response.put("utype",userJwt.getUtype());
    response.put("userpic",userJwt.getUserpic());
    response.put("companyId",userJwt.getCompanyId());
    if (authentication.getAuthorities() != null && !authentication.getAuthorities().isEmpty()) {
        response.put("authorities", AuthorityUtils.authorityListToSet(authentication.getAuthorities()));
    }

    return response;
}
}
package com.aorise.auth.config;
import org.springframework.context.annotation.Bean;
import org.springframework.context.annotation.Configuration;
import org.springframework.core.annotation.Order;
import org.springframework.security.authentication.AuthenticationManager;
import org.springframework.security.config.annotation.web.builders.HttpSecurity;
import org.springframework.security.config.annotation.web.builders.WebSecurity;
import org.springframework.security.config.annotation.web.configuration.EnableWebSecurity;
import org.springframework.security.config.annotation.web.configuration.WebSecurityConfigurerAdapter;
import org.springframework.security.crypto.bcrypt.BCryptPasswordEncoder;
import org.springframework.security.crypto.password.PasswordEncoder;
@Configuration
@EnableWebSecurity
@Order(-1)
class WebSecurityConfig extends WebSecurityConfigurerAdapter {
@Override
public void configure(WebSecurity web) throws Exception {
    web.ignoring().antMatchers("/userlogin","/userlogout","/userjwt");

}
@Bean
@Override
public AuthenticationManager authenticationManagerBean() throws Exception {
    AuthenticationManager manager = super.authenticationManagerBean();
    return manager;
}
//采用bcrypt对密码进行编码
@Bean
public PasswordEncoder passwordEncoder() {
    return new BCryptPasswordEncoder();
}
@Override
public void configure(HttpSecurity http) throws Exception {
    http.csrf().disable()
            .httpBasic().and()
            .formLogin()
            .and()
            .authorizeRequests().anyRequest().authenticated();

}
}

在AuthorizationServerConfig中 clients.jdbc会去调用另外一种去数据库查询
oauth_client_details表的client_id 与密码
这里也可以不去实现 直接使用下面注释掉的
最重要的还是 实现Security的UserDetailsService 方法
package com.aorise.auth.service;
import com.aorise.auth.ucenter.XcMenu;
import com.aorise.auth.ucenter.ext.XcUserExt;
import org.apache.commons.lang3.StringUtils;
import org.springframework.beans.factory.annotation.Autowired;
import org.springframework.security.core.Authentication;
import org.springframework.security.core.authority.AuthorityUtils;
import org.springframework.security.core.context.SecurityContextHolder;
import org.springframework.security.core.userdetails.User;
import org.springframework.security.core.userdetails.UserDetails;
import org.springframework.security.core.userdetails.UserDetailsService;
import org.springframework.security.core.userdetails.UsernameNotFoundException;
import org.springframework.security.crypto.bcrypt.BCryptPasswordEncoder;
import org.springframework.security.oauth2.provider.ClientDetails;
import org.springframework.security.oauth2.provider.ClientDetailsService;
import org.springframework.stereotype.Service;
import java.util.ArrayList;
import java.util.List;
@Service
public class UserDetailsServiceImpl implements UserDetailsService {
@Autowired
ClientDetailsService clientDetailsService;

@Override
public UserDetails loadUserByUsername(String username) throws UsernameNotFoundException {
    //取出身份,如果身份为空说明没有认证
    Authentication authentication = SecurityContextHolder.getContext().getAuthentication();
    //没有认证统一采用httpbasic认证,httpbasic中存储了client_id和client_secret,开始认证client_id和client_secret
    if(authentication==null){
        ClientDetails clientDetails = clientDetailsService.loadClientByClientId(username);
        if(clientDetails!=null){
            //密码
            String clientSecret = clientDetails.getClientSecret();
            return new User(username,clientSecret,AuthorityUtils.commaSeparatedStringToAuthorityList(""));
        }
    }
    if (StringUtils.isEmpty(username)) {
        return null;
    }
    XcUserExt userext = new XcUserExt();
    userext.setUsername("admin");
    userext.setPassword(new BCryptPasswordEncoder().encode("123"));
    userext.setPermissions(new ArrayList());
    if(userext == null){
        return null;
    }
    //取出正确密码(hash值)
    String password = userext.getPassword();
    //这里暂时使用静态密码
// String password =“123”;
//用户权限,这里暂时使用静态数据,最终会从数据库读取
//从数据库获取权限
List permissions = userext.getPermissions();
List user_permission = new ArrayList<>();
permissions.forEach(item-> user_permission.add(item.getCode()));
// user_permission.add(“course_get_baseinfo”);
// user_permission.add(“course_find_pic”);
String user_permission_string = StringUtils.join(user_permission.toArray(), “,”);
UserJwt userDetails = new UserJwt(username,
password,
AuthorityUtils.commaSeparatedStringToAuthorityList(user_permission_string));
userDetails.setId(userext.getId());
userDetails.setUtype(userext.getUtype());//用户类型
userDetails.setCompanyId(userext.getCompanyId());//所属企业
userDetails.setName(userext.getName());//用户名称
userDetails.setUserpic(userext.getUserpic());//用户头像
/* UserDetails userDetails = new org.springframework.security.core.userdetails.User(username,
password,
AuthorityUtils.commaSeparatedStringToAuthorityList(""));*/
// AuthorityUtils.createAuthorityList(“course_get_baseinfo”,“course_get_list”));
return userDetails;
}
}

这里的认证授权是写死的毕竟只是一个demo 开发当中可以使用调用用户微服务来认证
并且将需要是权限设置进去
最后返回springsecurity可以处理的user 类
这里的UserJwt是继承User
最后写一个登录方法将用户密码去验证然后获得token 并将其存储到redis中
package com.aorise.auth.controller;
import com.aorise.auth.service.AuthService;
import com.aorise.auth.ucenter.AuthToken;
import com.aorise.auth.ucenter.CookieUtil;
import com.aorise.auth.ucenter.LoginRequest;
import org.apache.commons.lang3.StringUtils;
import org.springframework.beans.factory.annotation.Autowired;
import org.springframework.beans.factory.annotation.Value;
import org.springframework.web.bind.annotation.PostMapping;
import org.springframework.web.bind.annotation.RequestMapping;
import org.springframework.web.bind.annotation.RestController;
import org.springframework.web.context.request.RequestContextHolder;
import org.springframework.web.context.request.ServletRequestAttributes;
import javax.servlet.http.HttpServletResponse;
/**
-
@author Administrator
-
@version 1.0
**/
@RestController
@RequestMapping("/")
public class AuthController {@Value("${auth.clientId}")
String clientId;@Value("${auth.clientSecret}")
String clientSecret;@Value("${auth.cookieDomain}")
String cookieDomain;@Value("${auth.cookieMaxAge}")
int cookieMaxAge;@Autowired
AuthService authService;@PostMapping("/userlogin")
public String login(LoginRequest loginRequest) {
if(loginRequest == null || StringUtils.isEmpty(loginRequest.getUserName())){
return “user or password is null”;
}
if(loginRequest == null || StringUtils.isEmpty(loginRequest.getPassWord())){
return “user or password is null”;
}
//账号
String username = loginRequest.getUserName();
//密码
String password = loginRequest.getPassWord();//申请令牌 AuthToken authToken = authService.login(username,password,clientId,clientSecret); //用户身份令牌 String access_token = authToken.getAccess_token(); //将令牌存储到cookie this.saveCookie(access_token); return "成功"+authToken;}
//将令牌存储到cookie
private void saveCookie(String token){HttpServletResponse response = ((ServletRequestAttributes) RequestContextHolder.getRequestAttributes()).getResponse(); //HttpServletResponse response,String domain,String path, String name, String value, int maxAge,boolean httpOnly CookieUtil.addCookie(response,cookieDomain,"/","uid",token,cookieMaxAge,false);}
}

请求获得的token 与jwt 并且存在cookie 跟redis中 之后每次访问都带着jwt访问 就可以认证了
授权的话在需要验证权限的Controller方法上加注解@PreAuthorize(“hasAnyAuthority(‘code’)”)
这里的话我就没有接下去做了
写这个博客 其实主要是为了方便自己温故而知新 为了更好的学习 毕竟第一次写有点写的不好
。。ps 在后面我会附加自己的githup 代码都在里面