树莓派3B+控制LCD1602显示英文或数字
认识一下LCD1602
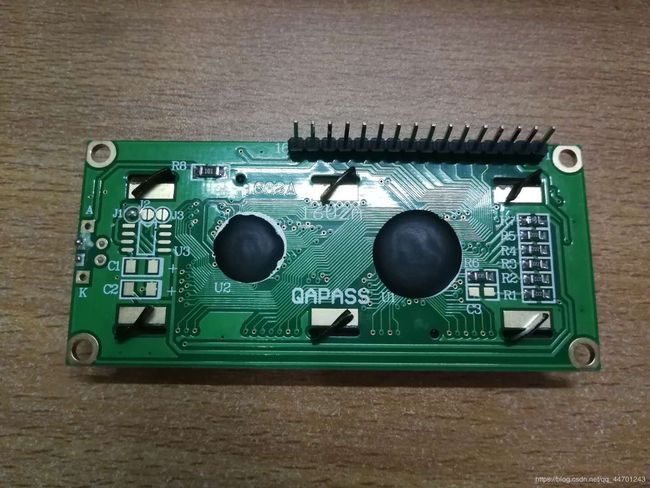
我手头有两种LCD1602,一种是16个引脚的,一种是4个引脚的。
正面图:

16个引脚的LCD1602:
4个引脚的LCD1602:
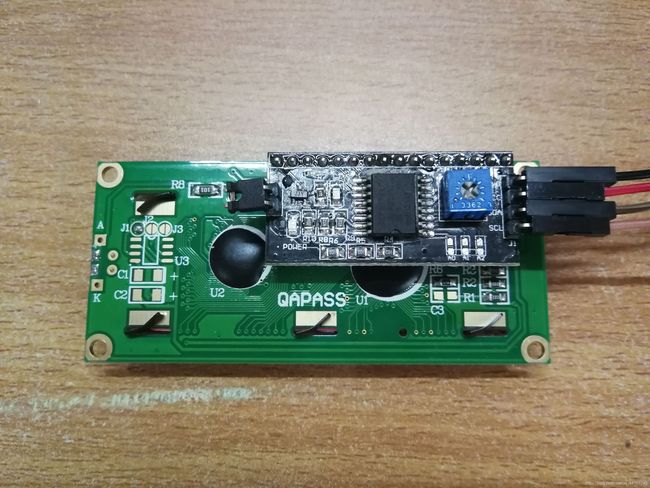
这里我使用的是16引脚的,4个引脚的那个好难啊~嘻嘻
Step1:连线
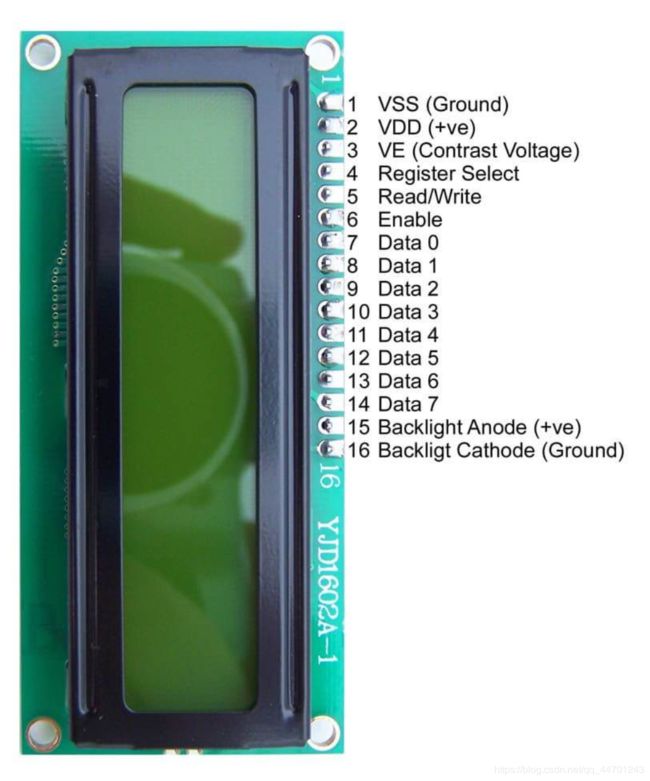
首先看一下LCD1602的引脚图:
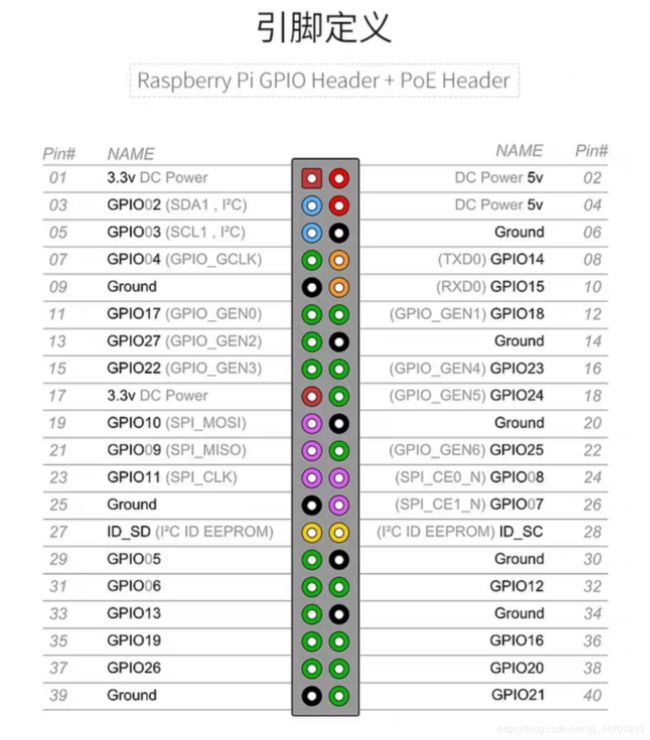
再来看一下树莓派3B+的引脚图:
下面开始连线:
| LCD1602引脚 | 树莓派引脚 |
|---|---|
| 01——VSS | 06——GND |
| 02——VDD | 02——+5V |
| 03——VO | 06——GND |
| 04——RS | 08——GPIO14 |
| 05——RW | 06——GND |
| 06——EN | 10——GPIO15 |
| 07——D0 | 不接 |
| 08——D1 | 不接 |
| 09——D2 | 不接 |
| 10——D3 | 不接 |
| 11——D4 | 11——GPIO17 |
| 12——D5 | 12——GPIO18 |
| 13——D6 | 13——GPIO27 |
| 14——D7 | 15——GPIO22 |
| 15——A | 02——+5V |
| 16——K | 06——GND |
连好线之后,打开树莓派的电源,给LCD1602供电,如下图:
Step2:运行代码
事先说一下,我使用的是nano编辑器,运行python代码的程序。
打开树莓派的桌面,在pi@raspberrypi:~ $语句下,输入:
nano lcd1602.py #创建名为lcd1602的py文件
打开之后,复制以下代码:
#!/usr/bin/python

#
# based on code from lrvick and LiquidCrystal
# lrvic - https://github.com/lrvick/raspi-hd44780/blob/master/hd44780.py
# LiquidCrystal - https://github.com/arduino/Arduino/blob/master/libraries/LiquidCrystal/LiquidCrystal.cpp
#

from time import sleep

class Adafruit_CharLCD:

    # commands
    LCD_CLEARDISPLAY 		= 0x01
    LCD_RETURNHOME 		= 0x02
    LCD_ENTRYMODESET 		= 0x04
    LCD_DISPLAYCONTROL 		= 0x08
    LCD_CURSORSHIFT 		= 0x10
    LCD_FUNCTIONSET 		= 0x20
    LCD_SETCGRAMADDR 		= 0x40
    LCD_SETDDRAMADDR 		= 0x80

    # flags for display entry mode
    LCD_ENTRYRIGHT 		= 0x00
    LCD_ENTRYLEFT 		= 0x02
    LCD_ENTRYSHIFTINCREMENT 	= 0x01
    LCD_ENTRYSHIFTDECREMENT 	= 0x00

    # flags for display on/off control
    LCD_DISPLAYON 		= 0x04
    LCD_DISPLAYOFF 		= 0x00
    LCD_CURSORON 		= 0x02
    LCD_CURSOROFF 		= 0x00
    LCD_BLINKON 		= 0x01
    LCD_BLINKOFF 		= 0x00

    # flags for display/cursor shift
    LCD_DISPLAYMOVE 		= 0x08
    LCD_CURSORMOVE 		= 0x00

    # flags for display/cursor shift
    LCD_DISPLAYMOVE 		= 0x08
    LCD_CURSORMOVE 		= 0x00
    LCD_MOVERIGHT 		= 0x04
    LCD_MOVELEFT 		= 0x00

    # flags for function set
    LCD_8BITMODE 		= 0x10
    LCD_4BITMODE 		= 0x00
    LCD_2LINE 			= 0x08
    LCD_1LINE 			= 0x00
    LCD_5x10DOTS 		= 0x04
    LCD_5x8DOTS 		= 0x00


    def __init__(self, pin_rs=14, pin_e=15, pins_db=[17, 18, 27, 22], GPIO = None):
        # Emulate the old behavior of using RPi.GPIO if we haven't been given
        # an explicit GPIO interface to use
        if not GPIO:
            import RPi.GPIO as GPIO
        self.GPIO = GPIO
        self.pin_rs = pin_rs
        self.pin_e = pin_e
        self.pins_db = pins_db

        self.GPIO.setmode(GPIO.BCM)
        self.GPIO.setup(self.pin_e, GPIO.OUT)
        self.GPIO.setup(self.pin_rs, GPIO.OUT)

        for pin in self.pins_db:
            self.GPIO.setup(pin, GPIO.OUT)

        self.write4bits(0x33) # initialization
        self.write4bits(0x32) # initialization
        self.write4bits(0x28) # 2 line 5x7 matrix
        self.write4bits(0x0C) # turn cursor off 0x0E to enable cursor
        self.write4bits(0x06) # shift cursor right

        self.displaycontrol = self.LCD_DISPLAYON | self.LCD_CURSOROFF | self.LCD_BLINKOFF

        self.displayfunction = self.LCD_4BITMODE | self.LCD_1LINE | self.LCD_5x8DOTS
        self.displayfunction |= self.LCD_2LINE

        """ Initialize to default text direction (for romance languages) """
        self.displaymode =  self.LCD_ENTRYLEFT | self.LCD_ENTRYSHIFTDECREMENT
        self.write4bits(self.LCD_ENTRYMODESET | self.displaymode) #  set the entry mode

        self.clear()


    def begin(self, cols, lines):

        if (lines > 1):
            self.numlines = lines
            self.displayfunction |= self.LCD_2LINE
            self.currline = 0


    def home(self):

        self.write4bits(self.LCD_RETURNHOME) # set cursor position to zero
        self.delayMicroseconds(3000) # this command takes a long time!


    def clear(self):

        self.write4bits(self.LCD_CLEARDISPLAY) # command to clear display
        self.delayMicroseconds(3000)        # 3000 microsecond sleep, clearing the display takes a long time


    def setCursor(self, col, row):

        self.row_offsets = [ 0x00, 0x40, 0x14, 0x54 ]

        if ( row > self.numlines ):
                row = self.numlines - 1 # we count rows starting w/0

        self.write4bits(self.LCD_SETDDRAMADDR | (col + self.row_offsets[row]))


    def noDisplay(self):
        """ Turn the display off (quickly) """

        self.displaycontrol &= ~self.LCD_DISPLAYON
        self.write4bits(self.LCD_DISPLAYCONTROL | self.displaycontrol)


    def display(self):
        """ Turn the display on (quickly) """

        self.displaycontrol |= self.LCD_DISPLAYON
        self.write4bits(self.LCD_DISPLAYCONTROL | self.displaycontrol)


    def noCursor(self):
        """ Turns the underline cursor on/off """

        self.displaycontrol &= ~self.LCD_CURSORON
        self.write4bits(self.LCD_DISPLAYCONTROL | self.displaycontrol)


    def cursor(self):
        """ Cursor On """

        self.displaycontrol |= self.LCD_CURSORON
        self.write4bits(self.LCD_DISPLAYCONTROL | self.displaycontrol)


    def noBlink(self):
        """ Turn on and off the blinking cursor """

        self.displaycontrol &= ~self.LCD_BLINKON
        self.write4bits(self.LCD_DISPLAYCONTROL | self.displaycontrol)


    def noBlink(self):
        """ Turn on and off the blinking cursor """

        self.displaycontrol &= ~self.LCD_BLINKON
        self.write4bits(self.LCD_DISPLAYCONTROL | self.displaycontrol)


    def DisplayLeft(self):
        """ These commands scroll the display without changing the RAM """

        self.write4bits(self.LCD_CURSORSHIFT | self.LCD_DISPLAYMOVE | self.LCD_MOVELEFT)


    def scrollDisplayRight(self):
        """ These commands scroll the display without changing the RAM """

        self.write4bits(self.LCD_CURSORSHIFT | self.LCD_DISPLAYMOVE | self.LCD_MOVERIGHT);


    def leftToRight(self):
        """ This is for text that flows Left to Right """

        self.displaymode |= self.LCD_ENTRYLEFT
        self.write4bits(self.LCD_ENTRYMODESET | self.displaymode);


    def rightToLeft(self):
        """ This is for text that flows Right to Left """
        self.displaymode &= ~self.LCD_ENTRYLEFT
        self.write4bits(self.LCD_ENTRYMODESET | self.displaymode)


    def autoscroll(self):
        """ This will 'right justify' text from the cursor """

        self.displaymode |= self.LCD_ENTRYSHIFTINCREMENT
        self.write4bits(self.LCD_ENTRYMODESET | self.displaymode)


    def noAutoscroll(self):
        """ This will 'left justify' text from the cursor """

        self.displaymode &= ~self.LCD_ENTRYSHIFTINCREMENT
        self.write4bits(self.LCD_ENTRYMODESET | self.displaymode)


    def write4bits(self, bits, char_mode=False):
        """ Send command to LCD """

        self.delayMicroseconds(1000) # 1000 microsecond sleep

        bits=bin(bits)[2:].zfill(8)

        self.GPIO.output(self.pin_rs, char_mode)

        for pin in self.pins_db:
            self.GPIO.output(pin, False)

        for i in range(4):
            if bits[i] == "1":
                self.GPIO.output(self.pins_db[::-1][i], True)

        self.pulseEnable()

        for pin in self.pins_db:
            self.GPIO.output(pin, False)

        for i in range(4,8):
            if bits[i] == "1":
                self.GPIO.output(self.pins_db[::-1][i-4], True)

        self.pulseEnable()


    def delayMicroseconds(self, microseconds):
        seconds = microseconds / float(1000000)        # divide microseconds by 1 million for seconds
        sleep(seconds)


    def pulseEnable(self):
        self.GPIO.output(self.pin_e, False)
        self.delayMicroseconds(1)                # 1 microsecond pause - enable pulse must be > 450ns
        self.GPIO.output(self.pin_e, True)
        self.delayMicroseconds(1)                # 1 microsecond pause - enable pulse must be > 450ns
        self.GPIO.output(self.pin_e, False)
        self.delayMicroseconds(1)                # commands need > 37us to settle


    def message(self, text):
        """ Send string to LCD. Newline wraps to second line"""

        for char in text:
            if char == '\n':
                self.write4bits(0xC0) # next line
            else:
                self.write4bits(ord(char),True)


if __name__ == '__main__':

    lcd = Adafruit_CharLCD()

    lcd.clear()
    lcd.message("   Updated \nPlease check out") #可以进行修改
粘贴好代码后,使用nano的快捷键,Ctrl + O 保存文件,回车;Ctrl + X 退出,回车。然后在pi@raspberrypi:~ $语句下输入:
python3 lcd1602.py #运行程序
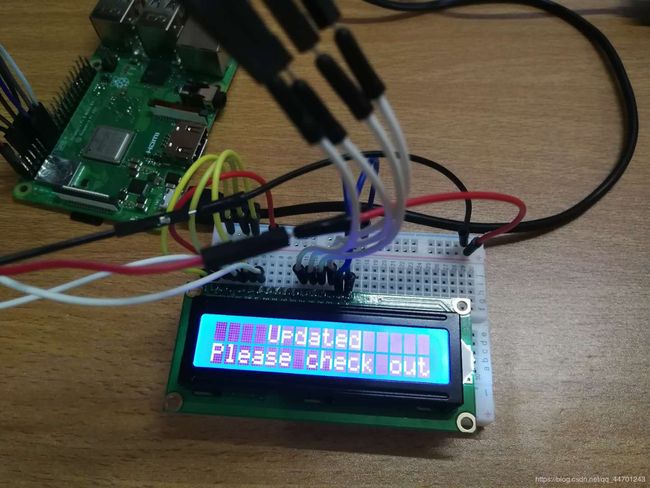
结果如下图,如果想做修改,只需要改主函数的最后一句~
(注意:想设置lcd1602显示汉语比较有困难,需要自己取模编码!建议大家还是别为难lcd1602了)
完成啦~
参考了一个网站,感觉真的好实用啊!
http://www.cnblogs.com/xiaowuyi/p/4051238.html