我们将以前的wordpress的网站镜像拷贝重新在另一个AWS的实例中启动,从而建立了一个新的site,但是wordpress 下是如果改了域名,会发生一些问题,首页显示域名: http://example.com,而往其他页面跳转的时候域名却去server host查询导致变成了 http://xx.xxx.xxx.xxx/contents 的形式。
(域名设定是通常设定,一般是在注册了域名的site,加入DNS的record, A record 将域名和实例的IP绑定一下就可以了)
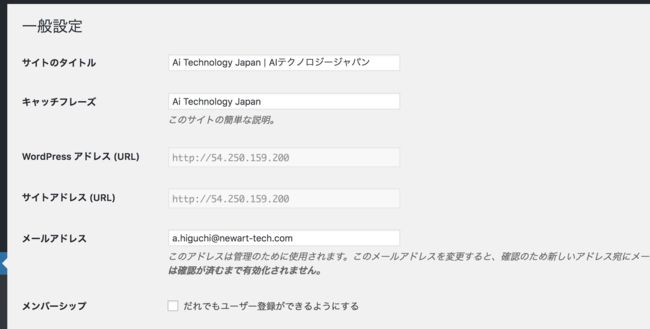
在wordpress的后台管理页面去看,发现siteurl 和 home (side menu: 设定-》一般)是不可改动的。
这里有三种方法去改动:
1)改动wp-config.php 文件
如果是用AWS,采用access key 连接,直接用command line 改动,
在系统改动,文件在: /opt/bitnami/apps/wordpress/htdocs/目录下
原文是下面:
define('WP_SITEURL',  'https://'.$_SERVER['HTTP_HOST']);
define('WP_HOME',  'https://'.$_SERVER['HTTP_HOST']);
改为:
define('WP_SITEURL',  'https://example.com/']);
define('WP_HOME',  'https://example.com/']);
在url域名之后不要忘了"/", 这个代表子页面以下,如果不加,没有效果。
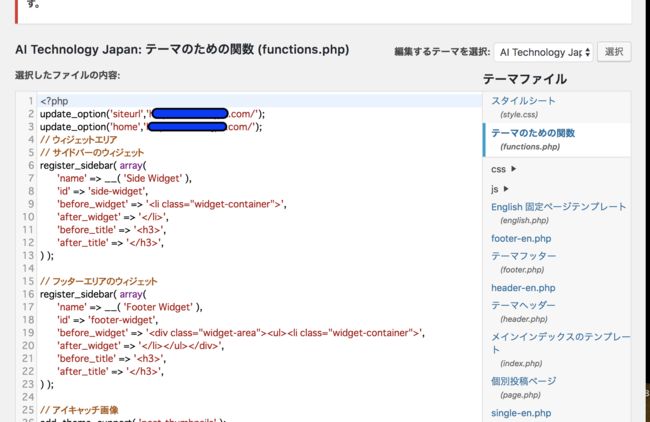
2)改动functions.php文件
这个文件需要在管理后台里改动,我试着在系统里直接改,但是文件没有正常load进来,后来到管理后台改了之后就OK了。
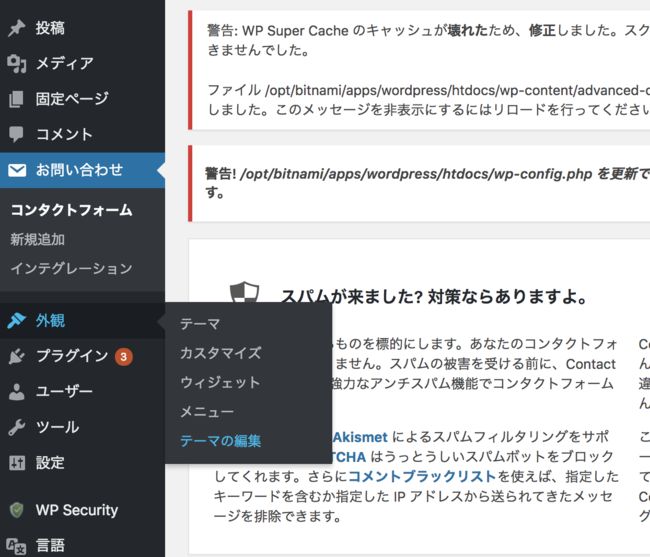
side menu -> 外観->テーマの編集 (用的日文版)
加入两行:
update_option(’siteurl’,’http://example.com/’);
update_option(‘home’,’http://example.com/’);
(上图是实际site名)
这里也要注意不要忘了"/"
3)直接改动数据库
wordpress 如果是用localhost的DB,
mysql -u username -p
password:   //(此处输入DB user PWD)
use Database_name
show tables;
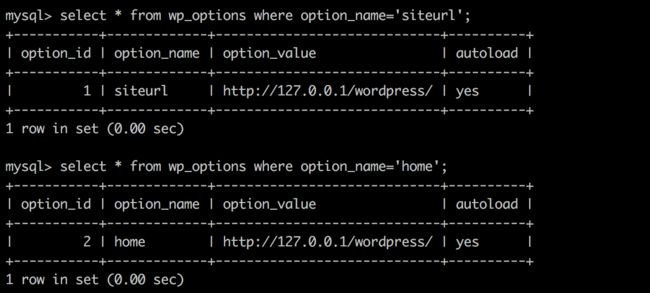
describe wp_options;   //此处是改动wp_options 里面的siteurl 和 home 两条记录
select * from wp_options where option_name=‘home' or option_name='siteurl';
update option_value='example.com' where option_name='home' or 'siteurl';
全部改好之后,要用WP super cache 这个Plugin 去除一下cache 才行。
关于WP super cache
安装plugin在 side menu 中选择plug in 然后选择 “新规追加”,直接install.
之前我曾经删除过WP super cache, 因此重新安装动作不正常,出现以下的错误alert:
Warning! Could not update /opt/bitnami/apps/wordpress/htdocs/wp-config.php! WPCACHEHOME must be set in config file.
Warning! /opt/bitnami/apps/wordpress/htdocs/wp-content/advanced-cache.php does not exist or cannot be updated.
1. If it already exists please delete the file first.
2. Make /opt/bitnami/apps/wordpress/htdocs/wp-content writable using the chmod command through your ftp or server software. (chmod 777 /opt/bitnami/apps/wordpress/htdocs/wp-content) and refresh this page. This is only a temporary measure and you’ll have to make it read only afterwards again. (Change 777 to 755 in the previous command)
3. Refresh this page to update /opt/bitnami/apps/wordpress/htdocs/wp-content/advanced-cache.php
If that doesn’t work, make sure the file /opt/bitnami/apps/wordpress/htdocs/wp-content/advanced-cache.php doesn’t exist:
1. Open /opt/bitnami/apps/wordpress/htdocs/wp-content/plugins/wp-super-cache/advanced-cache.php$wp_cache_file in a text editor.
2. Change the text CACHEHOME to /opt/bitnami/apps/wordpress/htdocs/wp-content/plugins/wp-super-cache/
3. Save the file and copy it to /opt/bitnami/apps/wordpress/htdocs/wp-content/advanced-cache.php and refresh this page.
Cannot continue... fix previous problems and retry.
解决方法:在wp-config.php 下增加WPCACHEHOME的设定:
define( 'WPCACHEHOME', '/opt/bitnami/apps/wordpress/htdocs/wp-content/plugins/wp-super-cache/' );
可能还需要加入:
define('WP_CACHE',true);
define(RELOCATE,true);
有些帖子会告诉你要加入以上的两个选项,需要自己试一下,这里面的原因没有查过
然后按照上面的提示将wp-content权限改一下,以便于程序能够读写该目录,也需要将wp-config.php的读写权限,根据需要。
关于权限可以查阅这里:http://itdoc.hitachi.co.jp/manuals/3021/3021313320/JPAS0348.HTM
如果仍然不好用,可以将advanced-cache.php和wp-cache-config.php 拷贝到wp-content 目录下(原先在子目录/plugins/wp-super-cache/下)
正常运作后的画面如下:
当出现以上警告的情况, 系统担心wp-content的权限过大,可以按提示改小一些。
上图表明正常运作,此时将cache启动(radio button),就可以使用了。
追记:
一些后续设定,不想开新的tip 就记录在这里(隐隐冒着一身的屌丝寒酸气)
在公司网站的mail 设定自动回信(wordpress 后台设定)
ref: https://wpforms.com/how-to-securely-send-wordpress-emails-using-gmail-smtp/
这个功能要有个前提,admin要帮该账户打开google developer's 权限


