SSH之IDEA2017整合Struts2+Spring+Hibernate
推荐大家使用maven解决依赖问题,可以省去手动解决依赖的问题,项目参考:链接
摘要
IDEA无疑是Java编程的利器,在下面我们将介绍如何使用IDEA来整合SSH(Struts2 + Spring + Hibernate);介绍將分为三个部分来讲,分别是新建工程,Spring引入并测试, Hibernate引入并测试,Struts2引入并测试; 下面使用的IDEA的版本是2017.1
以下的代码和流程大体参考了 SSH 只是完善了些细节和修改了部分代码
所有代码均可在 github 下载
零,预备工作
1) 安装IDEA
2) 安装MySQL
3) 安装tomcat 参考
4) 建MySQL数据库和表
- 建数据库: mysqladmin -u root -p create TESTDB
- 建表
-
CREATE TABLE addresslist (
	id INT NOT NULL AUTO_INCREMENT,
	name VARCHAR(40) NOT NULL,
	phone VARCHAR(40) NOT NULL,
	PRIMARY KEY ( id )
);
一,新建工程
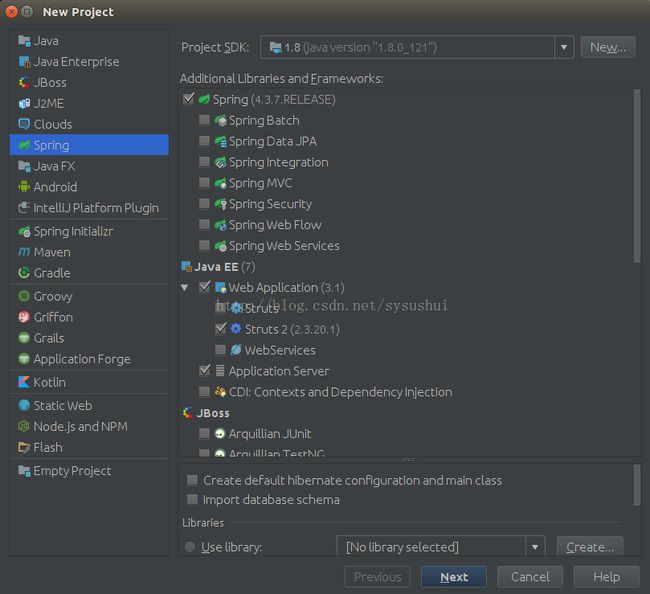
新建工程时,要选择我们使用的框架还有服务器
- 点击左侧的Spring
- Additional Libraries and Framework里面选择Spring,Web Application, Struts2, Application Server(选择tomcat就可以了),Hibernate;
- 点击Next,输入项目名称;完成后等待IDEA下载依赖包
二,Spring的引入和测试
新建完成工程后,为了测试我们的Spring是否引入成功,我们要对IOC进行测试
1. 在src目录下新建一个test包(src->New->package)
2. 在test包下面新建一个TestService.java,代码如下
package test;

/**
 * Created by kinthon on 17-3-31.
 */
public class TestService {
    private String name;

    public void setName(String name) {
        this.name = name;
    }

    public String getName() {

        return name;
    }

    public void hello()
    {
        System.out.println("hello "+ getName());
    }
}
3,在web/Web-INF目录下新建spring的配置文件applicationContext.xml文件(Web-INF右击->New->XML configuration file->Spring config),然后配置内容如下
4,在前面的步骤我们已经新建了java类,同时建了bean,接下来我们就是要试试能否通过引用到这个新建的bean.在test包下面我们再建一个文件 test.java,代码如下
package test;

import org.springframework.context.ApplicationContext;
import org.springframework.context.support.FileSystemXmlApplicationContext;

/**
 * Created by kinthon on 17-3-31.
 */
public class Test {
    public static void main(String[] args)
    {
        ApplicationContext ac = new FileSystemXmlApplicationContext("web/WEB-INF/applicationContext.xml");
        TestService ts = (TestService)ac.getBean("testService");
        ts.hello();
    }
}
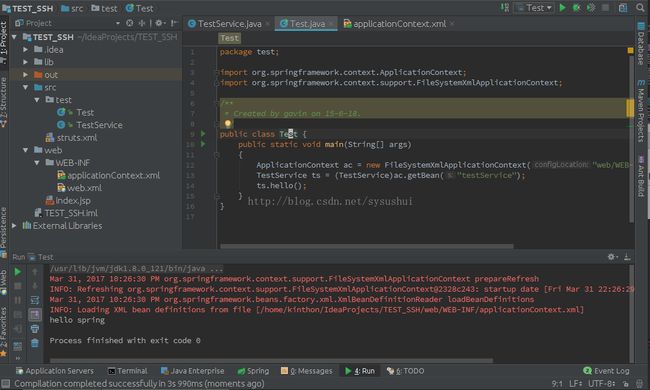
接下来就是直接测试Test的main函数,操作是右击编辑区,点击Run "Test.main()",正常的话,应该会出现如下效果
三,Hibernate引入与测试
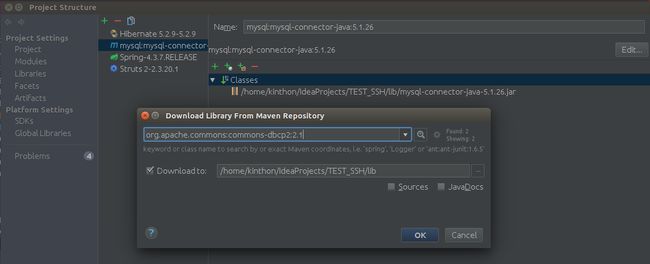
1) 使用Hibernate我们还要额外引入一些依赖,要引入的包有mysql-connector-java-5.1.26还有commons-dbcp2-2.1和commons-pool2-2.4.1;引入这些包我们可以直接使用IDEA的maven功能下载依赖包,然后直接引入;操作为 File->project Structure->Libraries->点击右侧的加号->From maven; 然后输入对应的包名就可以了;对于这两个包我们可以直接打勾Download to,它们没有过多的依赖包下载,截图如下
2) 在src下创建bean包,然后建立持久化类.这里主要是使用了IDEA的persistence下的OR映射功能;
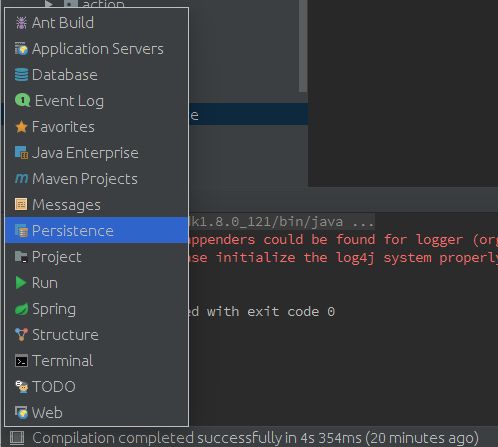
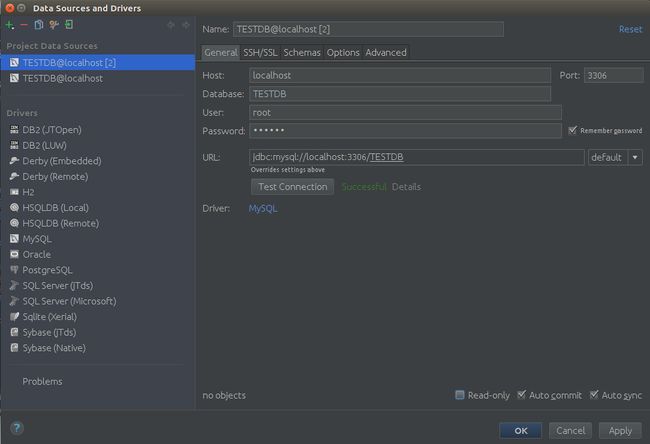
a) 建立数据库, 点击 IDEA最左下角的一个按钮,会弹出一些选项,然后选择Database,点击加号,选择Data Source -> MySQL, 进入后进行数据库的信息配置,以你自己的机器为主; 相关截图如下
b) 为了可以使用Persistence的sessionFactory进行生成持久化映射,需要先配置applicationContext.xml,让其接管Hibernate的配置;操作如下,在applicationContext.xml里面加入如下的内容(password的值根据自己的数据库进行配置)如果没有进行这一步的话,在Persistence界面是不会出现sessionFactory的。
            org.hibernate.dialect.MySQLDialect
            true
            jdbc:mysql://localhost:3306/TESTDB
            com.mysql.jdbc.Driver
c) 进行持久化类生成,点击左下角的按钮, 选择Persistence; 在Persistence界面,选择下拉,右击sessionFactory->Generate Persistence Mapping; 相关截图如下;如果没有出现sessionFactory的话,可以下载查看下:https://pan.baidu.com/s/14mAq5BkkfNXxVs6-rpNsyg
c) 在Generate Persistence Mapping界面, "Choose Data Source"选择我们一开始新建的TESTDB数据库, "Package"选择bean; "Database Schema Mapping"点击我们 建立的addresslist表, 相关截图如下
d)建Service层,在src目录下建service包,在service包下新建一个接口类Address.java和实现类AddressImpl,代码如下
Address.java
package Service;

import bean.Addresslist;

/**
 * Created by kinthon on 17-3-31.
 */
public interface Address {
    public void add(Addresslist al);
}
AddressImpl.java
package Service;


import bean.Addresslist;
import org.hibernate.Session;
import org.hibernate.SessionFactory;
import org.hibernate.Transaction;
import org.springframework.beans.factory.annotation.Autowired;
import org.springframework.beans.factory.annotation.Qualifier;


/**
 * Created by kinthon on 17-3-31.
 */
public class AddressImpl implements Address {

    @Qualifier("sessionFactory")
    @Autowired
    private SessionFactory sessionFactory;

    @Override
    public void add(Addresslist al) {
        Session s = sessionFactory.openSession();
        Transaction tx= s.beginTransaction();
        s.save(al);
        tx.commit();
    }

    public void setSessionFactory(SessionFactory sessionFactory) {
        this.sessionFactory = sessionFactory;
    }
}
e)让Spring接管Hibernate的配置文件,同时建立address服务的bean;目前applicationContext.xml配置如下
                org.hibernate.dialect.MySQLDialect
                true
                jdbc:mysql://localhost:3306/TESTDB
                com.mysql.jdbc.Driver


                classpath:bean/Addresslist.hbm.xml
                classpath:bean/Addresslist.hbm.xml


                bean.Addresslist
f)进行测试,修改test包下的Test.java,代码如下
package test;

import Service.Address;
import Service.AddressImpl;
import bean.Addresslist;
import org.springframework.context.ApplicationContext;
import org.springframework.context.support.FileSystemXmlApplicationContext;

/**
 * Created by kinthon on 17-3-31.
 */
public class Test {
    public static void main(String[] args)
    {
        ApplicationContext ac = new FileSystemXmlApplicationContext("web/WEB-INF/applicationContext.xml");
        Address ail = (AddressImpl)ac.getBean("address");
        Addresslist al = new Addresslist();
        al.setName("kaka");
        al.setPhone("123456123");
        ail.add(al);
    }
}
右击编辑器,点击"Run Test.main()"进行测试,正常的话,会出现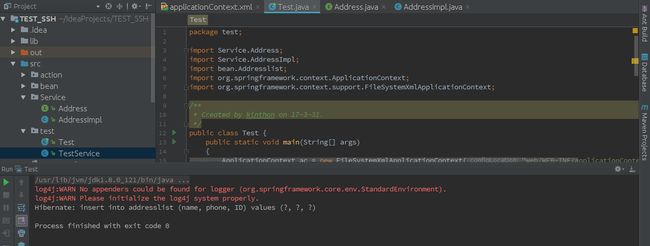
同时查看MySQL数据库,看看对应的TESTDB下的addresslist下有没有多一条name:kaka, phone:123456123的记录.
四,struts2 引入并测试 .
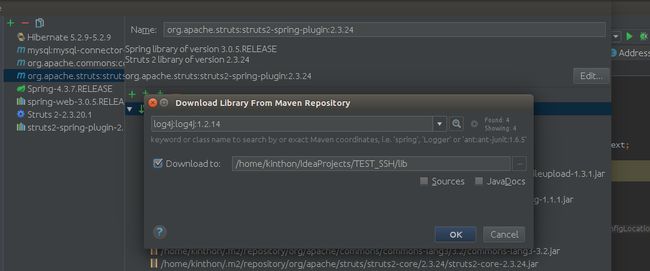
1) 要引入struts2,要先引入两个依赖,一个是struts2-spring-plugin-2.3.24, spring-web-3.0.5和log4j-1.2.14.jar; 对应前两个我们一样使用IDEA的maven功能进行下载,但是不要直接入我们的lib目录下,因为它会下载比较多的依赖;我们选择手工加入;先如下下载好,"Download to "不要打勾
下载struts2-spring-plugin-2.3.24会附带下载好spring-web-3.0.5; 下载完后查看下下载的目录, 只是查看下下载目录就可以了如下
可以看到struts2-spring-plugin的下载目录在home目录下的.m2(隐藏文件夹,可以按ctrl+h来显示)下, spring-web也是一样,接下来就是直接复制这两个包,放到项目的lib文件下,之后右击一下lib下的刚引入的这两个jar包,"Add as Library"; 对于log4j-1.2.14就相对简单,直接打勾Download to 就可以了.相关截图如下
2) 修改web/WEB-INF/web.xml文件,引入struts2,配置如下
        struts2
        org.apache.struts2.dispatcher.ng.filter.StrutsPrepareAndExecuteFilter


        struts2
        /*


        org.springframework.web.context.ContextLoaderListener


        contextConfigLocation
        WEB-INF/applicationContext.xml
3) 建一个action, 在src下加一个action包,然后新建一个AddressAction.java文件,代码如下
package action;

import Service.AddressImpl;
import bean.Addresslist;
import com.opensymphony.xwork2.ActionSupport;
import org.springframework.beans.factory.annotation.Autowired;

/**
 * Created by kinthon on 17-3-31.
 */
public class AddressAction extends ActionSupport {

    private String name;
    private String phone;
    @Autowired
    private AddressImpl address;


    public void setName(String name) {
        this.name = name;
    }

    public void setPhone(String phone) {
        this.phone = phone;
    }

    public String getName() {

        return name;
    }

    public String getPhone() {
        return phone;
    }

    public String add()
    {
        Addresslist al = new Addresslist();
        al.setName(getName());
        al.setPhone(getPhone());
        address.add(al);
        return SUCCESS;
    }

    public void setAddress(AddressImpl address) {
        this.address = address;
    }
}
4) 在web/WEB-INF下的applicationContext.xml下加入一个新的bean,内容如下
5) 在src下的struts.xml下进行如下修改,
/success.jsp
6) 测试
a) 在web目录下加入index.jsp和success.jsp文件,
index.jsp
<%--
  Created by IntelliJ IDEA.
  User: kinthon
  Date: 17-3-31
  Time: 下午1:22
  To change this template use File | Settings | File Templates.
--%>
<%@ page contentType="text/html;charset=UTF-8" language="java" %>


    $Title$


  welcome
success.jsp
<%--
  Created by IntelliJ IDEA.
  User: Administrator
  Date: 2016/5/17
  Time: 17:41
  To change this template use File | Settings | File Templates.
--%>
<%@ page contentType="text/html;charset=UTF-8" language="java" %>


    $Title$


success
b) 特别注意:引入新的包的话,直接运行的话,可能会有包没有引入成功的问题,可以到File->Project Structure->Artifacts 查看,在右边的最下边如果出现一个fix 按钮的话,就点击,然后点击 add All
c) 如果正常的话,点击运行,相关截图如下,图的最右边的运行按钮,记得將对象从Test切换为Tomcat
成功的话,可以直接在浏览器,输入 http://localhost:8080/addresslist/add?name=ssh&phone=18819453629 要是成功的话,浏览器会显示success,如下
同时MySQL的TESTDB的addresslist会多一条记录name:ssh;phone:18819453629
结语
如上就是使用IDEA2017.1整合SSH的整体教程了,个人新手,正积极学习ing。如果上述有任何问题,可以联系我。
