这一篇文章主要介绍如何在Vapor项目中连接mysql数据库。MySQL相信是大家最常用的数据库之一了,几乎每个公司都有用到这个数据库,如果你对于数据库的选择相对保守,那么mysql是个不错的选择。
在前几篇中我介绍了PostgreSQL和MongoDB的连接:
Vapor奇幻之旅(05 Fluent)
Vapor奇幻之旅(06 PostgreSQL)
Vapor奇幻之旅(07 连接服务端PostgreSQL)
Vapor奇幻之旅(08 连接服务端MongoDB)
如果你看了前几篇,应该知道连接数据库遵循以下套路:
1、安装配置好服务器,并提供外部访问的端口和权限。
2、添加相应的数据库的provider,provider会提供连接数据库的driver和对数据库的相关操作的支持。
3、项目里配置provider,并提供数据库的主机、用户名、密码、端口等信息。
4、测试连接。
本篇也将按照这个顺序介绍如何连接MySQL数据库。
1、安装配置MySQL
这一篇我还是介绍如何在ubuntu16.04上安装MySQL:
安装命令:
$ sudo apt-get update
$ sudo apt-get install mysql-server
$ mysql_secure_installation
第三个命令是安全相关的,根据自己的需要配置密码强度等信息。
安装好之后测试登陆一下:
$ mysql -u root -p
Enter password:
Welcome to the MySQL monitor.  Commands end with ; or \g.
Your MySQL connection id is 4
Server version: 5.7.21-0ubuntu0.16.04.1 (Ubuntu)

Copyright (c) 2000, 2018, Oracle and/or its affiliates. All rights reserved.

Oracle is a registered trademark of Oracle Corporation and/or its
affiliates. Other names may be trademarks of their respective
owners.

Type 'help;' or '\h' for help. Type '\c' to clear the current input statement.
接着运行
$ netstat -ntpl
可以看到mysql已经在运行,且使用的是3306接口:
但是本地ip地址是127.0.0.1,表示只能本地访问,于是需要修改/etc/mysql/mysql.conf.d/mysqld.cnf配置文件:
$ vim /etc/mysql/mysql.conf.d/mysqld.cnf
如果安装的是mysql5.6或者更低的版本,配置文件在 /etc/mysql/my.cnf这个文件里
$ vim /etc/mysql/my.cnf
修改里面的
bind-address = 0.0.0.0
修改完保存退出,重启mysql服务
$ sudo service mysql restart
在运行
$ netstat -ntpl
可以看到本地ip已经变成0.0.0.0了
这时到阿里控制台安全组添加3306接口的入方向授权,如果用的其他服务器,也需要添加允许端口访问的规则。
到这里我们的服务端的mysql就装好了。
2、配置MySQLProvider
在运行项目前,和PostgreSQLProvider需要CPostgreSQL库一样,MySQLProvider也需要为系统安装CMySQL库,这样项目才能够被成功编译:
MacOS:
brew install vapor/tap/cmysql
Ubuntu:
sudo apt-get install cmysql
- 1、配置Package.swift
// swift-tools-version:4.0

import PackageDescription

let package = Package(
    name: "VaporMySQL",
    products: [
        .library(name: "App", targets: ["App"]),
        .executable(name: "Run", targets: ["Run"])
    ],
    dependencies: [
        .package(url: "https://github.com/vapor/vapor.git", .upToNextMajor(from: "2.1.0")),
        .package(url: "https://github.com/vapor/fluent-provider.git", .upToNextMajor(from: "1.3.0")),
        .package(url: "https://github.com/vapor/mysql-provider", .upToNextMajor(from: "2.0.0"))
    ],
    targets: [
        .target(
            name: "App",
            dependencies: ["Vapor",  "FluentProvider", "MySQLProvider"],
            exclude: ["Config", "Database", "Localization", "Public", "Resources"]
        ),
        .target(name: "Run", dependencies: ["App"]),
        .testTarget(name: "AppTests", dependencies: ["App", "Testing"])
    ]
)
接着生成xcode项目
$ vapor xcode
对于已有的项目进行更新即可
$ vapor update
- 2、、在Config+Setup.swift中添加provider
import FluentProvider
import MySQLProvider

...

/// Configure providers
    private func setupProviders() throws {
        try addProvider(FluentProvider.Provider.self)
        try addProvider(MySQLProvider.Provider.self)
    }
3、添加Config/mysql.json文件,并配置内容:
{
    "hostname": "xxx.xxx.xxx.xxx",
    "user": "root",
    "password": "*******",
    "database": "mysql"
}
4、运行程序,测试接口。
将targert设置为run,运行设备选择My Mac,如果选择了连接Mac的iphone,会报错的。
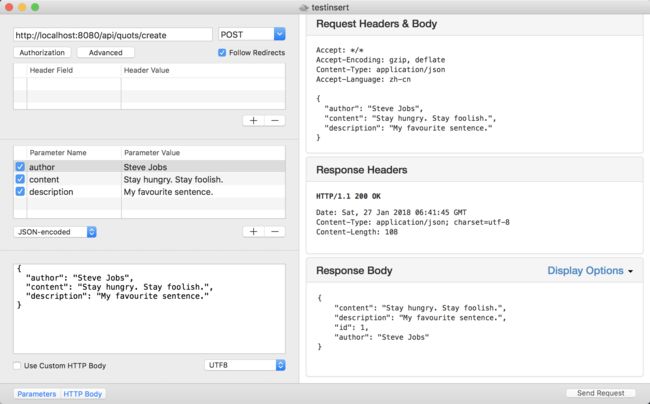
执行插入操作:
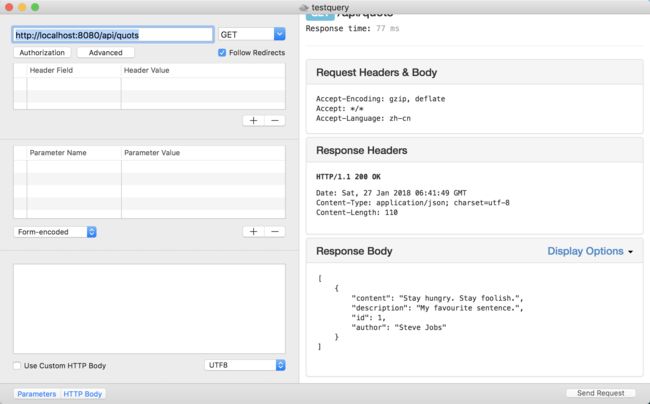
执行查询操作:
3、Trouble Shooting
- 无法连接上服务器
1、服务端运行netstat -ntpl 查看是否mysql本地ip是0.0.0.0,否则修改mysql的配置文件中的bind-address为0.0.0.0并重启mysql服务
2、检查是否添加安全组,如阿里云的安全组规则,添加3306接口的访问权限
3、进入服务端的mysql数据库,查询用户权限:
mysql> select host, user from user;
+-----------+------------------+
| host      | user             |
+-----------+------------------+
| %         | root             |
| localhost | debian-sys-maint |
| localhost | mysql.session    |
| localhost | mysql.sys        |
+-----------+------------------+
4 rows in set (0.00 sec)
如果host不是%可以通过以下方式来修改
mysql> use mysql
Reading table information for completion of table and column names
You can turn off this feature to get a quicker startup with -A

Database changed
mysql> update user set host = '%' where user = 'root';
Query OK, 1 row affected (0.01 sec)
Rows matched: 1  Changed: 1  Warnings: 0

mysql> flush privileges
    -> ;
Query OK, 0 rows affected (0.00 sec)
上面的root可以换成其他的user名
4、检查防火墙设置
- 本地提示缺少CMySQL库,需要按照上文中的方式添加CMySQL库到系统,如果生成项目后再从系统添加库支持,则需要vapor update一下项目,重新生成一个xcodeproj文件,这样就可以编译通过了。
总结
本篇介绍了怎么在ubuntu系统上安装和配置MySQL, 如何配置远程访问服务端的MySQL数据库,如果使用项目连接MySQL数据库。
关于Vapor其他知识,可以参考以下文章:
Vapor奇幻之旅(01开始)
Vapor奇幻之旅(02部署)
Vapor奇幻之旅(03上手)
Vapor奇幻之旅(04Routing)
Vapor奇幻之旅(05 Fluent)
Vapor奇幻之旅(06 PostgreSQL)
Vapor奇幻之旅(07 连接服务端PostgreSQL)
Vapor奇幻之旅(08 连接服务端MongoDB)
希望你对我的教程能够喜欢,你们的赞是我持续的动力,欢迎加入QQ群参与互动:431296189

