正点原子阿波罗F429+STM32CubeMX+LAN8720+LWIP+Freetos:带操作系统实现网络热插拔
1、前言
前文提要
点击跳转
点击跳转代码下载
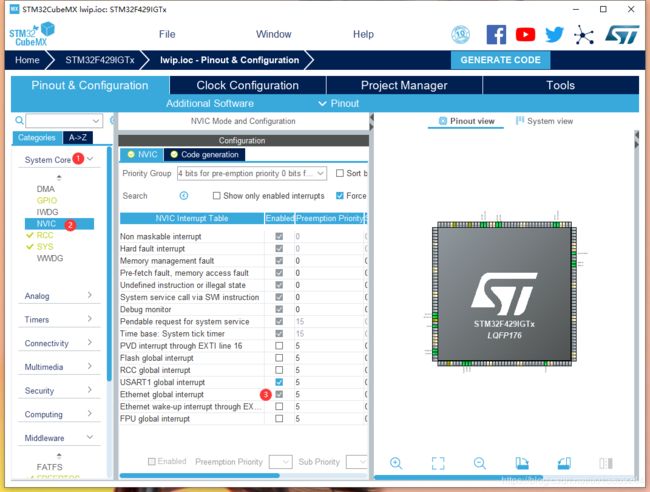
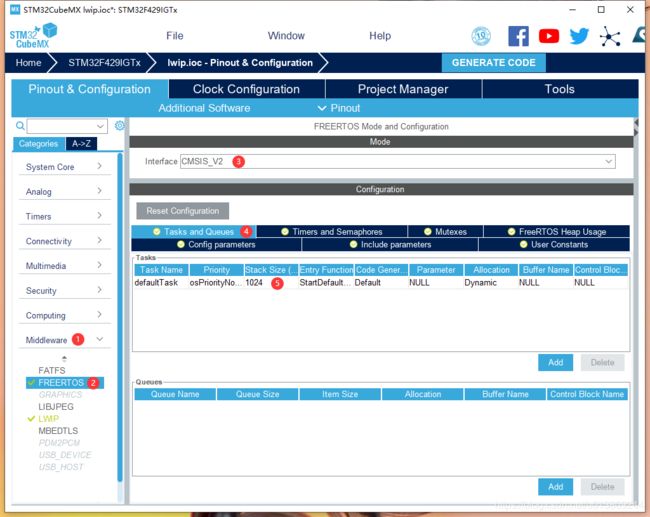
2、STM32CubeMX配置
已经配置完成了,点击生成代码。打开代码。
3、代码调试
3.1、main.c调试
1.删除掉main函数里面的use_lwip_process();
2.把printf(“程序开始\r\n”); 移动到MX_USART1_UART_Init(); 后面。
  MX_USART1_UART_Init();
  /* USER CODE BEGIN 2 */
	printf("程序开始\r\n");
  /* USER CODE END 2 */

  /* Call init function for freertos objects (in freertos.c) */
  MX_FREERTOS_Init();

  /* Start scheduler */
  osKernelStart();

  /* We should never get here as control is now taken by the scheduler */

  /* Infinite loop */
  /* USER CODE BEGIN WHILE */
  printf("程序开始\r\n");
  while (1)
  {
    /* USER CODE END WHILE */

    /* USER CODE BEGIN 3 */
  }
3.2 、use_lwip.c
修改use_lwip_process函数
void use_lwip_process(void)
{
	use_read_network_cable();
}
3.3、lwip.c
修改MX_LWIP_Init函数
void MX_LWIP_Init(void)
{
/* Initilialize the LwIP stack with RTOS */
tcpip_init( NULL, NULL );
/* IP addresses initialization with DHCP (IPv4) */
ipaddr.addr = 0;
netmask.addr = 0;
gw.addr = 0;
/* add the network interface (IPv4/IPv6) with RTOS */
netif_add(&gnetif, &ipaddr, &netmask, &gw, NULL, ðernetif_init, &tcpip_input);
/* Registers the default network interface */
netif_set_default(&gnetif);
if (netif_is_link_up(&gnetif))
{
/* When the netif is fully configured this function must be called */
netif_set_up(&gnetif);
}
else
{
/* When the netif link is down this function must be called */
netif_set_down(&gnetif);
}
/* Set the link callback function, this function is called on change of link status*/
netif_set_link_callback(&gnetif, ethernetif_update_config);
/* create a binary semaphore used for informing ethernetif of frame reception */
/* Start DHCP negotiation for a network interface (IPv4) */
dhcp_start(&gnetif);
/* USER CODE BEGIN 3 */
osThreadId_t lkTaskHandle;
const osThreadAttr_t defaultTask_attributes = {
.name = "lkTask",
.priority = (osPriority_t) osPriorityNormal,
.stack_size = configMINIMAL_STACK_SIZE * 2,
};
lkTaskHandle = osThreadNew(ethernetif_set_link, &gnetif, &defaultTask_attributes);
/* USER CODE END 3 */
}
3.4、ethernetif.c
把函数void ethernetif_set_link(void const *argument) 修改为void ethernetif_set_link(void *argument) ,去掉传递参数的const。同理修改ethernetif.h里面的函数名。
传递参数改变了,修改里面的代码为:
void ethernetif_set_link(void *argument)
{
uint32_t regvalue = 0;
struct netif *gnetif = (struct netif *)argument;
for(;;)
{
/* Read PHY_BSR*/
HAL_ETH_ReadPHYRegister(&heth, PHY_BSR, ®value);
regvalue &= PHY_LINKED_STATUS;
/* Check whether the netif link down and the PHY link is up */
if(!netif_is_link_up(gnetif) && (regvalue))
{
/* network cable is connected */
netif_set_link_up(gnetif);
}
else if(netif_is_link_up(gnetif) && (!regvalue))
{
/* network cable is dis-connected */
netif_set_link_down(gnetif);
}
/* Suspend thread for 200 ms */
osDelay(200);
}
}
3.5、stm32f4xx_hal_eth.c
打开stm32f4xx_hal_eth.c找到==HAL_StatusTypeDef HAL_ETH_Init(ETH_HandleTypeDef *heth)==函数修改里面的两端代码(不修改也没事,只是开机有时候会判断为连接错误,具体原因没找.)
      if((HAL_GetTick() - tickstart ) > ETH_TIMEOUT_LINKED_STATE)
      {
//        /* In case of write timeout */
//        err = ETH_ERROR;
//
//        /* Config MAC and DMA */
//        ETH_MACDMAConfig(heth, err);
//
//        heth->State= HAL_ETH_STATE_READY;
//
//        /* Process Unlocked */
//        __HAL_UNLOCK(heth);
//
//        return HAL_TIMEOUT;
		  break;
      }
    } while (((phyreg & PHY_LINKED_STATUS) != PHY_LINKED_STATUS));
      if((HAL_GetTick() - tickstart ) > ETH_TIMEOUT_AUTONEGO_COMPLETED)
      {
//        /* In case of write timeout */
//        err = ETH_ERROR;
//
//        /* Config MAC and DMA */
//        ETH_MACDMAConfig(heth, err);
//
//        heth->State= HAL_ETH_STATE_READY;
//
//        /* Process Unlocked */
//        __HAL_UNLOCK(heth);
//
//        return HAL_TIMEOUT;
		  break;
      }

    } while (((phyreg & PHY_AUTONEGO_COMPLETE) != PHY_AUTONEGO_COMPLETE));
3.6、freertos.c
1.添加头文件 #include “use_lwip.H”
/* USER CODE BEGIN Includes */
#include "use_lwip.H"
/* USER CODE END Includes */
在StartDefaultTask函数添加一句use_lwip_process(); 即可。
void StartDefaultTask(void *argument)
{
  /* init code for LWIP */
  MX_LWIP_Init();
  /* USER CODE BEGIN StartDefaultTask */
  /* Infinite loop */
  for(;;)
  {
	  use_lwip_process();
    osDelay(1);
  }
  /* USER CODE END StartDefaultTask */
}


