C#实现Android自动打包工具
前言
从毕业到现在,做了整整3年Android开发,兜兜转转又回到了南京.哎…
今天主要记录下,来到新公司实现一个打包工具的过程,目前我们Android端的任务除了修改已经存在的bug和开发新的功能外,就是对于不同的买家输出对应的系统,说白了就是基于一套模板代码,要打成不同的APK,然后通过替换一些图片来达到样子长得不一样的目的,就这么简单,目前呢没有实现通过网络下载图片来实现,还是通过替换本地文件来进行输出的.所以一个打包工具就是必须的了.
正题
那么问题来了这个打包工具应该要具备什么功能呢?
- 要会查找UI文件,包括从本地查找和从SVN查找
- 从模板代码自动创建一个对应的Android工程
- 自动替换工程里面的图片文件
- 自动修改app.gradle文件(修改appid,baseurl等等)
- 自动打包成APK文件
- 自动加固应用
- 上传打包记录到数据库(包括应用名称,id等等)
- 自动安装到手机并且打开应用
OK!大体上的功能就是这些了,接下来具体说下利用C#语言怎么实现这些功能,首先上几个最终的效果图
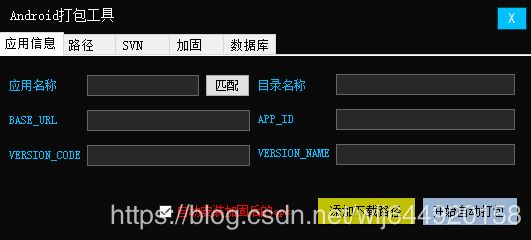
上图是每次打包都需要修改的配置

上图是配置一些路径信息

上图是配置SVN账号信息

上图是配置下加固的信息,当前使用的加固是360加固
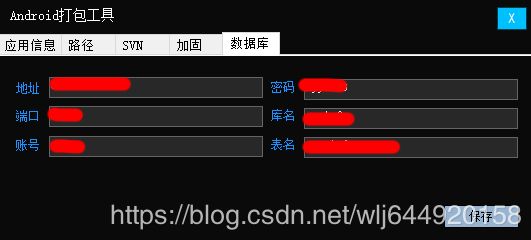
上图是配置数据库信息,用来保存打包记录

上图就是打包的过程截图
首先我们需要一个配置文件来保存,我们一些不怎么变动的打包信息,就可以保存在里面,这里我建了一个config.ini文件用来保存配置信息.
[app]
project_directory_name =
app_name =
base_url =
app_id =
version_code =
version_name =


[check]
is_install_jiagu_apk = false

[path]
ui_root_path =D:\UI
out_root_path =D:\OutService
model_path =D:\BtyProjects\MuYeHua

[svn]
svn_username =xxxx
svn_password =xxxx
svn_path =svn://xx.xx.xx.xx/

[jiagu]
jiagu_username =xxxxx
jiagu_password =xxxxxx
jiagu_path =D:\xxx\jiagu
jiagu_out_path =D:\OutApks

[db]
db_host =xx.xx.xx.xx
db_port =xx
db_user =xxx
db_pwd =xxxxx
db_name =xxx
db_table =xxxx
接下来我们针对上面提出的功能点一个个分析实现的过程:
1.查找本地和SVN上的UI文件
对于查找本地文件很简单UI的文件夹都是用项目名称来命名的只需要利用文件操作检查本地UI目录下是不是有指定的文件夹就行,
DirectoryInfo directoryInfo = new DirectoryInfo(config.ui_root_path);
                DirectoryInfo[] uis = directoryInfo.GetDirectories();
                foreach (DirectoryInfo info in uis)
                {
                    if (info.Name.Contains(config.app_name))
                    {
                        CheckAppColor(info.Name);
                        apendResultString("本地存在UI文件:" + info.Name + "    颜色值:" + app_color);
                        changeLogo();
                        return;
                    }
                }
那么对于SVN上的目录遍历我们就需要利用SVN工具来进行了,这里我们需要知道一点的是C#怎么调用其他应用程序并且截取标准输出
//同步模式调用其他程序,截取输出
        public List exec(string exePath, string parameters)
        {
            List list = new List();
            ProcessStartInfo psi = new ProcessStartInfo();
            psi.RedirectStandardOutput = true;
            psi.CreateNoWindow = true;
            psi.UseShellExecute = false;
            psi.FileName = exePath;
            psi.Arguments = parameters;
            Process process = Process.Start(psi);
            StreamReader outputStreamReader = process.StandardOutput;
            string line = outputStreamReader.ReadLine();//每次读取一行
            while (!outputStreamReader.EndOfStream)
            {
                apendResultString(line);
                list.Add(line);
                line = outputStreamReader.ReadLine();
            }
            process.WaitForExit();//等待程序执行完退出进程
            process.Close();//关闭进程
            outputStreamReader.Close();//关闭流
            return list;
        }
有了这个基础我们就好办了,先遍历SVN指定目录下的文件夹,判断是否有我们项目的UI文件
 List list = exec("svn", ls_svn_dir);

                    if (list.Count() > 0)
                    {
                        foreach (string path in list)
                        {
                            if (path.Contains(config.app_name))
                            {
                                ui_addr_on_svn = config.svn_path + svn_ui_dir + "/" + path;
                                CheckAppColor(ui_addr_on_svn);
                                apendResultString("SVN存在UI文件:" + ui_addr_on_svn + "    颜色值:" + app_color);
                                break;
                            }
                        }
                    }
如果SVN存在UI文件的情况下我们利用svn 的export命令进行下载(export和checkout的区别?)
//如果SVN存在UI就要开始下载了
                    apendResultString("######开始从SVN下载UI文件######");
                    string local_ui_path = config.ui_root_path + "\\" + config.app_name + app_color;
                    string projectPath = "export " + ui_addr_on_svn + " " + local_ui_path + " --username " + config.svn_username + " --password " + config.svn_password;
                    apendResultString(local_ui_path);
                    apendResultString(projectPath);

                    exec("svn", projectPath);
                    apendResultString("######UI文件下载完成!!!######");
UI文件的处理基本就是这样,然后接下来就是工程的创建,我们只需要从模板目录copy一份然后重新命名(命名规则工程名称+日期),这其中过滤掉.svn目和build目录就行了
final_project_name = config.project_directory_name + "_" + config.version_code + "_" + DateTime.Now.ToString("yyyy-MM-dd-hh-mm-ss");
            apendResultString("######开始创建Android工程" + final_project_name + "######");
            string desPath = config.out_root_path + "\\" + final_project_name;
            CopyDirectory(config.model_path, desPath);
工程创建成功之后我们就可以进行图片的替换了,
 foreach (string drawable in drawables_list)
                {
                    DirectoryInfo directory = new DirectoryInfo(config.ui_root_path + "\\" + config.app_name + app_color + "\\android\\" + drawable);
                    foreach (FileInfo f in directory.GetFiles())
                    {
                        if (f.Name.EndsWith(".png") || f.Name.EndsWith(".jpg") || f.Name.EndsWith(".jpeg"))
                        {
                            apendResultString("覆盖:" + f.Name);
                            f.CopyTo(config.out_root_path + "\\" + final_project_name + "\\" + res + "\\" + drawable + "\\" + f.Name, true);
                        }
                    }
                }
图片替换的过程中我们注意只替换图片文件就行了,接下来修改一下gradle文件一个新的Android项目就算完成了
string config_path = config.out_root_path + "\\" + final_project_name + "\\config\\config.gradle";
string colors_path = config.out_root_path + "\\" + final_project_name + "\\" + res + "\\values\\colors.xml";
string vcs_path = config.out_root_path + "\\" + final_project_name + "\\.idea\\vcs.xml";
string[] congig_lines = File.ReadAllLines(config_path);
for (int i = 0; i < congig_lines.Length; i++)
{
if (congig_lines[i].Contains("application_id"))
{
congig_lines[i] = " application_id : \"" + config.app_id + "\",";
continue;
}
if (congig_lines[i].Contains("key_storefile"))
{
congig_lines[i] = " key_storefile : \"" + config.model_path + "/myh.jks\",";
congig_lines[i] = congig_lines[i].Replace('\\', '/');
continue;
}
if (congig_lines[i].Contains("outFile_name"))
{
congig_lines[i] = " outFile_name : \"" + config.project_directory_name + "\",";
continue;
}
if (congig_lines[i].Contains("url"))
{
congig_lines[i] = " url : \"" + config.app_url + "\",";
continue;
}
if (congig_lines[i].Contains("appname"))
{
congig_lines[i] = " appname : \"" + config.app_name + "\"";
continue;
}
if (congig_lines[i].Contains("version_code"))
{
congig_lines[i] = " version_code : " + config.version_code + ",";
continue;
}
if (congig_lines[i].Contains("version_name"))
{
congig_lines[i] = " version_name : \"" + config.version_name + "\",";
continue;
}
}
File.WriteAllLines(config_path, congig_lines);
string[] colors_lines = File.ReadAllLines(colors_path);
for (int i = 0; i < colors_lines.Length; i++)
{
if (colors_lines[i].Contains("colorPrimary") && !colors_lines[i].Contains("Dark"))
{
colors_lines[i] = " #" + app_color + " ";
continue;
}
if (colors_lines[i].Contains("colorPrimaryDark"))
{
colors_lines[i] = " #" + app_color + " ";
continue;
}
if (colors_lines[i].Contains("colorAccent"))
{
colors_lines[i] = " #" + app_color + " ";
continue;
}
if (colors_lines[i].Contains("color_theme"))
{
colors_lines[i] = " #" + app_color + " ";
continue;
}
}
File.WriteAllLines(colors_path, colors_lines);
接下来就是最重要的一个步骤了,编译我们的工程生成APK文件,这里我是利用了控制台去执行的gradlew clean assembleLocalRelease然后截取的控制台的输出
string gradle_dir = config.out_root_path + "\\" + final_project_name + "\\";
            string cd_project_pan = gradle_dir.Substring(0, 2);
            string cd_project_directory = "cd " + gradle_dir;
            string buidl_project = "gradlew clean assembleLocalRelease";
            buidl_project = buidl_project.Trim().TrimEnd('&') + "&exit";//说明:不管命令是否成功均执行exit命令,否则当调用ReadToEnd()方法时,会处于假死状态
            using (Process p = new Process())
            {
                p.StartInfo.FileName = "cmd.exe";
                p.StartInfo.UseShellExecute = false;        //是否使用操作系统shell启动
                p.StartInfo.RedirectStandardInput = true;   //接受来自调用程序的输入信息
                p.StartInfo.RedirectStandardOutput = true;  //由调用程序获取输出信息
                p.StartInfo.CreateNoWindow = true;          //不显示程序窗口
                p.Start();//启动程序
                          //编译命令
                p.StandardInput.WriteLine(cd_project_pan);
                p.StandardInput.AutoFlush = true;
                p.StandardInput.WriteLine(cd_project_directory);
                p.StandardInput.AutoFlush = true;
                p.StandardInput.WriteLine(buidl_project);
                p.StandardInput.AutoFlush = true;
                StreamReader reader = p.StandardOutput;//截取输出流
                string line = reader.ReadLine();//每次读取一行
                apendResultString(line);
                while (!reader.EndOfStream)
                {
                    line = reader.ReadLine();
                    apendResultString(line);
                }
                p.WaitForExit();//等待程序执行完退出进程
                p.Close();
            }
编译成APK后我们记录下apk的路径然后同样的方式我们调用jiagu命令,这里需要注意的是360加固一般我们用的都是可视化的窗口工具,但是人性化的是他还提供了jar 的调用方式,这里我们依然使用控制台进行操作,注意导入签名信息就行了
//加固命令
            string cd_jiagu_pan = config.jiagu_path.Substring(0, 2);
            string cd_jiagu_directory = "cd " + config.jiagu_path;
            string login_jiagu = "java -jar jiagu.jar -login " + config.jiagu_username + " " + config.jiagu_password;
            string apk_release_directory = config.out_root_path + "\\" + final_project_name + "\\app\\build\\outputs\\apk\\local\\release";

            FileInfo[] apks = new DirectoryInfo(apk_release_directory).GetFiles();
            foreach (FileInfo apkInfo in apks)
            {
                if (apkInfo.Name.Contains(config.project_directory_name))
                {
                    final_apk_path = apkInfo.FullName;
                    break;
                }
            }
            string jiagu_project = "java -jar jiagu.jar -jiagu " + final_apk_path + " " + config.jiagu_out_path + "  -autosign";
            jiagu_project = jiagu_project.Trim().TrimEnd('&') + "&exit";//说明:不管命令是否成功均执行exit命令,否则当调用ReadToEnd()方法时,会处于假死状态
            using (Process p = new Process())
            {
                p.StartInfo.FileName = "cmd.exe";
                p.StartInfo.UseShellExecute = false;        //是否使用操作系统shell启动
                p.StartInfo.RedirectStandardInput = true;   //接受来自调用程序的输入信息
                p.StartInfo.RedirectStandardOutput = true;  //由调用程序获取输出信息
                p.StartInfo.CreateNoWindow = true;          //不显示程序窗口
                p.Start();
                //启动程序
                //编译命令
                p.StandardInput.WriteLine(cd_jiagu_pan);
                p.StandardInput.AutoFlush = true;
                p.StandardInput.WriteLine(cd_jiagu_directory);
                p.StandardInput.AutoFlush = true;
                p.StandardInput.WriteLine(jiagu_project);
                p.StandardInput.AutoFlush = true;
                //获取cmd窗口的输出信息
                StreamReader reader = p.StandardOutput;//截取输出流
                string line = reader.ReadLine();//每次读取一行
                apendResultString(line);
                while (!reader.EndOfStream)
                {
                    line = reader.ReadLine();
                    apendResultString(line);
                }
                p.WaitForExit();//等待程序执行完退出进程
                reader.Close();
                p.Close();
            }
等待加固完成了,我这里会吧打包的信息上传到数据库进行保存
// 数据库配置
            string connStr = "server=" + config.db_host + ";port=" + config.db_port + ";database=" + config.db_name + ";user=" + config.db_user + ";password=" + config.db_pwd + ";";
            MySqlConnection connection = null;
            bool exitsInDb = false;
            try
            {
                connection = new MySqlConnection(connStr);
                connection.Open();
                string selectByAppNameStr = "select * from " + config.db_table + " where app_name = '" + config.app_name + "'";
                MySqlCommand com = new MySqlCommand(selectByAppNameStr, connection);
                MySqlDataReader reader = com.ExecuteReader();
                while (reader.Read())
                {
                    string app_name_ = reader.GetString("app_name");
                    if (app_name_.Equals(config.app_name))
                    {
                        exitsInDb = true;
                    }
                }
                reader.Close();
                string updateStr;
                string date_string = DateTime.Now.ToString("yyyy-MM-dd HH:mm:ss");
                if (exitsInDb)
                {
                    updateStr = "update " + config.db_table + " set " +
                     "app_name = '" + config.app_name + "'," +
                     "app_file_name = '" + config.project_directory_name + "'," +
                     "app_url='" + config.app_url + "'," +
                     "app_version_code='" + config.version_code + "'," +
                     "app_version_name='" + config.version_name + "'," +
                     "update_date = '" + date_string + "'," +
                     "app_color = '" + app_color + "'," +
                     "user_name = '" + config.svn_username + "'" +
                     " where " +
                     "app_name = '" + config.app_name + "' " +
                     "or " +
                     "app_id = '" + config.app_id + "'";
                }
                else
                {
                    updateStr = "insert into " + config.db_table + " (app_name,app_file_name,app_url,app_version_code ,app_version_name ,app_id,create_date,update_date,app_color,user_name)" +
                              " values ('" + config.app_name + "','" + config.project_directory_name
                              + "','" + config.app_url + "','" + config.version_code + "','" + config.version_name
                              + "','" + config.app_id + "','" + date_string + "','" + date_string + "','" + app_color + "','" + config.svn_username + "')";
                }
                MySqlCommand updateCom = new MySqlCommand(updateStr, connection);
                updateCom.ExecuteNonQuery();

            }
OK,到这里基本上是所有的事情都做完了,但是这里为了方便测试,我会连接上手机进行安装和启动应用,这所有的操作都是依靠adb命令来完成的
 string install_com = "install -r " + final_apk_path;
            apendResultString("######开始安装应用,请确保USB连接######");
            exec("adb", install_com);
            apendResultString("######开始启动应用######");
            string start_com = "shell am start -n \"" + config.app_id + "/com.qfwl.lelexin.modules.other.view.activity.SplashActivity\" -a android.intent.action.MAIN -c android.intent.category.LAUNCHER";
            exec("adb", start_com);
            apendResultString("######应用已经启动######");
一个像模像样的打包工具就这么完成了!当然有人说了,如果是mac系统呢?这里为了mac也能顺利的打包成功,我们也同样谢了python的打包脚本.