移植GD32F450i USB CDC至GD32F407
移植成功后的代码链接:https://download.csdn.net/download/yellowmid2013/12095128
记录移植步骤:
1.网上下载了这么个东东(适用于F450i 的CDC程序):![]() ,解压进入目录GD32F4xx_Firmware_Library_V1.4\GD32F4xx_Firmware_Library_V1.4\Project\USB\GD32F450i\USB_Device\CDC_ACM\MDK-ARM;
,解压进入目录GD32F4xx_Firmware_Library_V1.4\GD32F4xx_Firmware_Library_V1.4\Project\USB\GD32F450i\USB_Device\CDC_ACM\MDK-ARM;
2.关键修改的地方如下:
a.我用的是keil5.26版本,所以 要改成
要改成 ,然后编译之类的问题自行解决,略过。
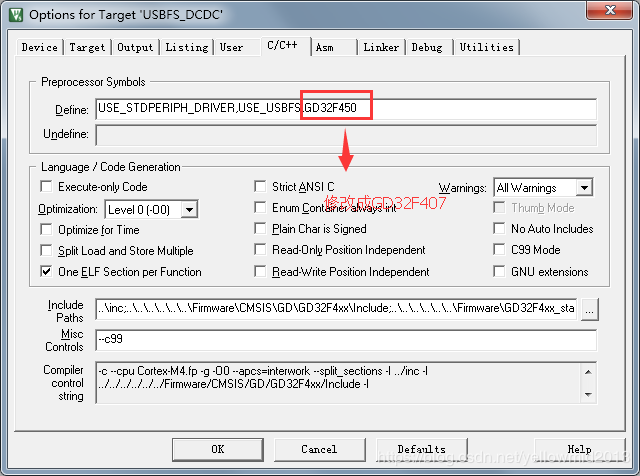
b.如果硬件用GPIO PA11,PA12来做USB device的D+ D- (用全速IP核),此处只需要把GD32F450修改成GD32F407,如下图然后跳到第3步;
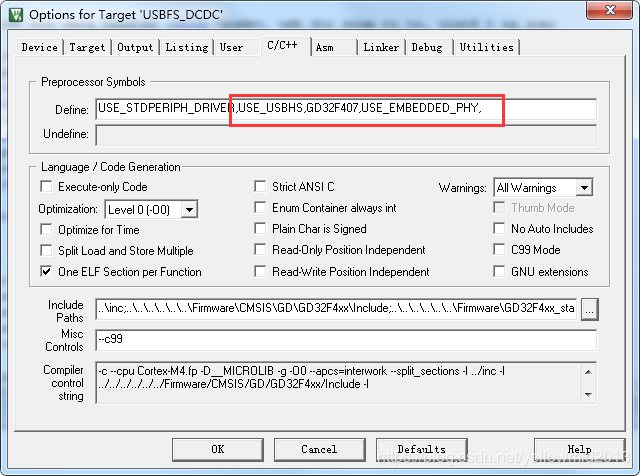
如果硬件用GPIO PB14, PB15来做USB device的D+ D- (高速IP核来当全速使),此处修改成USE_USBHS,GD32F407,USE_EMBEDDED_PHY,如下图所示
app.c 函数 usb_gpio_config添加gpio 初始化, 如下红色部分所示:
代码改成如下:
void usb_gpio_config(void)
{
rcu_periph_clock_enable(RCU_SYSCFG);
#ifdef USE_USBFS
rcu_periph_clock_enable(RCU_GPIOA);
/* USBFS_DM(PA11) and USBFS_DP(PA12) GPIO pin configuration */
gpio_mode_set(GPIOA, GPIO_MODE_AF, GPIO_PUPD_NONE, GPIO_PIN_11 | GPIO_PIN_12);
gpio_output_options_set(GPIOA, GPIO_OTYPE_PP, GPIO_OSPEED_200MHZ, GPIO_PIN_11 | GPIO_PIN_12);
gpio_af_set(GPIOA, GPIO_AF_10, GPIO_PIN_11 | GPIO_PIN_12);
#elif defined(USE_USBHS)
#ifdef USE_ULPI_PHY
rcu_periph_clock_enable(RCU_GPIOA);
rcu_periph_clock_enable(RCU_GPIOB);
rcu_periph_clock_enable(RCU_GPIOC);
rcu_periph_clock_enable(RCU_GPIOH);
rcu_periph_clock_enable(RCU_GPIOI);
/* ULPI_STP(PC0) GPIO pin configuration */
gpio_mode_set(GPIOC, GPIO_MODE_AF, GPIO_PUPD_NONE, GPIO_PIN_0);
gpio_output_options_set(GPIOC, GPIO_OTYPE_PP, GPIO_OSPEED_200MHZ, GPIO_PIN_0);
/* ULPI_CK(PA5) GPIO pin configuration */
gpio_mode_set(GPIOA, GPIO_MODE_AF, GPIO_PUPD_NONE, GPIO_PIN_5);
gpio_output_options_set(GPIOA, GPIO_OTYPE_PP, GPIO_OSPEED_200MHZ, GPIO_PIN_5);
/* ULPI_NXT(PH4) GPIO pin configuration */
gpio_mode_set(GPIOH, GPIO_MODE_AF, GPIO_PUPD_NONE, GPIO_PIN_4);
gpio_output_options_set(GPIOH, GPIO_OTYPE_PP, GPIO_OSPEED_200MHZ, GPIO_PIN_4);
/* ULPI_DIR(PI11) GPIO pin configuration */
gpio_mode_set(GPIOI, GPIO_MODE_AF, GPIO_PUPD_NONE, GPIO_PIN_11);
gpio_output_options_set(GPIOI, GPIO_OTYPE_PP, GPIO_OSPEED_200MHZ, GPIO_PIN_11);
/* ULPI_D1(PB0), ULPI_D2(PB1), ULPI_D3(PB10), ULPI_D4(PB11) \
ULPI_D5(PB12), ULPI_D6(PB13) and ULPI_D7(PB5) GPIO pin configuration */
gpio_mode_set(GPIOB, GPIO_MODE_AF, GPIO_PUPD_NONE, \
GPIO_PIN_5 | GPIO_PIN_13 | GPIO_PIN_12 |\
GPIO_PIN_11 | GPIO_PIN_10 | GPIO_PIN_1 | GPIO_PIN_0);
gpio_output_options_set(GPIOB, GPIO_OTYPE_PP, GPIO_OSPEED_200MHZ, \
GPIO_PIN_5 | GPIO_PIN_13 | GPIO_PIN_12 |\
GPIO_PIN_11 | GPIO_PIN_10 | GPIO_PIN_1 | GPIO_PIN_0);
/* ULPI_D0(PA3) GPIO pin configuration */
gpio_mode_set(GPIOA, GPIO_MODE_AF, GPIO_PUPD_NONE, GPIO_PIN_3);
gpio_output_options_set(GPIOA, GPIO_OTYPE_PP, GPIO_OSPEED_200MHZ, GPIO_PIN_3);
gpio_af_set(GPIOC, GPIO_AF_10, GPIO_PIN_0);
gpio_af_set(GPIOH, GPIO_AF_10, GPIO_PIN_4);
gpio_af_set(GPIOI, GPIO_AF_10, GPIO_PIN_11);
gpio_af_set(GPIOA, GPIO_AF_10, GPIO_PIN_5 | GPIO_PIN_3);
gpio_af_set(GPIOB, GPIO_AF_10, GPIO_PIN_5 | GPIO_PIN_13 | GPIO_PIN_12 |\
GPIO_PIN_11 | GPIO_PIN_10 | GPIO_PIN_1 | GPIO_PIN_0);
#else
rcu_periph_clock_enable(RCU_GPIOB);
/* USBFS_DM(PA11) and USBFS_DP(PA12) GPIO pin configuration */
gpio_mode_set(GPIOB, GPIO_MODE_AF, GPIO_PUPD_NONE, GPIO_PIN_14 | GPIO_PIN_15);
gpio_output_options_set(GPIOB, GPIO_OTYPE_PP, GPIO_OSPEED_200MHZ, GPIO_PIN_14 | GPIO_PIN_15);
gpio_af_set(GPIOB, GPIO_AF_10, GPIO_PIN_14 | GPIO_PIN_15);
#endif /* USE_ULPI_PHY */
#endif /* USE_USBFS */
}
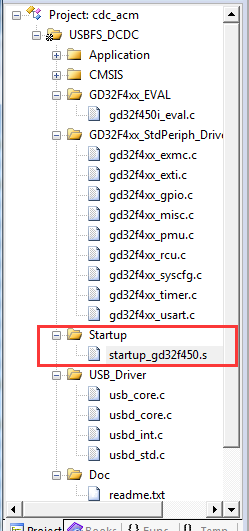
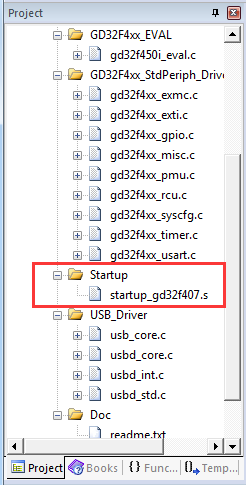
3.替换起启文件,把keil里的startup_gd32f450.s把成startup_gd32f407.s,具体比较简单略过
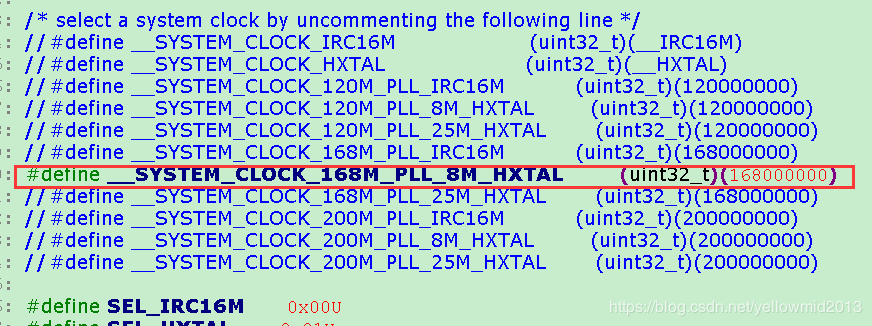
4.修改system_gd32f4xx.c,配置时钟。系统时钟改成168MHz,从而确保USB时间为48MHz,否则USB枚举不成功;
5.枚举成功后,装上GD官网USB驱动,有可能识别不了。因为PID不匹配,需要修改代码里的PID
把PID由0x018A改为0x018B,如下图
到此可以正常通讯
遗憾:
a.速率太慢;
b.64字节的整数倍未能正常发送,有哪位大神搞定请不吝赐教;
