基于netty实现websocket高并发服务
1.WebScoket简述
WebSocket是一种在单个TCP连接上进行全双工通信的协议。
WebSocket使得客户端和服务器之间的数据交换变得更加简单,允许服务端主动向客户端推送数据。在WebSocket API中,浏览器和服务器只需要完成一次握手,两者之间就直接可以创建持久性的连接,并进行双向数据传输。
websocket协议本身是构建在http协议之上的升级协议,客户端首先向服务器端去建立连接,这个连接本身就是http协议只是在头信息中包含了一些websocket协议的相关信息,一旦http连接建立之后,服务器端读到这些websocket协议的相关信息就将此协议升级成websocket协议。websocket协议也可以应用在非浏览器应用,只需要引入相关的websocket库就可以了.
Websocket使用ws或wss的统一资源标志符,类似于HTTPS,其中wss表示在TLS之上的Websocket.
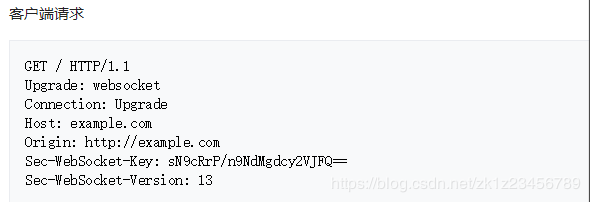
对于nginx配置,握手升级过程如下图所示:
connection必须设置成Upgrade,表示客户端希望连接升级.
Upgrade字段必须设置为websocket,表示希望升级到websocket协议.
2.利用spring-websocket实现聊天室
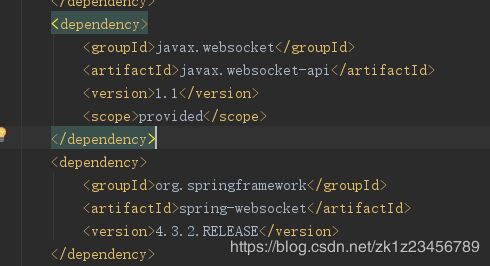
引入依赖jar包:
spring-websocket详细文档说明详见官方文档:
https://docs.spring.io/spring/docs/5.0.0.BUILD-SNAPSHOT/spring-framework-reference/html/websocket.html
接下来直接上代码解释其实现方式:
将需要处理的handler添加到注册中心,配置websocket入口,允许访问的域、注册Handler、SockJs支持和拦截器,当有websocket连接进来以后,就交给我们实现的handler去执行业务逻辑.
在这里我们也兼容了对SockJs的支持,WebSocket是一个相对比较新的规范,在Web浏览器和应用服务器上没有得到一致的支持。所以我们需要一种WebSocket的备选方案。
而这恰恰是SockJS所擅长的。SockJS是WebSocket技术的一种模拟,在表面上,它尽可能对应WebSocket API,但是在底层非常智能。如果WebSocket技术不可用的话,就会选择另外的通信方式。
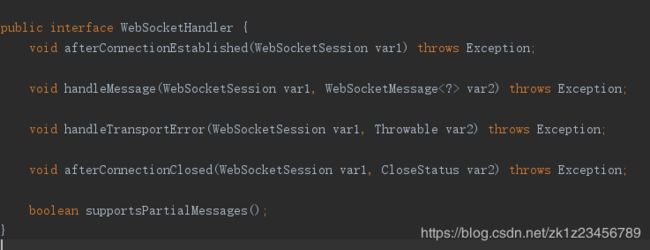
要实现自己的处理逻辑就需要实现WebSocketHandler这个接口,这个接口里面有5个方法,如下图:
afterConnectionEstablished:连接成功
handleMessage:消息处理
handleTransportError:异常
afterConnectionClosed:连接关闭
我们也可以通过握手拦截器中的before或者after方法去设置一些属性值,或者做一下其他的业务操作等等.
业务代码做到这里,然后nginx配置做好处理,我们整个的websocket服务基本已经搭建完成,就可以提供对外的服务了,这里我们使用spring-websoket+nginx+tomcat就简单的实现了我们的基本任务需求了,基于此架构的我们就简要的说到这里.
3.基于netty实现
3.0 netty简介
Netty是什么?
由JBOSS提供的基于Java NIO的开源框架,Netty提供异步非阻塞、事件驱动、高性能、高可靠、高可定制性的网络应用程序和工具,可用于开发服务端和客户端。
简单说一下BIO和NIO的区别
BIO主要存在以下缺点:
1.从线程模型图中可以看到,一连接一线程,由于线程数是有限的,所以这样的模型是非常消耗资源的,
最终也导致它不能承受高并发连接的需求
2.性能低,因为频繁的进行上下文切换,导致CUP利用率低
3.可靠性差,由于所有的IO操作都是同步的,即使是业务线程也如此,所以业务线程的IO操作也有可能被阻塞.
1.NIO采用了Reactor线程模型,一个Reactor聚合了一个多路复用器Selector,它可以同时注册、监听和轮询
成百上千个Channel,这样一个IO线程可以同时处理很多个客户端连接,线程模型优化为1:N(N<最大句柄、数),
或M:N(M通常为CUP核数+1)
2.避免了IO线程频繁的上下文切换,提升了CUP的效率
3.所有的IO操作都是异步的,所以业务线程的IO操作就不用担心阻塞,系统降低了对网络的实时情况和外部组件
的处理能力的依赖.
为什么要使用netty框架呢?
使用JDK原生NIO的不足之处
1.NIO的类库和API相当复杂,使用它来开发,需要非常熟练地掌握Selector、ByteBuffer、ServerSocketChannel、SocketChannel等
2.需要很多额外的编程技能来辅助使用NIO,例如,因为NIO涉及了Reactor线程模型,所以必须必须对多线程和网络编程非常熟悉才能写出高质量的NIO程序
3.想要有高可靠性,工作量和难度都非常的大,因为服务端需要面临客户端频繁的接入和断开、网络闪断、半包读写、失败缓存、网络阻塞的问题,这些将严重影响我们的可靠性,而使用原生NIO解决它们的难度相当大。
4.JDK NIO中著名的BUG--epoll空轮询,当select返回0时,会导致Selector空轮询而导致CUP100%,官方表示JDK1.6之后修复了这个问题,其实只是发生的概率降低了,没有根本上解决。
那么为什么要用Netty呢?
1.API使用简单,更容易上手,开发门槛低
2.功能强大,预置了多种编解码功能,支持多种主流协议
3.定制能力高,可以通过ChannelHandler对通信框架进行灵活地拓展
4.高性能,与目前多种NIO主流框架相比,Netty综合性能最高
5.高稳定性,解决了JDK NIO的BUG
6.经历了大规模的商业应用考验,质量和可靠性都有很好的验证
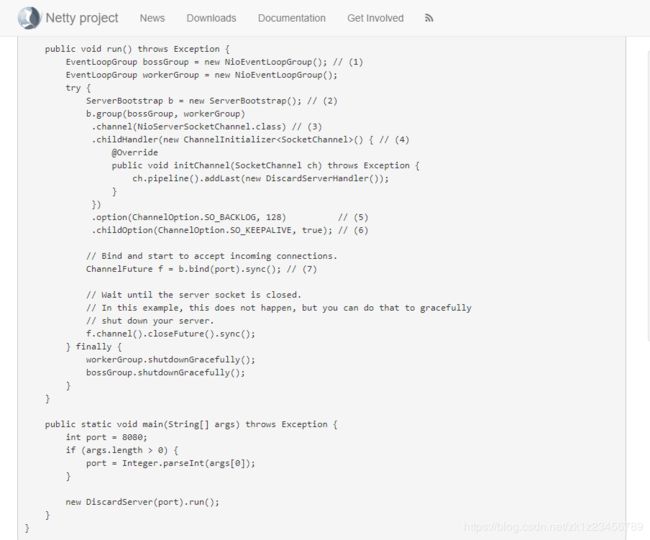
这是一个摘自于netty官方的服务启动的demo,我们先说一下启动的流程,然后我们再详细的说一下具体的具体的参数说明.
-
创建boss和work线程组,bossGroup负责接收客户端的链接,workerGroup负责工作线程(IO操作,任务操作等等)
-
ServerBootstrap是一个辅助启动NIO服务的类
-
设置服务端的channel类型,这里我们使用的nio的,所以是NioSserverSocketChannel
-
设置childHandler,具体需要执行的处理器,这是一个实现ChannelInitializer抽象类的内部类,这个可以帮助使用新建一些自己的handler,处理自己的网络程序,这个抽象类里面有一个initChannel方法,在websocket链接进来的时候,就会初始化调用这个参数.
-
设置tcp的一些标准参数,例如KEEP_ALIVE,这是开启心跳机制的,当客户端服务端建立链接处于ESTABLISHED状态,超过2个小时未交流,机制就会被启动,等等一些tcp参数.
-
绑定端口,启动服务
下面我们对启动流程中的个别做一下简要的说明和分析:
3.1 EventLoopGroup
3.1.1 EventLoopGroup,在这里new了2个
EventLoopGroup bossGroup = new NioEventLoopGroup();
EventLoopGroup workerGroup = new NioEventLoopGroup();
一个作为boss线程组,负责客户端接收,一个负责工作线程的工作(与客户端的IO操作和任务操作等等).
private static final int DEFAULT_EVENT_LOOP_THREADS = Math.max(1, SystemPropertyUtil.getInt("io.netty.eventLoopThreads", NettyRuntime.availableProcessors() * 2));

protected MultithreadEventLoopGroup(int nThreads, Executor executor, Object... args) {
  super(nThreads == 0 ? DEFAULT_EVENT_LOOP_THREADS : nThreads, executor, args);
}
我们创建的时候,并未设置要创建的group数量,默认是当前cpu核数的2倍.
为什么需要创建2个EventLoopGroup呢?我们就需要提一个Reactor模型了,netty是基于Reactor模型实现的.
3.2 Reactor模型之:
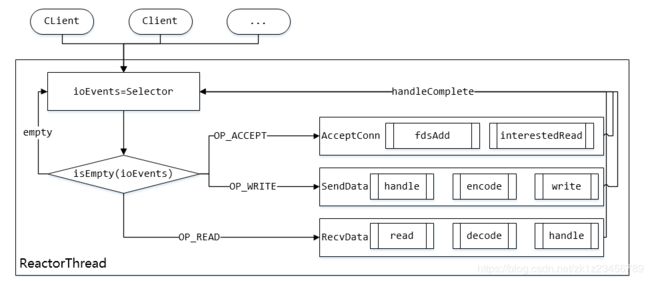
理论上一个NIO线程,既能够接收客户端的链接,同时也能够处理IO操作以及其他任务操作等等,但是一个线程对cpu利用率不高,并且,一旦有大量的请求连接,性能上势必会下降,甚至无法响应的情况.
3.2.2.多线程模型
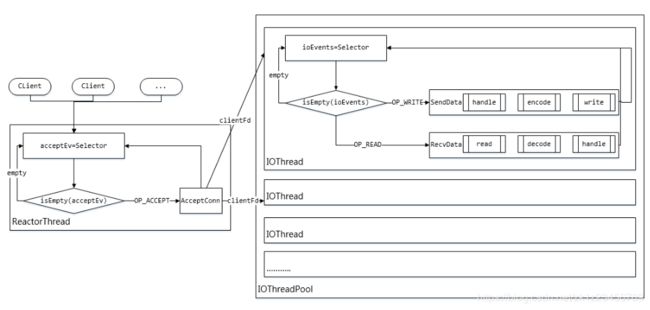
1个线程负责专门接收客户端的链接,另一组线程负责处理IO操作或者其他的任务操作.虽然如此,但理论上来说依然有一个地方是单点的;那就是处理客户端连接的线程。
因为大多数服务端应用或多或少在连接时都会处理一些业务,如鉴权之类的,当连接的客户端越来越多时这一个线程依然会存在性能问题。
3.2.3:主从模式
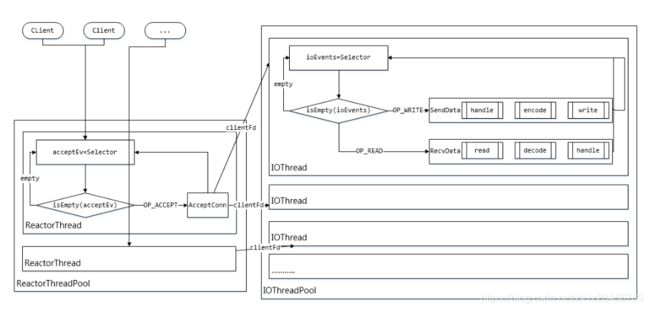
一个NIO线程池处理链接监听,一个线程池处理IO操作,并且在netty官方中,墙裂推荐使用这种线程模型.
虽然我们当前项目booGroup使用了线程组,但是实际中还是用的单线程的,具体原因在bind的时候再详述.
3.2 bind过程
private ChannelFuture doBind(final SocketAddress localAddress) {
        final ChannelFuture regFuture = this.initAndRegister();
        final Channel channel = regFuture.channel();
        //省略以下代码
    }
在调用bind的时候会调用到AbstractBootstrap中的doBind()方法,上面就是代码的简写,继续跟踪代码,在调用完这个以后,接下来就会打开一个socket,就像我们之前使用ServerSocket一样,打开socket,等待客户端的链接
Class NioServerSocketChannel

private static java.nio.channels.ServerSocketChannel newSocket(SelectorProvider provider) {
        try {
            return provider.openServerSocketChannel();
        } catch (IOException var2) {
            throw new ChannelException("Failed to open a server socket.", var2);
        }
    }
接下来就是accept操作,netty是事件驱动的,在当前channel上设置accept事件
public NioServerSocketChannel(java.nio.channels.ServerSocketChannel channel) {
        super((Channel)null, channel, 16);
        //16 就是代表着accept事件
        this.config = new NioServerSocketChannel.NioServerSocketChannelConfig(this, this.javaChannel().socket());
    }
接着就是初始化Pipeline(暂时不说),以及netty底层的io操作对象Unsafe.
    final ChannelFuture initAndRegister() {
        Channel channel = null;

        try {
            channel = this.channelFactory.newChannel();
            this.init(channel);
        } catch (Throwable var3) {
            //省略
            }
        }

        ChannelFuture regFuture = this.config().group().register(channel);
        //省略

        return regFuture;
    }
创建完这些以后,继续进行初始化和注册的流程,创建完channel之后有一个this.init的方法,点进去之后就是一些tcp参数的初始化,以及一些AttributeKey的属性值设置.
p.addLast(new ChannelHandler[]{new ChannelInitializer() {
            public void initChannel(final Channel ch) throws Exception {
                final ChannelPipeline pipeline = ch.pipeline();
                ChannelHandler handler = ServerBootstrap.this.config.handler();
                if (handler != null) {
                    pipeline.addLast(new ChannelHandler[]{handler});
                }

                ch.eventLoop().execute(new Runnable() {
                    public void run() {
                        pipeline.addLast(new ChannelHandler[]{new ServerBootstrap.ServerBootstrapAcceptor(ch, currentChildGroup, currentChildHandler, currentChildOptions, currentChildAttrs)});
                    }
                });
            }
        }});
这里会把ServerBootstrapAcceptor对象放到当前channel的处理链中,同时还把workerGroup作为构造函数的参数放入其中,这里的作用咱们下面再具体分析.
继续调用initAndRegister方法,进入这个方法我们就看到一个newChannel的方法,点进去就会看到是通过反射生成服务端的channel对象的,此处的this.config().group()获取到的EventLoopGroup就是设置的bossGroup线程组,但奇怪的是,当前项目启动就只使用了一个线程,并没有使用线程组的概念,是因为我们只启动了一个ServerBootStrap启动类,线程组的概念使用于同时启动多个ServerBootStrap.
继续跟踪代码
MultithreadEventLoopGroup

public ChannelFuture register(Channel channel) {
        return this.next().register(channel);
    }
会调用MultithreadEventLoopGroup的register方法
SingleThreadEventLoop

public ChannelFuture register(ChannelPromise promise) {
        ObjectUtil.checkNotNull(promise, "promise");
        promise.channel().unsafe().register(this, promise);
        return promise;
    }
接着就会调用AbstractChannel的register0方法,如下
private void register0(ChannelPromise promise) {
            try {
                boolean firstRegistration = this.neverRegistered;
                AbstractChannel.this.doRegister();
                this.neverRegistered = false;
                AbstractChannel.this.registered = true;
                AbstractChannel.this.pipeline.invokeHandlerAddedIfNeeded();
                this.safeSetSuccess(promise);
                AbstractChannel.this.pipeline.fireChannelRegistered();
                //省略

        }
执行完里面的doResgister方法之后,下面的就是触发一个时间,顺着pipeline链执行.
接下来我们继续看doRegister方法,最终会执行AbstractNioChannel里面的doRgister方法
protected void doRegister() throws Exception {
        boolean selected = false;

        while(true) {
            try {
                this.selectionKey = this.javaChannel().register(this.eventLoop().unwrappedSelector(), 0, this);
                return;
            } catch (CancelledKeyException var3) {
                //省略
            }
        }
    }
这里呢,生成一个selecttionKey就结束了.
3.3 Selector选择器
我们就接着netty服务启动流程最后一步来继续解释其含义.
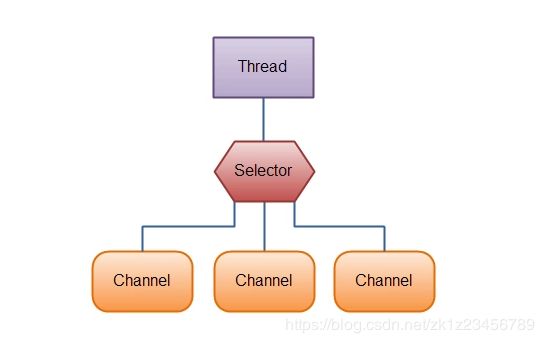
Selector 允许一个单一的线程来操作多个 Channel. 如果我们的应用程序中使用了多个 Channel, 那么使用 Selector 很方便的实现这样的目的, 但是因为在一个线程中使用了多个 Channel, 因此也会造成了每个 Channel 传输效率的降低.
使用 Selector 的图解如下:
为了使用 Selector, 我们首先需要将 Channel 注册到 Selector 中, 随后调用 Selector 的 select()方法, 这个方法会阻塞, 直到注册在 Selector 中的 Channel 发送可读写事件. 当这个方法返回后, 当前的这个线程就可以处理 Channel 的事件了.
NioEventLoop(NioEventLoopGroup parent, Executor executor, SelectorProvider selectorProvider, SelectStrategy strategy, RejectedExecutionHandler rejectedExecutionHandler) {
        super(parent, executor, false, DEFAULT_MAX_PENDING_TASKS, rejectedExecutionHandler);
        if (selectorProvider == null) {
            throw new NullPointerException("selectorProvider");
        } else if (strategy == null) {
            throw new NullPointerException("selectStrategy");
        } else {
            this.provider = selectorProvider;
            NioEventLoop.SelectorTuple selectorTuple = this.openSelector();
            this.selector = selectorTuple.selector;
            this.unwrappedSelector = selectorTuple.unwrappedSelector;
            this.selectStrategy = strategy;
        }
    }
在初始化NioEventLoopGroup的时候,初始化了一个selector选择器,在有channel进来的时候,注册到这个selector上面来.在注册完成以后生成一个SelectionKey,这个key是什么呢?
SelectionKey包含如下内容:
-
interest set, 即我们感兴趣的事件集, 即在调用 register 注册 channel 时所设置的 interest set.
-
ready set
-
channel
-
selector
-
attached object, 可选的附加对象
Selector大致流程如下:
1. 通过 Selector.open() 打开一个 Selector.
2.将 Channel 注册到 Selector 中, 并设置需要监听的事件(interest set)
3.不断重复:
1.调用 select() 方法
2.调用 selector.selectedKeys() 获取 selected keys
3.迭代每个 selected key:
4.从 selected key 中获取 对应的 Channel 和附加信息(如果有的话)
判断是哪些 IO 事件已经就绪了, 然后处理它们. 如果是 OP_ACCEPT 事件, 获取 SocketChannel, 并将它设置为 非阻塞的, 然后将这个 Channel 注册到 Selector 中.
接下来我们进入到源码里面观察selector的操作流程
protected void run() {
        while(true) {
            while(true) {
                //省略
        }
    }
这里是2个死循环,一直校验是否有新的客户端链接或者新的任务是否需要执行.
而这个run的启动是在SingleThreadEventExecutor中的execute方法中开启的线程.
switch(this.selectStrategy.calculateStrategy(this.selectNowSupplier, this.hasTasks())) {
                    case -2:
                        continue;
                    case -1:
                        this.select(this.wakenUp.getAndSet(false));
                        if (this.wakenUp.get()) {
                            this.selector.wakeup();
}SingleThreadEventExecutor类里面维护了一个队列private final Queue taskQueue; 这是一个任务队列,是在上面的这个类里面执行的execute的方法,把需要执行的task添加到队列里面去,以备在selector选择的时候从队列里面取出来执行,每一个task都是事先Runnable接口的,都是一个单独的线程.
public void execute(Runnable task) {
        if (task == null) {
            throw new NullPointerException("task");
        } else {
            boolean inEventLoop = this.inEventLoop();
            if (inEventLoop) {
                this.addTask(task);
            } else {
                this.startThread();
                this.addTask(task);
                if (this.isShutdown() && this.removeTask(task)) {
                    reject();
                }
            }

        }
    }
switch(this.selectStrategy.calculateStrategy(this.selectNowSupplier, this.hasTasks())) {
case -2:
continue;
case -1:
this.select(this.wakenUp.getAndSet(false));
if (this.wakenUp.get()) {
this.selector.wakeup();
}先判断任务队列里面是否有任务,如果没有任务,则调用select阻塞,等待IO事件就绪.
default:
                        this.cancelledKeys = 0;
                        this.needsToSelectAgain = false;
                        int ioRatio = this.ioRatio;
                        if (ioRatio == 100) {
                            try {
                                this.processSelectedKeys();
                            } finally {
                                this.runAllTasks();
                            }
                        } else {
                            long ioStartTime = System.nanoTime();
                            boolean var13 = false;

                            try {
                                var13 = true;
                                this.processSelectedKeys();
                                var13 = false;
                            } finally {
                                if (var13) {
                                    long ioTime = System.nanoTime() - ioStartTime;
                                    this.runAllTasks(ioTime * (long)(100 - ioRatio) / (long)ioRatio);
                                }
                            }

                            long ioTime = System.nanoTime() - ioStartTime;
                            this.runAllTasks(ioTime * (long)(100 - ioRatio) / (long)ioRatio);
                        }
这段代码里面出现了一个ioRation的变量,它表示的是此线程分配给 IO 操作所占的时间比(即运行 processSelectedKeys 耗时在整个循环中所占用的时间),假如总共是100,IO操作占用70,那么task的操作就只能占用30,从上面的代码中也可以看到,如果这个变量值不是100,就会计算io操作消耗的时间,然后计算剩余的时间去执行task任务.如果ioRation占用100,也就是说占用满了,就直接执行processSelectedKeys方法和runAllTasks()方法.
接下来就是Selector选择器重要的部分了
private void processSelectedKeys() {
        if (this.selectedKeys != null) {
            this.processSelectedKeysOptimized();
        } else {
            this.processSelectedKeysPlain(this.selector.selectedKeys());
        }

    }
调用processSelectKeys方法,这里判断了一个是否存在selectedKeys,正常情况下这个值不等于空的,并且上下两个方法没有多大的差别的.
private void processSelectedKeysOptimized() {
        for(int i = 0; i < this.selectedKeys.size; ++i) {
            SelectionKey k = this.selectedKeys.keys[i];
            this.selectedKeys.keys[i] = null;
            Object a = k.attachment();
            if (a instanceof AbstractNioChannel) {
                this.processSelectedKey(k, (AbstractNioChannel)a);
            } else {
                NioTask task = (NioTask)a;
                processSelectedKey(k, task);
            }

            if (this.needsToSelectAgain) {
                this.selectedKeys.reset(i + 1);
                this.selectAgain();
                i = -1;
            }
        }

    }
接着调用上面的方法,我们可以看到是从selectKeys中循环获取到的,上面SelectionKey也说到了,包含的具体的内容,这里我们取出来的是attachment的附加信息,那么这个附加信息是什么呢?
在channel注册过程中,我们跟踪一下代码可以看到,附加的就是NioChannel对象,这里我们暂时不说明.
private void processSelectedKey(SelectionKey k, AbstractNioChannel ch) {
        NioUnsafe unsafe = ch.unsafe();
        if (!k.isValid()) {
            //省略
        } else {
            try {
                int readyOps = k.readyOps();
                if ((readyOps & 8) != 0) {
                    int ops = k.interestOps();
                    ops &= -9;
                    k.interestOps(ops);
                    unsafe.finishConnect();
                }

                if ((readyOps & 4) != 0) {
                    ch.unsafe().forceFlush();
                }

                if ((readyOps & 17) != 0 || readyOps == 0) {
                    unsafe.read();
                }
            } catch (CancelledKeyException var7) {
                unsafe.close(unsafe.voidPromise());
            }

        }
    }
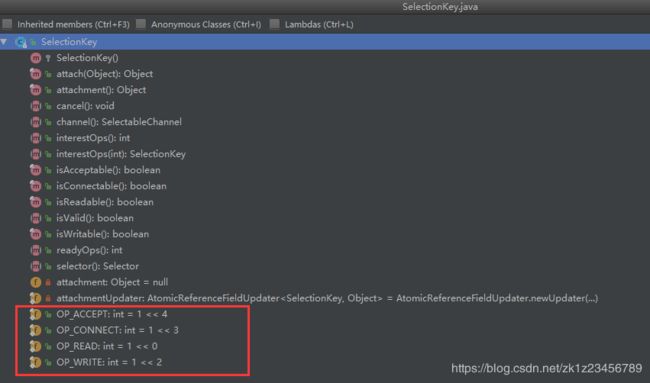
这里就是真正开始执行业务逻辑的地方了,SelectionKey中也定义了4中事件,如上图所示.
在processSelectedKey方法中,首先从selectionKey中获取ready set,根据具体数值判断就绪的是什么事件,=16就是accept事件,=1就是read,=4就是write,=8就是connect.
ChannelConfig config = AbstractNioMessageChannel.this.config();
            ChannelPipeline pipeline = AbstractNioMessageChannel.this.pipeline();
            Handle allocHandle = AbstractNioMessageChannel.this.unsafe().recvBufAllocHandle();
            allocHandle.reset(config);
            boolean closed = false;
            Throwable exception = null;

            try {

                        allocHandle.incMessagesRead(localRead);
                    } while(allocHandle.continueReading());
                } catch (Throwable var11) {
                    exception = var11;
                }

                localRead = this.readBuf.size();

                for(int i = 0; i < localRead; ++i) {
                    AbstractNioMessageChannel.this.readPending = false;
                    pipeline.fireChannelRead(this.readBuf.get(i));
                }

                this.readBuf.clear();
                allocHandle.readComplete();
                pipeline.fireChannelReadComplete();
分配 ByteBuf,从 SocketChannel 中读取数据,调用 pipeline.fireChannelRead 发送一个 inbound 事件.
接下来我们分析一下当websocket链接进来以后的流程操作
protected int doReadMessages(List这里就是接受accept的地方,并且生成一个socketchannel,接下来就是初始化unsafe和pipeline,然后把channel注册到selector中.
看下这个链接的操作是如何绑定到工作线程组的
public void channelRead(ChannelHandlerContext ctx, Object msg) {
            final Channel child = (Channel)msg;
            child.pipeline().addLast(new ChannelHandler[]{this.childHandler});
            AbstractBootstrap.setChannelOptions(child, this.childOptions, ServerBootstrap.logger);
            Entry[] var4 = this.childAttrs;
            int var5 = var4.length;

            for(int var6 = 0; var6 < var5; ++var6) {
                Entry, Object> e = var4[var6];
                child.attr((AttributeKey)e.getKey()).set(e.getValue());
            }

            try {
                this.childGroup.register(child).addListener(new ChannelFutureListener() {
                    public void operationComplete(ChannelFuture future) throws Exception {
                        if (!future.isSuccess()) {
                            ServerBootstrap.ServerBootstrapAcceptor.forceClose(child, future.cause());
                        }

                    }
                });
            } catch (Throwable var8) {
                forceClose(child, var8);
            }

        }
这个是ServerBootStrap中的channel read方法,首先把相关的handler设置进去,接下里的this.childGroup就是在启动的时候初始化进去的workerGroup,这里就把工作线程组和IO操作关联起来了,接下来的操作就是注册到selector中,上面已经描述过了.
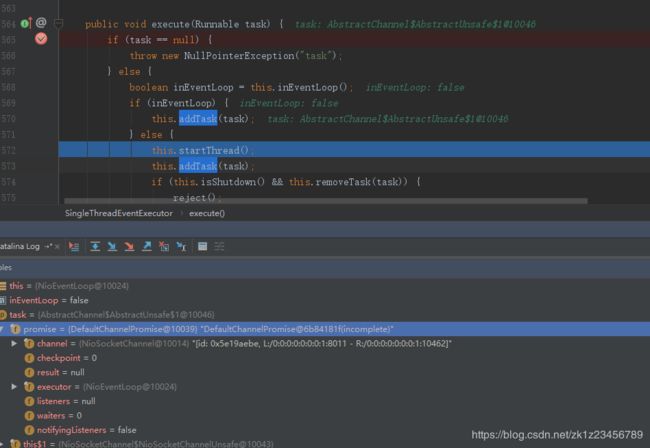
这是客户端链接建立以后注册到selector时,set的附加信息就是NioSocketChannel,正好对应NioEventLoop的run的执行方法选择.
从上图我们可以看到当我们建立链接以后,就会把这个channel关联的io操作放到task任务里面.
看完IO操作相关的以后,我们再看下EventLoop中的runAllTasks方法,这个就是执行任务队列里面的待执行的任务列表
protected boolean runAllTasks() {
        boolean ranAtLeastOne = false;
        boolean fetchedAll;
        do {
            fetchedAll = this.fetchFromScheduledTaskQueue();
            if (this.runAllTasksFrom(this.taskQueue)) {
                ranAtLeastOne = true;
            }
        } while(!fetchedAll);

        this.afterRunningAllTasks();
        return ranAtLeastOne;
    }
fetchFromScheduledTaskQueue这个方法呢就是取出所有到了特定执行时间的Schedule的task任务,放到task队列里面,等待被取出执行.
3.4 ChannelHandler
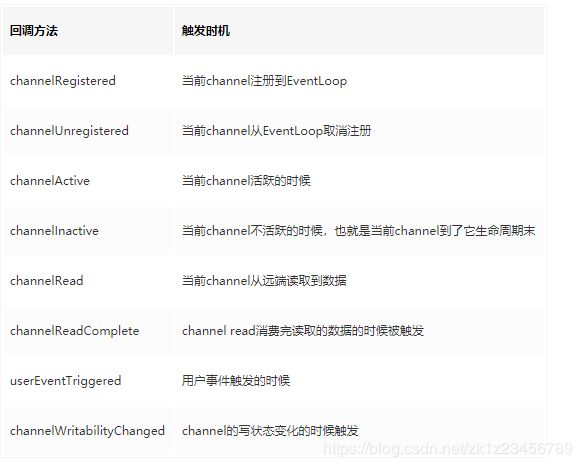
如果我们要实现自己的业务处理逻辑,就需要实现这个接口,当然了,我们不能直接实现它,而是实ChannelInboundHandlerAdapter这个适配器类,在ChannelHandler上层还有一个继承了它的接口ChannelInboundHandler,事件方法如下图: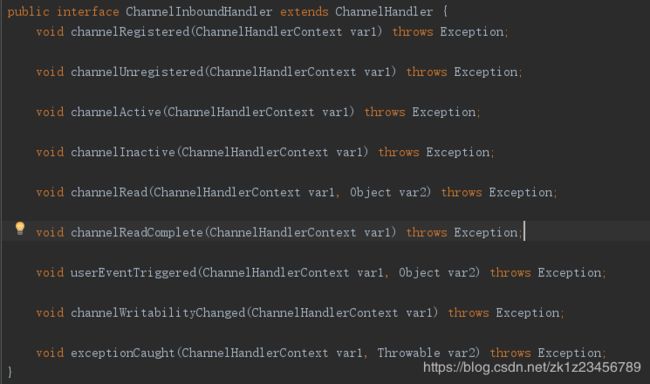
对应的解释:
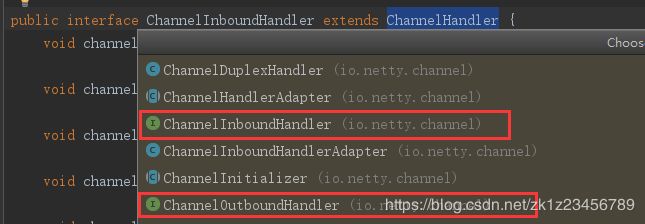
在ChannelHandler的上层继承接口中有这么2个接口,如下图
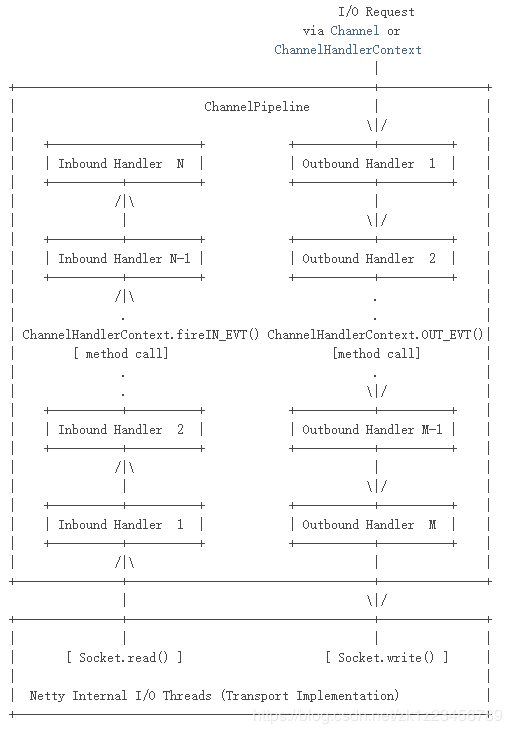
InboundHandler和OutboundHandler,下图是展示在pipeline中的事件流动方向:
Inbound是按照放到pipeline的从上往下的方向流动,outBound则是相反,inbound就像是数据的读取如read readComplete,而outbound就像是写出操作,如write flush.
那么什么是pipeline呢?
ChannelPipeline实际上应该叫做ChannelHandlerPipeline,可以把ChannelPipeline看成是一个ChandlerHandler的链表,当需要对Channel进行某种处理的时候,Pipeline负责依次调用每一个Handler进行处理。每个Channel都有一个属于自己的Pipeline,调用Channel#pipeline()方法可以获得Channel的Pipeline,调用Pipeline#channel()方法可以获得Pipeline的Channel。
Pipeline是什么时候初始化的呢?
protected AbstractChannel(Channel parent) {
        this.parent = parent;
        this.id = this.newId();
        this.unsafe = this.newUnsafe();
        this.pipeline = this.newChannelPipeline();
    }
在AbstractChannel的构造函数中初始化pipeline的,沿着new方法继续往下查询,
protected DefaultChannelPipeline(Channel channel) {
        this.channel = (Channel)ObjectUtil.checkNotNull(channel, "channel");
        this.succeededFuture = new SucceededChannelFuture(channel, (EventExecutor)null);
        this.voidPromise = new VoidChannelPromise(channel, true);
        this.tail = new DefaultChannelPipeline.TailContext(this);
        this.head = new DefaultChannelPipeline.HeadContext(this);
        this.head.next = this.tail;
        this.tail.prev = this.head;
    }
就到了DefaultChannelPipeline的构造方法,pipeline维护着add进去的所有handler,从上面我们可以看到有head和tail这2个变量,这两个就是pipeline链表的头和尾,默认初始化的,结构如下图所示:
在引导启动的时候我们看到了一个方法
.childHandler(new WebsocketChatServerInitializer())这里就是设置我们自己业务逻辑的地方,实现了ChannelInitializer这个抽象类,当链接进来以后,注册完毕,就会执行initChannel方法,初始化我们自己设置的channelHandler.
接下来就来看看我们自己的实现逻辑:
public void initChannel(SocketChannel ch) throws Exception {//2
		ChannelPipeline pipeline = ch.pipeline();
        pipeline.addLast(new HttpServerCodec());
		pipeline.addLast(new HttpObjectAggregator(64*1024));
		pipeline.addLast(httpRequestHandler);
		pipeline.addLast(new WebSocketServerProtocolHandler("/sockjs", true));
		pipeline.addLast(textWebSocketFrameHandler);
	}
addLast的前2个是处理http操作,我们这里暂时不讲,等下面再详细分析.
WebSocketServerProtocolHandler,它负责websocket握手以及处理控制框架(Close,Ping(心跳检检测request),Pong(心跳检测响应)),文本和二进制数据帧被传递到管道中的下一个处理程序进行处理.并且执行完这个handler以后,会移除合和替换一些handler.
public void handlerAdded(ChannelHandlerContext ctx) {
        ChannelPipeline cp = ctx.pipeline();
        if (cp.get(WebSocketServerProtocolHandshakeHandler.class) == null) {
            ctx.pipeline().addBefore(ctx.name(), WebSocketServerProtocolHandshakeHandler.class.getName(), new WebSocketServerProtocolHandshakeHandler(this.websocketPath, this.subprotocols, this.allowExtensions, this.maxFramePayloadLength, this.allowMaskMismatch, this.checkStartsWith));
        }
    }
在其中的Added方法中,会new一个WebSocketServerProtocolHandshakeHandler,在这个handler里面最终会调用
ChannelFuture handshakeFuture = handshaker.handshake(ctx.channel(), req);
    public final ChannelFuture handshake(Channel channel, FullHttpRequest req, HttpHeaders responseHeaders, final ChannelPromise promise) {
        if (logger.isDebugEnabled()) {
            logger.debug("{} WebSocket version {} server handshake", channel, this.version());
        }

        FullHttpResponse response = this.newHandshakeResponse(req, responseHeaders);
        ChannelPipeline p = channel.pipeline();
        if (p.get(HttpObjectAggregator.class) != null) {
            p.remove(HttpObjectAggregator.class);
        }

        if (p.get(HttpContentCompressor.class) != null) {
            p.remove(HttpContentCompressor.class);
        }

        ChannelHandlerContext ctx = p.context(HttpRequestDecoder.class);
        final String encoderName;
        if (ctx == null) {
            ctx = p.context(HttpServerCodec.class);
            if (ctx == null) {
                promise.setFailure(new IllegalStateException("No HttpDecoder and no HttpServerCodec in the pipeline"));
                return promise;
            }

            p.addBefore(ctx.name(), "wsdecoder", this.newWebsocketDecoder());
            p.addBefore(ctx.name(), "wsencoder", this.newWebSocketEncoder());
            encoderName = ctx.name();
        } else {
            p.replace(ctx.name(), "wsdecoder", this.newWebsocketDecoder());
            encoderName = p.context(HttpResponseEncoder.class).name();
            p.addBefore(encoderName, "wsencoder", this.newWebSocketEncoder());
        }
在这个方法里面,会移除http相关的handler,并且把http的编解码handler升级为websocket的编解码handler.
textWebSocketFrameHandler就是我们真正具体的业务逻辑处理的handler,实现了
我们可以看到泛型中的TextWebSocketFrame,那么这个具体是什么数据类型呢?
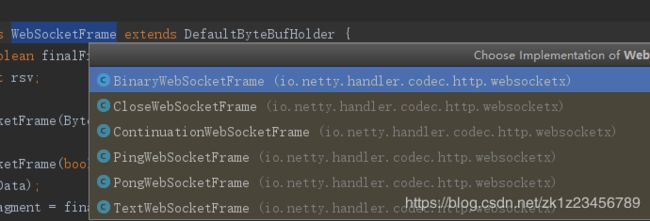
WebSocket规范中定义了6种类型的桢,netty为其提供了具体的对应的POJO实现。
WebSocketFrame:所有桢的父类,所谓桢就是WebSocket服务在建立的时候,在通道中处理的数据类型。本列子中客户端和服务器之间处理的是文本信息。所以范型参数是TextWebSocketFrame.
到这里我们的websocket业务逻辑也就写完了,接下来我们在分析一下上述未讲解的http的handler.
我们的项目不仅有wss协议的,也有http协议的请求,如果要处理http的请求,就需要HttpServerCodec和HttpObjectAggregator这2个处理器.
HttpServerCodec是netty针对http编解码的处理类.
但是这些只能处理像http get的请求,也就是数据带在url后面的http请求,如果是像post的请求呢,message是在body里面的.
下面贴一下http get和post的请求格式:
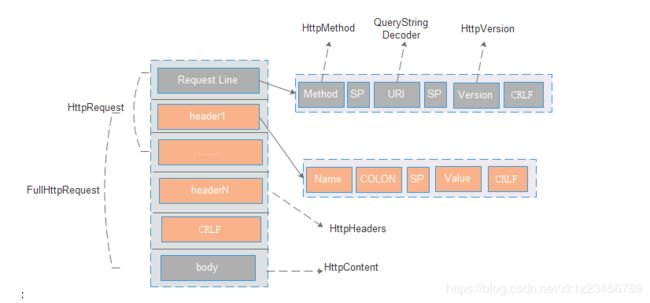
那么HttpObjectAggregator这个netty的处理器就是为了解决这个问题而来的.它把HttpMessage和HttpContent聚合成为一个FullHttpRquest或者FullHttpRsponse,大致结构如下图所示:
public class HttpRequestHandler extends SimpleChannelInboundHandler {
    //省略部分代码,只显示大致结构

    @Override
    public void channelRead0(ChannelHandlerContext ctx, FullHttpRequest request) throws Exception {
上面这个就是我们自己实现的处理http的hanlder,数据类型就是FullHttpRequest.
上面的整个流程就是基于netty实现的,简要描述了netty处理http和websocket的大致流程,如有错误地方,希望大家提出意见,谢谢!!!
备注:关于ByteBuf导致内存泄露的问题
从netty 4.0开始,ByteBuf的生命周期,不再有垃圾收集器管理了,而是有引用计数器管理.
对于 netty Inbound message,当 event loop 读入了数据并创建了 ByteBuf,并用这个 ByteBuf 触发了一个 channelRead() 事件时,那么管道(pipeline)中相应的ChannelHandler 就负责释放这个 buffer 。因此,处理接数据的 handler 应该在它的 channelRead() 中调用 buffer 的 release().
对于 netty Outbound message,你的程序所创建的消息对象都由 netty 负责释放,释放的时机是在这些消息被发送到网络之后。但是,在发送消息的过程中,如果有 handler 截获(intercept)了你的发送请求并创建了一些中间对象,则这些 handler 要确保正确释放这些中间对象.
而有时候,ByteBuf 会被一个 buffer holder 持有,它们都扩展了一个公共接口 ByteBufHolder。正因如此, ByteBuf 并不是 netty 中唯一一种引用计数对象。由 decoder 生成的消息对象很可能也是引用计数对象,比如 HTTP 协议栈中的 HttpContent,因为它也扩展了 ByteBufHolder。
WebSocketFrame就实现了ByteBufHolder,持有ByteBuf的数据,所以handler的实现这里我们使用的是SimpleChannelInboundHandler
