一、PyEcharts简介
“pyecharts 是一个用于生成 Echarts 图表的类库。Echarts 是百度开源的一个数据可视化 JS 库。用 Echarts 生成的图可视化效果非常棒,为了与 Python 进行对接,方便在 Python 中直接使用数据生成图”。
pyecharts可以展示动态图,在线报告使用比较美观,并且展示数据方便,鼠标悬停在图上,即可显示数值、标签等。
官网地址:http://pyecharts.org/#/zh-cn/charts
https://pyecharts.org/#/zh-cn/quickstart
https://github.com/pyecharts/pyecharts
二、模块安装
下载安装:(推荐)
https://pypi.org/project/pyecharts/0.1.9.4/#files
pip install pyecharts-0.1.9.4-py2.py3-none-any.whl
在线安装,不成功:
(film) C:\Users\Administrator>pip install pyecharts
三、图表示例
- 柱形图
# -*- coding: utf-8 -*-

from pyecharts import Bar

'''
柱形图
'''

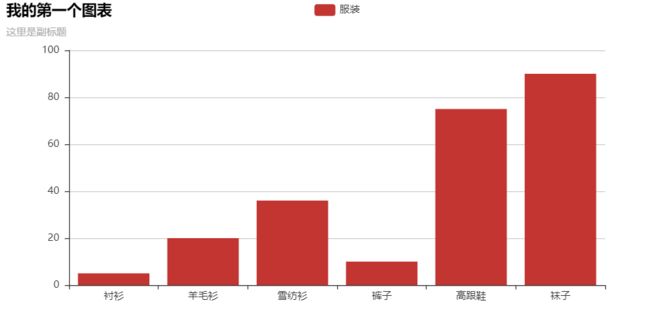
bar = Bar("我的第一个图表", "这里是副标题")
bar.add("服装", ["衬衫", "羊毛衫", "雪纺衫", "裤子", "高跟鞋", "袜子"], [5, 20, 36, 10, 75, 90])
bar.show_config()
bar.render()
会生成Html文件(render.html):
- 柱状图数据堆叠
# -*- coding: utf-8 -*-

from pyecharts import Bar

'''
柱状图数据堆叠
'''

attr = ["衬衫", "羊毛衫", "雪纺衫", "裤子", "高跟鞋", "袜子"]
v1 = [5, 20, 36, 10, 75, 90]
v2 = [10, 25, 8, 60, 20, 80]
bar = Bar("柱状图数据堆叠示例")
bar.add("商家A", attr, v1, is_stack=True)
bar.add("商家B", attr, v2, is_stack=True)
bar.show_config()
bar.render()
- 散点图
# -*- coding: utf-8 -*-

from pyecharts import EffectScatter
'''
散点图
'''

v1 = [10, 20, 30, 40, 50, 60]
v2 = [25, 20, 15, 10, 60, 33]
es = EffectScatter("带有涟漪特效动画的动态散点图示例")
es.add("effectScatter", v1, v2)
es.render()
- 漏斗图
# -*- coding: utf-8 -*-

from pyecharts import Funnel
'''
漏斗图
'''

attr = ["衬衫", "羊毛衫", "雪纺衫", "裤子", "高跟鞋", "袜子"]
value = [20, 40, 60, 80, 100, 120]
funnel = Funnel("漏斗图示例")
funnel.add("商品", attr, value, is_label_show=True, label_pos="inside", label_text_color="#fff")
funnel.render()
- 饼图
# -*- coding: utf-8 -*-

from pyecharts import Pie
'''
饼图
'''

attr = ["衬衫", "羊毛衫", "雪纺衫", "裤子", "高跟鞋", "袜子"]
v1 = [11, 12, 13, 10, 10, 10]
pie = Pie("饼图示例")
pie.add("", attr, v1, is_label_show=True)
pie.render()
- 圆环图
# -*- coding: utf-8 -*-

from pyecharts import Pie
'''
圆环图
'''

attr = ["衬衫", "羊毛衫", "雪纺衫", "裤子", "高跟鞋", "袜子"]
v1 = [11, 12, 13, 10, 10, 10]
pie = Pie("饼图-圆环图示例", title_pos='center')
pie.add("", attr, v1, radius=[40, 75], label_text_color=None,
        is_label_show=True, legend_orient='vertical',
        legend_pos='left')
pie.render()
- 仪表盘
# -*- coding: utf-8 -*-

from pyecharts import Gauge

'''
仪表盘
'''

gauge = Gauge("仪表盘示例")
gauge.add("业务指标", "完成率", 66.66)
gauge.show_config()
gauge.render()
- 地理坐标系
需安装模块:
$ pip install echarts-countries-pypkg
$ pip install echarts-china-provinces-pypkg
$ pip install echarts-china-cities-pypkg
$ pip install echarts-china-counties-pypkg
$ pip install echarts-china-misc-pypkg
$ pip install echarts-united-kingdom-pypkg
- 全球国家地图: echarts-countries-pypkg (1.9MB):世界地图和 213 个国家,包括中国地图。
- 中国省级地图: echarts-china-provinces-pypkg (730KB):23 个省,5 个自治区。
- 中国市级地图: echarts-china-cities-pypkg (3.8MB):370 个中国城市。
中国地图在 echarts-countries-pypkg
1)中国地图
# -*- coding: utf-8 -*-

from pyecharts import Map, Geo

'''
中国地图
'''
# 省和直辖市
province_distribution = {'河南': 45.23, '北京': 37.56, '河北': 21, '辽宁': 12, '江西': 6, '上海': 20, '安徽': 10, '江苏': 16, '湖南': 9, '浙江': 13, '海南': 2, '广东': 22, '湖北': 8, '黑龙江': 11, '澳门': 1, '陕西': 11, '四川': 7, '内蒙古': 3, '重庆': 3, '云南': 6, '贵州': 2, '吉林': 3, '山西': 12, '山东': 11, '福建': 4, '青海': 1, '舵主科技,质量保证': 1, '天津': 1, '其他': 1}
provice=list(province_distribution.keys())
values=list(province_distribution.values())

# maptype='china' 只显示全国直辖市和省级
# 数据只能是省名和直辖市的名称
map = Map("中国地图",'中国地图', width=1200, height=600)
map.add("", provice, values, visual_range=[0, 50],  maptype='china', is_visualmap=True,
    visual_text_color='#000')
map.show_config()
map.render(path="./data/04-01中国地图.html")
2)省份地图
# -*- coding: utf-8 -*-

from pyecharts import Map, Geo

'''
中国地图
'''
# 城市 -- 指定省的城市 xx市
city = ['郑州市', '安阳市', '洛阳市', '濮阳市', '南阳市', '开封市', '商丘市', '信阳市', '新乡市']
values2 = [1.07, 3.85, 6.38, 8.21, 2.53, 4.37, 9.38, 4.29, 6.1]

# 河南地图  数据必须是省内放入城市名
map2 = Map("河南地图",'河南', width=1200, height=600)
map2.add('河南', city, values2, visual_range=[1, 10], maptype='河南', is_visualmap=True, visual_text_color='#000')
map2.show_config()
map2.render(path="./data/04-02河南地图.html")
3)区县地图--不显示
# -*- coding: utf-8 -*-

from pyecharts import Map, Geo

'''
区县地图
'''

# 区县 -- 具体城市内的区县  xx县
quxian = ['夏邑县', '民权县', '梁园区', '睢阳区', '柘城县', '宁陵县']
values3 = [3, 5, 7, 8, 2, 4]

# # 商丘地图 数据为商丘市下的区县
map3 = Map("商丘地图",'商丘', width=1200, height=600)
map3.add("商丘", quxian, values3, visual_range=[1, 10], maptype='商丘', is_visualmap=True,
    visual_text_color='#000')

map3.show_config()
map3.render(path="./data/04-03商丘地图.html")
4)热力分布图
# -*- coding: utf-8 -*-

from pyecharts import Map, Geo

'''
热力图
'''

data = [
("海门", 9),("鄂尔多斯", 12),("招远", 12),("舟山", 12),("齐齐哈尔", 14),("盐城", 15),
("赤峰", 16),("青岛", 18),("乳山", 18),("金昌", 19),("泉州", 21),("莱西", 21),
("日照", 21),("胶南", 22),("南通", 23),("拉萨", 24),("云浮", 24),("梅州", 25)]

geo = Geo("全国主要城市空气质量热力图", "data from pm2.5", title_color="#fff", title_pos="center", width=1200, height=600, background_color='#404a59')

attr, value = geo.cast(data)

geo.add("空气质量热力图", attr, value, visual_range=[0, 25], type='heatmap',visual_text_color="#fff", symbol_size=15, is_visualmap=True, is_roam=False)
geo.show_config()
geo.render(path="./data/04-04空气质量热力图.html")
5)空气质量评分
# -*- coding: utf-8 -*-

from pyecharts import Map, Geo

'''
热力图
'''

# 空气质量评分
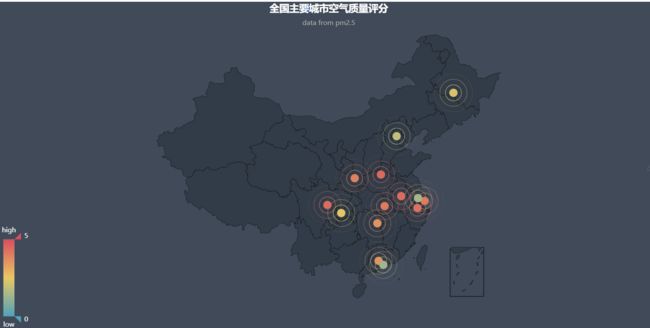
indexs = ['上海', '北京', '合肥', '哈尔滨', '广州', '成都', '无锡', '杭州', '武汉', '深圳', '西安', '郑州', '重庆', '长沙']
values = [4.07, 1.85, 4.38, 2.21, 3.53, 4.37, 1.38, 4.29, 4.1, 1.31, 3.92, 4.47, 2.40, 3.60]


geo = Geo("全国主要城市空气质量评分", "data from pm2.5", title_color="#fff", title_pos="center", width=1200, height=600, background_color='#404a59')

# type="effectScatter", is_random=True, effect_scale=5  使点具有发散性
geo.add("空气质量评分", indexs, values, type="effectScatter", is_random=True, effect_scale=5, visual_range=[0, 5],visual_text_color="#fff", symbol_size=15, is_visualmap=True, is_roam=False)
geo.show_config()
geo.render(path="./data/04-05空气质量评分.html")
6)世界地图
# -*- coding: utf-8 -*-

from pyecharts import Map, Geo

'''
世界地图
'''

# 世界地图数据
value = [95.1, 23.2, 43.3, 66.4, 88.5]
attr= ["China", "Canada", "Brazil", "Russia", "United States"]
map0 = Map("世界地图示例", width=1200, height=600)
map0.add("世界地图", attr, value, maptype="world",  is_visualmap=True, visual_text_color='#000')

map0.render(path="./data/04-00世界地图.html")
- 水球图
# -*- coding: utf-8 -*-

from pyecharts import Liquid

'''
水球图
'''

liquid =Liquid("水球图")
liquid.add("Liquid", [0.6])
liquid.show_config()
liquid.render(path='./data/03-01水球.html')

# 圆形水球
liquid2 =Liquid("水球图示例")
liquid2.add("Liquid", [0.6, 0.5, 0.4, 0.3], is_liquid_outline_show=False)
liquid2.show_config()
liquid2.render(path='./data/03-02圆形水球.html')

# 菱形水球
liquid3 =Liquid("水球图示例")
liquid3.add("Liquid", [0.6, 0.5, 0.4, 0.3], is_liquid_animation=False, shape='diamond')
liquid3.show_config()
liquid3.render(path='./data/03-03菱形水球.html')
- 极坐标图
# -*- coding: utf-8 -*-

from pyecharts import Polar

'''
极坐标图
'''

# 极坐标
radius =['周一', '周二', '周三', '周四', '周五', '周六', '周日']
polar =Polar("极坐标系-堆叠柱状图示例", width=1200, height=600)
polar.add("A", [1, 2, 3, 4, 3, 5, 1], radius_data=radius, type='barRadius', is_stack=True)
polar.add("B", [2, 4, 6, 1, 2, 3, 1], radius_data=radius, type='barRadius', is_stack=True)
polar.add("C", [1, 2, 3, 4, 1, 2, 5], radius_data=radius, type='barRadius', is_stack=True)
polar.show_config()
polar.render(path='./data/03-04极坐标.html')
- 雷达图
# -*- coding: utf-8 -*-

from pyecharts import Radar

'''
雷达图
'''

# 雷达图
schema =[ ("销售", 6500), ("管理", 16000), ("信息技术", 30000), ("客服", 38000), ("研发", 52000), ("市场", 25000)]
v1 =[[4300, 10000, 28000, 35000, 50000, 19000]]
v2 =[[5000, 14000, 28000, 31000, 42000, 21000]]
radar =Radar()
radar.config(schema)
radar.add("预算分配", v1, is_splitline=True, is_axisline_show=True)
radar.add("实际开销", v2, label_color=["#4e79a7"], is_area_show=False)
radar.show_config()
radar.render(path='./data/03-05雷达图.html')
四、不同格式存储
支持保存做种格式
如果想直接将图片保存为 png, pdf, gif 格式的文件,可以使用 pyecharts-snapshot。使用该插件请确保你的系统上已经安装了 Nodejs 环境。
1.安装phantomjs: conda install phantomjs
2.安装 pyecharts-snapshot : pip install pyecharts-snapshot
2.调用 render 方法 bar.render(path='snapshot.png') 文件结尾可以为 svg/jpeg/png/pdf/gif。请注意,svg 文件需要你在初始化 bar 的时候设置 renderer='svg'。
对象.render(path='snapshot.html')
对象.render(path='snapshot.png')
对象.render(path='snapshot.pdf')


