PHP环境搭建 环境搭建
操作系统:Centos 64位
假设系统中已经安装了GCC编译工具。
一、LAMP安装前的准备
1、zlib (1.2.8) 下载地址:http://zlib.net/zlib-1.2.8.tar.gz
在php中使用到的gzip的压缩和输出功能就是用到了zlib库。
2、libxml2 (2.2.9) 下载地址:ftp://xmlsoft.org/libxml2/
在php中使用到的DOM, libxml, SimpleXML, SOAP, WDDX, XSL, XSLT, XML, XMLReader, XMLRPC ,XMLWriter的扩展到要使用到此库。
3、libcrypt (2.5.8) 下载地址:http://mcrypt.sourceforge.net
Mcrypt是PHP的一个扩展,完成了常用加密算法的封装。其实该扩展是对mcrypt标准类库的封装,mcrypt完成了相当多的常用加密算法,如DES, TripleDES, Blowfish (def ault), 3-WAY, SAFER-SK64, SAFER-SK128, TWOFISH, TEA, RC2 和 GOST加密算法,并且提供了CBC、OFB、CFB 和 ECB 四种块加密的模型。
4、libpng (1.5.18) 下载地址: http://sourceforge.net/projects/libpng/
是一套免费的、公开源代码的程序库,支持对 PNG 图形文件的创建、读写等操作。使用 zlib 程序库作为压缩引擎,zlib 也是著名的 gzip (GNU zip) 所采用的压缩引擎。
5、jpeg8 (v8d) 下载地址:http://www.ijg.org/files/
是一套免费的、公开源代码的程序库,支持对 jpg/jpeg 图形文件的创建、读写等操作。
6、freetype (2.5.2) 下载地址:http://www.freetype.org/download.html
FreeType库是一个完全免费(开源)的、高质量的且可移植的字体引擎,它提供统一的接口来访问多种字体格式文件,包括TrueType, OpenType, Type1, CID, CFF, Windows FON/FNT, X11 PCF等。
7、autoconf (2.69) 下载地址:http://ftp.gnu.org/gnu/autoconf/?C=M;O=D
Autoconf是一个用于生成可以自动地配置软件源代码包以适应多种Unix类系统的 shell脚本的工具。GD2用到它
8、GD2 (2.1.0) 下载地址:http://libgd.bitbucket.org/
GD库,是php处理图形的扩展库,GD库提供了一系列用来处理图片的API,使用GD库可以处理图片,或者生成图片。
8.2、libxpm (最好安装一下,不然安装PHP时,会报相应的错)
让你的程序具有读取xpm格式图像的功能
9、apr (1.5.1) 下载地址:http://apr.apache.org/download.cgi
10、apr-util (1.5.3) 下载地址:http://apr.apache.org/download.cgi
11、pcre (8.35) 下载地址:http://www.pcre.org/
PCRE(Perl Compatible Regular Expressions)是一个Perl库,包括 perl 兼容的正规表达式库。
12、apache httpd (2.4.9) 下载地址:http://httpd.apache.org/download.cgi
13、mysql ( 5.6.17 ) 下载地址:http://dev.mysql.com/downloads/mysql/
14、php (5.5.13) 下载地址:http://www.php.net/
二、源码包安装
1、安装zlib
解压:tar xvf zlib-1.2.8.tar.gz
生成Makefile:./configure --prefix=/usr/local/zlib/
编译:make
安装:make install
PHP5源代码的配置时,会通过在configure命令的选项中加上"--with-zlib-dir=/usr/local/zlib"选 项,用于指定安装zlib库文件的位置
解压:tar xvf libxml2-2.9.0.tar.gz
生成Makefile:./configure --prefix=/usr/local/libxml2 --with-zlib=/usr/local/zlib/
编译:make
安装:make install
3、安装libmcrypt
解压:tar xvf libmcrypt-2.5.8.tar.gz
生成Makefile:./configure --prefix=/usr/local/libxml2 --with-zlib=/usr/local/libmcrypt/
编译:make
安装:make install安装完成libmcrypt库以后,不同的linux系统版本有可能还要安装一下libltdl库。安装方法和前面的步骤相同,可以进入到解压缩的 目录/usr/local/src/libmcrypt-2.5.8下,找到libltdl库源代码所在的目录libltdl,进入这个目录按照下面几个 命令配置、编译、安装就可以了。
4、安装libpng
解压:tar xvJf libpng-1.5.18.tar.xz
生成Makefile:./configure --prefix=/usr/local/libpng/
编译:make
安装:make install注:libpng与zlib之间有版本兼容性问题,如果版本不合适的会make的时候会报如下的错误,
/bin/sh ./libtool  --tag=CC   --mode=link gcc  -g -O2   -o pngfix contrib/tools/pngfix.o libpng16.la -lm -lz -lm /usr/lib64/libz.so
libtool: link: gcc -g -O2 -o .libs/pngfix contrib/tools/pngfix.o /usr/lib64/libz.so  ./.libs/libpng16.so -lz -lm -Wl,-rpath -Wl,/usr/local/lib
contrib/tools/pngfix.o: In function `zlib_reset':
/home/fred/root/lamp/libpng-1.6.10/contrib/tools/pngfix.c:2179: undefined reference to `inflateReset2'
collect2: ld returned 1 exit status
make[1]: *** [pngfix] Error 1
make[1]: Leaving directory `/home/fred/root/lamp/libpng-1.6.10'
make: *** [all] Error 2
已知 zlib-1.2.8和libpng-1.6.10之间就存在这种问题, zlib-1.2.8和libpng-1.5.18可以正常安装,有篇文章对此问题进行了一些描述
http://stackoverflow.com/questions/19738464/pngfix-c2151-undefined-reference-to-inflateres
5、安装jpeg8
解压:tar xvf jpegsrc.v8d.tar.gz
生成Makefile:./configure --prefix=/usr/local/jpeg8/
编译:make
安装:make install
6、安装freetype
解压:tar xvf freetype-2.5.2.tar.gz设置环境变量:export LIBPNG_CFLAGS="-I/usr/local/libpng/include"
export LIBPNG_LDFLAGS="-L/usr/local/libpng/lib"生成Makefile:./configure --prefix=/usr/local/freetype/
编译:make
安装:make install如果安装成功将会在/usr/local/freetype目录下存在bin,include,lib和share四个目录。并在安装GD2库时, 通过configure命令选项中加上“--with-freetype=/usr/local/freetype/”选项,指定freetype库文件 位置。
7、安装autoconf
解压:tar xvfJ autoconf-2.69.tar.xz生成Makefile:./configure // 无需指定路径
编译:make
安装:make install8、安装GD2
解压:tar xvfJ libgd-2.1.0.tar.xz生成Makefile:#./configure \ //配置命令
>--prefix=/usr/local/gd/ \ //指定安装软件的位置
>--with-jpeg=/usr/local/jpeg8/ \ //指定去哪找jpeg库文件
>--with-png=/usr/local/libpng/ \ //指定去哪找png库文件
>--with-freetype=/usr/local/freetype/ //指定去哪找freetype 2.x字体库的位置
编译:make
安装:make install
8.2、安装xpm
yum install libXpm-devel
9、安装apr
解压:tar xvf apr-1.5.1.tar.gz生成Makefile:./configure --prefix=/usr/local/apr-httpd/
编译:make
安装:make install
10、安装apr-util
解压:tar xvf apr-util-1.5.3.tar.gz生成Makefile:./configure --prefix=/usr/local/apr-util-httpd/ --with-apr=/usr/local/apr-httpd/
编译:make
安装:make install
11、安装pcre
解压:tar xvf pcre-8.35.tar.gz生成Makefile:./configure --prefix=/usr/local/pcre/
编译:make
安装:make install
12、安装apache httpd
-1、解压:tar xvf httpd-2.4.9.tar.gz-2、把apr源文件放到srclib目录(如果用的是刚才安装过的那个源文件目录需要先make clean):mv apr-1.5.1 httpd-2.4.9/srclib/apr
-3、把apr-util源文件放到srclib目录(如果用的是刚才安装过的那个源文件目录需要先make clean):
mv apr-util-1.5.3 httpd-2.4.9/srclib/apr-util-4、生成Makefile:./configure --prefix=/usr/local/apache2 \> --sysconfdir=/etc/httpd \
> --enable-mods-shared=all \> --enable-deflate \> --enable-speling \
> --enable-cache \
> --enable-file-cache \
> --enable-disk-cache \
> --enable-mem-cache \
> --enable-so \
> --enable-expires=shared \
> --enable-rewrite=shared \
> --enable-static-support \
> --with-z=/usr/local/zlib/ \
> --with-apr=/usr/local/apr-httpd/ \
> --with-apr-util=/usr/local/apr-util-httpd/ \
> --with-pcre=/usr/local/pcre/ \> --with-included-apr \
> --disable-userdir-5、编译:make
-6、安装:make install启动Apache服务器,并查端口是否开启,启动Apache服务器的命令行如下: #/usr/local/apache243/bin/apachectl start 提示信息: AH00558: httpd: Could not reliably determine the server's fully qualified domain name, using ::1. Set the 'ServerName' directive globally to suppress this message 解决方案: vi /etc/httpd/httpd.conf 修改ServerName配置,重启apache ServerName localhost:80
13、安装mysql
创建mysql帐号:> groupadd mysql
> useradd -r -g mysql mysql
此源码包和普通的安装方式生成Maikefile时有点不一样解压:tar xvf mysql-5.6.17.tar.gz
生成Makefile:cmake .
编译:make
安装:make install
# End of source-build specific instructions
# Postinstallation setup
> cd /usr/local/mysql
> chown -R mysql .
> chgrp -R mysql .
> scripts/mysql_install_db --user=mysql // 创建授权表
> chown -R root .
> chown -R mysql data
> bin/mysqld_safe --user=mysql & // 启动mysql
# Next command is optional
> cp support-files/mysql.server /etc/init.d/mysql // 安装启动服务
> mysql -u rootmysql>delete from mysql.user where `host`='localhost' and user=''; //删除空用户mysql>flush privileges; // 刷新授权表mysql>set password for 'root'@'localhost'=PASSWORD('benben'); // 修改root用户密码
13、安装php
./configure --prefix=/usr/local/php \
--with-config-file-path=/usr/local/php/etc \
--with-apxs2=/usr/local/apache2/bin/apxs \
--with-xpm-dir=/usr/lib64/ \
--with-mysql=/usr/local/mysql/ \
--with-libxml-dir=/usr/local/libxml2/ \
--with-png-dir=/usr/local/libpng/ \
--with-jpeg-dir=/usr/local/jpeg8/ \
--with-freetype-dir=/usr/local/freetype/ \
--with-gd=/usr/local/gd/ \
--with-zlib-dir=/usr/local/zlib/ \
--with-mcrypt=/usr/local/libmcrypt/ \
--with-mysqli=/usr/local/mysql/bin/mysql_config \
--enable-soap \
--enable-mbstring=all \
--enable-sockets
修改php.ini 把;date.timezone 前面的分号去掉,改成date.timezone ="PRC"
整合Apache与PHP,上面编译之前,我们使用configure命令安装配置时,使用--with-apxs2=/usr/local /apache2/bin/apxs选项以使Apache 2将PHP作为功能模块使用。但我们还要修改Apahce配置文件,添加PHP的支持,告 诉Apache将哪些后缀作为PHP解析。例如,让Apache把.php或.phtml后缀名解析为PHP.使用vi打开Apache的配置文件 /etc/httpd/httpd.conf,找到AddType application/x-gzip .gz .tgz指令选项,并在其下方添加一 条指令AddType application/x-httpd-php .php .phtml。也可以将任何后缀的文件解析为PHP,只要在添加的语 句中加入并用空格分开,这里以多添加一个.phtml来示例,如下示:
# If the AddEncoding directives above are commented-out, then you
# probably should define those extensions to indicate media types:
AddType application/x-compress .Z
AddType application/x-gzip .gz .tgz
AddType application/x-httpd-php .php .phtml
修改完成后必须重启Apache服务器,才能重新加载配置文件使修改生效。
[root@localhost php-5.5.13]#/usr/local/apache243/bin/apachectl stop
[root@localhost php-5.5.13]#/usr/local/apache243/bin/apachectl start
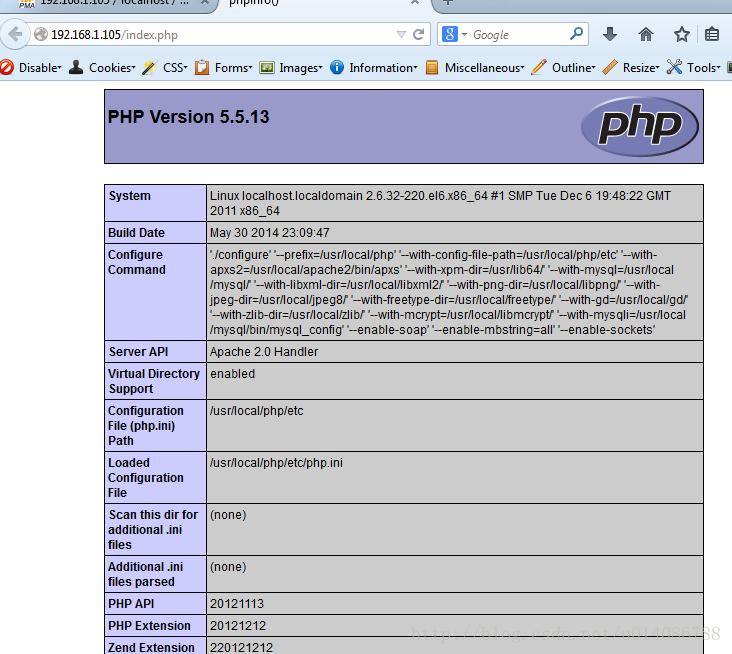
测试PHP环境是否可以正常运行,在/usr/local/apache2/htdocs目录下建一个test.php或test.phtml的文件,内容如下示:
phpinfo();
?>
打开浏览器,在地址栏输入http://http://192.168.1.105/test.php来运行该文件,如果出现下图内容,说明LAMP环境安装成功。
