CAS单点登录【3】 - 自定义主题、自定义表单、自定义验证码、自定义错误消息、自定义返回消息 - 【未完】
这里用的版本
5.3.1
-
上一篇: CAS集群【2】 - 自定义认证
-
下一篇:CAS集群【4】 - 服务器开发调试(eclipse调试cas)
-
github 服务端 : https://github.com/LawssssCat/v-cas
-
github 客户端:
-
官方资料 - https://apereo.github.io/cas/5.1.x/installation/User-Interface-Customization.html
参考:
- 【⭐️⭐️】 CAS 5.1.x 的搭建和使用(二)—— 通过Overlay搭建服务端-其它配置说明
- 悟空_ CAS单点登录-自定义主题、界面 (十一)
- 狂飙的yellowcong CAS之5.2x版本自定义登录页面-yellowcong
- CAS之5.2x版本自定义返回消息-yellowcong
- CAS之5.2x版本自定义错误信息-yellowcong
- CAS之5.1.x版本自定义表单信息-yellowcong
- CAS单点登录(六)——自定义登录界面和表单信息
- CAS之5.2.x版本自定义表单信息-yellowcong
-
史上最全的Cas学习整理-yellowcong
-
cas 脚手架: https://casinitializr.herokuapp.com/
-
各个版本模板: https://github.com/apereo/cas-overlay-template
文章目录
- 1 自定义主题
- # 依赖
- # 项目结构
- # 启用识别
- # service 目录配置
- ## 1、HTTPSandIMAPS-10000001.json(默认)
- ## 2、vshop-1000.json
- ## 3、vsell-1001.json
- # templates 登录模板
- ## static文件夹
- ## vsell 模板
- ## vshop 模板
- # 启动服务
- # 访问测试
- # 登录测试
- # 问题集合
- ## 1、未认证授权的服务
- ## 2、乱码+没样式
- # 如何修改默认主题?
- 2 自定义表单
- 自定义验证码
- # 1、生成验证码类
- ## 自定义工具类
- 自定义返回消息
1 自定义主题
前提:不考虑前后端分离
需求:
我现在的需求是,我有两个子站点,
vshop.comvsell.com
两个站点使用不同的样式。
步骤:
1、在 services文件夹 添加的 json 配置文件
2、配置 application.properties ,设置 cas.serviceRegistry.initFromJson=true ,让配置的 json 文件生效
3、在 static 文件夹,添加静态样式
4、在 templates 文件夹添加模板
下面一步步看
# 依赖
# 项目结构
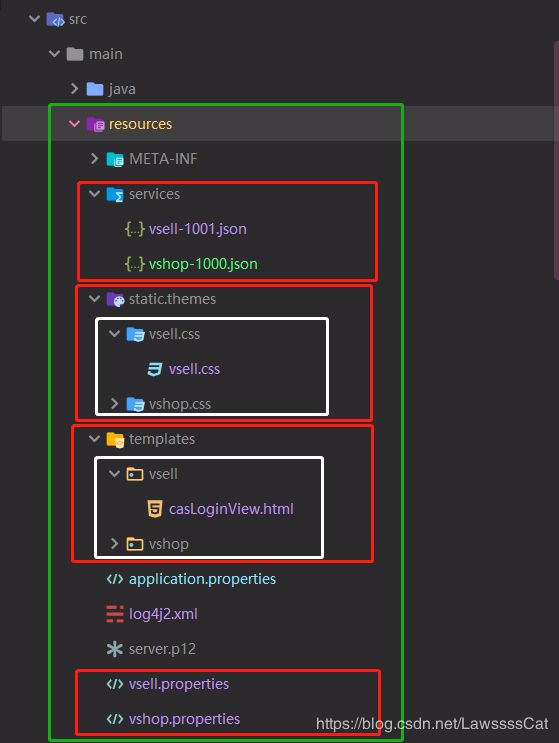
配置文件都扔在了 src/main/resources 这个目录下
| 目录 | 意义 |
|---|---|
| services | 需要配置自定义登录的网站模版 |
| static | 静态文件目录,用于存放js,css代码的 |
| templates | 模板代码 casLoginView.html 这个 名称不可瞎改 |
| vshop.properties | 用于存放 vshop.com 网站的模版配置信息 |
| vshell.properties | 用于存放 vshell.com 网站的模版配置信息 |
上面的位置,也能自己定(如下)
# 自定义server配置(server名anumbrella)
anumbrella.javascript.file=/themes/anumbrella/js/cas.js
anumbrella.standard.css.file=/themes/anumbrella/css/cas.css
anumbrella.login.images.path=/themes/anumbrella/images

# 默认配置
cas.standard.css.file=/css/cas.css
cas.javascript.file=/js/cas.js
cas.admin.css.file=/css/admin.css
# 启用识别
这个配置可以从
配置 application.properties ,设置 cas 需要从 json 文件做初始化操作,不然我们配置的 json 没有生效
(非常重要)
# @@@@@@@@@@@@@@@@@@@@@@@@@@@@@@@@@@@@@@@@@@@
# 自定义样式(开始)
# @@@@@@@@@@@@@@@@@@@@@@@@@@@@@@@@@@@@@@@@@@@

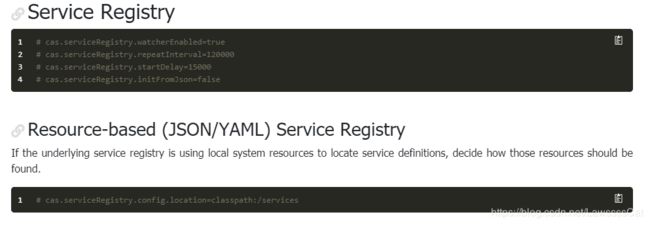
#开启识别json文件,默认false
cas.serviceRegistry.initFromJson=true

#自动扫描服务配置,默认开启
#cas.serviceRegistry.watcherEnabled=true
#120秒扫描一遍
#cas.serviceRegistry.repeatInterval=120000
#延迟15秒开启
#cas.serviceRegistry.startDelay=15000

#默认json/yml资源加载路径为resources/services
#cas.serviceRegistry.config.location=classpath:/services


# @@@@@@@@@@@@@@@@@@@@@@@@@@@@@@@@@@@@@@@@@@@
# 自定义样式(结束)
# @@@@@@@@@@@@@@@@@@@@@@@@@@@@@@@@@@@@@@@@@@@
# service 目录配置
首先,样式有三种。
-
不同的子项目下面,可能登录的风格和样式不一样,所以我们需要配置这个service目录,设定每一个子网站对应的请求样式
-
同时,还有默认样式
其次,配置样式的文件 *.json ,
称之为 service 目录配置。
service 概念大概在下章讲到,现在先用 json 文件。
## 1、HTTPSandIMAPS-10000001.json(默认)
这个json配置文件是系统默认的(通过项目打包后,在target目录下可以找到)
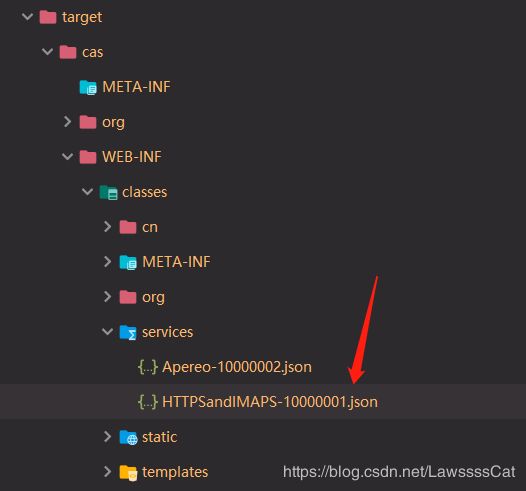
我们可以直接修改这个,来设定系统默认的登录模板。
内容如下,
{
  "@class" : "org.apereo.cas.services.RegexRegisteredService",
  "serviceId" : "^(https|imaps)://.*",
  "name" : "HTTPS and IMAPS",
  "id" : 10000001,
  "description" : "This service definition authorizes all application urls that support HTTPS and IMAPS protocols.",
  "evaluationOrder" : 10000
}
参数说明
| 参数 | 意义 |
|---|---|
@class |
模版注册的类 |
serviceId |
表示哪一个网站使用这个模板 正则表达式 |
name |
给这个模板命名 |
id |
模板的id,建议 json 文件命名为 name-id 这样好区分,而且官网推荐 |
description |
注释,就说明这个模板,或则这个网站 |
evaluationOrder |
就是主题的顺序,这么多主题匹配,肯定是这个 id 越小,越先匹配 |
theme |
主题名称,主题名称建议和网站名称一致 |
attributeReleasePolicy |
cas 参数返回策略,这个大家现在配置不配置,无所谓了,不影响操操作 |
另外,还有
- 服务访问策略——(accessStrategy),具体可以查看:服务策略配置。
- 服务属性配置——(properties),具体查看:服务属性配置。
- 服务到期政策——(expirationPolicy),具体查看:服务到期配置。
注意:模版的配置配置文件的命名必须是 name+id.json 的这种方式,不然找不到配置文件。
## 2、vshop-1000.json
这个是 *.vshop.com 网站的配置,任何 vshop.* 的 https、http 、imaps,都可以走这个模板
{
  "@class" : "org.apereo.cas.services.RegexRegisteredService",
  "serviceId" : "^(https|imaps|http)://vshop.*",
  "name" : "vshop",
  "id" : 1000,
  "description" : "vshop项目访问过来,跳转到demo主题",
  "evaluationOrder" : 10,
  "theme": "vshop"
}
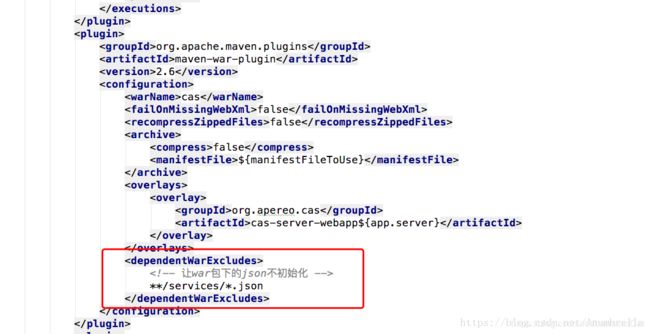
因为在CAS服务中,默认是提供了默认的Service配置项
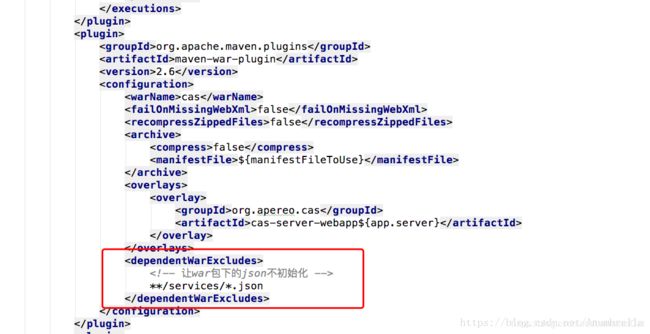
所以如果添加的Json配置没起作用,可以尝试注释掉默认启动Json
在pom.xml文件里面进行配置,如下:
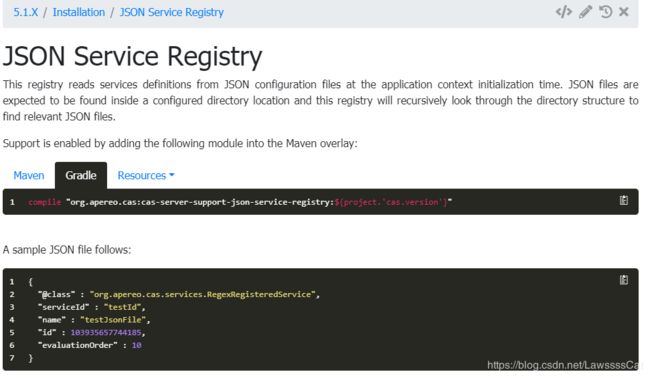
(后来发现,不需要添加cas-server-support-json-service-registry依赖,添加了,反而才需要上面的配置。猜测,应该默认添加这条依赖,导致依赖重复)
## 3、vsell-1001.json
这个和上一个差不多,但是注意一点, id 、 evaluationOrder 、 theme 这三个配置不要和别的站点重复了
evaluationOrder 指的是匹配的顺序,越小,就越先匹配上。
{
  "@class" : "org.apereo.cas.services.RegexRegisteredService",
  "serviceId" : "^(https|imaps|http)://vsell.*",
  "name" : "vsell",
  "id" : 1001,
  "description" : "vsell项目访问过来,跳转到demo主题",
  "evaluationOrder" : 11,
  "theme": "vsell"
}
# templates 登录模板
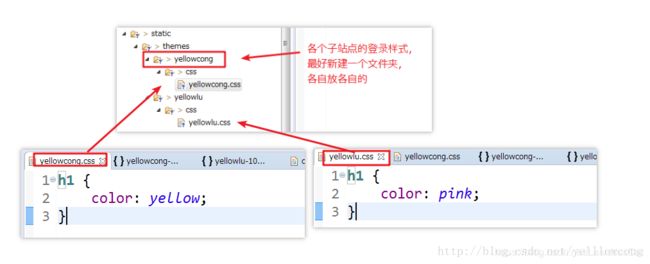
目录结构可以看到,每个子站点,都会新建一个文件夹,
- 文件夹的名称需要和 service里面配置站点的theme的名称对应上
- casLoginView.html 这个模板的名称,不能瞎改,这个是固定的。
## static文件夹
美工不是重点,这里设置了表头的颜色而已。
## vsell 模板
注意,名字必须 casLoginView.html 哦
<html xmlns:th="http://www.w3.org/1999/xhtml" lang="zh">
<head>
    <meta charset="UTF-8"/>
    <meta name="viewport" content="width=device-width, initial-scale=1"/>
    <meta http-equiv="X-UA-Compatible" content="IE=edge"/>
    <title th:text="${#themes.code('title')}">title>
    <link rel="stylesheet" th:href="@{${#themes.code('css.file')}}"/>
head>

<body>
<h1 th:text="${#themes.code('title')}">h1>
<h2>vsell 的登录模板h2>
<div>
    <form method="post" th:object="${credential}">
        <div th:if="${#fields.hasErrors('*')}">
            <span th:each="err : ${#fields.errors('*')}" th:utext="${err}">span>
        div>
        <h2 th:utext="#{screen.welcome.instructions}">h2>

        <section class="row">
            <label for="username" th:utext="#{screen.welcome.label.netid}">label>
            <div th:unless="${openIdLocalId}">
                <input class="required"
                       id="username"
                       size="25"
                       tabindex="1"
                       type="text"
                       th:disabled="${guaEnabled}"
                       th:field="*{username}"
                       th:accesskey="#{screen.welcome.label.netid.accesskey}"
                       autocomplete="off"/>
            div>
        section>

        <section class="row">
            <label for="password" th:utext="#{screen.welcome.label.password}">label>
            <div>
                <input class="required"
                       type="password"
                       id="password"
                       size="25"
                       tabindex="2"
                       th:accesskey="#{screen.welcome.label.password.accesskey}"
                       th:field="*{password}"
                       autocomplete="off"/>
            div>
        section>

        <section>
            <input type="hidden" name="execution" th:value="${flowExecutionKey}"/>
            <input type="hidden" name="_eventId" value="submit"/>
            <input type="hidden" name="geolocation"/>
            <input class="btn btn-submit btn-block"
                   name="submit"
                   accesskey="l"
                   th:value="#{screen.welcome.button.login}"
                   tabindex="6"
                   type="submit"/>
        section>
    form>
div>
body>
html>
## vshop 模板
<html xmlns:th="http://www.w3.org/1999/xhtml" lang="zh">
<head>
    <meta charset="UTF-8"/>
    <meta name="viewport" content="width=device-width, initial-scale=1"/>
    <meta http-equiv="X-UA-Compatible" content="IE=edge"/>
    <title th:text="${#themes.code('title')}">title>
    <link rel="stylesheet" th:href="@{${#themes.code('css.file')}}"/>
head>

<body>
<h1 th:text="${#themes.code('title')}">h1>
<h2>vsell 的登录模板h2>
<div>
    <form method="post" th:object="${credential}">
        <div th:if="${#fields.hasErrors('*')}">
            <span th:each="err : ${#fields.errors('*')}" th:utext="${err}">span>
        div>
        <h2 th:utext="#{screen.welcome.instructions}">h2>

        <section class="row">
            <label for="username" th:utext="#{screen.welcome.label.netid}">label>
            <div th:unless="${openIdLocalId}">
                <input class="required"
                       id="username"
                       size="25"
                       tabindex="1"
                       type="text"
                       th:disabled="${guaEnabled}"
                       th:field="*{username}"
                       th:accesskey="#{screen.welcome.label.netid.accesskey}"
                       autocomplete="off"/>
            div>
        section>

        <section class="row">
            <label for="password" th:utext="#{screen.welcome.label.password}">label>
            <div>
                <input class="required"
                       type="password"
                       id="password"
                       size="25"
                       tabindex="2"
                       th:accesskey="#{screen.welcome.label.password.accesskey}"
                       th:field="*{password}"
                       autocomplete="off"/>
            div>
        section>

        <section>
            <input type="hidden" name="execution" th:value="${flowExecutionKey}"/>
            <input type="hidden" name="_eventId" value="submit"/>
            <input type="hidden" name="geolocation"/>
            <input class="btn btn-submit btn-block"
                   name="submit"
                   accesskey="l"
                   th:value="#{screen.welcome.button.login}"
                   tabindex="6"
                   type="submit"/>
        section>
    form>
div>
body>
html>
# 启动服务
到项目的根目录,找到build.cmd,然后debug启动服务。
build.cmd debug
# 访问测试
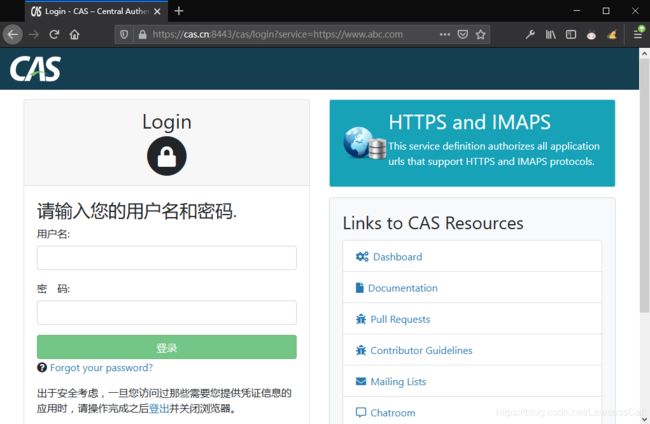
- 默认主题 https://cas.cn:8443/cas/login?service=https://www.abc.com
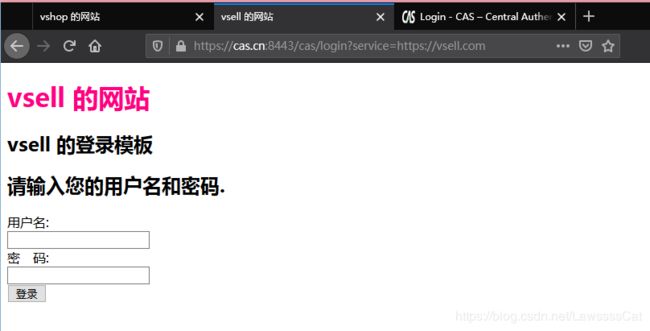
- vsell https://cas.cn:8443/cas/login?service=https://vsell.com
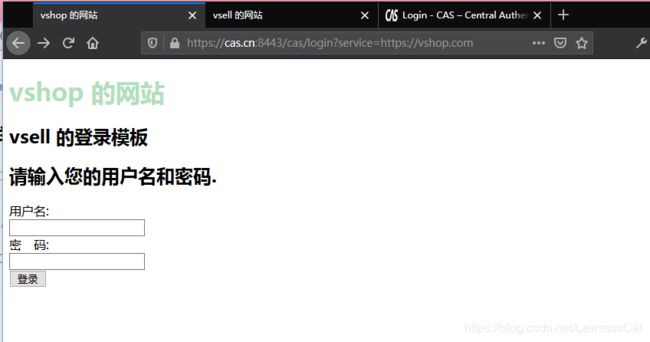
- vshop https://cas.cn:8443/cas/login?service=https://vshop.com
# 登录测试
因为模板那里匹配好了名字,因此,可以直接登录
(这里先尝试登录,后面再说表单名匹配的问题)
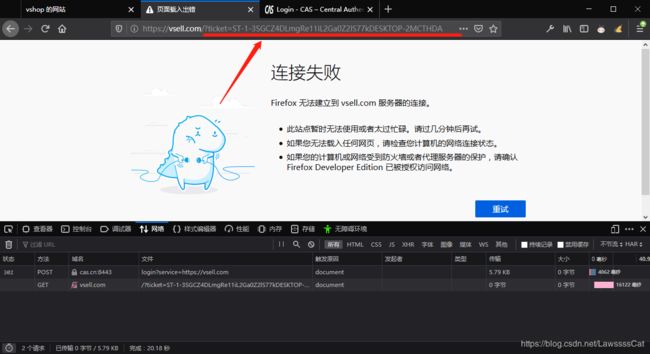
可以看到,登录是成功了(只是我没写转跳的网站,因此报错)
主要看 url 那里,多出了 ticket (cas 认证的核心~)
done
# 问题集合
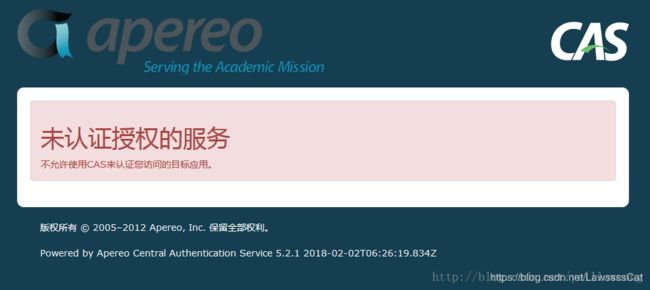
## 1、未认证授权的服务
出这个问题,肯定是配置有问题
- serviceId 配置中,缺少http配置。
- 没有配置application.properties,的cas.serviceRegistry.initFromJson=true,让json的配置文件生效。
- serviceid 的正则匹配错误
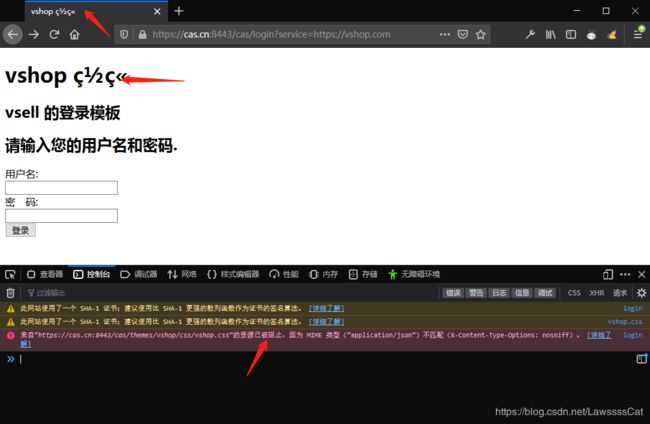
## 2、乱码+没样式
- 检查 主题下 的 properties 文件内容和编码
- 检查 文件所放的路径是否正确(是否是
springmvc的 静态资源路径)
# 如何修改默认主题?
application.properties
cas.theme.defaultThemeName=[theme_id]
2 自定义表单
如果要验证其他信息,比如邮箱,手机号,但是邮箱,手机信息在另一个数据库,还有在一段时间内同一IP输入错误次数限制等。
这里就需要我们自定义认证策略,自定义CAS的web认证流程。
依赖
<dependency>
     <groupId>org.apereo.casgroupId>
     <artifactId>cas-server-core-webflowartifactId>
     <version>${cas.version}version>
dependency>

<dependency>
     <groupId>org.apereo.casgroupId>
     <artifactId>cas-server-core-webflow-apiartifactId>
     <version>${cas.version}version>
dependency>
首先我们创建需要的表单信息,即这里除了要使用用户名和密码外,还要用户输入邮箱,手机号,所以需要
- 自定义Credential - (登录凭证,如username、password、email…)
- 自定义CasWebflowConfigurer - (登录环境配置,如重新绑定登录使用的 credential)
- 自定义CasWebflowExecutionPlanConfigurer - (配置的执行者,借此使上面的配置生效)
(最后在 spring.factories 中配置) - 自定义AbstractPreAndPostProcessingAuthenticationHandler - (验证规则,因为验证凭证变了,规则也要变)
具体看: CAS单点登录(六)——自定义登录界面和表单信息
自定义验证码
CAS单点登录(七)——自定义验证码以及自定义错误信息
平时登录我们会发现除了必填的信息外,还需要填写一下验证码。这是为了流控、暴力破解、降低数据库压力等等原因,今天我们就讲解一下如何在CAS中添加验证码。
注意:这一节的内容需要上面的知识点
- 自定义验证策略
- 定义Webflow校验流程
.
如果不知道,请先查看上一节的内容。
其实网上有很多关于CAS验证码如何实现的,只是CAS版本都是以前比较低的,今天讲解一下CAS 5.3.x版本中如何自定义验证码。
知识点和上一节关于自定义表单基本类似,只是这里补充了一些细节。
# 1、生成验证码类
这里提供两种方法
- 一种是 自定义生成验证码的工具类
- 一种是使用 谷歌提供 的
kaptcha类。
## 自定义工具类
未完待续
自定义返回消息
需求
-
这种需求的应用场景就是,A系统登录,我想返回啥,B系统登录,我又想返回啥。
-
单点登录,默认是只返回登录的用户名,不会返回其他的信息,我们需要在这个基础上进行扩展,开发。
-
配置自定义返回消息的时候,需要自定义表单处理,然后根据获取的结果来返回自定义数据。
扩展步骤
- 修改services文件夹的json配置
- 配置自定义认证类
- 并配置到springboot中。

