Spring学习笔记 —— 从IOC说起
- 什么是IOC
- Spring中IOC的实现
- 读取Bean定义文件
- 解析DOM对象
- 生成Bean
- 小结
- 参考文章
什么是IOC?
在Java程序中,常常会出现类之间的引用情况,而要初始化被引用的类,我们只能通过构造函数,赋值函数来完成对象的赋值,又或者是通过单例模式的静态方法来获取我们想要的对象。
如下代码:
public class UserService{

    private UserDao userDao;

    public UserService(UserDao userDao) {
        this.userDao = userDao;
    }

    public void setUserDao(UserDao userDao) {
        this.userDao = userDao;
    }

}
为了能够成功得到UserService中的UserDao,我们增加了构造方法和赋值函数方法。但是,如果有多个类需要引用到UserDao,我们为了降低UserService和UserDao的耦合程度,就只能使用单例方法。而如果这样的依赖关系很多的话,那么,如何能够让我们的代码变得更加简洁呢?
很多人也许能够想到,map就能解决这个问题
Map map = new HashMap, Object>();

userDao = map.get(UserDao.class);
我们可以将所有实例化的单例,都存放在一个HashMap中,这样子就能够实现一个单例HashMap而解决所有单例的存取问题了。
这其实就是一个最简单的IOC(Inversion of Control 控制反转)实现,我们不在编译时确定依赖对象的来源,但却能够在运行时得到这个对象。
但是,还有几个问题是这种简单的实现无法解决的。
- 在实例化对象之间有相互依赖关系时,我们必须决定初始化顺序,而这个逻辑可能会非常复杂
- 每次获取对象必须通过一个静态的接口,无法让依赖对象一次性初始化完成(代码不够简洁)
- 可扩展性不强,如果要控制对象实例化过程,要增加很多额外代码
为了解决这些问题,Spring框架就诞生了。在Spring框架中,我们将对象的属性配置写在xml文件中(也可以在java代码中定义),读取了这些配置文件后,会在容器中生成bean definition对象,在运行时需要的时候,我们可以通过
BeanFactory.getBean(String beanName)这个接口来得到我们想要的对象。调用这个接口的时候,BeanFactory会根据之前生成的Bean Definition来生成,保存(视需求而定),返回对象。另外,我们还能够控制对象实例化过程。下面,就来介绍Spring中IOC容器是如何实现的
Spring中IOC的实现
App.java
public class App {
    public static void main(String args[]) {
        DefaultListableBeanFactory listableBeanFactory = new DefaultListableBeanFactory();

        XmlBeanDefinitionReader xmlBeanDefReader = new XmlBeanDefinitionReader(listableBeanFactory);

        xmlBeanDefReader.loadBeanDefinitions("beans.xml");
        UserService userService = listableBeanFactory.getBean(UserService.class);
    }
}
beans.xml
<beans xmlns="http://www.springframework.org/schema/beans"
    xmlns:xsi="http://www.w3.org/2001/XMLSchema-instance"
    xmlns:context="http://www.springframework.org/schema/context"
    xsi:schemaLocation="http://www.springframework.org/schema/beans
    http://www.springframework.org/schema/beans/spring-beans-3.0.xsd
    http://www.springframework.org/schema/context
    http://www.springframework.org/schema/context/spring-context-3.0.xsd">

   <bean id="helloDAO" class="com.study.Spring.UserDao" scope="singleton">
   bean>

   <bean id="helloWorld" class="com.study.Spring.UserService" scope="singleton">
   bean>

beans>
如下,就是一个最简单的Spring IOC容器的例子。在这个IOC容器示例化的过程中,又完成了哪些事情呢?
看起来很简单的步骤,但是在Spring里面却是用了很复杂的架构来实现的。下面我们逐条来分析。
读取Bean定义文件
在Spring中,我们是通过一个统一的接口,来实现Resource的读取的。
ResourceLoader.java
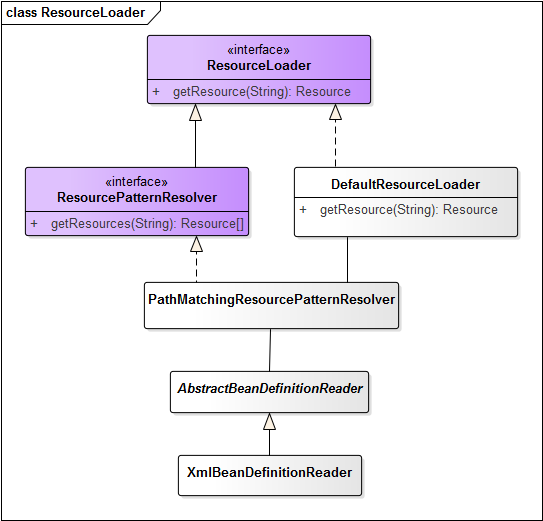
Resource getResource(String location);所有实现了这个接口的类,就必须实现getResource方法。因此,在我们的例子中,实际上也是包含了实现了ResourceLoader的类。从ResourceLoader角度出发,类的继承关系如下图所示。

我们可以看到,XMLBeanDefinitionReader继承了抽象类AbstractBeanDefinitionReader,而抽象类又默认初始化了PathMatchingResourcePatterResolver作为它的resourceLoader,PathMatchingResourcePatterResolver里又默认初始化了DefaultResourceLoader,并且将所有getResource的操作都委托给它,因此,哦我们如果需要查看资源加载,在默认情况下,可以直接查看DefaultResourceLoader里面的getResource方法。
后面,我也会在UML图中标注出需要重点关注的方法,一般可以认为在图中标示的方法就是默认使用的方法。
DefaultResourceLoader.java
@Override
    public Resource getResource(String location) {
        Assert.notNull(location, "Location must not be null");
        if (location.startsWith("/")) {
            return getResourceByPath(location);
        }
        else if (location.startsWith(CLASSPATH_URL_PREFIX)) {
            return new ClassPathResource(location.substring(CLASSPATH_URL_PREFIX.length()), getClassLoader());
        }
        else {
            try {
                // Try to parse the location as a URL...
                URL url = new URL(location);
                return new UrlResource(url);
            }
            catch (MalformedURLException ex) {
                // No URL -> resolve as resource path.
                return getResourceByPath(location);
            }
        }
    }
得到了Resource之后,就会对resource进行封装,转换。
因为Resource继承了InputStreamSource接口,因此我们能够直接通过Resource得到InputStream。
InputStreamSource.java只声明了一个接口。
InputStream getInputStream() throws IOException;封装和转换,是在XmlBeanDefinitionReader中的loadBeanDefinitions中完成的
public int loadBeanDefinitions(EncodedResource encodedResource) throws BeanDefinitionStoreException {
        Assert.notNull(encodedResource, "EncodedResource must not be null");
        if (logger.isInfoEnabled()) {
            logger.info("Loading XML bean definitions from " + encodedResource.getResource());
        }

        Set currentResources = this.resourcesCurrentlyBeingLoaded.get();
        if (currentResources == null) {
            currentResources = new HashSet(4);
            this.resourcesCurrentlyBeingLoaded.set(currentResources);
        }
        if (!currentResources.add(encodedResource)) {
            throw new BeanDefinitionStoreException(
                    "Detected cyclic loading of " + encodedResource + " - check your import definitions!");
        }
        try {
            InputStream inputStream = encodedResource.getResource().getInputStream();
            try {
                InputSource inputSource = new InputSource(inputStream);
                if (encodedResource.getEncoding() != null) {
                    inputSource.setEncoding(encodedResource.getEncoding());
                }
                return doLoadBeanDefinitions(inputSource, encodedResource.getResource());
            }
            finally {
                inputStream.close();
            }
        }
        catch (IOException ex) {
            throw new BeanDefinitionStoreException(
                    "IOException parsing XML document from " + encodedResource.getResource(), ex);
        }
        finally {
            currentResources.remove(encodedResource);
            if (currentResources.isEmpty()) {
                this.resourcesCurrentlyBeingLoaded.remove();
            }
        }
    }
将InputStream转换为DOM对象,也同样是只声明了一个接口。
DocumentLoader.java
Document loadDocument(
            InputSource inputSource, EntityResolver entityResolver,
            ErrorHandler errorHandler, int validationMode, boolean namespaceAware)
throws Exception;而这个转换,则发生在了XmlBeanDefinitionReader的doLoadBeanDefinitions方法中
protected int doLoadBeanDefinitions(InputSource inputSource, Resource resource)
            throws BeanDefinitionStoreException {
        try {
            Document doc = doLoadDocument(inputSource, resource);
            return registerBeanDefinitions(doc, resource);
        }
        ...exception 处理
    }
至此,我们就完成了Resource文件的读取,以及转换,得到了我们想要的Document对象。后面,我们将会分析,Spring是怎么将Document对象转化为真正的BeanDefinition的。
解析DOM对象
解析整个DOM对象,我们是通过BeanDefinitionDocumentReader.java来完成的。
BeanDefinitionDocumentReader.java依然只定义了一个接口
void registerBeanDefinitions(Document doc, XmlReaderContext readerContext)
throws BeanDefinitionStoreException;可见,XmlBeanDefinitionReader默认持有了DefaultBeanDefinitionDocumentReader,并且默认调用其registerBeanDefinitions方法,而DefaultBeanDefinitionDocumentReader在生成bean的定义并且将其保存的时候,会委托BeanDefinitionParserDelegate进行Bean的解析。
在DefaultBeanDefinitionDocumentReader中parseDefaultElement我们可以看到,处理XML的时候,实际上是将默认的XML元素分成了四种——import的XML,alias,Bean定义以及内部Bean的定义。
private void parseDefaultElement(Element ele, BeanDefinitionParserDelegate delegate) {
        if (delegate.nodeNameEquals(ele, IMPORT_ELEMENT)) {
            importBeanDefinitionResource(ele);
        }
        else if (delegate.nodeNameEquals(ele, ALIAS_ELEMENT)) {
            processAliasRegistration(ele);
        }
        else if (delegate.nodeNameEquals(ele, BEAN_ELEMENT)) {
            processBeanDefinition(ele, delegate);
        }
        else if (delegate.nodeNameEquals(ele, NESTED_BEANS_ELEMENT)) {
            // recurse
            doRegisterBeanDefinitions(ele);
        }
    }
而进一步查看其如何处理的,就能够发现原来所有的Bean先会通过delege parser,完成了之后再进行decorate,最后,将会将这个Bean的定义保存到Registry中。
protected void processBeanDefinition(Element ele, BeanDefinitionParserDelegate delegate) {
        BeanDefinitionHolder bdHolder = delegate.parseBeanDefinitionElement(ele);
        if (bdHolder != null) {
            bdHolder = delegate.decorateBeanDefinitionIfRequired(ele, bdHolder);
            try {
                // Register the final decorated instance.
                BeanDefinitionReaderUtils.registerBeanDefinition(bdHolder, getReaderContext().getRegistry());
            }
            catch (BeanDefinitionStoreException ex) {
                getReaderContext().error("Failed to register bean definition with name '" +
                        bdHolder.getBeanName() + "'", ele, ex);
            }
            // Send registration event.
            getReaderContext().fireComponentRegistered(new BeanComponentDefinition(bdHolder));
        }
    }
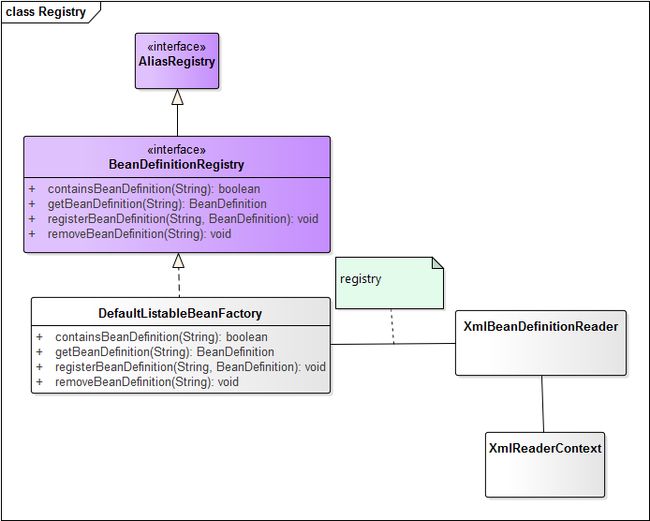
那么,Registry又是什么东西呢?

那么,看到这里我们就知道,DefaultListableBeanFactory通过实现BeanDefinitionRegistry接口,从而达到了存储Bean定义的目的。我们再来看看其具体实现,
@Override
    public void registerBeanDefinition(String beanName, BeanDefinition beanDefinition)
            throws BeanDefinitionStoreException {

        Assert.hasText(beanName, "Bean name must not be empty");
        Assert.notNull(beanDefinition, "BeanDefinition must not be null");

        if (beanDefinition instanceof AbstractBeanDefinition) {
            try {
                ((AbstractBeanDefinition) beanDefinition).validate();
            }
            catch (BeanDefinitionValidationException ex) {
                throw new BeanDefinitionStoreException(beanDefinition.getResourceDescription(), beanName,
                        "Validation of bean definition failed", ex);
            }
        }

        BeanDefinition oldBeanDefinition;

        oldBeanDefinition = this.beanDefinitionMap.get(beanName);
        //如果出现冲突/覆盖情况,根据设置来决定处理方式。
        if (oldBeanDefinition != null) {
            if (!isAllowBeanDefinitionOverriding()) {
                throw new BeanDefinitionStoreException(beanDefinition.getResourceDescription(), beanName,
                        "Cannot register bean definition [" + beanDefinition + "] for bean '" + beanName +
                        "': There is already [" + oldBeanDefinition + "] bound.");
            }
            else if (oldBeanDefinition.getRole() < beanDefinition.getRole()) {
                ..省略debug输出
            }
            else if (!beanDefinition.equals(oldBeanDefinition)) {
                ..省略debug输出
            }
            else {
                ..省略debug输出
            }
            this.beanDefinitionMap.put(beanName, beanDefinition);
        }
        else {
            if (hasBeanCreationStarted()) {
                // 如果有Bean正在创建,那么需要在确保beanDefinitionMap已经不在使用的时候,再进行bean定义写入
                synchronized (this.beanDefinitionMap) {
                    this.beanDefinitionMap.put(beanName, beanDefinition);
                    List updatedDefinitions = new ArrayList(this.beanDefinitionNames.size() + 1);
                    updatedDefinitions.addAll(this.beanDefinitionNames);
                    updatedDefinitions.add(beanName);
                    this.beanDefinitionNames = updatedDefinitions;
                    if (this.manualSingletonNames.contains(beanName)) {
                        Set updatedSingletons = new LinkedHashSet(this.manualSingletonNames);
                        updatedSingletons.remove(beanName);
                        this.manualSingletonNames = updatedSingletons;
                    }
                }
            }
            else {
                //将Bean定义保存在map中
                this.beanDefinitionMap.put(beanName, beanDefinition);
                this.beanDefinitionNames.add(beanName);
                this.manualSingletonNames.remove(beanName);
            }
            this.frozenBeanDefinitionNames = null;
        }

        if (oldBeanDefinition != null || containsSingleton(beanName)) {
            resetBeanDefinition(beanName);
        }
    }
生成Bean
在注册完所有的Bean定义之后,IOC的容器就算准备完成了,我们也就可以使用最开始提到的getBean方法,来进行Bean的获取了。
但是,在getBean的时候,又发生了哪些事情呢?我们通过代码观察,可以发现,最后会到一个非常关键的方法:AbstractBeanFactory.doGetBean
protected T doGetBean(
final String name, final Class requiredType, final Object[] args, boolean typeCheckOnly)
throws BeansException {
final String beanName = transformedBeanName(name);
Object bean;
// 首先在单例的Beans中检查目标是否存在
Object sharedInstance = getSingleton(beanName);
if (sharedInstance != null && args == null) {
//..略去debug代码
bean = getObjectForBeanInstance(sharedInstance, name, beanName, null);
}
else {
// 对于scope为prototype的Bean,如果同时出现两个正在创建,那么可以认为是处在一个循环创建的阶段。
if (isPrototypeCurrentlyInCreation(beanName)) {
throw new BeanCurrentlyInCreationException(beanName);
}
// 首先检查是否在父亲工厂Bean中存在
BeanFactory parentBeanFactory = getParentBeanFactory();
if (parentBeanFactory != null && !containsBeanDefinition(beanName)) {
String nameToLookup = originalBeanName(name);
if (args != null) {
// 通过父亲查找Bean
return (T) parentBeanFactory.getBean(nameToLookup, args);
}
else {
// 通过父亲查找Bean
return parentBeanFactory.getBean(nameToLookup, requiredType);
}
}
if (!typeCheckOnly) {
markBeanAsCreated(beanName);
}
try {
final RootBeanDefinition mbd = getMergedLocalBeanDefinition(beanName);
checkMergedBeanDefinition(mbd, beanName, args);
// 初始化依赖的Bean
String[] dependsOn = mbd.getDependsOn();
if (dependsOn != null) {
for (String dependsOnBean : dependsOn) {
if (isDependent(beanName, dependsOnBean)) {
throw new BeanCreationException(mbd.getResourceDescription(), beanName,
"Circular depends-on relationship between '" + beanName + "' and '" + dependsOnBean + "'");
}
registerDependentBean(dependsOnBean, beanName);
getBean(dependsOnBean);
}
}
// 真正开始创建目标Bean
if (mbd.isSingleton()) {
sharedInstance = getSingleton(beanName, new ObjectFactory 这里看大图
而再往后的创建过程,都可以直接通过调试代码观察的,在此就不赘述了。大家也可以参阅Spring 源码解读IOC原理中的第四章,看到更为详细的代码剖析。
小结
在这篇文章中,我们剖析了一个最为简单的Bean实现,通过XmlBeanDefinitionReader进行XML文件的读取,解析,再通过DefaultListableBeanFactory进行Bean定义的注册,Bean的生成,最后获得Bean。
而将所有点连结起来,就是如下的类图。

这里看大图
主要分析了四个比较重要的接口:
- BeanDefinitionDocumentReader 负责将Document对象中的Bean解析出来,并且保存到Registry中
- ResourceLoader 负责将文件作为资源加载到系统里
- BeanDefinitionRegistry 负责Bean定义的增删改查
- BeanFactory 负责创建、查找Bean对象
在下一篇文章,我们将会对Spring的另外一个概念——context进行介绍和分析。
参考文章
- Spring版本 - 4.2.6 - Release
- 浅谈IOC–说清楚IOC是什么
- Spring 源码解读IOC原理
