ARouter学习之三——注解解析器(arouter-compiler源码)
因为疑惑,所以学习。
上一篇了解了ARouter所使用的注解是怎么来的,但疑惑为什么定义的这个注解就生效了呢?能帮助我们实现路由跳转呢?或实现参数赋值呢?本文解答这个问题。
注:源码来自2019/09/10 Git下载的版本1.5.0 https://github.com/alibaba/ARouter
目录
目录
目录
一、参考必读
二、源码Compiler介绍
三、AutowiredProcessor的源码实现
四、总结
一、参考必读
如果你同当初的我一样好奇,请静心稳步下方参考文献,读完后再继续。若想快速了解,跳过参考文献也可,那读下我蹩脚的总结吧。
Java注解处理器
注解处理器(Annotation Processor)是Javac的一个工具,对编写的Java代码进行扫描并生成Java代码。啥意思呢?就是注解处理器就是本文章一开始疑惑的答案。为什么生效?为什么能实现这些功能?原因就是虽然我们没有写出功能实现的Java代码,但通过我们写了注解的Java代码,注解处理器解析生成了功能实现的Java代码,并在javac编译时一同被编译。
对于自定义的注解,我们需要编写针对自定义注解的处理器,换句话讲,你自己捣鼓出一个注解,你想让这个注解起到什么作用,总得用代码告诉机器吧,这个就是要编写的自定义注解处理器。只有你用代码告诉了机器,它才能生成你没有写出的那部分Java代码。
每个处理器都继承于AbstractProcessor【位于javax.annotation.processing包下】,其含有四个方法需要实现。一个用于初始化,一个用于实现注解处理,一个指定处理器起作用的注解包含(它是一个集合),一个是声明支持最低的Java版本。具体的四个方法,后面会通过ARouter源码来说明。
二、源码Compiler介绍
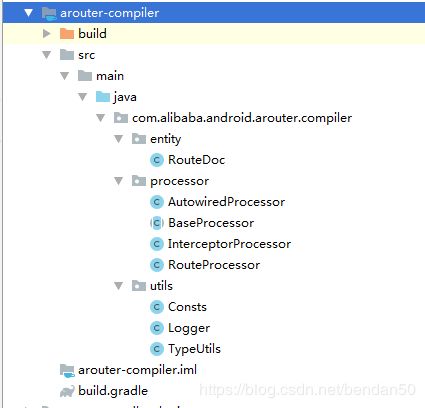
通过第一部分的说明,我们应该很清楚Compiler是干什么的了,编译用户注解的元素信息,生成Java文件。其源码结构:
重点显然在processor里,即实现注解处理。其中BaseProcessor为继承AbstractProcessor的自定义基类,做了除注解处理之外的其他三个必要函数。而余下的三个则是继承BaseProcessor,针对各自的注解实现注解处理的实现。看下BaseProcessor的源码前先做下准备工作,介绍下源码所用到的几个类:SourceVersion和ProcessingEnvironment
SourceVersion是一个枚举,用来列举所支持的Java版本,如1.6;1.7;1.8等。这些均为枚举值,具体为:RELEASE_6/RELEASE_7/RELEASE_8等。
该类还有一个方法,是在BaseProcessor中使用到的:latestSupported(),用来返回最新所支持的版本。
再来看下ProcessingEnvironment的API文档
一个接口,实现了该接口的实体将提供写文件、报告错误、查找工具类等功能。正因为此,该接口定义了诸如:getFiler()、getLocale()、getElementUtils()、getMessager()、getTypeUtils()等方法。
摘录API如下:
getFiler--Returns the filer used to create new source, class, or auxiliary files.
getLocale--Returns the current locale or null if no locale is in effect.
getElementUtils--Returns an implementation of some utility methods for operating on elements
getMessager--Returns the messager used to report errors, warnings, and other notices.
getTypeUtils--Returns an implementation of some utility methods for operating on types.
getOptions--Returns the processor-specific options passed to the annotation processing tool.
介绍完基础,可以放大招上菜了,看下ARouter的BaseProcessor是如何实现的。源码如下:
public abstract class BaseProcessor extends AbstractProcessor {
    Filer mFiler;
    Logger logger;
    Types types;
    Elements elementUtils;
    TypeUtils typeUtils;
    // Module name, maybe its 'app' or others
    String moduleName = null;
    // If need generate router doc
    boolean generateDoc;

    @Override
    public synchronized void init(ProcessingEnvironment processingEnv) {
        super.init(processingEnv);

        mFiler = processingEnv.getFiler();
        types = processingEnv.getTypeUtils();
        elementUtils = processingEnv.getElementUtils();
        typeUtils = new TypeUtils(types, elementUtils);
        logger = new Logger(processingEnv.getMessager());

        // Attempt to get user configuration [moduleName]
        Map options = processingEnv.getOptions();
        if (MapUtils.isNotEmpty(options)) {
            moduleName = options.get(KEY_MODULE_NAME);
            generateDoc = VALUE_ENABLE.equals(options.get(KEY_GENERATE_DOC_NAME));
        }

        if (StringUtils.isNotEmpty(moduleName)) {
            moduleName = moduleName.replaceAll("[^0-9a-zA-Z_]+", "");

            logger.info("The user has configuration the module name, it was [" + moduleName + "]");
        } else {
            logger.error(NO_MODULE_NAME_TIPS);
            throw new RuntimeException("ARouter::Compiler >>> No module name, for more information, look at gradle log.");
        }
    }

    @Override
    public SourceVersion getSupportedSourceVersion() {
        return SourceVersion.latestSupported();
    }

    @Override
    public Set getSupportedOptions() {
        return new HashSet() {{
            this.add(KEY_MODULE_NAME);
            this.add(KEY_GENERATE_DOC_NAME);
        }};
    }
}
初始化函数干了两件事,初始化变量+获取并检查模块名。需要注意的是throw new RuntimeException的提示,在使用ARouter框架时,出现异常,可以基于源码发现问题所在。
三、AutowiredProcessor的源码实现
直奔基类BaseProcessor没有重写的方法process()。
public class AutowiredProcessor extends BaseProcessor {
    ...
    @Override
    public boolean process(Set set, RoundEnvironment roundEnvironment) {
        if (CollectionUtils.isNotEmpty(set)) {
            try {
                logger.info(">>> Found autowired field, start... <<<");
                categories(roundEnvironment.getElementsAnnotatedWith(Autowired.class));
                generateHelper();

            } catch (Exception e) {
                logger.error(e);
            }
            return true;
        }

        return false;
    }
    ...
}
通过对ProcessingEnvironment的认识,可以肯定RoundEnvironment类其功能与ProcessingEnvironment是相似的,在此不再展开,可查API。categories的参数是:返回的那些被特定类型注解解释的元素集合。以@Autowired为例,这一步应该是拿到了那些被注解解释的类属性。再看下categories拿到这个元素集合后,又做了什么。然后再分析另一个generateHelper()方法。
private Map> parentAndChild = new HashMap<>();   // Contain field need autowired and his super class.
/**
     * Categories field, find his papa.
     *
     * @param elements Field need autowired
     */
    private void categories(Set elements) throws IllegalAccessException {
        if (CollectionUtils.isNotEmpty(elements)) {
            for (Element element : elements) {
                TypeElement enclosingElement = (TypeElement) element.getEnclosingElement();

                if (element.getModifiers().contains(Modifier.PRIVATE)) {
                    throw new IllegalAccessException("The inject fields CAN NOT BE 'private'!!! please check field ["
                            + element.getSimpleName() + "] in class [" + enclosingElement.getQualifiedName() + "]");
                }

                if (parentAndChild.containsKey(enclosingElement)) { // Has categries
                    parentAndChild.get(enclosingElement).add(element);
                } else {
                    List childs = new ArrayList<>();
                    childs.add(element);
                    parentAndChild.put(enclosingElement, childs);
                }
            }

            logger.info("categories finished.");
        }
    }
该函数有三个关键点:
一、核心是在给一个类私有变量赋值,即parentAndChild。通过变量后面的注释和categories方法的注释可猜出其作用是找出需要自动写的变量和其父元素。
二、被@Autowired注解的变量不能是private私有类型,否则将报语法异常。这都通过源码分析出来的。
三、element.getEnclosingElement()这句代码的作用就是找该注解修饰元素的父元素。其API描述如下:
一个用来获取子元素,一个用来获取父元素。
之后的处理就是有父元素已经存在,则直接把注解的那个元素加进去;不存在,则new个子元素的列表,新增父元素与子元素的映射。
至此,经过categories方法的处理,我们拿到了需要注解的所有子元素和它的父元素。
再来看接下来调用的generateHelper()方法。此前请移步了解【javapoet】库。
JavaPoet的使用指南:https://blog.csdn.net/l540675759/article/details/82931785#_220
private void generateHelper() throws IOException, IllegalAccessException {
	TypeElement type_ISyringe = elementUtils.getTypeElement(ISYRINGE);
	TypeElement type_JsonService = elementUtils.getTypeElement(JSON_SERVICE);
	TypeMirror iProvider = elementUtils.getTypeElement(Consts.IPROVIDER).asType();
	TypeMirror activityTm = elementUtils.getTypeElement(Consts.ACTIVITY).asType();
	TypeMirror fragmentTm = elementUtils.getTypeElement(Consts.FRAGMENT).asType();
	TypeMirror fragmentTmV4 = elementUtils.getTypeElement(Consts.FRAGMENT_V4).asType();

	// Build input param name.
	//生成参数类型为Object,名为tagret的参数,用于接下来自动生成的方法中
	ParameterSpec objectParamSpec = ParameterSpec.builder(TypeName.OBJECT, "target").build();

	if (MapUtils.isNotEmpty(parentAndChild)) {
		for (Map.Entry> entry : parentAndChild.entrySet()) {
			// Build method : 'inject'
			MethodSpec.Builder injectMethodBuilder = MethodSpec.methodBuilder(METHOD_INJECT)    //常规方式生成方法,参数为方法名
					.addAnnotation(Override.class)          //生成注解,@Override
					.addModifiers(PUBLIC)                   //添加方法修饰符,公有方法
					.addParameter(objectParamSpec);         //设置方法参数,类型为Object,参数名为target,参数个数1个

			TypeElement parent = entry.getKey();
			List childs = entry.getValue();

			String qualifiedName = parent.getQualifiedName().toString();
			String packageName = qualifiedName.substring(0, qualifiedName.lastIndexOf("."));
			String fileName = parent.getSimpleName() + NAME_OF_AUTOWIRED;

			logger.info(">>> Start process " + childs.size() + " field in " + parent.getSimpleName() + " ... <<<");

			TypeSpec.Builder helper = TypeSpec.classBuilder(fileName)       //创建类,参数为类名
					.addJavadoc(WARNING_TIPS)                       //添加文档注释
					.addSuperinterface(ClassName.get(type_ISyringe))        //实现接口
					.addModifiers(PUBLIC);              //设置类的修饰符

			//生成成员变量,传入TypeName(Class)、name(名称)、Modifier(修饰符)就可生成一个基本的成员变量
			FieldSpec jsonServiceField = FieldSpec.builder(TypeName.get(type_JsonService.asType()), "serializationService", Modifier.PRIVATE).build();
			helper.addField(jsonServiceField);      //该类添加生成的成员变量

			//设置inject方法的方法体
			injectMethodBuilder.addStatement("serializationService = $T.getInstance().navigation($T.class)", ARouterClass, ClassName.get(type_JsonService));
			injectMethodBuilder.addStatement("$T substitute = ($T)target", ClassName.get(parent), ClassName.get(parent));

			// Generate method body, start inject.
			for (Element element : childs) {
				...
			}

			helper.addMethod(injectMethodBuilder.build());      //该类添加生成的方法

			// Generate autowire helper
			JavaFile.builder(packageName, helper.build()).build().writeTo(mFiler);      //类写文件,完成。JavaFile控制生成的Java文件的输出类

			logger.info(">>> " + parent.getSimpleName() + " has been processed, " + fileName + " has been generated. <<<");
		}

		logger.info(">>> Autowired processor stop. <<<");
	}
}
上文源码中的汉字注释是根据JavaPoet总结的,中间的for (Element element : childs)循环用于处理各元素,过长就省略了。这个方法就是生成.java文件。通过声明类、定义变量、方法、然后写成文件。
四、总结
虎头蛇尾的就到了小结。本文开头的疑惑已经解开。就是Java注解处理器+JavaPoet。
注解有了,注解也生效了。接下来就是怎么用了。


