在上一篇中,你学到了如何来用UICollectionView完成一个网格相册.
在本篇中,你将继续来学习collection views的更多用法.继续使用上一篇的项目或者可以在这里下载(你需要上一篇提到的新的API key).
- 添加标头
这个应用每个搜索结果都有一个section.可以在搜索结果之前添加一个标头,以便更好地显示照片信息.
使用UICollectionReusableView来创建标头.这个类是collection view cell的一种(实际上,cells继承于此类),但用法却同headers或footers相似.
这个view可以在storyboard里创建并可以连接到你的类中.新建一个UICollectionReusableView的子类,命名为FlickrPhotoHeaderView.
在collection view的Attributes Inspector里面勾选Section Header:
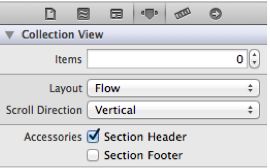
你会发现"Collection Reusable View"将自动添加到Collection View的下面.选择Collection Reusable View后就可以添加子视图了.
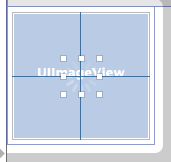
你可以通过拖动Collection Reusable View的底部来使其变为90pixels高,便于有更多的空间.(你也可以在属性面板里改变view的尺寸)
在header view的中心添加一个label控件.将字体调为System 32.0并在alignment menu里添加水平和竖直相关的约束,更新frame:

选择头视图,将其Class设为FlickrPhotoHeaderView.
设置背景颜色为90%的白色,视图的Identifier设为FlickrPhotoHeaderView.这个identifier将会在下面用到.
点击Assistant editor,确保FlickrPhotoHeaderView.swift打开,连线拖拽label到类中.命名为label:
class FlickrPhotoHeaderView: UICollectionReusableView {
  @IBOutlet weak var label: UILabel!
}
如果现在就运行程序,你将看不到header(或者将是个仅有个"Label"文字的空白页).你需要实现另外的一个datasource 方法.打开FlickrPhotosViewController.swift添加UICollectionViewDataSource扩展:
override func collectionView(collectionView: UICollectionView,
  viewForSupplementaryElementOfKind kind: String,
  atIndexPath indexPath: NSIndexPath) -> UICollectionReusableView {
    //1
    switch kind {
      //2
      case UICollectionElementKindSectionHeader:
        //3
        let headerView =
        collectionView.dequeueReusableSupplementaryViewOfKind(kind,
          withReuseIdentifier: "FlickrPhotoHeaderView",
          forIndexPath: indexPath)
          as! FlickrPhotoHeaderView
        headerView.label.text = searches[indexPath.section].searchTerm
        return headerView
      default:
        //4
        assert(false, "Unexpected element kind")
    }
}
这个方法和cellForItemAtIndexPath相似,但却视为额外的视图所用的.下面是以上代码的释义:
- kind参数由布局对象提供并标明是哪个额外的视图.
- UICollectionElementKindSectionHeader为flow layout提供的一种额外视图.通过添加storyboard中的属性来告诉flow layout需要额外的视图,因此添加了个section header.当然也有UICollectionElementKindSectionFooter,但现在并没有用到.如果你使用的不是flow layout,并不会这么容易就添加header和footer.
- header通过storyboard中的identifier来标示.原理同cell相似.label上的文字被设置为相关的搜索项目.
- 断言在这里是提醒后来的开发者(或者是将来的你),这里并不想得到除header view外的对象.
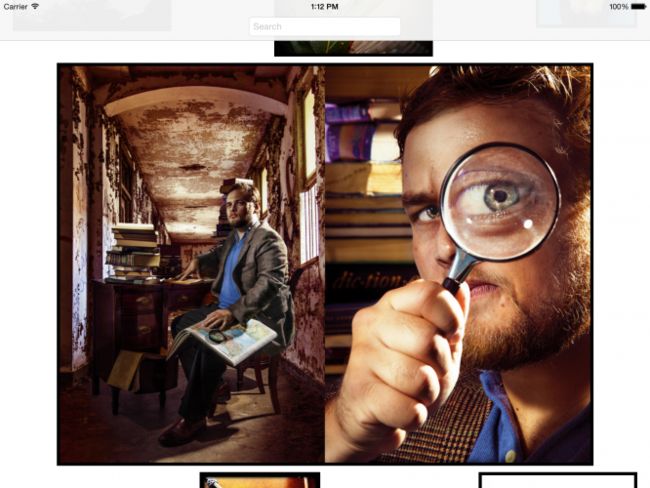
运行程序,你会看到UI快完成了.如果你进行了多个搜索,你将会得到section headers来很好地分隔你的搜索结果.翻转设配你会发现无需额外的工作,各个布局都看起来很不错.

Cell的交互
在最后,你将学到cell的一些交互.你将完成两种不同的操作.一种是放大图片,一种是多选图片来分享.单个选择
Collection能够通过动画来变化它的布局.第一个任务是点击时图片放大.
首先,你需要添加一个属性来表示你点击的cell.打开FlickrPhotosViewController.swift,添加如下代码:
//1
var largePhotoIndexPath : NSIndexPath? {
didSet {
  //2
  var indexPaths = [NSIndexPath]()
  if largePhotoIndexPath != nil {
    indexPaths.append(largePhotoIndexPath!)
  }
  if oldValue != nil {
    indexPaths.append(oldValue!)
  }
  //3
      collectionView?.performBatchUpdates({
        self.collectionView?.reloadItemsAtIndexPaths(indexPaths)
        return
        }){
          completed in
          //4
          if self.largePhotoIndexPath != nil {
            self.collectionView?.scrollToItemAtIndexPath(
              self.largePhotoIndexPath!,
              atScrollPosition: .CenteredVertically,
              animated: true)
          }
      }
  }
}
下面是代码的释义:
- largePhotoIndexPath为点击图片的index path.
- 当此属性被更新时,collection view需要更新.didSet属性表明这是个安全的地方来处理这些更新.如果用户已经点击了一幅图片后再点击另一幅,或者点击相同一副图两次则需要缩放动画,这时需要两个cells重载.
- 更新动画完成后,最好将放大的图片放在屏幕中央.
"如何来增大Cell?"待会告诉你.
点击cell时会将collection view选中.你将通过设置的largeIndexPath属性来获取你点击的cell,但你并不希望这个cell真正被选中,当你使用多选时这将会是你迷惑.collection view 通过代理方法来判断是否选中了一个cell.仍然在FlickrPhotosViewController.swift添加一个新的扩展方法来增加collection view的代理方法,如下:
extension FlickrPhotosViewController : UICollectionViewDelegate {

  override func collectionView(collectionView: UICollectionView,
    shouldSelectItemAtIndexPath indexPath: NSIndexPath) -> Bool {
      if largePhotoIndexPath == indexPath {
        largePhotoIndexPath = nil
      }
      else {
        largePhotoIndexPath = indexPath
      }
      return false
  }
}
这个方法相当简单.如果这个cell已经是大图了,设置largePhotoIndexPath为nil,相反地,设置其index path为所点击的.这将会调用之前你添加的属性观察者来使collection view更新重载.
要实现点击cell方法图片,需要修改flow layout的代理方法sizeForItemAtIndexPath.替换成一下代码:
func collectionView(collectionView: UICollectionView,
  layout collectionViewLayout: UICollectionViewLayout,
  sizeForItemAtIndexPath indexPath: NSIndexPath) -> CGSize {

  let flickrPhoto = photoForIndexPath(indexPath)

  // New code
  if indexPath == largePhotoIndexPath {
    var size = collectionView.bounds.size
    size.height -= topLayoutGuide.length
    size.height -= (sectionInsets.top + sectionInsets.right)
    size.width -= (sectionInsets.left + sectionInsets.right)
    return flickrPhoto.sizeToFillWidthOfSize(size)
  }
  // Previous code
  if var size = flickrPhoto.thumbnail?.size {
    size.width += 10
    size.height += 10
    return size
  }
  return CGSize(width: 100, height: 100)
}
添加的方法用来计算放大后的尺寸.
没必要更大的cell除非你有更大的图片需要真实.
在Main.storyboard的collection view cell里面image view上添加一个activity indicator.将这个activity indicator 的Style设置为Large White,勾选Hides When Stopped.将它放于cell的中央,添加约束.
将activity indicator在FlickrPhotoCell.swift中添加对应的outlet,命名为activityIndicator:
@IBOutlet weak var activityIndicator: UIActivityIndicatorView!
然后在FlickrPhotoCell.swift中添加如下代码来控制cell的背景色:
override func awakeFromNib() {
  super.awakeFromNib()
  self.selected = false
}

override var selected : Bool {
  didSet {
    self.backgroundColor = selected ? themeColor : UIColor.blackColor()
  }
}
最后需要更新FlickrPhotosCollectionViewController.swift里的cellForItemAtIndexPath:
override func collectionView(collectionView: UICollectionView, cellForItemAtIndexPath indexPath: NSIndexPath) -> UICollectionViewCell {

  let cell = collectionView.dequeueReusableCellWithReuseIdentifier(
    reuseIdentifier, forIndexPath: indexPath) as! FlickrPhotoCell
  let flickrPhoto = photoForIndexPath(indexPath)

  //1
  cell.activityIndicator.stopAnimating()

  //2
  if indexPath != largePhotoIndexPath {
    cell.imageView.image = flickrPhoto.thumbnail
    return cell
  }

  //3
  if flickrPhoto.largeImage != nil {
    cell.imageView.image = flickrPhoto.largeImage
    return cell
  }

  //4
  cell.imageView.image = flickrPhoto.thumbnail
  cell.activityIndicator.startAnimating()

  //5
  flickrPhoto.loadLargeImage {
    loadedFlickrPhoto, error in

    //6
    cell.activityIndicator.stopAnimating()

    //7
    if error != nil {
      return
    }

    if loadedFlickrPhoto.largeImage == nil {
      return
    }

    //8
    if indexPath == self.largePhotoIndexPath {
      if let cell = collectionView.cellForItemAtIndexPath(indexPath) as? FlickrPhotoCell {
        cell.imageView.image = loadedFlickrPhoto.largeImage
      }
    }
  }

  return cell
}
下面为以上代码的释义:
- 总是停止activity spinner - 你需要复用cell在图片下载之前.
- 这部分和之前相同 - 如果你没有查看大图片,仅设置返回thumbnail即可.
- 如果大图片已经加载完,返回它
- 当你想要获得大图片,但还没有时,设置spinner运转并通过thumbnail image获取图片,当下载完后缩略图将会被方法.
- 异步请求大图片并通过block来返回结果.
- 加载完成后,停止spinner.
- 如果发生错误或没有图片加载,将不做什么.
- 检查放大图片的index path在下载时是否变化,获得正确的cell的index path使图片放大.
运行程序,进行搜索,点击你喜欢的图片,它将填满屏幕,其它的cell将为它腾出足够的空间.
再次点击cell,或者滑动后点击其它cell.无需写任何代码,collection view会完成布局变化的动画.
Girl学iOS100天 第14天