Python一键更换证件照背景色
Python一键更换证件照背景色
PS: 也是从网上各个帖子中学习的Python,因此代码的格式以及内容有粘贴网上其他大神的代码,如有侵权请告知删除
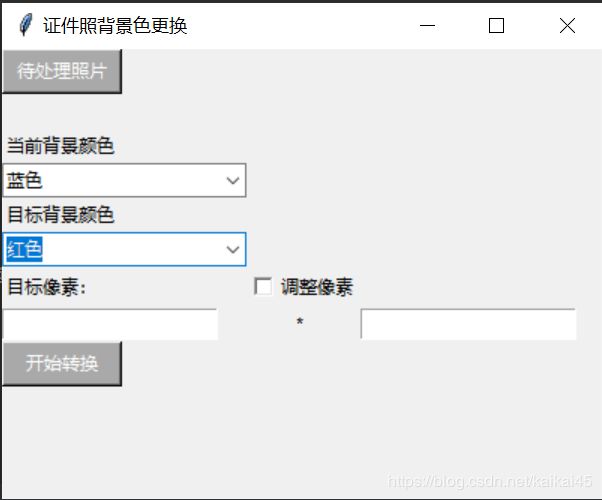
示例界面
import cv2
import numpy as np
from tkinter import *
from tkinter import ttk
import tkinter as tk
import tkinter.filedialog
import os

root = Tk()
root.title('证件照背景色更换')
root.geometry('400x300')
SelectNum = tk.IntVar()  # 用来储存下面勾选项1中返回的0或1

FileName = ""
UsingColour = ""
DesColour = ""
DesSize1 = ""
DesSize2 = ""

BlueRange = [[90, 70, 70], [110, 255, 255]]
Blue = [219, 142, 67]
Red = [0, 0, 255]
White = [255, 255, 255]

def Button1Anwser():
    global FileName
    Path = Label(root, text='')
    FileName = tkinter.filedialog.askopenfilename()
    Path.config(text = FileName)
    Path.grid(row=2, column=0, sticky=W)

def Button2Anwser():
    global DesColour
    global DesSize1
    global DesSize2

    ColNum = str(Descmb.get())
    if ColNum == "蓝色":
        DesColour = Blue
    if ColNum == "红色":
        DesColour = Red
    if ColNum == "白色":
        DesColour = White

    img = cv2.imread(FileName)

    Text = Label(root, text='')
    Text.config(text='正在转换')
    Text.grid(row=9, column=1)

    # 缩放
    rows, cols, channels = img.shape  # 长 宽 通道数
    rows, cols, channels = img.shape
    cv2.imshow('img', img)

    # 转换hsv
    hsv = cv2.cvtColor(img, cv2.COLOR_BGR2HSV)  # rgb转hsv
    lower_colour = np.array([BlueRange[0]])
    upper_colour = np.array([BlueRange[1]])
    # 去除背景,低于lower_red和高于upper_red的部分分别变成0,lower_red~upper_red之间的值变成255
    mask = cv2.inRange(hsv, lower_colour, upper_colour)

    # 腐蚀膨胀
    erode = cv2.erode(mask, None, iterations=1)  # 腐蚀
    dilate = cv2.dilate(erode, None, iterations=1)  # 膨胀

    # 遍历替换
    for i in range(rows):
        for j in range(cols):
            if dilate[i, j] == 255:
                img[i, j] = (DesColour)  # 此处替换颜色,为BGR通道
    cv2.imshow('res', img)

    Text = Label(root, text='')
    Text.config(text='转换完成')
    Text.grid(row=9, column=1)
    if SelectNum.get() == 1:
        DesSize1 = int(Size1.get())
        DesSize2 = int(Size2.get())
        img = cv2.resize(img, (DesSize1, DesSize2), interpolation=cv2.INTER_CUBIC)
    cv2.imwrite(os.path.split(FileName)[0]+'\Result.jpg', img)  # 保存图像

    cv2.waitKey(0)
    cv2.destroyAllWindows()

# -------------------------------------界面---------------------------------
SelectFile = Button(root, text="待处理照片", command=Button1Anwser,width=10, height=1, bg="DarkGray", fg="white")
SelectFile.grid(row=1, column=0, sticky=W)

UsingCol = Label(root, text='')
UsingCol.config(text='当前背景颜色')
UsingCol.grid(row=3, column=0, sticky=W)

Usingcmb = ttk.Combobox(root)
Usingcmb.grid(row=4, column=0, sticky=W)
Usingcmb['value'] = ('蓝色')

DesCol = Label(root, text='')
DesCol.config(text='目标背景颜色')
DesCol.grid(row=5, column=0, sticky=W)

Descmb = ttk.Combobox(root)
Descmb.grid(row=6, column=0, sticky=W)
Descmb['value'] = ('蓝色', '红色', '白色')

PicSize1 = Label(root, text='目标像素:')
PicSize1.grid(row=7, sticky=W)

Select = tk.Checkbutton(root, text='调整像素', variable=SelectNum, onvalue=1, offvalue=0)
Select.grid(row=7, column=1, sticky=W)

Size1 = Entry(root)
Size1.place(width=5, height=1)
Size1.grid(row=8, column=0, sticky=W)
MultiText = Label(root, text='* ')
MultiText.grid(row=8, column=1)
Size2 = Entry(root)
Size2.place(width=5, height=1)
Size2.grid(row=8, column=2, sticky=W)

SelectFile = Button(root, text="开始转换", command=Button2Anwser, width=10, height=1, bg="DarkGray", fg="white")
SelectFile.grid(row=9, sticky=W)

root.mainloop()