Spring Boot示例 - 2. 使用Spring Boot + Spring Data REST + Spring Data JPA构建符合HATEOAS规范的REST应用
一、概述
一般使用Spring MVC + Spring Data JPA即可构建REST服务,但是这种方式要完整实现Controller层,Service层和Repository层,需要编写很多样板代码,诸如注释,XML配置等。
使用Spring Data REST可以轻松构建超媒体驱动(hypermedia-driven)的REST服务。
Spring Data REST本身是个Spring MVC的应用,它利用Spring Data repositories,并直接将其方法暴露为REST资源。
什么是HATEOAS?
HATEOAS(Hypermedia as the engine of application state)是 REST 架构风格中最复杂的约束,也是构建成熟 REST 服务的核心。REST 成熟度模型把 REST 服务按照成熟度划分成 4 个层次:
第一个层次(Level 0)的 Web 服务只是使用 HTTP 作为传输方式,实际上只是远程方法调用(RPC)的一种具体形式。SOAP 和 XML-RPC 都属于此类。
第二个层次(Level 1)的 Web 服务引入了资源的概念。每个资源有对应的标识符和表达。
- 第三个层次(Level 2)的 Web 服务使用不同的 HTTP 方法来进行不同的操作,并且使用 HTTP 状态码来表示不同的结果。如 HTTP GET 方法来获取资源,HTTP DELETE 方法来删除资源。
- 第四个层次(Level 3)的 Web 服务使用 HATEOAS。在资源的表达中包含了链接信息。客户端可以根据链接来发现可以执行的动作。
从上述 REST 成熟度模型中可以看到,使用 HATEOAS 的 REST 服务是成熟度最高的,也是推荐的做法。对于不使用 HATEOAS 的 REST 服务,客户端和服务器的实现之间是紧密耦合的。客户端需要根据服务器提供的相关文档来了解所暴露的资源和对应的操作。当服务器发生了变化时,如修改了资源的 URI,客户端也需要进行相应的修改。而使用 HATEOAS 的 REST 服务中,客户端可以通过服务器提供的资源的表达来智能地发现可以执行的操作。当服务器发生了变化时,客户端并不需要做出修改,因为资源的 URI 和其他信息都是动态发现的。
本文展示如何使用Spring Boot + Spring Data REST来构建REST服务。
二、操作指南
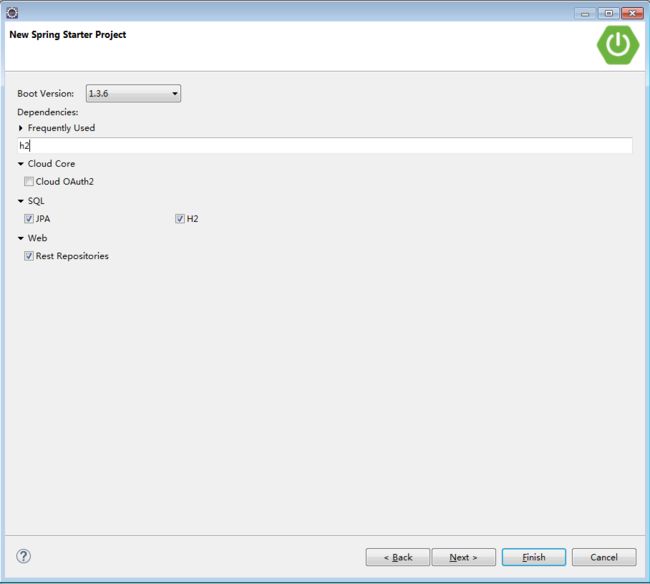
1. Eclipse中新建Spring Starter项目
创建项目名为springbootrestdemo的Spring Starter Project:

选择依赖项 - JPA,H2,REST Repositories
2. 添加devtools特性,然后查看生成项目的pom文件
项目名 -> 右键 -> Spring Tools -> Add Boot Devtools
pom内容如下:
<project xmlns="http://maven.apache.org/POM/4.0.0" xmlns:xsi="http://www.w3.org/2001/XMLSchema-instance"
    xsi:schemaLocation="http://maven.apache.org/POM/4.0.0 http://maven.apache.org/xsd/maven-4.0.0.xsd">
    <modelVersion>4.0.0modelVersion>

    <groupId>com.examplegroupId>
    <artifactId>springbootrestdemoartifactId>
    <version>0.0.1-SNAPSHOTversion>
    <packaging>jarpackaging>

    <name>springbootrestdemoname>
    <description>Demo project for Spring Bootdescription>

    <parent>
        <groupId>org.springframework.bootgroupId>
        <artifactId>spring-boot-starter-parentartifactId>
        <version>1.3.6.RELEASEversion>
        <relativePath/>
    parent>

    <properties>
        <project.build.sourceEncoding>UTF-8project.build.sourceEncoding>
        <project.reporting.outputEncoding>UTF-8project.reporting.outputEncoding>
        <java.version>1.8java.version>
    properties>

    <dependencies>
        <dependency>
            <groupId>org.springframework.bootgroupId>
            <artifactId>spring-boot-starter-data-jpaartifactId>
        dependency>
        <dependency>
            <groupId>org.springframework.bootgroupId>
            <artifactId>spring-boot-starter-data-restartifactId>
        dependency>

        <dependency>
            <groupId>com.h2databasegroupId>
            <artifactId>h2artifactId>
            <scope>runtimescope>
        dependency>
        <dependency>
            <groupId>org.springframework.bootgroupId>
            <artifactId>spring-boot-starter-testartifactId>
            <scope>testscope>
        dependency>
        <dependency>
            <groupId>org.springframework.bootgroupId>
            <artifactId>spring-boot-devtoolsartifactId>
        dependency>
    dependencies>

    <build>
        <plugins>
            <plugin>
                <groupId>org.springframework.bootgroupId>
                <artifactId>spring-boot-maven-pluginartifactId>
            plugin>
        plugins>
    build>


project>
3. 构建运行应用,验证依赖项
3.1 项目名称 ->右键->Run As -> Spring Boot App,成功显示如下内容:
  .   ____          _            __ _ _
 /\\ / ___'_ __ _ _(_)_ __  __ _ \ \ \ \
( ( )\___ | '_ | '_| | '_ \/ _` | \ \ \ \
 \\/  ___)| |_)| | | | | || (_| |  ) ) ) )
  '  |____| .__|_| |_|_| |_\__, | / / / /
 =========|_|==============|___/=/_/_/_/
 :: Spring Boot ::        (v1.3.6.RELEASE)
 ...
 2016-07-13 18:26:09.653  INFO 13144 --- [  restartedMain] c.example.SpringbootrestdemoApplication  : Started SpringbootrestdemoApplication in 11.858 seconds (JVM running for 13.331)
3.2 访问http://localhost:8080/查看可访问的REST接口
如图所示,此即Spring DATA REST默认提供的接口的url

3.3 访问http://localhost:8080/h2-console/ 查看内嵌db
Spring Boot会在内存中自动初始化一个内嵌的h2db,默认db名字是test_db。通过h2db提供的http console就可以查看db的情况。
使用默认的sa用户,密码为空,默认的jdbc url是jdbc:h2:mem:testdb

此时应用还未提供jpa代码,因此db是空的:

如何更改db?
在pom中引入对应db的依赖,并且在外部属性中定义相应的datasource属性,就可以完成db的切换。例如:application.properties中如下定义,再添加mysql和hikaricp的依赖到pom中即可将db切换成mysql,并且将数据源连接池切换成hikaricp(默认使用tomcat-jdbc)
spring.datasource.url=jdbc:mysql://localhost:3306/test_db
spring.datasource.username=xxx
spring.datasource.password=xxx
spring.datasource.type=com.zaxxer.hikari.HikariDataSource
4. 实现JPA代码
4.1 创建domain类
创建com.example.domain.City类,内容如下:
package com.example.domain;

import java.io.Serializable;

import javax.persistence.Column;
import javax.persistence.Entity;
import javax.persistence.GeneratedValue;
import javax.persistence.Id;

@Entity
public class City implements Serializable {

    private static final long serialVersionUID = 1L;

    @Id
    @GeneratedValue
    private Long id;

    @Column(nullable = false)
    private String name;

    @Column(nullable = false)
    private String state;

    @Column(nullable = false)
    private String country;

    @Column(nullable = false)
    private String map;

    protected City() {
    }

    public City(String name, String country) {
        super();
        this.name = name;
        this.country = country;
    }

    public String getName() {
        return this.name;
    }

    public String getState() {
        return this.state;
    }

    public String getCountry() {
        return this.country;
    }

    public String getMap() {
        return this.map;
    }

    @Override
    public String toString() {
        return getName() + "," + getState() + "," + getCountry();
    }
}
4.2 创建测试数据insert语句:
在src/main/resources目录下创建import.sql,内容如下:
-- Atlanta
insert into city(country, name, state, map) values ('USA', 'Atlanta', 'GA', '33.748995, -84.387982');
-- Chicago
insert into city(country, name, state, map) values ('USA', 'Chicago', 'IL', '41.878114, -87.629798');
-- Eau Claire
insert into city(country, name, state, map) values ('USA', 'Eau Claire', 'WI', '44.811349, -91.498494');
-- Hollywood
insert into city(country, name, state, map) values ('USA', 'Hollywood', 'FL', '26.011201, -80.14949');
-- Miami
insert into city(country, name, state, map) values ('USA', 'Miami', 'FL', '25.788969, -80.226439');
-- Melbourne
insert into city(country, name, state, map) values ('USA', 'Melbourne', 'FL', '28.083627, -80.608109');
-- New York
insert into city(country, name, state, map) values ('USA', 'New York', 'NY', '40.714353, -74.005973');
-- Palm Bay
insert into city(country, name, state, map) values ('USA', 'Palm Bay', 'FL', '28.034462, -80.588665');
-- San Francisco
insert into city(country, name, state, map) values ('USA', 'San Francisco', 'CA', '37.77493, -122.419415');
-- Washington
insert into city(country, name, state, map) values ('USA', 'Washington', 'DC', '38.895112, -77.036366');
应用启动时,hibernate会自动创建testdb.city表,并将import.sql的内容导入testdb。
4.3 创建Repository类:
创建com.example.service.CityRepository接口,内容如下:
package com.example.service;

import org.springframework.data.repository.PagingAndSortingRepository;

import com.example.domain.City;

/**
* @ClassName: CityRepository
* @Description: City实体的操作接口
* @author LIUYUEFENG559
* @date 2016年7月14日 上午9:39:21
*/
public interface CityRepository extends PagingAndSortingRepository<City, Long> {

}
4.4 应用自动重启后查看状态
由于开启了DevTools,每次保存后应用都会自动重启(要打开Eclipse的Build Automatically功能)。查看http://localhost:8080

可以看到http://localhost:8080/cities 这个REST接口已经可以访问,并且允许的参数有page, size和sort。
为什么path名是cities?
Spring Data REST根据Repository类使用的Entity名,按照一定的规则来生成url的path名。规则的内容是:Entity名的小写,复数格式,例如cities。
除了这个面向集合类型的path名,Spring Data REST还会生成对应单个实体的path,格式为:集合类型path名/{id},如cities/1。可以自定义path名
使用@RepositoryRestResource注解可以自定义path名,后面会详细讲解
这三个参数用来分页与排序,例如传入page=1&size=3&sort=name,asc即表示——列表以name升序排列,没页显示3条,查询第2页的内容。
http://localhost:8080/cities?page=1&size=3&sort=name,asc 返回内容如下:
{
  "_embedded" : {
    "cities" : [ {
      "name" : "Hollywood",
      "state" : "FL",
      "country" : "USA",
      "map" : "26.011201, -80.14949",
      "_links" : {
        "self" : {
          "href" : "http://localhost:8080/cities/4" },
        "city" : {
          "href" : "http://localhost:8080/cities/4" }
      }
    }, {
      "name" : "Melbourne",
      "state" : "FL",
      "country" : "USA",
      "map" : "28.083627, -80.608109",
      "_links" : {
        "self" : {
          "href" : "http://localhost:8080/cities/6" },
        "city" : {
          "href" : "http://localhost:8080/cities/6" }
      }
    }, {
      "name" : "Miami",
      "state" : "FL",
      "country" : "USA",
      "map" : "25.788969, -80.226439",
      "_links" : {
        "self" : {
          "href" : "http://localhost:8080/cities/5" },
        "city" : {
          "href" : "http://localhost:8080/cities/5" }
      }
    } ]
  },
  "_links" : {
    "first" : {
      "href" : "http://localhost:8080/cities?page=0&size=3&sort=name,asc"
    },
    "prev" : {
      "href" : "http://localhost:8080/cities?page=0&size=3&sort=name,asc"
    },
    "self" : {
      "href" : "http://localhost:8080/cities"
    },
    "next" : {
      "href" : "http://localhost:8080/cities?page=2&size=3&sort=name,asc"
    },
    "last" : {
      "href" : "http://localhost:8080/cities?page=3&size=3&sort=name,asc"
    },
    "profile" : {
      "href" : "http://localhost:8080/profile/cities"
    }
  },
  "page" : {
    "size" : 3,
    "totalElements" : 10,
    "totalPages" : 4,
    "number" : 1
  }
}
这些接口的实现是由Spring Data JPA根据我们的CityRepository接口自动完成的。虽然我们自己接口内没有自定义任何接口,但是因为我们继承了PagingAndSortingRepository接口,它里面的findAll、findOne、save、delete等方法都会被Spring Data JPA自动实现,findAll映射到cities这个path上,使用GET可以访问;findOne映射到cities/{id}这个path上,使用GET可以访问;PUT调用save,表示insert或者完全的update(即没提供的字段会被设置为null);PATCH也调用save,表示insert或者部分的update(没提供的字段不会去更改);DELETE会调用delete。
例如,刚才的http://localhost:8080/cities会调用findAll方法;
http://localhost:8080/cities/1会调用findOne方法;
curl -X PUT -H “Content-Type:application/json” -d ‘{ “country”: “China”, “map”: “1,1”, “name”:”呵呵”, “state”:”东莞”}’ http://localhost:8080/cities/1 会调用save完全update;
curl -X PATCH -H “Content-Type:application/json” -d ‘{ “country”: “China”, “map”: “1,1”,”state”:”深圳”}’ http://localhost:8080/cities/1 会调用save部分update;
curl -X DELETE http://localhost:8080/cities/1会删掉id为1的数据。
4.5 修改REST接口的根路径
默认接口的根路径是/,在外部属性中设置spring.data.rest.base-path即可修改REST接口的根路径。例如可以在src/main/resources/application.properties中增加如下内容:
spring.data.rest.base-path=/api保存文件,应用自动重启后,访问http://localhost:8080会报错:

只有访问http://localhost:8080/api 才可以:

4.6 修改REST接口的path
Spring Data REST默认会根据Respositories使用的Entity类名来生成api的path名。如果想更改默认行为,需要使用@RepositoryRestResource注解,并指定path属性,例如:
@RepositoryRestResource(path = “newpath”)。
在CityRepository接口的定义上加上如下内容:
@RepositoryRestResource(path = "fuck")
public interface CityRepository extends PagingAndSortingRepository<City, Long> {

}
保存后访问http://localhost:8080/api

就可以看到api的路径已经更改。
三、参考链接
https://spring.io/understanding/HATEOAS
http://www.ibm.com/developerworks/cn/java/j-lo-SpringHATEOAS/#ibm-pcon