【springboot源码解析】第二章:springboot是如何启动内置tomcat的
缘起
在上一章中我们介绍了springboot中分析脉络的两个方向,一个是顺着主入口来分析,一个是带着疑问springboot是如何去掉web.xml来分析,本文我们先分析第一个方向
springboot主入口
在启动springboot的时候可谓是相当简单,只需要执行以下代码
public static void main(String[] args) {
	SpringApplication.run(HppaApplication.class, args);
}
那些看似简单的事物,其实并不简单。我们之所以觉得他简单,是因为复杂性都被隐藏了。通过上诉代码,你大概率可以提出以下几个疑问
- springboot是如何启动内置tomcat的
- springboot为什么可以相应请求,他是如何配置了springmvc
springboot是如何启动内置tomcat的
SpringApplication.run(HppaApplication.class, args);
这个会最终调用到一个同名方法run(String… args)
public ConfigurableApplicationContext run(String... args) {
	//StopWatch主要是用来统计每项任务执行时长,例如Spring Boot启动占用总时长。
	StopWatch stopWatch = new StopWatch();
	stopWatch.start();
	ConfigurableApplicationContext context = null;
	Collection<SpringBootExceptionReporter> exceptionReporters = new ArrayList<>();
	configureHeadlessProperty();
	//第一步:获取并启动监听器 通过加载META-INF/spring.factories 完成了SpringApplicationRunListener实例化工作
	SpringApplicationRunListeners listeners = getRunListeners(args);
	//实际上是调用了EventPublishingRunListener类的starting()方法
	listeners.starting();
	try {
		ApplicationArguments applicationArguments = new DefaultApplicationArguments(args);
		//第二步:构造容器环境,简而言之就是加载系统变量,环境变量,配置文件
		ConfigurableEnvironment environment = prepareEnvironment(listeners, applicationArguments);
		//设置需要忽略的bean
		configureIgnoreBeanInfo(environment);
		//打印banner
		Banner printedBanner = printBanner(environment);
		//第三步:创建容器
		context = createApplicationContext();
		//第四步:实例化SpringBootExceptionReporter.class,用来支持报告关于启动的错误
		exceptionReporters = getSpringFactoriesInstances(SpringBootExceptionReporter.class,
				new Class[] { ConfigurableApplicationContext.class }, context);
		//第五步:准备容器 这一步主要是在容器刷新之前的准备动作。包含一个非常关键的操作:将启动类注入容器,为后续开启自动化配置奠定基础。
		prepareContext(context, environment, listeners, applicationArguments, printedBanner);
		//第六步:刷新容器 springBoot相关的处理工作已经结束,接下的工作就交给了spring。 内部会调用spring的refresh方法,
		// refresh方法在spring整个源码体系中举足轻重,是实现 ioc 和 aop的关键。
		refreshContext(context);
		//第七步:刷新容器后的扩展接口 设计模式中的模板方法,默认为空实现。如果有自定义需求,可以重写该方法。比如打印一些启动结束log,或者一些其它后置处理。
		afterRefresh(context, applicationArguments);
		stopWatch.stop();
		if (this.logStartupInfo) {
			new StartupInfoLogger(this.mainApplicationClass).logStarted(getApplicationLog(), stopWatch);
		}
		//发布应用已经启动的事件
		listeners.started(context);
		/*
		 * 遍历所有注册的ApplicationRunner和CommandLineRunner,并执行其run()方法。
		 * 我们可以实现自己的ApplicationRunner或者CommandLineRunner,来对SpringBoot的启动过程进行扩展。
		 */
		callRunners(context, applicationArguments);
	}
	catch (Throwable ex) {
		handleRunFailure(context, ex, exceptionReporters, listeners);
		throw new IllegalStateException(ex);
	}

	try {
		//应用已经启动完成的监听事件
		listeners.running(context);
	}
	catch (Throwable ex) {
		handleRunFailure(context, ex, exceptionReporters, null);
		throw new IllegalStateException(ex);
	}
	return context;
}
很长是吧,这个方法大概做了以下几件事
- 获取并启动监听器 通过加载META-INF/spring.factories 完成了SpringApplicationRunListener实例化工作
- 构造容器环境,简而言之就是加载系统变量,环境变量,配置文件
- 创建容器
- 实例化SpringBootExceptionReporter.class,用来支持报告关于启动的错误
- 准备容器
- 刷新容器
- 刷新容器后的扩展接口
那么内置tomcat启动源码,就是隐藏在上诉第六步:refreshContext方法里面,该方法最终会调用到AbstractApplicationContext类的refresh()方法
public void refresh() throws BeansException, IllegalStateException {
	synchronized (this.startupShutdownMonitor) {
		// Prepare this context for refreshing.
		prepareRefresh();

		// Tell the subclass to refresh the internal bean factory.
		ConfigurableListableBeanFactory beanFactory = obtainFreshBeanFactory();

		// Prepare the bean factory for use in this context.
		prepareBeanFactory(beanFactory);

		try {
			// Allows post-processing of the bean factory in context subclasses.
			postProcessBeanFactory(beanFactory);

			// Invoke factory processors registered as beans in the context.
			invokeBeanFactoryPostProcessors(beanFactory);

			// Register bean processors that intercept bean creation.
			registerBeanPostProcessors(beanFactory);

			// Initialize message source for this context.
			initMessageSource();

			// Initialize event multicaster for this context.
			initApplicationEventMulticaster();

			// Initialize other special beans in specific context subclasses.
			onRefresh();

			// Check for listener beans and register them.
			registerListeners();

			// Instantiate all remaining (non-lazy-init) singletons.
			finishBeanFactoryInitialization(beanFactory);

			// Last step: publish corresponding event.
			finishRefresh();
		}

		catch (BeansException ex) {
			if (logger.isWarnEnabled()) {
				logger.warn("Exception encountered during context initialization - " +
						"cancelling refresh attempt: " + ex);
			}

			// Destroy already created singletons to avoid dangling resources.
			destroyBeans();

			// Reset 'active' flag.
			cancelRefresh(ex);

			// Propagate exception to caller.
			throw ex;
		}

		finally {
			// Reset common introspection caches in Spring's core, since we
			// might not ever need metadata for singleton beans anymore...
			resetCommonCaches();
		}
	}
}
onRefresh()会调用到ServletWebServerApplicationContext中的createWebServer()
private void createWebServer() {
	WebServer webServer = this.webServer;
	ServletContext servletContext = getServletContext();
	if (webServer == null && servletContext == null) {
		ServletWebServerFactory factory = getWebServerFactory();
		this.webServer = factory.getWebServer(getSelfInitializer());
	}
	else if (servletContext != null) {
		try {
			getSelfInitializer().onStartup(servletContext);
		}
		catch (ServletException ex) {
			throw new ApplicationContextException("Cannot initialize servlet context", ex);
		}
	}
	initPropertySources();
}
createWebServer()就是启动web服务,但是还没有真正启动Tomcat,既然webServer是通过ServletWebServerFactory来获取的,那就来看看这个工厂的真面目。
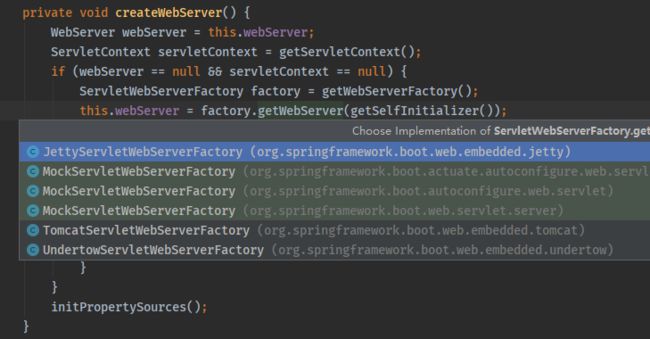
可以看到,tomcat,Jetty都实现了这个getWebServer方法,我们看TomcatServletWebServerFactory中的getWebServer(ServletContextInitializer… initializers).
public WebServer getWebServer(ServletContextInitializer... initializers) {
	if (this.disableMBeanRegistry) {
		Registry.disableRegistry();
	}
	Tomcat tomcat = new Tomcat();
	File baseDir = (this.baseDirectory != null) ? this.baseDirectory : createTempDir("tomcat");
	tomcat.setBaseDir(baseDir.getAbsolutePath());
	Connector connector = new Connector(this.protocol);
	connector.setThrowOnFailure(true);
	tomcat.getService().addConnector(connector);
	customizeConnector(connector);
	tomcat.setConnector(connector);
	tomcat.getHost().setAutoDeploy(false);
	configureEngine(tomcat.getEngine());
	for (Connector additionalConnector : this.additionalTomcatConnectors) {
		tomcat.getService().addConnector(additionalConnector);
	}
	prepareContext(tomcat.getHost(), initializers);
	return getTomcatWebServer(tomcat);
}
到此,不知道你有没有看出来内置tomcat是如何启动的,其实就是New了一个Tomcat,你还不知道原来Tomcat还能这样启动啊,确实是可以的,我在没看到源码之前我也不知道还能这样启动。
总结
springboot的内部通过new Tomcat()的方式启动了一个内置Tomcat。但是这里还有一个问题,这里只是启动了tomcat,但是我们的springmvc是如何加载的呢?下一章我们讲接收,springboot是如何自动装配springmvc的