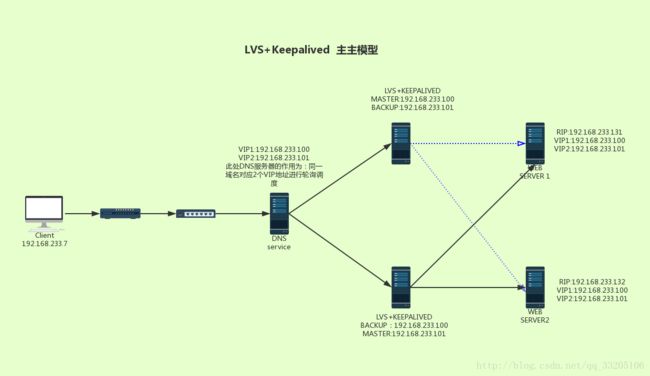
lvs+keepalived主主模式
操作系统:Centos7.2
VIP:192.168.233.100
VIP:192.168.233.100
RIP:192.168.233.131
RIP:192.168.233.132
软件部署介绍:
lvs+keepalivd(1) (backup master)一、环境检查:
关闭系统防火墙
systemctl stop firewalld.service检查系统是否支持ip_vs
modprobe ip_vs 加载ip_vs模块 lsmod |grep ip_vs 查询模块二、配置keepalived
(1)安装keepalived,并配置lvs
yum install keepalived -y
yum install ipvsadm -y
(2)主配置文件路径
vim /etc/keepalived/keepalived.conf配置文件如下:
! Configuration File for keepalived

global_defs {
   notification_email {
   root@localhost
   }
   notification_email_from admin@localhost
   smtp_server 127.0.0.1
   smtp_connect_timeout 10
   router_id 51
}

vrrp_instance VI_1 {
    state BACKUP
    interface eno16777736
    virtual_router_id 51
    priority 90
    advert_int 3
    authentication {
        auth_type PASS
        auth_pass 123.com
    }
    virtual_ipaddress {
        192.168.233.100
    }
}

virtual_server 192.168.233.100 80 {
    delay_loop 3
    lb_algo rr
    lb_kind DR
    nat_mask 255.255.255.0
    persistence_timeout 300
    protocol TCP

    real_server 192.168.233.131 80 {
        weight 1
        HTTP_GET {
            url {
              path /var/www/lighttpd/index.html
              digest 389975d8d57ca94e672162998e06c017
            }
            connect_timeout 3
            nb_get_retry 3
            delay_before_retry 3
        }
    }
   real_server 192.168.233.132 80 {
        weight 1
        HTTP_GET {
            url {
              path /var/www/lighttpd/index.html
              digest 389975d8d57ca94e672162998e06c017
            }
            connect_timeout 3
            nb_get_retry 3
            delay_before_retry 3
        }
    }
}


vrrp_instance VI_2 {
    state MASTER
    interface eno16777736
    virtual_router_id 52
    priority 100
    advert_int 3
    authentication {
        auth_type PASS
        auth_pass qq.com
    }
    virtual_ipaddress {
        192.168.233.101
    }
}

virtual_server 192.168.233.101 80 {
    delay_loop 3
    lb_algo rr
    lb_kind DR
    nat_mask 255.255.255.0
    persistence_timeout 300
    protocol TCP

    real_server 192.168.233.131 80 {
        weight 1
        HTTP_GET {
            url {
              path /var/www/lighttpd/index.html
              digest 389975d8d57ca94e672162998e06c017
            }
            connect_timeout 3
            nb_get_retry 3
            delay_before_retry 3
        }
    }
   real_server 192.168.233.132 80 {
        weight 1
        HTTP_GET {
            url {
              path /var/www/lighttpd/index.html
              digest 389975d8d57ca94e672162998e06c017
            }
            connect_timeout 3
            nb_get_retry 3
            delay_before_retry 3
        }
    }
}
启动keepalived
systemctl start keepalived.service查看keepalived状态
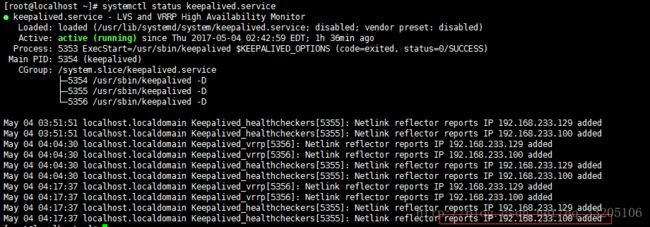
systemctl status keepalived.service 
第二台lvs+keepalived部署,和第一台操作步骤一样,这里只介绍配置文件
lvs+keepalivd(2) (master backup)(1)配置文件:
vim /etc/keepalived/keepalived.conf! Configuration File for keepalived
global_defs {
notification_email {
root@localhost
}
notification_email_from admin@localhost
smtp_server 127.0.0.1
smtp_connect_timeout 10
router_id LVS_DEVEL_R2
}
vrrp_instance VI_1 {
state MASTER
interface eno16777736
virtual_router_id 51
priority 100
advert_int 3
authentication {
auth_type PASS
auth_pass 123.com
}
virtual_ipaddress {
192.168.233.100
}
}
virtual_server 192.168.233.100 80 {
delay_loop 3
lb_algo rr
lb_kind DR
nat_mask 255.255.255.0
persistence_timeout 300
protocol TCP
real_server 192.168.233.131 80 {
weight 1
HTTP_GET {
url {
path /var/www/lighttpd/index.html
digest 389975d8d57ca94e672162998e06c017
}
connect_timeout 3
nb_get_retry 3
delay_before_retry 3
}
}
real_server 192.168.233.132 80 {
weight 1
HTTP_GET {
url {
path /var/www/lighttpd/index.html
digest 389975d8d57ca94e672162998e06c017
}
connect_timeout 3
nb_get_retry 3
delay_before_retry 3
}
}
}
vrrp_instance VI_2 {
state BACKUP
interface eno16777736
virtual_router_id 52
priority 90
advert_int 3
authentication {
auth_type PASS
auth_pass qq.com
}
virtual_ipaddress {
192.168.233.101
}
}
virtual_server 192.168.233.101 80 {
delay_loop 3
lb_algo rr
lb_kind DR
nat_mask 255.255.255.0
persistence_timeout 300
protocol TCP
real_server 192.168.233.131 80 {
weight 1
HTTP_GET {
url {
path /var/www/lighttpd/index.html
digest 389975d8d57ca94e672162998e06c017
}
connect_timeout 3
nb_get_retry 3
delay_before_retry 3
}
}
real_server 192.168.233.132 80 {
weight 1
HTTP_GET {
url {
path /var/www/lighttpd/index.html
digest 389975d8d57ca94e672162998e06c017
}
connect_timeout 3
nb_get_retry 3
delay_before_retry 3
}
}
}启动服务
systemctl start keepalived.service systemctl status keepalived.service 部署web server1
1.安装依赖关系:
yum -y install prce-devel zlib-devel openssl-devel
2.创建用户和组
useradd nginx
usergroup nginx
3.解压包
用tar zxvf 将包解压到/usr/src目录下
cd /us/src/nginx目录下进行编译
./configure --prefix=/usr/local/nginx --user=nginx --group=nginx --with-file-aio
--with-http_stub_status_module --with-http_gzip_static_module --with-http_flv_modeule --with-http_ssl_module
配置参数详解:
--with-http_stub_status_module 启用状态统计
--with-http_gzip_static_module 支持动态压缩
--with-file-aio  支持文件修改
--with-http_flv_modeule 时间的偏移量
make && makeinstall
vim /usr/local/nginx/conf/nginx.conf   打开配置主文件
配置tomcat的代理服务
1.在server模块上边添加(意思就是用nginx代理tomcat的服务,访问nginx的地址的时候,访问的就是tomcat两个的页面)
upstream tomcat_server {
server 192.168.0.1:8080 weight="1";
server 192.168.0.2:8080 weight="1";
2.在location{}界中,默认网页下面添加
proxy_pass http://tomcat_server;
nginx -t (启动nginx)
ln -s /usr/local/nginx/sbin/nginx /usr/local/sbin
编辑nginx配置文件
user  nginx;
worker_processes  auto;   #nginx进程数,按照cpu数目指定
worker_cpu_affinity 0001;   #绑定cpu
worker_priority -5;   #work进程优先级
#error_log  logs/error.log;
error_log  /var/log/nginx/webserver_error.log  notice;
#error_log  logs/error.log  info;
daemon on;
pid        /var/log/nginx/nginx.pid;

worker_rlimit_nofile 51200;   #指定文件描述符数量

events {
    use epoll;   #使用epoll的I/O模型
    worker_connections  51200;
    accept_mutex on;
}


http {

    upstream webserv {
    #ip_hash;
    #server 59.46.10.114 weight=1;
    server 103.242.135.25 weight=1;
    }
    include       mime.types;
    default_type  application/octet-stream;

    log_format main  '$request_time $remote_addr - $remote_user [$time_local]"$request" '
                '$status $body_bytes_sent "$http_referer" '
                '"$http_user_agent" "$http_x_forwarded_for"'
                '"$upstream_cache_status" "$sent_http_content_range"';
    access_log  /var/log/nginx/webserver_access.log main;

    fastcgi_cache_path /var/cache/nginx/fastcgi levels=1:2:2 keys_zone=fcgicache:1024m inactive=360d max_size=10g;

    proxy_cache_path /var/cache/nginx/proxy levels=1:2:2 keys_zone=proxycache:1024m inactive=360d max_size=10g;

    sendfile        on;
    tcp_nopush     on;
    server_tokens off;
    #keepalive_timeout  0;

    keepalive_timeout  60;
    client_header_buffer_size 4k;  #客户端请求头部缓冲区大小
    open_file_cache_valid 30s;
    open_file_cache_min_uses 1;
    open_file_cache max=102400 inactive=365 ;
    gzip  on;
    gzip_types text/plain text/css text/javascript text/xml application/xml         application/xhtml+xml application/xml+rss application/json;
    gzip_buffers 4 4k;
    gzip_comp_level 6;
    gzip_min_length 1024;

    server {
        listen       80;
        server_name  59.46.10.114;
        charset utf-8;
        access_log   /var/log/nginx/webserver.log yangxu;
        root   /var/www/lighttpd/;
        #limit_rate 20480;
        index  index.php index.html index.htm;

    #if ($request_method = POST) {
        #return 405;
    #}

    location = /image {
    limit_rate 20480;
        #limit_conn_zone $binary_remote_addr zone=addr:10m;
    }

    location /status {
    stub_status;
    }

    location ~^/admin/ {
        auth_basic "Please input user and password";
        auth_basic_user_file /usr/local/nginx/conf/.ngxpasswd;
    }

    location ~^/123/ {
    rewrite (.*)\.html$ $1.txt last;
    rewrite (.*)\.txt$  $1.doc redirect;
    }

     location ~ \.php$ {
           gzip on ;
           gzip_types text/plain text/css text/javascript text/xml application/xml application/xhtml+xml application/xml+rss application/json;
           gzip_buffers 4 4k;
           gzip_comp_level 4;
           gzip_min_length 1024;
            root           /var/www/lighttpd/;
            fastcgi_cache fcgicache;
            fastcgi_cache_key $request_uri;
            fastcgi_cache_valid 200 302;
            fastcgi_pass   127.0.0.1:9000;
            fastcgi_index  index.php;
            proxy_set_header User-Agent wordpress;
            fastcgi_param  SCRIPT_FILENAME  /scripts$fastcgi_script_name;
            include        fastcgi.conf;
         #  if ( $request_method = POST ) {
      #  return 200 "welcome to yangxu web sites";

    #}
        }
        location ~(.*)\.(jpg|png)$ {
        #gzip on ;
        proxy_pass http://127.0.0.1;
        proxy_set_header X-Real-IP $remote_addr;
        proxy_set_header X-Forwarded-For $remote_addr;
        proxy_set_header X-Forwarded-For $proxy_add_x_forwarded_for;
        proxy_set_header Host $host;
        proxy_set_header User-Agent wordpress;
        proxy_headers_hash_bucket_size 512;
    }
    #match health{
    #status 200;
    #body ~"ok";
    #}


    #location / {
    #health_check match=health interval=2 fails=3 uri=/.health.html;
    #proxy_pass http://webserv;
    #proxy_cache  proxycache;
    #proxy_cache_key $request_uri;
    #proxy_cache_valid 302 200 10m;
    #proxy_cache_use_stale error;
    #proxy_connect_timeout 60s;
    #proxy_send_timeout 60s;
    #proxy_read_timeout 60s;
    #add_header X-cache $upstream_cache_status;
    #}


        #error_page  404      =200        http://59.46.10.114/wordpress;

        error_page   500 502 503 504  =200  /50x.html;
        location = /50x.html {
            root   /var/www/lighttpd/50x.html;
        }
}
#server {
#        listen       443 ssl;
#        server_name  localhost;
#
#        ssl_certificate      /usr/local/nginx/conf/ssl/nginx.crt;
#        ssl_certificate_key  /usr/local/nginx/conf/ssl/nginx.key;

#        ssl_session_cache    shared:SSL:1m;
#        ssl_session_timeout  5m;

#        ssl_ciphers  HIGH:!aNULL:!MD5;
#        ssl_prefer_server_ciphers  on;

#        location / {
#            root   /var/www/lighttpd;
#            index  index.html index.htm;
#        }
#    }


}
修改主页面:
echo "RS1" >>/var/www/lighttpd/index.html启动服务
/etc/init.d/nginx start配置VIP,lo接口,这里我们用脚本实现:
#!/bin/bash

SNS_VIP=192.168.233.100
SNS1_VIP=192.168.233.101
/etc/rc.d/init.d/functions
case "$1" in
start)
       ifconfig lo:0 $SNS_VIP netmask 255.255.255.255 broadcast $SNS_VIP
       ifconfig lo:1 $SNS1_VIP netmask 255.255.255.255 broadcast $SNS1_VIP
       /sbin/route add -host $SNS_VIP dev lo:0
       /sbin/route add -host $SNS1_VIP dev lo:1
       echo "1" >/proc/sys/net/ipv4/conf/lo/arp_ignore
       echo "2" >/proc/sys/net/ipv4/conf/lo/arp_announce
       echo "1" >/proc/sys/net/ipv4/conf/all/arp_ignore
       echo "2" >/proc/sys/net/ipv4/conf/all/arp_announce
       sysctl -p >/dev/null 2>&1
       echo "RealServer Start OK"
       ;;
stop)
       ifconfig lo:0 down
       ifconfig lo:1 down
       route del $SNS_VIP >/dev/null 2>&1
       echo "0" >/proc/sys/net/ipv4/conf/lo/arp_ignore
       echo "0" >/proc/sys/net/ipv4/conf/lo/arp_announce
       echo "0" >/proc/sys/net/ipv4/conf/all/arp_ignore
       echo "0" >/proc/sys/net/ipv4/conf/all/arp_announce
       echo "RealServer Stoped"
       ;;
*)
       echo "Usage: $0 {start|stop}"
       exit
esac
exit 0
/etc/init.d/lvs startok,web server部署完成,下面我们进行测试


