MATLAB相机标定及OpenCV畸变校准
https://blog.csdn.net/lql0716/article/details/71973318?locationNum=8&fps=1
用相机进行拍照,从不同的角度进行拍照,为了达到较高的精度,图片的数目至少要20张左右。(注意拍照时的分辨率要固定,且图片的尺寸要一致!)
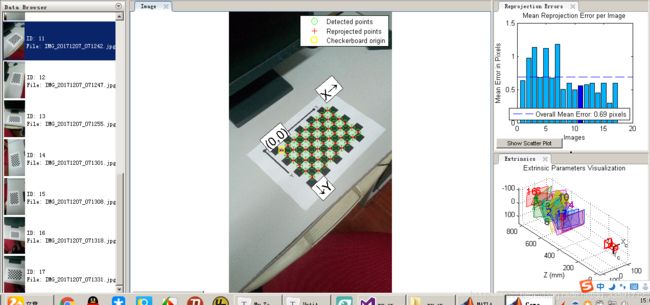
MATLAB相机标定
步骤:
启动:cameraCalibrator回车
add images
设置棋盘格的尺寸(mm),提前量一下。
设置参数。包括径向畸变参数的个数(2/3)、是否计算切向畸变。
开始标定
参数导出,保存的参数是一种特殊的数据结构,里面包含了相机内参(IntrinsicMatrix)、径向畸变(RadialDistortion)、切向畸变(TangentialDistortion)、相机的外参(RotationMatrices,TranslationVectors)等。
畸变参数,总共有五个,径向畸变3个(k1,k2,k3)和切向畸变2个(p1,p2)。
以及在OpenCV中的畸变系数的排列(这点一定要注意k1,k2,p1,p2,k3),千万不要以为k是连着的。
![]()
并且通过实验表明,三个参数的时候由于k3所对应的非线性较为剧烈。估计的不好,容易产生极大的扭曲,所以我们在MATLAB中选择使用两参数,并且选择错切和桶形畸变。


这个MATLAB函数将内矩阵和畸变矩阵输出到xml中,方便OpenCV读取。
注意事项(1.相机内参矩阵,千万记住要转置2.相机径向畸变参数向量这里是1*2的)
function writeXML(cameraParams,file)
%writeXML(cameraParams,file)
%功能:将相机校正的参数保存为xml文件
%输入:
%cameraParams:相机校正数据结构
%file:xml文件名
%说明在xml文件是由一层层的节点组成的。
%首先创建父节点 fatherNode,
%然后创建子节点 childNode=docNode.createElement(childNodeName),
%再将子节点添加到父节点 fatherNode.appendChild(childNode)
docNode = com.mathworks.xml.XMLUtils.createDocument('opencv_storage'); %创建xml文件对象
docRootNode = docNode.getDocumentElement; %获取根节点
IntrinsicMatrix = ((cameraParams.IntrinsicMatrix)'); %*相机内参矩阵,千万记住要转置*
RadialDistortion = cameraParams.RadialDistortion; %相机径向畸变参数向量1*3
TangentialDistortion =cameraParams.TangentialDistortion; %相机切向畸变向量1*2
%Distortion = [RadialDistortion(1:2),TangentialDistortion,RadialDistortion(3)]; %当RadialDistortion为3维时,构成opencv中的畸变系数向量[k1,k2,p1,p2,k3]
Distortion = [RadialDistortion(1:2),TangentialDistortion,0]; %当RadialDistortion为2维时,构成opencv中的畸变系数向量[k1,k2,p1,p2,k3]

camera_matrix = docNode.createElement('camera-matrix'); %创建mat节点
camera_matrix.setAttribute('type_id','opencv-matrix'); %设置mat节点属性
rows = docNode.createElement('rows'); %创建行节点
rows.appendChild(docNode.createTextNode(sprintf('%d',3))); %创建文本节点,并作为行的子节点
camera_matrix.appendChild(rows); %将行节点作为mat子节点

cols = docNode.createElement('cols');
cols.appendChild(docNode.createTextNode(sprintf('%d',3)));
camera_matrix.appendChild(cols);

dt = docNode.createElement('dt');
dt.appendChild(docNode.createTextNode('d'));
camera_matrix.appendChild(dt);

data = docNode.createElement('data');
for i=1:3
    for j=1:3
        data.appendChild(docNode.createTextNode(sprintf('%.16f ',IntrinsicMatrix(i,j))));
    end
    data.appendChild(docNode.createTextNode(sprintf('\n')));
end
camera_matrix.appendChild(data);
docRootNode.appendChild(camera_matrix);

distortion = docNode.createElement('distortion');
distortion.setAttribute('type_id','opencv-matrix');
rows = docNode.createElement('rows');
rows.appendChild(docNode.createTextNode(sprintf('%d',5)));
distortion.appendChild(rows);

cols = docNode.createElement('cols');
cols.appendChild(docNode.createTextNode(sprintf('%d',1)));
distortion.appendChild(cols);

dt = docNode.createElement('dt');
dt.appendChild(docNode.createTextNode('d'));
distortion.appendChild(dt);
data = docNode.createElement('data');
for i=1:5
      data.appendChild(docNode.createTextNode(sprintf('%.16f ',Distortion(i))));
end
distortion.appendChild(data);

docRootNode.appendChild(distortion);

xmlFileName = file;
xmlwrite(xmlFileName,docNode);
end
在matlab命令行输入:
writeXML(cameraParams,'cameraParams.xml');
这个OpenCV代码是将xml读取,并且对一张照片进行畸变校准。
#include
#include
using namespace std;
using namespace cv;

/**
 * @主函数
 */
int main( )
{

	/// 读取一副图片,不改变图片本身的颜色类型(该读取方式为DOS运行模式)
		Mat src = imread( "1.jpg");
		Mat distortion = src.clone();
		Mat camera_matrix = Mat(3, 3, CV_32FC1);
		Mat distortion_coefficients;


		//导入相机内参和畸变系数矩阵
		FileStorage file_storage("cameraParams.xml", FileStorage::READ);
		file_storage["camera-matrix"] >> camera_matrix;
		file_storage["distortion"] >> distortion_coefficients;
		file_storage.release();
		//矫正
		undistort(src, distortion, camera_matrix, distortion_coefficients);

		imshow("img", src);
		imshow("undistort", distortion);
		imwrite("undistort.jpg", distortion);

		waitKey(0);
		return 0;
}
下面是后话了。(可以不看)
利用求得的相机的内参和外参数据,可以对图像进行畸变的矫正,这里有两种方法可以达到矫正的目的,分别说明一下。
方法一:使用initUndistortRectifyMap和remap两个函数配合实现。
initUndistortRectifyMap用来计算畸变映射,remap把求得的映射应用到图像上。
initUndistortRectifyMap的函数原型:
[cpp] view plain copy 在CODE上查看代码片派生到我的代码片
//! initializes maps for cv::remap() to correct lens distortion and optionally rectify the image
CV_EXPORTS_W void initUndistortRectifyMap( InputArray cameraMatrix, InputArray distCoeffs,
InputArray R, InputArray newCameraMatrix,
Size size, int m1type, OutputArray map1, OutputArray map2 );
第一个参数cameraMatrix为之前求得的相机的内参矩阵;
第二个参数distCoeffs为之前求得的相机畸变矩阵;
第三个参数R,可选的输入,是第一和第二相机坐标之间的旋转矩阵;
第四个参数newCameraMatrix,输入的校正后的3X3摄像机矩阵;
第五个参数size,摄像机采集的无失真的图像尺寸;
第六个参数m1type,定义map1的数据类型,可以是CV_32FC1或者CV_16SC2;
第七个参数map1和第八个参数map2,输出的X/Y坐标重映射参数;
remap函数原型:
[cpp] view plain copy 在CODE上查看代码片派生到我的代码片
//! warps the image using the precomputed maps. The maps are stored in either floating-point or integer fixed-point format
CV_EXPORTS_W void remap( InputArray src, OutputArray dst,
InputArray map1, InputArray map2,
int interpolation, int borderMode=BORDER_CONSTANT,
const Scalar& borderValue=Scalar());
第一个参数src,输入参数,代表畸变的原始图像;
第二个参数dst,矫正后的输出图像,跟输入图像具有相同的类型和大小;
第三个参数map1和第四个参数map2,X坐标和Y坐标的映射;
第五个参数interpolation,定义图像的插值方式;
第六个参数borderMode,定义边界填充方式;
方法二:使用undistort函数实现
undistort函数原型:
[cpp] view plain copy 在CODE上查看代码片派生到我的代码片
//! corrects lens distortion for the given camera matrix and distortion coefficients
CV_EXPORTS_W void undistort( InputArray src, OutputArray dst,
InputArray cameraMatrix,
InputArray distCoeffs,
InputArray newCameraMatrix=noArray() );
第一个参数src,输入参数,代表畸变的原始图像;
第二个参数dst,矫正后的输出图像,跟输入图像具有相同的类型和大小;
第三个参数cameraMatrix为之前求得的相机的内参矩阵;
第四个参数distCoeffs为之前求得的相机畸变矩阵;
第五个参数newCameraMatrix,默认跟cameraMatrix保持一致;
方法一相比方法二执行效率更高一些,推荐使用。