MongDB第三章--搭建分片集群
mongodb 中的分片机制
知识点:
- 分片的概念
- mongodb 中的分片架构
- 分片示例
1.为什么需要分片?
随着数据的增长,单机实例的瓶颈是很明显的。可以通过复制的机制应对压力,但mongodb中单个集群的 节点数量限制到了12个以内,所以需要通过分片进一步横向扩展。此外分片也可节约磁盘的存储。
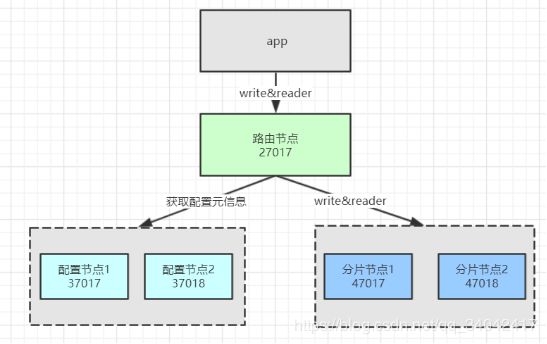
1.mongodb 中的分片架构
分片中的节点说明:
- 路由节点(mongos):用于分发用户的请求,起到反向代理的作用。
- 配置节点(config):用于存储分片的元数据信息,路由节基于元数据信息 决定把请求发给哪个分片。(3.4版本之后,该节点,必须使用复制集。)
- 分片节点(shard):用于实际存储的节点,其每个数据块默认为64M,满了之后就会产生新的数据库。
2.分片示例流程:
- 配置 并启动config 节点集群
- 配置集群信息
- 配置并启动2个shard 节点
- 配置并启动路由节点
- 添加shard 节点
- 添加shard 数据库
- 添加shard 集合
- 插入测试数据
- 检查数据的分布
- 插入大批量数据查看shard 分布
- 设置shard 数据块为一M
- 插入10万条数据
配置 并启动config 节点集群
在mongdb安装目录下新建config1-37017.conf的配置文件
touch config1-37017.conf
文件内容如下:
# 节点1 config1-37017.conf
dbpath=/data/mongo/config1
port=37017
fork=true
# 注意要写绝对路径,否则或启动报错
logpath=/data/mongo/config1/logs/config1.log
replSet=configCluster
configsvr=true
在mongdb安装目录下新建config2-37018.conf的配置文件
touch config2-37018.conf
文件内容如下:
# 节点2 config2-37018.conf
dbpath=/data/mongo/config2
port=37018
fork=true
# 注意要写绝对路径
logpath=/data/mongo/config2/logs/config2.log
replSet=configCluster
configsvr=true
启动配置节点
./bin/mongod -f config1-37017.conf
./bin/mongod -f config2-37018.conf
./bin/mongo --port=37017进入shell 并添加 config 集群配置:
var cfg ={"_id":"configCluster",
"protocolVersion" : 1,
"members":[
{"_id":0,"host":"127.0.0.1:37017"},
{"_id":1,"host":"127.0.0.1:37018"}
]
}
// 重新装载配置,并重新生成集群。
rs.initiate(cfg)
# 配置 shard 节点集群==============
在mongdb安装目录下新建shard1-47017.conf的配置文件
shard1-47017.conf
文件内容如下:
# 节点1 shard1-47017.conf
./bin/mongod -f shard1-47017.conf
dbpath=/data/mongo/shard1
port=47017
fork=true
logpath=/data/mongo/shard1/logs/shard1.log
shardsvr=true
# 节点2 shard2-47018.conf
在mongdb安装目录下新建shard1-47017.conf的配置文件
shard1-47017.conf
文件内容如下:
dbpath=/data/mongo/shard2
port=47018
fork=true
logpath=/data/mongo/shard2/logs/shard2.log
shardsvr=true
启动分片节点:
./bin/mongod -f shard1-47017.conf
./bin/mongod -f shard2-47018.conf
配置 路由节点 mongos ==============
在mongdb安装目录下新建route-27017.conf的配置文件
route-27017.conf
文件内容如下:
# 节点 route-27017.conf
port=27017
bind_ip=0.0.0.0
fork=true
logpath=/data/mongo/route/logs/route.log
configdb=configCluster/127.0.0.1:37017,127.0.0.1:37018
启动所有节点:
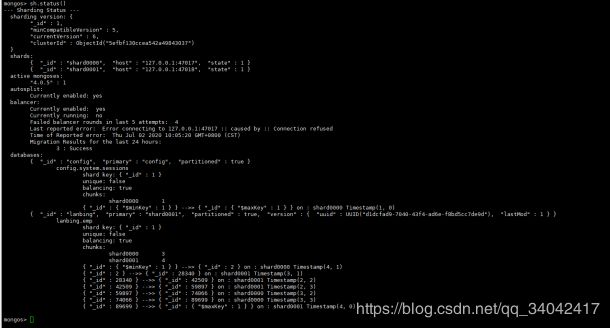
分片状态:
注意:只能在路由节点才能添加分片节点
启动路由节点:
./bin/mongos -f route-27017.conf
进入路由节点客户端 ./bin/mongo --port=27017
// 添加分片节点
sh.status()
sh.addShard("127.0.0.1:47017");
sh.addShard("127.0.0.1:47018");
为数据库开启分片功能
sh.enableSharding("lanbing")
为指定集合开启分片功能
sh.shardCollection("lanbing.emp",{"_id":1})
修改分片大小
use config
db.settings.find()
db.settings.save({_id:"chunksize",value:1})
尝试插入1万条数据:
for(var i=1;i<=100000;i++){
db.emp.insert({"_id":i,"name":"copy"+i});
}


