CAS_5.2 cas-overlay-template,https安全协议,数据库认证,ldap认证 搭建(一)
一、到github下载5.2x版本的 cas-overlay-template
https://github.com/apereo/cas-overlay-template
下载cas-overlay-template,在解压后的文件路径下执行maven命令build package,会下载依赖构建war包,在target文件夹下生成cas.war
maven命令不熟的可以把解压后的文件导入eclipse 再install,在target文件夹下生成cas.war
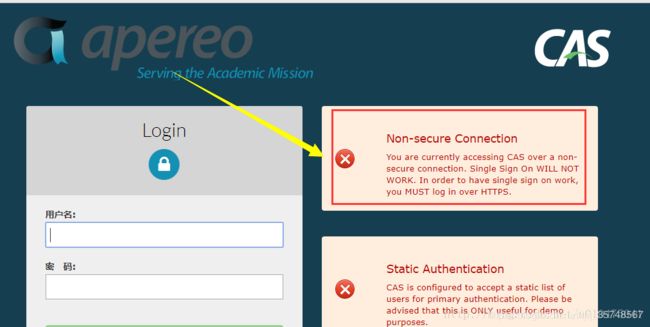
复制cas.war包到tomcat的webapp目录下,运行start.up,访问http://localhost:8080/cas/login;
可以看到,登录用户名和密码可以输入casuser 和 Mellon,这是初始配置文件默认的,文件位于apache-tomcat-8.5.16\webapps\cas\WEB-INF\classes下的application.properties
这个是登录界面,这个是http协议的,但是cas默认https协议和IMAPS,文章后面会讲解怎么配置https

二、生成证书
密钥生成
生成步骤,各参数含义:
-genkeypair 生成密钥
-keyalg 指定密钥算法,这时指定RSA,
-keysize 指定密钥长度,默认是1024位
-siglag 指定数字签名算法,这里指定为SHA1withRSA算法
-validity 指定证书有效期,这里指定36500天,也就是100年,我想我的应用用不到那么长时间
-alias 指定别名,这里是cas.server.com
-keystore 指定密钥库存储位置,这里存在d盘
-dname 指定用户信息,不用一个一个回答它的问题了;
注意:CN=域名,我们采用hnlens.com
keytool -genkeypair -keyalg RSA -keysize 2048 -sigalg SHA1withRSA -validity 36500 -alias passport.sso.com -keystore d:/tomcat.keystore -dname “CN=passport.sso.com,OU=kawhi,O=carl,L=GuangZhou,ST=GuangDong,C=CN”
1
输入上述命令,下面密码我们输入123456,然后一直回车,就在d盘生成了tomcat.keystore文件;
证书生成
在cmd下输入如下命令,密码为上面输入的123456:
keytool -exportcert -alias passport.sso.com -keystore d:/tomcat.keystore -file d:/tomcat.cer -rfc
1
证书生成在:d:/tomcat.cer
导入cacerts证书库
输入密码为 changeit并同意导入
keytool -import -alias passport.sso.com -keystore %JAVA_HOME%\jre\lib\security\cacerts -file d:/tomcat.cer -trustcacerts
1
检查是否导入成功
keytool -list -keystore “%JAVA_HOME%\jre\lib\security\cacerts” | findstr/i server
1
有东西输出代表成功
项目设置
证书有了,我们必须让项目识别证书,并且把ssl开关打开
密钥引用
把tomcat.keystore拷贝到sso-server\src\main\resources下
开启ssl
文件apliction.properties调整
server.ssl.enabled=true
server.ssl.key-store=classpath:tomcat.keystore
server.ssl.key-store-password=123456
server.ssl.keyAlias=passport.sso.com
tomcat下的server.xml 添加以下内容
/>
重启服务 访问: https://你的域名:8443/cas/login
三、数据库配置
CAS Server Context Configuration
server.context-path=/cas
server.port=8443
#添加认证服务
cas.serviceRegistry.initFromJson=true
#STEP 4签发证书,如果是用spring boot之类嵌入式的容器,则需要改这里的配置,如果是直接部在tomcat中,则需要把tomcat改成https的
server.ssl.key-store=file:keystore的文件路径
server.ssl.key-store-password=changeit
server.ssl.key-password=changeit
server.ssl.enabled=true
spring.http.encoding.charset=UTF-8
spring.http.encoding.enabled=true
spring.http.encoding.force=true
#CAS Cloud Bus Configuration
spring.cloud.bus.enabled=false
endpoints.enabled=false
endpoints.sensitive=true
endpoints.restart.enabled=false
endpoints.shutdown.enabled=false
management.security.enabled=true
management.security.roles=ACTUATOR,ADMIN
management.security.sessions=if_required
management.context-path=/status
management.add-application-context-header=false
security.basic.authorize-mode=role
security.basic.enabled=false
security.basic.path=/cas/status/**
#CAS Web Application Session Configuration
server.session.timeout=300
server.session.cookie.http-only=true
server.session.tracking-modes=COOKIE
#CAS Thymeleaf View Configuration
spring.thymeleaf.encoding=UTF-8
spring.thymeleaf.cache=false
spring.thymeleaf.mode=HTML
#CAS Log4j Configuration
server.context-parameters.isLog4jAutoInitializationDisabled=true
#CAS AspectJ Configuration
spring.aop.auto=true
spring.aop.proxy-target-class=true
#CAS Authentication Credentials
#cas.authn.accept.users=casuser::Mellon
#数据库配置
#配置密码加密
cas.authn.jdbc.query[0].passwordEncoder.type=DEFAULT
cas.authn.jdbc.query[0].passwordEncoder.characterEncoding=UTF-8
cas.authn.jdbc.query[0].passwordEncoder.encodingAlgorithm=MD5
cas.authn.jdbc.query[0].sql=SELECT * FROM yellowcong_users WHERE user_name =?
#select * from cms_auth_user where user_name=?
cas.authn.jdbc.query[0].healthQuery=
cas.authn.jdbc.query[0].isolateInternalQueries=false
cas.authn.jdbc.query[0].url=jdbc:mysql://127.0.0.1:3306/yellowcong?useUnicode=true&characterEncoding=UTF-8&autoReconnect=true&useSSL=false
cas.authn.jdbc.query[0].failFast=true
cas.authn.jdbc.query[0].isolationLevelName=ISOLATION_READ_COMMITTED
cas.authn.jdbc.query[0].dialect=org.hibernate.dialect.MySQLDialect
cas.authn.jdbc.query[0].leakThreshold=10
cas.authn.jdbc.query[0].propagationBehaviorName=PROPAGATION_REQUIRED
cas.authn.jdbc.query[0].batchSize=1
cas.authn.jdbc.query[0].user=root
cas.authn.jdbc.query[0].maxAgeDays=180
cas.authn.jdbc.query[0].password=root
cas.authn.jdbc.query[0].autocommit=false
cas.authn.jdbc.query[0].driverClass=com.mysql.jdbc.Driver
cas.authn.jdbc.query[0].idleTimeout=5000
cas.authn.jdbc.query[0].fieldPassword=PASSWORD
#返回用户信息 多属性
cas.authn.attributeRepository.jdbc[0].singleRow=true
cas.authn.attributeRepository.jdbc[0].order=0
cas.authn.attributeRepository.jdbc[0].url=jdbc:mysql://127.0.0.1:3306/yellowcong?useUnicode=true&characterEncoding=UTF-8&autoReconnect=true&useSSL=false
cas.authn.attributeRepository.jdbc[0].username=user_name
cas.authn.attributeRepository.jdbc[0].user=root
cas.authn.attributeRepository.jdbc[0].password=root
cas.authn.attributeRepository.jdbc[0].sql=select * from yellowcong_users where {0}
cas.authn.attributeRepository.jdbc[0].dialect=org.hibernate.dialect.MySQLDialect
cas.authn.attributeRepository.jdbc[0].ddlAuto=none
cas.authn.attributeRepository.jdbc[0].driverClass=com.mysql.jdbc.Driver
cas.authn.attributeRepository.jdbc[0].leakThreshold=10
cas.authn.attributeRepository.jdbc[0].propagationBehaviorName=PROPAGATION_REQUIRED
cas.authn.attributeRepository.jdbc[0].batchSize=1
cas.authn.attributeRepository.jdbc[0].healthQuery=SELECT 1
cas.authn.attributeRepository.jdbc[0].failFast=true
四、Ldap配置
上述的mysql配置替换成下面的就行了
cas.authn.ldap[0].type=AD
cas.authn.ldap[0].ldapUrl=ldap://xxx.com:389
cas.authn.ldap[0].useSsl=false
cas.authn.ldap[0].baseDn=cn=Users,dc=xxx,dc=com
cas.authn.ldap[0].userFilter=sAMAccountName={user}
cas.authn.ldap[0].subtreeSearch=true
cas.authn.ldap[0].bindDn=cn=你的管理员账号,cn=users,dc=XXX,dc=com
cas.authn.ldap[0].bindCredential=yourpassword
cas.authn.ldap[0].dnFormat=%[email protected]
cas.authn.ldap[0].principalAttributeId=sAMAccountName
cas.authn.ldap[0].principalAttributeList=displayName,mail
cas.authn.ldap[0].allowMultiplePrincipalAttributeValues=true
cas.authn.ldap[0].allowMissingPrincipalAttributeValue=true