Android对ListView控件增删改查
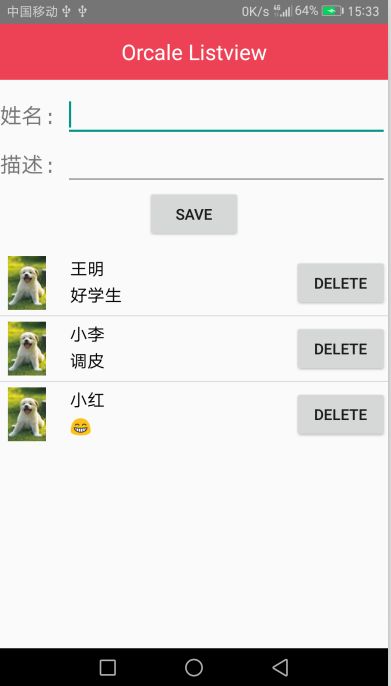
在Android开发中ListView控件经常用到,下面这个示例可以手动输入数据,在ListView控件上增加一个Item,同时在每一个Item上有一个删除按钮可以删除该条目,界面如下。
(1)工程目录结构

ListViewAdapter.java 是ListView的适配类
StudentBean.java 是ListView Item的数据
MainActivity.java是启动类
CommonConstant.java 是常量
activity_main.xml是主的布局文件
add_user.xml是界面上添加学生姓名、描述信息和Save按钮的布局文件
title_tool.xml是自定义的标题布局文件
student_listview.xml是ListView每一个Item的布局文件
(2)布局文件
这几个布局文件都采用LinearLayout布局,代码如下
active_main.xml
AndroidManifest.xml文件
3、代码逻辑实现.
ListView的适配器采用BaseAdapter,界面上的数据放入List中。
private List studentBeanList = new ArrayList();
notifyDataSetChanged
当点击Save按钮的时候,把界面上输入的姓名和描述信息放入添加到studentBeanList 中,同时出发Adapter的notifyDataSetChanged事件,重新加载界面数据。
在点击每一个Item的Delete按钮时候,把studentBeanList 中数据移除,同时也发出Adapter的notifyDataSetChanged事件,重新加载界面数据。
代码如下:
MainActivity.java
package com.nii.orcale;

import android.content.Context;
import android.os.Bundle;
import android.support.v7.app.AppCompatActivity;
import android.view.View;
import android.widget.Button;
import android.widget.EditText;
import android.widget.ListView;
import android.widget.Toast;
import com.nii.orcale.adapter.ListViewAdapter;
import com.nii.orcale.bean.StudentBean;
import org.apache.commons.lang3.StringUtils;
import java.util.ArrayList;
import java.util.List;

public class MainActivity extends AppCompatActivity
{

    /**
     * Context
     */
    private Context mContext;


    /**
     * listview
     */
    private ListView listView;

    /**
     * 适配器
     */
    private ListViewAdapter listViewAdapter;

    /**
     * 保存数据
     */
    private List studentBeanList = new ArrayList();

    @Override
    protected void onCreate(Bundle savedInstanceState)
    {
        super.onCreate(savedInstanceState);
        setContentView(R.layout.activity_main);

        this.mContext = this;

        //加载listview
        listView = (ListView) findViewById(R.id.listView);
        listViewAdapter = new ListViewAdapter(mContext,studentBeanList);
        listView.setAdapter(listViewAdapter);

        //save button的点击事件
        Button saveButton = (Button) findViewById(R.id.saveButton);
        saveButton.setOnClickListener(new View.OnClickListener()
        {
            @Override
            public void onClick(View v)
            {
                saveStudentMessage();
            }
        });
    }


    /**
     * 保存学生的信息
     */
    private void saveStudentMessage()
    {
        EditText nameEditText = (EditText) findViewById(R.id.nameEditText);
        EditText descEditText = (EditText) findViewById(R.id.descEditText);

        if (StringUtils.isEmpty(nameEditText.getText().toString())
                || StringUtils.isEmpty(descEditText.getText().toString()))
        {
            Toast.makeText(mContext,"姓名和描述信息都不能为空",Toast.LENGTH_SHORT).show();
            return;
        }

        //判断该学生是否存在
        for (StudentBean studentBean : studentBeanList)
        {
            if (StringUtils.equals(studentBean.getName(),nameEditText.getText().toString()))
            {
                Toast.makeText(mContext,nameEditText.getText().toString() + "已经存在",Toast.LENGTH_SHORT).show();
                return;
            }
        }


        StudentBean studentBean = new StudentBean(nameEditText.getText().toString(),descEditText.getText().toString());
        studentBeanList.add(studentBean);

        listViewAdapter.notifyDataSetChanged();
    }

}
适配器ListViewAdapter.java
package com.nii.orcale.adapter;

import android.content.Context;
import android.view.LayoutInflater;
import android.view.View;
import android.view.ViewGroup;
import android.widget.BaseAdapter;
import android.widget.Button;
import android.widget.TextView;
import com.nii.orcale.R;
import com.nii.orcale.bean.StudentBean;

import java.util.ArrayList;
import java.util.List;
import java.util.Map;

/**
 * Created by wzj on 2017/2/11.
 */
public class ListViewAdapter extends BaseAdapter
{
    /**
     * Context
     */
    private Context mContext;

    /**
     * 数据
     */
    private List studentBeanList;

    /**
     * 构造函数
     * @param context context
     * @param studentBeanList studentBeanMap
     */
    public ListViewAdapter(Context context,List studentBeanList)
    {
        this.mContext = context;
        this.studentBeanList = studentBeanList;
    }

    /**
     * How many items are in the data set represented by this Adapter.
     *
     * @return Count of items.
     */
    @Override
    public int getCount()
    {
        return studentBeanList.size();
    }

    /**
     * Get the data item associated with the specified position in the data set.
     *
     * @param position Position of the item whose data we want within the adapter's
     *                 data set.
     * @return The data at the specified position.
     */
    @Override
    public Object getItem(int position)
    {
        return null;
    }

    /**
     * Get the row id associated with the specified position in the list.
     *
     * @param position The position of the item within the adapter's data set whose row id we want.
     * @return The id of the item at the specified position.
     */
    @Override
    public long getItemId(int position)
    {
        return 0;
    }

    /**
     * Get a View that displays the data at the specified position in the data set. You can either
     * create a View manually or inflate it from an XML layout file. When the View is inflated, the
     * parent View (GridView, ListView...) will apply default layout parameters unless you use
     * {@link LayoutInflater#inflate(int, ViewGroup, boolean)}
     * to specify a root view and to prevent attachment to the root.
     *
     * @param position    The position of the item within the adapter's data set of the item whose view
     *                    we want.
     * @param convertView The old view to reuse, if possible. Note: You should check that this view
     *                    is non-null and of an appropriate type before using. If it is not possible to convert
     *                    this view to display the correct data, this method can create a new view.
     *                    Heterogeneous lists can specify their number of view types, so that this View is
     *                    always of the right type (see {@link #getViewTypeCount()} and
     *                    {@link #getItemViewType(int)}).
     * @param parent      The parent that this view will eventually be attached to
     * @return A View corresponding to the data at the specified position.
     */
    @Override
    public View getView(int position, View convertView, ViewGroup parent)
    {
        View view = null;
        if (convertView != null)
        {
            view = convertView;
        }
        else
        {
            view = View.inflate(mContext, R.layout.student_listview, null);
        }

        StudentBean studentBean = studentBeanList.get(position);
        if (studentBean == null)
        {
            studentBean = new StudentBean("NoName","NoDesc");
        }

        //更新数据
        final TextView nameTextView = (TextView) view.findViewById(R.id.showStuName);
        nameTextView.setText(studentBean.getName());

        TextView descTextView = (TextView)view.findViewById(R.id.showStuDesc);
        descTextView.setText(studentBean.getDesc());

        final int removePosition = position;

        //删除按钮点击事件
        Button deleteButton = (Button)view.findViewById(R.id.showDeleteButton);
        deleteButton.setOnClickListener(new View.OnClickListener()
        {
            @Override
            public void onClick(View v)
            {
                deleteButtonAction(removePosition);
            }
        });


        return view;
    }

    private void deleteButtonAction(int position)
    {
        studentBeanList.remove(position);

        notifyDataSetChanged();
    }
}
数据对象StuentBean.java
package com.nii.orcale.bean;

/**
 * Created by wzj on 2017/2/12.
 */
public class StudentBean
{
    private int id;

    private String name;

    private int score;

    private String desc;

    public StudentBean()
    {

    }

    public StudentBean(String name, String desc)
    {
        this.name = name;
        this.desc = desc;
    }

    public int getId()
    {
        return id;
    }

    public void setId(int id)
    {
        this.id = id;
    }

    public String getName()
    {
        return name;
    }

    public void setName(String name)
    {
        this.name = name;
    }

    public int getScore()
    {
        return score;
    }

    public void setScore(int score)
    {
        this.score = score;
    }

    public String getDesc()
    {
        return desc;
    }

    public void setDesc(String desc)
    {
        this.desc = desc;
    }
}
注意:
代码github链接: https://github.com/HelloKittyNII/ModuleCode/tree/master/android/03.listview1、需要在给ListView每一个Item上都要添加事件。