搭建深度学习后台服务器
本篇文章的原创为国外的一篇文章(一个可扩展的Keras深度学习REST API),链接为:
https://www.pyimagesearch.com/2018/01/29/scalable-keras-deep-learning-rest-api/#
我们的Keras深度学习REST API将能够批量处理图像,扩展到多台机器(包括多台web服务器和Redis实例),并在负载均衡器之后进行循环调度。
为此,我们将使用:
- KerasRedis(内存数据结构存储)
- Flask (Python的微web框架)
- 消息队列和消息代理编程范例
本篇文章的整体思路如下:
我们将首先简要讨论Redis数据存储,以及如何使用它促进消息队列和消息代理。然后,我们将通过安装所需的Python包来配置Python开发环境,以构建我们的Keras深度学习REST API。一旦配置了开发环境,就可以使用Flask web框架实现实际的Keras深度学习REST API。在实现之后,我们将启动Redis和Flask服务器,然后使用cURL和Python向我们的深度学习API端点提交推理请求。最后,我们将以对构建自己的深度学习REST API时应该牢记的注意事项的简短讨论结束。
第一部分:简要介绍Redis如何作为REST API消息代理/消息队列

图片1:Redis可以用作我们深度学习REST API的消息代理/消息队列
Redis是内存中的数据存储。它不同于简单的键/值存储(比如memcached),因为它可以存储实际的数据结构。今天我们将使用Redis作为消息代理/消息队列。这包括:
- 在我们的机器上运行Redis
- 将数据(图像)按照队列的方式用Redis存储,并依次由我们的REST API处理
- 为新批输入图像循环访问Redis
- 对图像进行分类并将结果返回给客户端
文章中对Redis官网有一个超链接(https://redis.io/topics/introduction),但是要翻出去,所以我就截图一个图片放上去仅供参考。

第二部分:安装和配置Redis
官网做法,linux系统的安装:

自己的安装方法:
conda install redis开启方式相同:
resdis-server结果:

测试和原文的命令一致。
redis-cli ping第三部分:配置Python开发环境以构建Keras REST API
文章中说需要创建新的虚拟环境来防止影响系统级别的python项目(但是我没有创建),但是还是需要安装rest api所需要依赖的包。以下为所需要的包。
$ pip install numpy
$ pip install scipy h5py
$ pip install tensorflow # tensorflow-gpu for GPU machines
$ pip install keras
$ pip install flask gevent
$ pip install imutils requests
$ pip install redis
$ pip install Pillow
第四部分:实现可扩展的Keras REST API
首先是Keras Redis Flask REST API数据流程图

让我们开始构建我们的服务器脚本。为了方便起见,我在一个文件中实现了服务器,但是它可以按照您认为合适的方式模块化。为了获得最好的结果和避免复制/粘贴错误,我建议您使用本文的“下载”部分来获取相关的脚本和图像。:
# import the necessary packages
from keras.applications import ResNet50
from keras.preprocessing.image import img_to_array
from keras.applications import imagenet_utils
from threading import Thread
from PIL import Image
import numpy as np
import base64
import flask
import redis
import uuid
import time
import json
import sys
import io
为了简单起见,我们将在ImageNet数据集上使用ResNet预训练。我将指出在哪里可以用你自己的模型交换ResNet。flask模块包含flask库(用于构建web API)。redis模块将使我们能够与redis数据存储接口。从这里开始,让我们初始化将在run_keras_server.py中使用的常量.
# initialize constants used to control image spatial dimensions and
# data type
IMAGE_WIDTH = 224
IMAGE_HEIGHT = 224
IMAGE_CHANS = 3
IMAGE_DTYPE = "float32"

# initialize constants used for server queuing
IMAGE_QUEUE = "image_queue"
BATCH_SIZE = 32
SERVER_SLEEP = 0.25
CLIENT_SLEEP = 0.25
我们将向服务器传递float32图像,尺寸为224 x 224,包含3个通道。我们的服务器可以处理一个BATCH_SIZE = 32。如果您的生产系统上有GPU(s),那么您需要调优BATCH_SIZE以获得最佳性能。我发现将SERVER_SLEEP和CLIENT_SLEEP设置为0.25秒(服务器和客户端在再次轮询Redis之前分别暂停的时间)在大多数系统上都可以很好地工作。如果您正在构建一个生产系统,那么一定要调整这些常量。
让我们启动我们的Flask app和Redis服务器:
# initialize our Flask application, Redis server, and Keras model
app = flask.Flask(__name__)
db = redis.StrictRedis(host="localhost", port=6379, db=0)
model = None
在这里你可以看到启动Flask是多么容易。在运行这个服务器脚本之前,我假设Redis服务器正在运行(之前的redis-server)。我们的Python脚本连接到本地主机6379端口(Redis的默认主机和端口值)上的Redis存储。不要忘记将全局Keras模型初始化为None。接下来我们来处理图像的序列化:
def base64_encode_image(a):
	# base64 encode the input NumPy array
	return base64.b64encode(a).decode("utf-8")

def base64_decode_image(a, dtype, shape):
	# if this is Python 3, we need the extra step of encoding the
	# serialized NumPy string as a byte object
	if sys.version_info.major == 3:
		a = bytes(a, encoding="utf-8")

	# convert the string to a NumPy array using the supplied data
	# type and target shape
	a = np.frombuffer(base64.decodestring(a), dtype=dtype)
	a = a.reshape(shape)

	# return the decoded image
	return a
Redis将充当服务器上的临时数据存储。图像将通过诸如cURL、Python脚本甚至是移动应用程序等各种方法进入服务器,而且,图像只能每隔一段时间(几个小时或几天)或者以很高的速率(每秒几次)进入服务器。我们需要把图像放在某个地方,因为它们在被处理前排队。我们的Redis存储将作为临时存储。
为了将图像存储在Redis中,需要对它们进行序列化。由于图像只是数字数组,我们可以使用base64编码来序列化图像。使用base64编码还有一个额外的好处,即允许我们使用JSON存储图像的附加属性。
base64_encode_image函数处理序列化。类似地,在通过模型传递图像之前,我们需要反序列化图像。这由base64_decode_image函数处理。
预处理图片:
def prepare_image(image, target):
	# if the image mode is not RGB, convert it
	if image.mode != "RGB":
		image = image.convert("RGB")

	# resize the input image and preprocess it
	image = image.resize(target)
	image = img_to_array(image)
	image = np.expand_dims(image, axis=0)
	image = imagenet_utils.preprocess_input(image)

	# return the processed image
	return image
我已经定义了一个prepare_image函数,它使用Keras中的ResNet50实现对输入图像进行预处理,以便进行分类。在使用您自己的模型时,我建议修改此函数,以执行所需的预处理、缩放或规范化。
从那里我们将定义我们的分类方法:
def classify_process():
	# load the pre-trained Keras model (here we are using a model
	# pre-trained on ImageNet and provided by Keras, but you can
	# substitute in your own networks just as easily)
	print("* Loading model...")
	model = ResNet50(weights="imagenet")
	print("* Model loaded")
classify_process函数将在它自己的线程中启动,我们将在下面的__main__中看到这一点。该函数将从Redis服务器轮询图像批次,对图像进行分类,并将结果返回给客户端。
在model = ResNet50(weights="imagenet")这一行中,我将这个操作与终端打印消息连接起来——根据Keras模型的大小,加载是即时的,或者需要几秒钟。
加载模型只在启动这个线程时发生一次——如果每次我们想要处理一个映像时都必须加载模型,那么速度会非常慢,而且由于内存耗尽可能导致服务器崩溃。
加载模型后,这个线程将不断轮询新的图像,然后将它们分类(注意这部分代码应该时尚一部分的继续):
	# continually poll for new images to classify
	while True:
		# attempt to grab a batch of images from the database, then
		# initialize the image IDs and batch of images themselves
		queue = db.lrange(IMAGE_QUEUE, 0, BATCH_SIZE - 1)  #第79行
		imageIDs = []
		batch = None

		# loop over the queue
		for q in queue:
			# deserialize the object and obtain the input image
			q = json.loads(q.decode("utf-8"))
			image = base64_decode_image(q["image"], IMAGE_DTYPE,
				(1, IMAGE_HEIGHT, IMAGE_WIDTH, IMAGE_CHANS))

			# check to see if the batch list is None
			if batch is None:
				batch = image

			# otherwise, stack the data
			else:
				batch = np.vstack([batch, image])

			# update the list of image IDs
			imageIDs.append(q["id"])
在这里,我们首先使用Redis数据库的lrange函数从队列(第79行)中获取最多的BATCH_SIZE图像。
从那里我们初始化imageIDs和批处理(第80和81行),并开始在第84行开始循环队列。
在循环中,我们首先解码对象并将其反序列化为一个NumPy数组image(第86-88行)。
接下来,在第90-96行中,我们将向批处理添加图像(或者如果批处理当前为None,我们将该批处理设置为当前图像)。
我们还将图像的id附加到imageIDs(第99行)。
让我们完成循环和函数:
		# check to see if we need to process the batch
		if len(imageIDs) > 0:                     # 第102行
			# classify the batch
			print("* Batch size: {}".format(batch.shape))
			preds = model.predict(batch)
			results = imagenet_utils.decode_predictions(preds)

			# loop over the image IDs and their corresponding set of
			# results from our model
			for (imageID, resultSet) in zip(imageIDs, results):
				# initialize the list of output predictions
				output = []

				# loop over the results and add them to the list of
				# output predictions
				for (imagenetID, label, prob) in resultSet:
					r = {"label": label, "probability": float(prob)}
					output.append(r)

				# store the output predictions in the database, using
				# the image ID as the key so we can fetch the results
				db.set(imageID, json.dumps(output))        #第122行

			# remove the set of images from our queue
			db.ltrim(IMAGE_QUEUE, len(imageIDs), -1)

		# sleep for a small amount
		time.sleep(SERVER_SLEEP)
在这个代码块中,我们检查批处理中是否有图像(第102行)。如果我们有一批图像,我们通过模型(第105行)对整个批进行预测。从那里,我们循环一个图像和相应的预测结果(110-122行)。这些行向输出列表追加标签和概率,然后使用imageID将输出存储在Redis数据库中(第116-122行)。
我们使用第125行上的ltrim从队列中删除了刚刚分类的图像集。最后,我们将睡眠设置为SERVER_SLEEP时间并等待下一批图像进行分类。下面我们来处理/predict我们的REST API端点:
@app.route("/predict", methods=["POST"])
def predict():
	# initialize the data dictionary that will be returned from the
	# view
	data = {"success": False}

	# ensure an image was properly uploaded to our endpoint
	if flask.request.method == "POST":
		if flask.request.files.get("image"):
			# read the image in PIL format and prepare it for
			# classification
			image = flask.request.files["image"].read()
			image = Image.open(io.BytesIO(image))
			image = prepare_image(image, (IMAGE_WIDTH, IMAGE_HEIGHT))

			# ensure our NumPy array is C-contiguous as well,
			# otherwise we won't be able to serialize it
			image = image.copy(order="C")

			# generate an ID for the classification then add the
			# classification ID + image to the queue
			k = str(uuid.uuid4())
			d = {"id": k, "image": base64_encode_image(image)}
			db.rpush(IMAGE_QUEUE, json.dumps(d))
稍后您将看到,当我们发布到REST API时,我们将使用/predict端点。当然,我们的服务器可能有多个端点。我们使用@app。路由修饰符以第130行所示的格式在函数上方定义端点,以便Flask知道调用什么函数。我们可以很容易地得到另一个使用AlexNet而不是ResNet的端点,我们可以用类似的方式定义具有关联函数的端点。你懂的,但就我们今天的目的而言,我们只有一个端点叫做/predict。
我们在第131行定义的predict方法将处理对服务器的POST请求。这个函数的目标是构建JSON数据,并将其发送回客户机。如果POST数据包含图像(第137和138行),我们将图像转换为PIL/Pillow格式,并对其进行预处理(第141-143行)。
在开发这个脚本时,我花了大量时间调试我的序列化和反序列化函数,结果发现我需要第147行将数组转换为C-contiguous排序(您可以在这里了解更多)。老实说,这是一个相当大的麻烦事,但我希望它能帮助你站起来,快速跑。
如果您想知道在第99行中提到的id,那么实际上是使用uuid(通用唯一标识符)在第151行生成的。我们使用UUID来防止hash/key冲突。
接下来,我们将图像的id和base64编码附加到d字典中。使用rpush(第153行)将这个JSON数据推送到Redis db非常简单。
让我们轮询服务器以返回预测:
			# keep looping until our model server returns the output
			# predictions
			while True:
				# attempt to grab the output predictions
				output = db.get(k)

				# check to see if our model has classified the input
				# image
				if output is not None:
 					# add the output predictions to our data
 					# dictionary so we can return it to the client
					output = output.decode("utf-8")
					data["predictions"] = json.loads(output)

					# delete the result from the database and break
					# from the polling loop
					db.delete(k)
					break

				# sleep for a small amount to give the model a chance
				# to classify the input image
				time.sleep(CLIENT_SLEEP)

			# indicate that the request was a success
			data["success"] = True

	# return the data dictionary as a JSON response
	return flask.jsonify(data)
我们将持续循环,直到模型服务器返回输出预测。我们开始一个无限循环,试图得到157-159条预测线。从这里,如果输出包含预测,我们将对结果进行反序列化,并将结果添加到将返回给客户机的数据中。我们还从db中删除了结果(因为我们已经从数据库中提取了结果,不再需要将它们存储在数据库中),并跳出了循环(第163-172行)。
否则,我们没有任何预测,我们需要睡觉,继续投票(第176行)。如果我们到达第179行,我们已经成功地得到了我们的预测。在本例中,我们向客户机数据添加True的成功值(第179行)。注意:对于这个示例脚本,我没有在上面的循环中添加超时逻辑,这在理想情况下会为数据添加一个False的成功值。我将由您来处理和实现。最后我们称烧瓶。jsonify对数据,并将其返回给客户端(第182行)。这就完成了我们的预测函数。
为了演示我们的Keras REST API,我们需要一个__main__函数来实际启动服务器:
# if this is the main thread of execution first load the model and
# then start the server
if __name__ == "__main__":
	# load the function used to classify input images in a *separate*
	# thread than the one used for main classification
	print("* Starting model service...")
	t = Thread(target=classify_process, args=())
	t.daemon = True
	t.start()

	# start the web server
	print("* Starting web service...")
	app.run()
第186-196行定义了__main__函数,它将启动classify_process线程(第190-192行)并运行Flask应用程序(第196行)。
第五部分:启动可伸缩的Keras REST API
要测试我们的Keras深度学习REST API,请确保使用本文的“下载”部分下载源代码示例图像。从这里,让我们启动Redis服务器,如果它还没有运行:
redis-server然后,在另一个终端中,让我们启动REST API Flask服务器:
python run_keras_server.py 另外,我建议在向服务器提交请求之前,等待您的模型完全加载到内存中。现在我们可以继续使用cURL和Python测试服务器。
第七部分:使用cURL访问Keras REST API
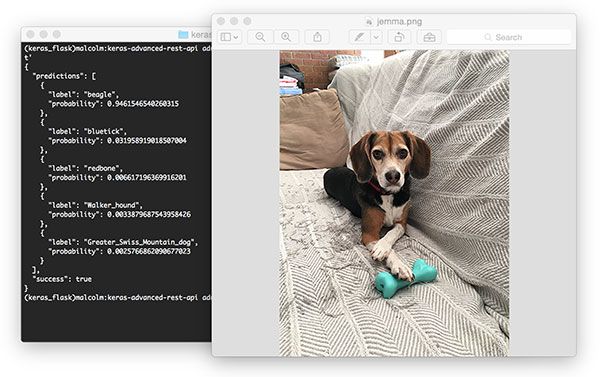
使用cURL来测试我们的Keras REST API服务器。这是我的家庭小猎犬Jemma。根据我们的ResNet模型,她被归类为一只拥有94.6%自信的小猎犬。
curl -X POST -F [email protected] 'http://localhost:5000/predict'你会在你的终端收到JSON格式的预测:
{
  "predictions": [
    {
      "label": "beagle",
      "probability": 0.9461546540260315
    },
    {
      "label": "bluetick",
      "probability": 0.031958919018507004
    },
    {
      "label": "redbone",
      "probability": 0.006617196369916201
    },
    {
      "label": "Walker_hound",
      "probability": 0.0033879687543958426
    },
    {
      "label": "Greater_Swiss_Mountain_dog",
      "probability": 0.0025766862090677023
    }
  ],
  "success": true
}
第六部分:使用Python向Keras REST API提交请求
如您所见,使用cURL验证非常简单。现在,让我们构建一个Python脚本,该脚本将发布图像并以编程方式解析返回的JSON。
让我们回顾一下simple_request.py
# import the necessary packages
import requests

# initialize the Keras REST API endpoint URL along with the input
# image path
KERAS_REST_API_URL = "http://localhost:5000/predict"
IMAGE_PATH = "jemma.png"
我们在这个脚本中使用Python请求来处理向服务器提交数据。我们的服务器运行在本地主机上,可以通过端口5000访问端点/predict,这是KERAS_REST_API_URL变量(第6行)指定的。
我们还定义了IMAGE_PATH(第7行)。png与我们的脚本在同一个目录中。如果您想测试其他图像,请确保指定到您的输入图像的完整路径。
让我们加载图像并发送到服务器:
# load the input image and construct the payload for the request
image = open(IMAGE_PATH, "rb").read()
payload = {"image": image}

# submit the request
r = requests.post(KERAS_REST_API_URL, files=payload).json()

# ensure the request was sucessful
if r["success"]:
	# loop over the predictions and display them
	for (i, result) in enumerate(r["predictions"]):
		print("{}. {}: {:.4f}".format(i + 1, result["label"],
			result["probability"]))

# otherwise, the request failed
else:
	print("Request failed")
我们在第10行以二进制模式读取图像并将其放入有效负载字典。负载通过请求发送到服务器。在第14行发布。如果我们得到一个成功消息,我们可以循环预测并将它们打印到终端。我使这个脚本很简单,但是如果你想变得更有趣,你也可以使用OpenCV在图像上绘制最高的预测文本。
第七部分:运行简单的请求脚本
编写脚本很容易。打开终端并执行以下命令(当然,前提是我们的Flask服务器和Redis服务器都在运行)。
python simple_request.py
使用Python以编程方式使用我们的Keras深度学习REST API的结果
第八部分:扩展深度学习REST API时的注意事项
如果您预期在深度学习REST API上有较长一段时间的高负载,那么您可能需要考虑一种负载平衡算法,例如循环调度,以帮助在多个GPU机器和Redis服务器之间平均分配请求。
记住,Redis是内存中的数据存储,所以我们只能在队列中存储可用内存中的尽可能多的图像。
使用float32数据类型的单个224 x 224 x 3图像将消耗602112字节的内存。
假设一台内存为16GB的服务器,这意味着我们可以在队列中保存大约26500个图像,但在这一点上,我们可能希望添加更多的GPU服务器来更快地消耗队列。
第九部分:然而,有一个微妙的问题。。。
根据您如何部署深度学习REST API,将classify_process函数保持在与web API其余代码相同的文件中存在一个微妙的问题。大多数web服务器,包括Apache和nginx,都允许多个客户机线程。如果你保持classify_process在同一个文件中预测的观点,那么你可能加载多个模型,如果您的服务器软件认为有必要创建一个新线程来服务的客户机请求,每一个新线程,将会创建一个新视图,因此一种新的模式将被加载。
解决方案是将classify_process转移到一个完全独立的进程中,然后与Flask web服务器和Redis服务器一起启动它。
最后,本人这里有一些flask和rest api的视频讲解资源,需要的话可以联系我