EAST-tensorflow 源码解读
EAST网络提供了对自然场景中文字区域的目标检测功能
源码:https://github.com/argman/EAST
主要侧重于对样本标签的制作部分
目录
一、网络结构
二、loss定义
三、训练标签的生成
3.1 crop_area图片切割
3.2 generate_rbox标签生成
一、网络结构
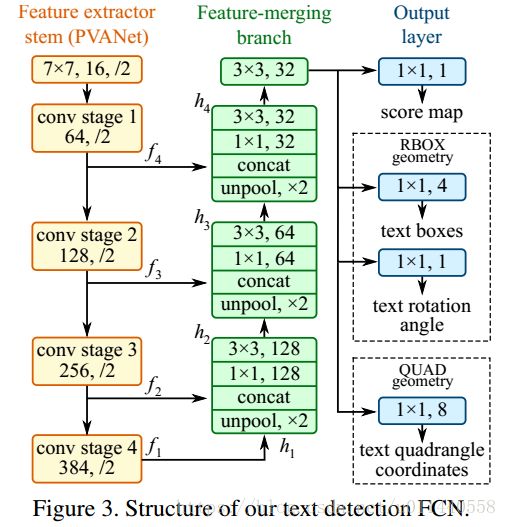
网络结构不难理解,如下图所示:
为了检测不同大小尺度的文字目标,网络从不同的卷积层提取了f1-f4四个卷积层输出,并通过不同模块h2-h4的上采样后,将不同卷积层的输出按通道叠加,最后输出结果分别经过[1,1,1],[1,1,4],[1,1,1]的卷积核,得到3个输出:
1.score map:[H/4,W/4,1]的张量,表示其中每个像素在文本内容框内的置信。
2.text boxes:[H/4,W/4,4]的张量,表示在文本内容框内的像素到框四边的距离信息。
3.text rotation:[H/4,W/4,1]的张量,表示所处文本框的倾斜角度
下面是源码中的相应部分:
def model(images, weight_decay=1e-5, is_training=True):
    '''
    define the model, we use slim's implemention of resnet
    '''
    # 对RGB像素值做标准化,即减去均值
    images = mean_image_subtraction(images)

    # 先将图片经过resnet_v1网络
    # 得到resnet_v1的全部stage的输出,存在end_points里面
    with slim.arg_scope(resnet_v1.resnet_arg_scope(weight_decay=weight_decay)):
        logits, end_points = resnet_v1.resnet_v1_50(images, is_training=is_training, scope='resnet_v1_50')

    with tf.variable_scope('feature_fusion', values=[end_points.values]):
        batch_norm_params = {
        'decay': 0.997,
        'epsilon': 1e-5,
        'scale': True,
        'is_training': is_training
        }
        with slim.arg_scope([slim.conv2d],
                            activation_fn=tf.nn.relu,
                            normalizer_fn=slim.batch_norm,
                            normalizer_params=batch_norm_params,
                            weights_regularizer=slim.l2_regularizer(weight_decay)):
            # 取第2,3,4,5次池化后的输出
            f = [end_points['pool5'], end_points['pool4'],
                 end_points['pool3'], end_points['pool2']]
            for i in range(4):
                print('Shape of f_{} {}'.format(i, f[i].shape))
            g = [None, None, None, None]
            h = [None, None, None, None]
            num_outputs = [None, 128, 64, 32]
            for i in range(4):
                # 由网络结构图可知h0=f0
                if i == 0:
                    h[i] = f[i]
                # 对其他的hi有,hi = conv(concat(fi,unpool(hi-1)))
                else:
                    c1_1 = slim.conv2d(tf.concat([g[i-1], f[i]], axis=-1), num_outputs[i], 1)
                    h[i] = slim.conv2d(c1_1, num_outputs[i], 3)
                # 由网络结构可知,对于h0,h1,h2都要先经过unpool在与fi进行叠加
                if i <= 2:
                    g[i] = unpool(h[i])
                else:
                    g[i] = slim.conv2d(h[i], num_outputs[i], 3)
                print('Shape of h_{} {}, g_{} {}'.format(i, h[i].shape, i, g[i].shape))

            # score map
            F_score = slim.conv2d(g[3], 1, 1, activation_fn=tf.nn.sigmoid, normalizer_fn=None)
            # text boxes
            geo_map = slim.conv2d(g[3], 4, 1, activation_fn=tf.nn.sigmoid, normalizer_fn=None) * FLAGS.text_scale
            # text rotation
            angle_map = (slim.conv2d(g[3], 1, 1, activation_fn=tf.nn.sigmoid, normalizer_fn=None) - 0.5) * np.pi/2 # angle is between [-45, 45]
            # 这里将坐标与角度信息合并输出
            F_geometry = tf.concat([geo_map, angle_map], axis=-1)

    return F_score, F_geometry
二、loss定义
整个loss主要由三部分组成:
1. 分类loss,即对score_map中预测像素是否处于文本内容内的预测结果的交叉熵
2. 角度loss,对旋转角度预测的一个简单误差函数
3. 定位loss,这里采用了IOU loss
代码很简短,如下:
def loss(y_true_cls, y_pred_cls,
         y_true_geo, y_pred_geo,
         training_mask):
    '''
    define the loss used for training, contraning two part,
    the first part we use dice loss instead of weighted logloss,
    the second part is the iou loss defined in the paper
    :param y_true_cls: ground truth of text
    :param y_pred_cls: prediction os text
    :param y_true_geo: ground truth of geometry
    :param y_pred_geo: prediction of geometry
    :param training_mask: mask used in training, to ignore some text annotated by ###
    :return:
    '''
    # score交叉熵
    classification_loss = dice_coefficient(y_true_cls, y_pred_cls, training_mask)
    classification_loss *= 0.01

    # d1 -> top, d2->right, d3->bottom, d4->left
    # IOU loss计算
    d1_gt, d2_gt, d3_gt, d4_gt, theta_gt = tf.split(value=y_true_geo, num_or_size_splits=5, axis=3)
    d1_pred, d2_pred, d3_pred, d4_pred, theta_pred = tf.split(value=y_pred_geo, num_or_size_splits=5, axis=3)
    area_gt = (d1_gt + d3_gt) * (d2_gt + d4_gt)
    area_pred = (d1_pred + d3_pred) * (d2_pred + d4_pred)
    w_union = tf.minimum(d2_gt, d2_pred) + tf.minimum(d4_gt, d4_pred)
    h_union = tf.minimum(d1_gt, d1_pred) + tf.minimum(d3_gt, d3_pred)
    area_intersect = w_union * h_union
    area_union = area_gt + area_pred - area_intersect
    L_AABB = -tf.log((area_intersect + 1.0)/(area_union + 1.0))

    # 角度误差函数
    L_theta = 1 - tf.cos(theta_pred - theta_gt)


    tf.summary.scalar('geometry_AABB', tf.reduce_mean(L_AABB * y_true_cls * training_mask))
    tf.summary.scalar('geometry_theta', tf.reduce_mean(L_theta * y_true_cls * training_mask))

    # 加权和得到geo loss
    L_g = L_AABB + 20 * L_theta

    # 考虑training_mask,背景像素不参与误差计算
    return tf.reduce_mean(L_g * y_true_cls * training_mask) + classification_loss
三、训练标签的生成
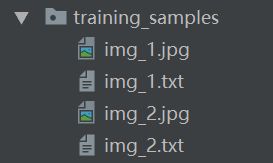
训练集针对每一幅图片,都有一个txt文件记录其中的文本框位置及内容,如下所示:
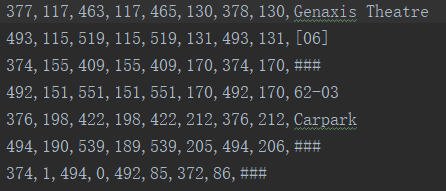
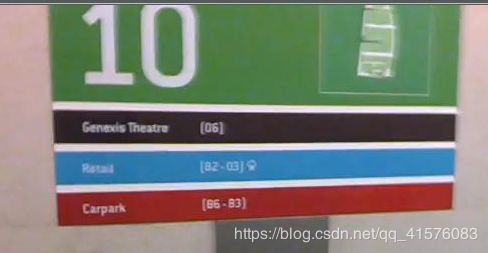
txt文件内容如下所示:
显然,每一行记录了一个文本框的位置信息,以及文本内容,而以###或者*标注的则是无法辨识的内容。
对每一幅图片,读入txt内容后要进行的操作主要有以下几步:
1. 随机切割图片中的带文字部分与背景部分,并resize以及pad成要求尺寸的样本图片
2. 根据切割部分的gt内容制作score_map, geo_map, rotation_map。
源代码如下:
def generator(input_size=512, batch_size=32,
              background_ratio=3./8,
              random_scale=np.array([0.5, 1, 2.0, 3.0]),
              vis=False):
    # 获得训练集路径下所有图片名字
    image_list = np.array(get_images())
    print('{} training images in {}'.format(
        image_list.shape[0], FLAGS.training_data_path))
    # index :总样本数
    index = np.arange(0, image_list.shape[0])
    while True:
        np.random.shuffle(index)
        images = []
        image_fns = []
        score_maps = []
        geo_maps = []
        training_masks = []
        for i in index:
            try:
                # 读取图片
                im_fn = image_list[i]
                im = cv2.imread(im_fn)
                # print im_fn
                h, w, _ = im.shape

                # 读取标签txt
                txt_fn = im_fn.replace(os.path.basename(im_fn).split('.')[1], 'txt')
                if not os.path.exists(txt_fn):
                    print('text file {} does not exists'.format(txt_fn))
                    continue

                # 读出对应label文档中的内容
                # text_polys:样本中文字坐标
                # text_tags:文字框内容是否可辨识
                text_polys, text_tags = load_annoataion(txt_fn)
                # 保存其中的有效标签框,并修正文本框坐标溢出边界现象
                text_polys, text_tags = check_and_validate_polys(text_polys, text_tags, (h, w))

                # 随机resize一下图片,并将text_polys中的坐标做等比例改变
                rd_scale = np.random.choice(random_scale)
                im = cv2.resize(im, dsize=None, fx=rd_scale, fy=rd_scale)
                text_polys *= rd_scale


                # random crop a area from image
                # crop_area函数:圈出图中的某一块文字或者空区域,并生成其polys,即文本框标签数据
                # 随机做一些无字符样本,也就是背景样本
                if np.random.rand() < background_ratio:
                    # crop background
                    im, text_polys, text_tags = crop_area(im, text_polys, text_tags, crop_background=True)
                    # 图片里没找到纯背景就切换下一幅图
                    if text_polys.shape[0] > 0:
                        # cannot find background
                        continue
                    # pad and resize image
                    # 对得到的背景图片进行扩充至size=input_size
                    # score标签全为0,因为是背景
                    # 同理,geo标签全为0
                    new_h, new_w, _ = im.shape
                    max_h_w_i = np.max([new_h, new_w, input_size])
                    im_padded = np.zeros((max_h_w_i, max_h_w_i, 3), dtype=np.uint8)
                    im_padded[:new_h, :new_w, :] = im.copy()
                    im = cv2.resize(im_padded, dsize=(input_size, input_size))
                    score_map = np.zeros((input_size, input_size), dtype=np.uint8)
                    geo_map_channels = 5 if FLAGS.geometry == 'RBOX' else 8
                    geo_map = np.zeros((input_size, input_size, geo_map_channels), dtype=np.float32)
                    training_mask = np.ones((input_size, input_size), dtype=np.uint8)
                # 另一部分作为正常样本
                else:
                    im, text_polys, text_tags = crop_area(im, text_polys, text_tags, crop_background=False)
                    # 如果图片中本身就没有文字则跳过该样本
                    if text_polys.shape[0] == 0:
                        continue
                    h, w, _ = im.shape

                    # 填充,resize图像至设定尺寸
                    new_h, new_w, _ = im.shape
                    max_h_w_i = np.max([new_h, new_w, input_size])
                    im_padded = np.zeros((max_h_w_i, max_h_w_i, 3), dtype=np.uint8)
                    im_padded[:new_h, :new_w, :] = im.copy()
                    im = im_padded
                    # resize the image to input size
                    new_h, new_w, _ = im.shape
                    resize_h = input_size
                    resize_w = input_size
                    im = cv2.resize(im, dsize=(resize_w, resize_h))
                    # 将文本框坐标标签等比例修改
                    resize_ratio_3_x = resize_w/float(new_w)
                    resize_ratio_3_y = resize_h/float(new_h)
                    text_polys[:, :, 0] *= resize_ratio_3_x
                    text_polys[:, :, 1] *= resize_ratio_3_y
                    new_h, new_w, _ = im.shape
                    # 结合文本框真值标签生成score图和geo图
                    score_map, geo_map, training_mask = generate_rbox((new_h, new_w), text_polys, text_tags)

                # 是否显示样本切割填充结果
                if vis:
                    fig, axs = plt.subplots(3, 2, figsize=(20, 30))

                    axs[0, 0].imshow(im[:, :, ::-1])
                    axs[0, 0].set_xticks([])
                    axs[0, 0].set_yticks([])
                    for poly in text_polys:
                        poly_h = min(abs(poly[3, 1] - poly[0, 1]), abs(poly[2, 1] - poly[1, 1]))
                        poly_w = min(abs(poly[1, 0] - poly[0, 0]), abs(poly[2, 0] - poly[3, 0]))
                        axs[0, 0].add_artist(Patches.Polygon(
                            poly, facecolor='none', edgecolor='green', linewidth=2, linestyle='-', fill=True))
                        axs[0, 0].text(poly[0, 0], poly[0, 1], '{:.0f}-{:.0f}'.format(poly_h, poly_w), color='purple')
                    axs[0, 1].imshow(score_map[::, ::])
                    axs[0, 1].set_xticks([])
                    axs[0, 1].set_yticks([])
                    axs[1, 0].imshow(geo_map[::, ::, 0])
                    axs[1, 0].set_xticks([])
                    axs[1, 0].set_yticks([])
                    axs[1, 1].imshow(geo_map[::, ::, 1])
                    axs[1, 1].set_xticks([])
                    axs[1, 1].set_yticks([])
                    axs[2, 0].imshow(geo_map[::, ::, 2])
                    axs[2, 0].set_xticks([])
                    axs[2, 0].set_yticks([])
                    axs[2, 1].imshow(training_mask[::, ::])
                    axs[2, 1].set_xticks([])
                    axs[2, 1].set_yticks([])
                    plt.tight_layout()
                    plt.show()
                    plt.close()

                # 将一个样本的样本内容和标签信息append
                images.append(im[:, :, ::-1].astype(np.float32))
                image_fns.append(im_fn)
                score_maps.append(score_map[::4, ::4, np.newaxis].astype(np.float32))
                geo_maps.append(geo_map[::4, ::4, :].astype(np.float32))
                training_masks.append(training_mask[::4, ::4, np.newaxis].astype(np.float32))

                # 处理并append足够多样本后发布一次
                if len(images) == batch_size:
                    yield images, image_fns, score_maps, geo_maps, training_masks
                    images = []
                    image_fns = []
                    score_maps = []
                    geo_maps = []
                    training_masks = []
            except Exception as e:
                import traceback
                traceback.print_exc()
                continue
在上述程序中有两个比较重要的函数,分别是crop_area函数和generate_rbox函数。
3.1 crop_area图片切割
前者主要是对样本图片进行切割,以一定的几率切出来一副图片中的某一完整的文字块,或者一块没有文字的部分,之后对其进行填充,重定义尺寸,以产生样本。代码如下
def crop_area(im, polys, tags, crop_background=False, max_tries=50):
    '''
    make random crop from the input image
    :param im:
    :param polys:[[[x1, y1], [x2, y2], [x3, y3], [x4, y4]] , ....]
    :param tags:
    :param crop_background:
    :param max_tries:
    :return:
    '''
    h, w, _ = im.shape
    pad_h = h//10
    pad_w = w//10
    h_array = np.zeros((h + pad_h*2), dtype=np.int32)
    w_array = np.zeros((w + pad_w*2), dtype=np.int32)
    for poly in polys:
        # [[x1, y1], [x2, y2], [x3, y3], [x4, y4]]
        # 取整
        poly = np.round(poly, decimals=0).astype(np.int32)
        # x,y坐标极值
        # 将文字框的最大外包矩形区域投影至x,y轴
        minx = np.min(poly[:, 0])
        maxx = np.max(poly[:, 0])
        w_array[minx+pad_w:maxx+pad_w] = 1
        miny = np.min(poly[:, 1])
        maxy = np.max(poly[:, 1])
        h_array[miny+pad_h:maxy+pad_h] = 1

    # 如果投影后,x,y轴全部为1,则不能直接找到完整取出某一块文字块,而不割裂其他文字块的部分
    # 就直接返回原图
    h_axis = np.where(h_array == 0)[0]
    w_axis = np.where(w_array == 0)[0]
    if len(h_axis) == 0 or len(w_axis) == 0:
        return im, polys, tags
    # 尝试max_tries次切分
    for i in range(max_tries):
        # 寻找x,y轴投影的两个0值之间的区域
        # 可能包含完整文字块,也可能包含某一块无文字背景
        xx = np.random.choice(w_axis, size=2)
        xmin = np.min(xx) - pad_w
        xmax = np.max(xx) - pad_w
        xmin = np.clip(xmin, 0, w-1)
        xmax = np.clip(xmax, 0, w-1)
        yy = np.random.choice(h_axis, size=2)
        ymin = np.min(yy) - pad_h
        ymax = np.max(yy) - pad_h
        ymin = np.clip(ymin, 0, h-1)
        ymax = np.clip(ymax, 0, h-1)
        # 寻找的区域过小则再次尝试
        if xmax - xmin < FLAGS.min_crop_side_ratio*w or ymax - ymin < FLAGS.min_crop_side_ratio*h:
            # area too small
            continue
        # 如果不是背景图片,则重置文本框真值标签为包含在截取部分内的部分标签
        if polys.shape[0] != 0:
            poly_axis_in_area = (polys[:, :, 0] >= xmin) & (polys[:, :, 0] <= xmax) \
                                & (polys[:, :, 1] >= ymin) & (polys[:, :, 1] <= ymax)
            selected_polys = np.where(np.sum(poly_axis_in_area, axis=1) == 4)[0]
        # 如果是背景图,则无文本框真值标签
        else:
            selected_polys = []

        # 如果没有选择到文本框真值标签
        if len(selected_polys) == 0:
            # no text in this area
            # 若是在找背景则直接返回截取区域,文本框真值标签置为空
            if crop_background:
                return im[ymin:ymax+1, xmin:xmax+1, :], polys[selected_polys], tags[selected_polys]
            # 若不是,则进行下一次尝试
            else:
                continue
        # 达到最大尝试次数仍为成功则返回最后一次的寻找结果
        im = im[ymin:ymax+1, xmin:xmax+1, :]
        polys = polys[selected_polys]
        tags = tags[selected_polys]
        polys[:, :, 0] -= xmin
        polys[:, :, 1] -= ymin
        return im, polys, tags

    return im, polys, tags
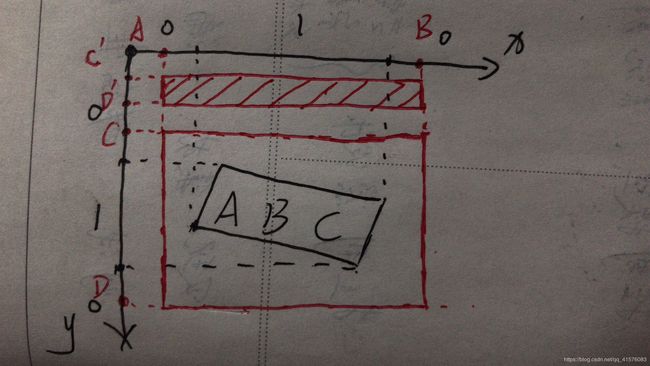
关于这种方法的大致效果如下图所示,黑色框是文字ABC的真值标签框,其在x,y轴的投影部分为1,x,y轴其他部分为0。在x,y轴上任选两处为0点,组成矩形:
1. 若为A,B,C,D四个点,则生成图中的红色框,可以将文字ABC整块的连带部分背景切割下来
2. 若为A,B,C',D'四个点,则生成图中的红色阴影部分,可以切割出一块没有任何文字的纯背景区域
真实应用如下所示:
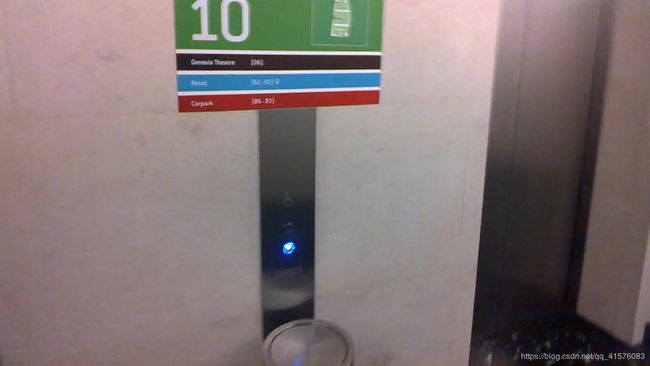
原图:
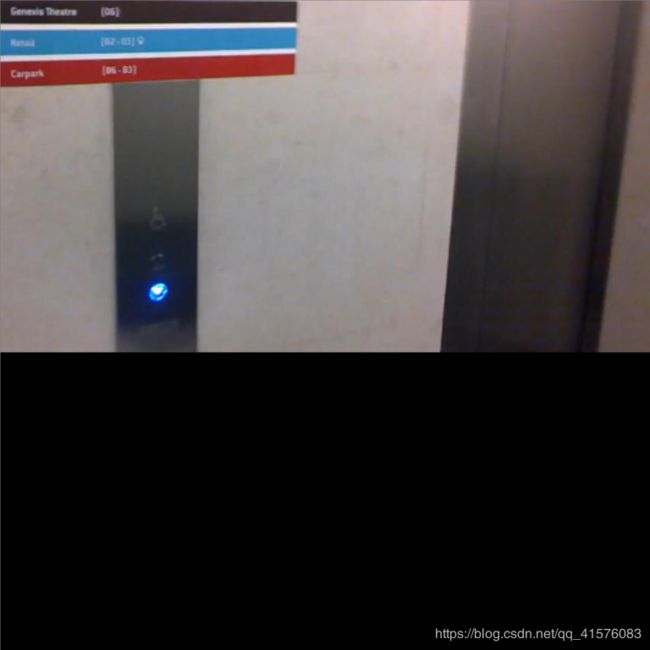
切割后生成图:
可以看到把部分文字区域整块的挖了下来。
3.2 generate_rbox标签生成
下一个函数是generate_rbox函数,该函数主要是根据图像及文本框真值标签来生成score_map,geo_map,其原理是:
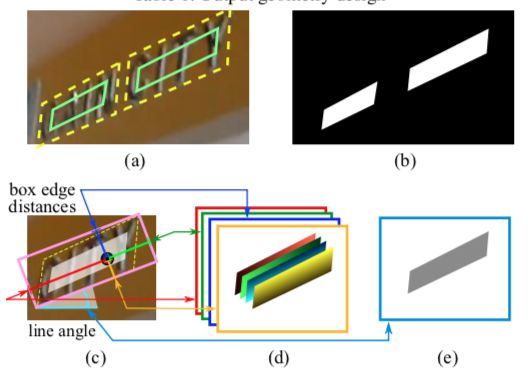
如下图,对于(a)的文字区域,我们先对其边框进行0.3倍的放缩,然后获得其二值图(b)。
在(c)图中,我们可以看到,对每一块文字框,我们先根据二值图获得能包含整段文字部分的平行四边形,即图(c)中的黄色虚线部分,再获得能完全包围该平行四边形的矩形框,即图(c)中的粉色矩形框。
之后对于框内的每一个像素,取其至矩形四边的距离得到[None,None,4]的geo_map标签,例如针对图中所示的某一像素,可以得到图(d)所示的[1,1,4]的四通道张量。
由矩形框的倾斜角度得到[None,None,1]的rotation_map标签。
而二值图像本身即[None,None,1]的score_map标签。
源代码如下:
def generate_rbox(im_size, polys, tags):
    h, w = im_size
    poly_mask = np.zeros((h, w), dtype=np.uint8)
    score_map = np.zeros((h, w), dtype=np.uint8)
    geo_map = np.zeros((h, w, 5), dtype=np.float32)
    # mask used during traning, to ignore some hard areas
    training_mask = np.ones((h, w), dtype=np.uint8)

    # 对每个文本框标签
    for poly_idx, poly_tag in enumerate(zip(polys, tags)):
        poly = poly_tag[0]
        tag = poly_tag[1]

        # 对每个顶点,找到经过他的两条边中较短的那条
        r = [None, None, None, None]
        for i in range(4):
            r[i] = min(np.linalg.norm(poly[i] - poly[(i + 1) % 4]),
                       np.linalg.norm(poly[i] - poly[(i - 1) % 4]))

        # score map
        # 放缩边框为之前的0.3倍,并对边框对应score图中的位置进行填充
        shrinked_poly = shrink_poly(poly.copy(), r).astype(np.int32)[np.newaxis, :, :]
        # score_map是框类像素均为1,poly_mask则按文字框个数递增填充
        cv2.fillPoly(score_map, shrinked_poly, 1)
        cv2.fillPoly(poly_mask, shrinked_poly, poly_idx + 1)

        # 如果文本框标签太小或者txt中没具体标记是什么内容,即*或者###,则加掩模,训练时忽略该部分
        poly_h = min(np.linalg.norm(poly[0] - poly[3]), np.linalg.norm(poly[1] - poly[2]))
        poly_w = min(np.linalg.norm(poly[0] - poly[1]), np.linalg.norm(poly[2] - poly[3]))
        if min(poly_h, poly_w) < FLAGS.min_text_size:
            cv2.fillPoly(training_mask, poly.astype(np.int32)[np.newaxis, :, :], 0)
        if tag:
            cv2.fillPoly(training_mask, poly.astype(np.int32)[np.newaxis, :, :], 0)

        # 当前新加入的文本框区域像素点
        xy_in_poly = np.argwhere(poly_mask == (poly_idx + 1))
        # if geometry == 'RBOX':
        # 对任意两个顶点的组合生成一个平行四边形 - generate a parallelogram for any combination of two vertices
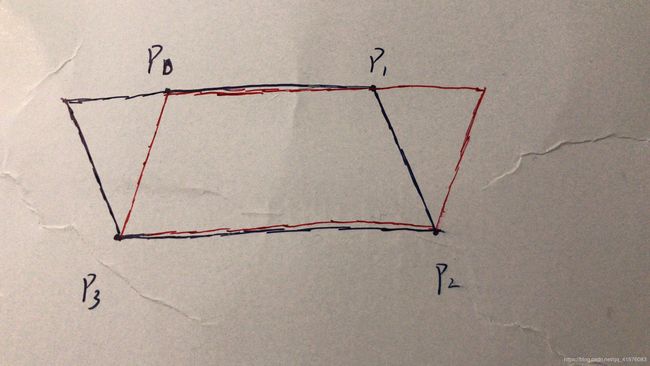
        # 对于四个顶点,确定两个顶点组成的一条边,再结合剩下的两个点可以得到两个包含这四个点的平行四边形
        # 这里就是遍历两个顶点的组合,生成8个平行四边形
        fitted_parallelograms = []
        for i in range(4):
            # 选中p0和p1的连线边,生成两个平行四边形
            p0 = poly[i]
            p1 = poly[(i + 1) % 4]
            p2 = poly[(i + 2) % 4]
            p3 = poly[(i + 3) % 4]
            # 拟合ax+by+c=0
            edge = fit_line([p0[0], p1[0]], [p0[1], p1[1]])
            backward_edge = fit_line([p0[0], p3[0]], [p0[1], p3[1]])
            forward_edge = fit_line([p1[0], p2[0]], [p1[1], p2[1]])
            # 通过另外两个点距离edge的距离,来决定edge对应的平行线应该过p2还是p3
            if point_dist_to_line(p0, p1, p2) > point_dist_to_line(p0, p1, p3):
                # 平行线经过p2 - parallel lines through p2
                if edge[1] == 0:
                    edge_opposite = [1, 0, -p2[0]]
                else:
                    edge_opposite = [edge[0], -1, p2[1] - edge[0] * p2[0]]
            else:
                # 经过p3 - after p3
                if edge[1] == 0:
                    edge_opposite = [1, 0, -p3[0]]
                else:
                    edge_opposite = [edge[0], -1, p3[1] - edge[0] * p3[0]]

            # move forward edge
            # 第一个平行四边形保留p1和p2的连线
            new_p0 = p0
            new_p1 = p1
            new_p2 = p2
            new_p3 = p3
            new_p2 = line_cross_point(forward_edge, edge_opposite)
            if point_dist_to_line(p1, new_p2, p0) > point_dist_to_line(p1, new_p2, p3):
                # across p0
                if forward_edge[1] == 0:
                    forward_opposite = [1, 0, -p0[0]]
                else:
                    forward_opposite = [forward_edge[0], -1, p0[1] - forward_edge[0] * p0[0]]
            else:
                # across p3
                if forward_edge[1] == 0:
                    forward_opposite = [1, 0, -p3[0]]
                else:
                    forward_opposite = [forward_edge[0], -1, p3[1] - forward_edge[0] * p3[0]]
            new_p0 = line_cross_point(forward_opposite, edge)
            new_p3 = line_cross_point(forward_opposite, edge_opposite)
            fitted_parallelograms.append([new_p0, new_p1, new_p2, new_p3, new_p0])
            # or move backward edge
            # 第二个平行四边形保留p0和p3的连线
            new_p0 = p0
            new_p1 = p1
            new_p2 = p2
            new_p3 = p3
            new_p3 = line_cross_point(backward_edge, edge_opposite)
            if point_dist_to_line(p0, p3, p1) > point_dist_to_line(p0, p3, p2):
                # across p1
                if backward_edge[1] == 0:
                    backward_opposite = [1, 0, -p1[0]]
                else:
                    backward_opposite = [backward_edge[0], -1, p1[1] - backward_edge[0] * p1[0]]
            else:
                # across p2
                if backward_edge[1] == 0:
                    backward_opposite = [1, 0, -p2[0]]
                else:
                    backward_opposite = [backward_edge[0], -1, p2[1] - backward_edge[0] * p2[0]]
            new_p1 = line_cross_point(backward_opposite, edge)
            new_p2 = line_cross_point(backward_opposite, edge_opposite)
            fitted_parallelograms.append([new_p0, new_p1, new_p2, new_p3, new_p0])
        # 选定面积最小的平行四边形
        areas = [Polygon(t).area for t in fitted_parallelograms]
        parallelogram = np.array(fitted_parallelograms[np.argmin(areas)][:-1], dtype=np.float32)
        # sort thie polygon
        parallelogram_coord_sum = np.sum(parallelogram, axis=1)
        min_coord_idx = np.argmin(parallelogram_coord_sum)
        parallelogram = parallelogram[
            [min_coord_idx, (min_coord_idx + 1) % 4, (min_coord_idx + 2) % 4, (min_coord_idx + 3) % 4]]
        # 得到外包矩形即旋转角
        rectange = rectangle_from_parallelogram(parallelogram)
        rectange, rotate_angle = sort_rectangle(rectange)

        p0_rect, p1_rect, p2_rect, p3_rect = rectange
        # 对当前新加入的文本框区域像素点,根据其到矩形四边的距离修改geo_map
        for y, x in xy_in_poly:
            point = np.array([x, y], dtype=np.float32)
            # top
            geo_map[y, x, 0] = point_dist_to_line(p0_rect, p1_rect, point)
            # right
            geo_map[y, x, 1] = point_dist_to_line(p1_rect, p2_rect, point)
            # down
            geo_map[y, x, 2] = point_dist_to_line(p2_rect, p3_rect, point)
            # left
            geo_map[y, x, 3] = point_dist_to_line(p3_rect, p0_rect, point)
            # angle
            geo_map[y, x, 4] = rotate_angle
    return score_map, geo_map, training_mask
其实很好理解,每次固定两个点,也就是找到了平行四边形的一条边,然后根据另外两个点又可以确定两个边,分别取这两个边即可得到两个平行四边形,如下图中的黑色和红色平行四边形,就是在固定P0和P1两点后得到的两个平行四边形。
