python实现AND感知机
AND感知机通过训练后,可以进行逻辑"与"的运算。例如:当输入 1,1时,输出为1;输入1,0时,输出为0。
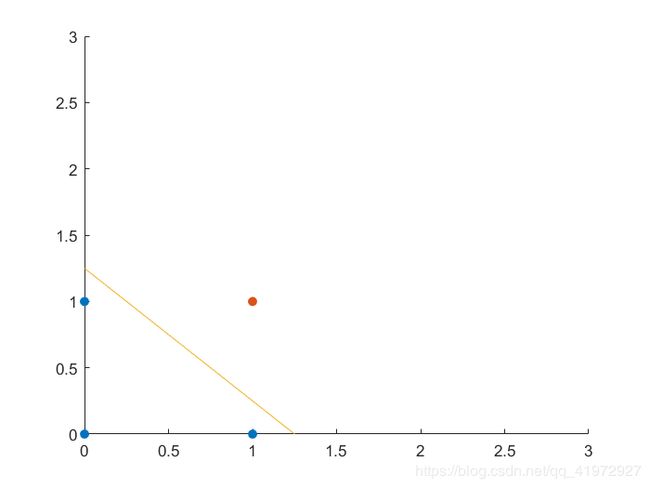
通过上图,我们可以发现(0,0)(0,1)(1,0)这三个点数表示输出为0,而点(1,1)表示输出为1,所以我们可以近似找到一条直线将输出为0的点与输出为1的点分隔开。我们可以通过不断训练系数(即权值与阈值)找到这条直线。假设输入为x0,x1,权值分别为w0,w1,输出为y,那么感知机的模型为y = w0 * x0 + w1 * x1 - Θ,其中Θ为阈值,也叫偏置。模型 中的权值与阈值初始可以是任意值。
其实AND感知机是一个二分类的过程,其结果不是0就为1,所以我们需要激活函数
这个函数可以将得到的任意实数y映射成0或1, 这样便于得到正确的结果。
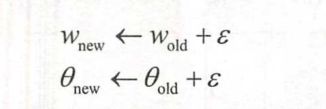
根据下列规则,可调整权值与阈值的大小,输出正确的结果。
其中ε为误差 ε = y - y' ,y为预期值,y'为实际值。
当输入x0 = 1, x1 = 1,权值w0 = 1,w1 = 1,阈值Θ = 3(权值与阈值初始可以为任意值),则 y = 1 * 1 + 1 * 1 - 3 = -1,将y带入sgn(x)函数中得到0,结果与预期结果1不符(1 and 1 = 1),那么就要根据上述跪着调整权值与阈值,
误差为ε = 1 - 0 = 1,根据上面公式W![]() = 1 + 1 = 0, Θ
= 1 + 1 = 0, Θ![]() = 3 + 1 = 4。所以现在 y = 2 * 1 + 2 * 1 - 4 = 0,带入sgn(x)中得到1与预期结果相符。
= 3 + 1 = 4。所以现在 y = 2 * 1 + 2 * 1 - 4 = 0,带入sgn(x)中得到1与预期结果相符。
代码如下:
#and感知机
class Perception(object):
    def __init__(self, input_para_num, acti_func):
        self.activator = acti_func
        #权重向量初始化为0
        self.weights = [0.0 for _ in range(input_para_num)]          #这里只是将所有的权值初始化成0(初始化成其他值是不会影响到结果的)


    def __str__(self):
        return 'final weights\n\tw0 = {:.2f}\n\tw1 = {:.2f}\n\tw2 = {:.2f}'\
        .format(self.weights[0], self.weights[1], self.weights[2])


    def predict(self,row_vec):
        act_values = 0.0
        for i in range(len(self.weights)):
            act_values += self.weights[i] * row_vec[i]
        return self.activator(act_values)

    #对感知机进行训练
    def train(self, dataset, iteration, rate):
        for i in range(iteration):
            for input_vec_label in dataset:
                #计算机感知机在当前权重下输出
                prediction = self.predict(input_vec_label)
                #更新权重
                self._update_weights(input_vec_label, prediction, rate)

    #更新权重
    def _update_weights(self, input_vec_label, prediction, rate):
        delta = input_vec_label[-1] - prediction
        for i in range(len(self.weights)):
            self.weights[i] += rate * delta * input_vec_label[i]


#激活函数
def func_activator(input_value):
    return 1.0 if input_value >= 0.0 else 0.0


def get_training_dataset():
    #构建训练数据
    dataset = [[-1, 1, 1, 1], [-1, 0, 0, 0],[-1, 1, 0, 0],[-1, 0, 1, 0]]
    #期望的输出列表,注意要与输入一一对应
    #[-1, 1, 1] -> 1, [-1, 0, 0] -> 0,[-1, 1, 0] -> 0,[-1, 0, 1] -> 0
    return dataset


def train_and_perception():
    p = Perception(3, func_activator)
    #获取训练数据
    dataset = get_training_dataset()
    #指定迭代次数:10轮,学习效率设置为0.1
    p.train(dataset, 10, 0.1)
    #返回训练好的感知机
    return p

if __name__ == '__main__':
    #训练and感知机
    and_perception = train_and_perception()
    #打印训获得的权重
    print(and_perception)
    #测试
    print('1 and 1 = %d' % and_perception.predict([-1, 1, 1]))      #第一个值-1是x0,其系数w0为阈值
    print('0 and 0 = %d' % and_perception.predict([-1, 0, 0]))
    print('1 and 0 = %d' % and_perception.predict([-1, 1, 0]))
    print('0 and 1 = %d' % and_perception.predict([-1, 0, 1]))
运行结果:
发现AND感知机训练成功
参考:
《深度学习之美:AI时代的数据处理与最佳实践_张玉宏》


