自定义View(一)——自定义ViewGroup+简单自绘View
文章目录
- 为什么要自定义View
- 自定义View的步骤
- View位置描述
- LayoutInflate
- 基本用法:
- 举个栗子:
- 自定义ViewGroup
- View的构造函数
- 自绘View
- 自定义属性
- onDraw()
- 手动支持wrap_content属性
- onMeasure()
- 支持padding属性
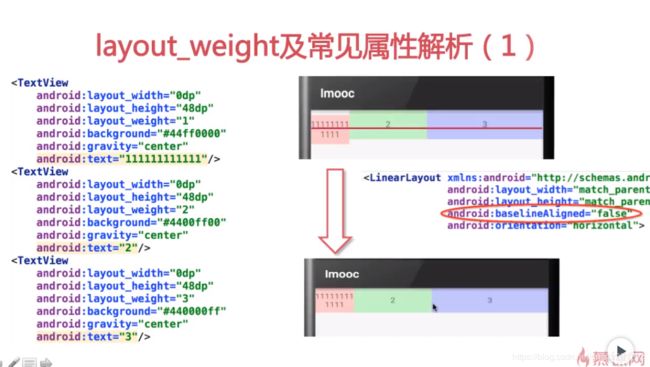
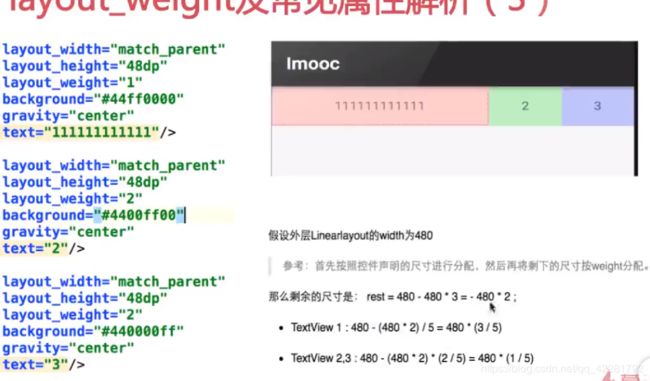
- layout_weight
为什么要自定义View
- 需求有特定风格的控件
- 用户交互,例如滑动TextView中的文字
- 嵌套布局(?)
- 封装常用的一组控件,例如底部导航栏
自定义View的步骤
- 自定义属性,attr中声明,代码中获取
- onMeasure():测量
- onLayout():布局(ViewGroup)
- onDraw():绘制
- onTouchEvent():交互
- onInterceptTouchEvent():拦截动作(ViewGroup)
View位置描述
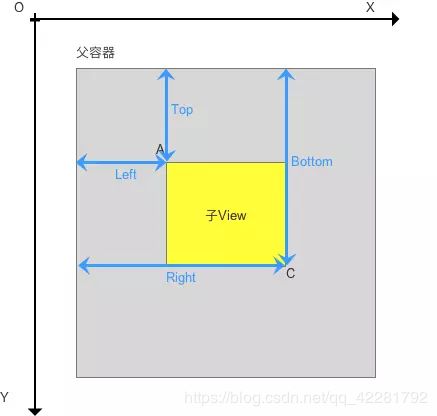
4个顶点的位置描述分别由4个值决定:
(请记住:View的位置是相对于父控件而言的)
Top:子View上边界到父view上边界的距离
Left:子View左边界到父view左边界的距离
Bottom:子View下边距到父View上边界的距离
Right:子View右边界到父view左边界的距离
LayoutInflate
LayoutInflate主要用于加载布局,包括在Activity中调用setContentView(),方法内部其实也是用LayoutInflate来实现的。
基本用法:
- 两句语句都可以获取到LayoutInflater的实例
//两种初始化方式
        LayoutInflater inflater = LayoutInflater.from(this);
//        LayoutInflater inflater1 = (LayoutInflater) this.getSystemService(Context.LAYOUT_INFLATER_SERVICE);
因为在源码里,from就是一个系统封装好的方法,里面用了context.getSystemService……

- 调用他的inflate方法加载布局
- inflate()方法一般接收两个参数,第一个参数就是要加载的布局id,第二个参数是指给该布局的外部再嵌套一层父布局,如果不需要就直接传null。
- 这样就成功成功创建了一个布局的实例,之后再将它添加到指定的位置就可以显示出来了。
inflater.inflate(resourceId, root);
举个栗子:
- activity_main.xml
<LinearLayout xmlns:android="http://schemas.android.com/apk/res/android"
    android:layout_width="match_parent"
    android:layout_height="match_parent"
    android:id="@+id/main_layout"
    android:orientation="vertical">

</LinearLayout>
- button_layout.xml
<RelativeLayout xmlns:android="http://schemas.android.com/apk/res/android"
    android:orientation="vertical" android:layout_width="match_parent"
    android:layout_height="wrap_content"
    android:text="button">

</RelativeLayout>
- 如何通过LayoutInflater来将 button_layout布局 添加到主布局文件的LinearLayout中呢?
- MainActivity中
- 用inflate()方法来加载button_layout这个布局,然后调用LinearLayout的addView()方法将它添加到LinearLayout中。
    @Override
    protected void onCreate(Bundle savedInstanceState) {
        super.onCreate(savedInstanceState);
        setContentView(R.layout.activity_main);
        LinearLayout mainLayout = findViewById(R.id.main_layout);
        //两种初始化方式
        LayoutInflater inflater = LayoutInflater.from(this);
//        LayoutInflater inflater1 = (LayoutInflater) this.getSystemService(Context.LAYOUT_INFLATER_SERVICE);
        View buttonLayout = inflater.inflate(R.layout.button_layout, null);
        mainLayout.addView(buttonLayout);
<RelativeLayout xmlns:android="http://schemas.android.com/apk/res/android"
    android:orientation="vertical" android:layout_width="300dp"
    android:layout_height="100dp"
    android:text="button">

</RelativeLayout>
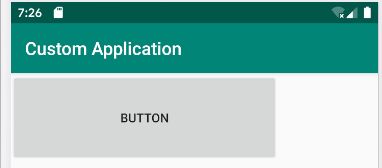
发现button大小并未改变。
layout_width和layout_height 其实是用于设置View在布局中的大小的,也就是View必须存在于一个布局中,这两个参数的设定才有效。这也是为什么这两个属性叫作layout_width和layout_height,而不是width和height。
所以最简单的是在Button的外面再套一个布局
<RelativeLayout xmlns:android="http://schemas.android.com/apk/res/android"
    android:orientation="vertical" android:layout_width="match_parent"
    android:layout_height="match_parent"
    >

    <Button
        android:layout_width="300dp"
        android:layout_height="150dp"
        android:text="button"/>

</RelativeLayout>
- 问题又来了,平时在Activity中指定布局文件的时候,最外层的那个布局是可以指定大小的呀,layout_width和layout_height都是有作用的。
- 这主要是因为,在setContentView()方法中,Android会自动在布局文件的最外层再嵌套一个FrameLayout,所以layout_width和layout_height属性才会有效果。
- 那么我们来证实一下吧,在MainActivity加入以下代码:
        ViewParent parent = mainLayout.getParent();
        Log.d("MainActivity", "the parent of mainLayout is" + parent);
log信息
![]()
可以看到,LinearLayout的父布局确实是一个FrameLayout,而这个FrameLayout就是由系统自动帮我们添加上的。
自定义ViewGroup
组合控件的意思就是,我们并不需要自己去绘制视图上显示的内容,而只是用系统原生的控件就好了,我们将几个系统原生的控件组合到一起,例如最常见的 标题栏。
- 新建一个view_title.xml布局文件,写我们标题栏的布局
<?xml version="1.0" encoding="utf-8"?>
<LinearLayout xmlns:android="http://schemas.android.com/apk/res/android"
    android:layout_width="match_parent"
    android:layout_height="match_parent"
    android:orientation="horizontal">

    <Button
        android:id="@+id/btn_back"
        android:layout_width="100dp"
        android:layout_height="50dp"
        android:text="back"
        android:textAllCaps="false"/>

    <TextView
        android:id="@+id/tv_title"
        android:layout_width="250dp"
        android:layout_height="50dp"
        android:text="This is title"
        android:textAllCaps="false"
        android:gravity="center_horizontal"/>

    <ImageView
        android:id="@+id/iv_home"
        android:layout_width="50dp"
        android:layout_height="50dp"
        android:background="@mipmap/user"/>

</LinearLayout>
- 接下来创建一个TitleView.java继承自FrameLayout
刚开始我是这么写的:
在public TitleView(Context context) {} 的构造方法中,调用LayoutInflater的inflate()方法来加载刚刚定义的title.xml布局,并初始化控件。
用setTitleText方法设置标题文字,用setBackListener方法设置返回键点击响应等等……
public class TitleView extends FrameLayout implements View.OnClickListener {

    private Button mBtnBack;
    private TextView mTvTitle;
    private ImageView mIvHome;

    public TitleView(Context context) {
        super(context);
        LayoutInflater.from(context).inflate(R.layout.view_title, this);
        mBtnBack = findViewById(R.id.btn_back);
        mTvTitle = findViewById(R.id.tv_title);
        mIvHome = findViewById(R.id.iv_home);

        mBtnBack.setOnClickListener(this);
    }

    @Override
    public void onClick(View view) {
        switch (view.getId()) {
            case R.id.btn_back:
                ((Activity)getContext()).finish();  //结束当前activity
                break;
        }
    }

    public void setTitleText(String text) {
        mTvTitle.setText(text);
    }

    public void setBackText(String text) {
        mBtnBack.setText(text);
    }

    public void setBackListener(OnClickListener listener) {
        mBtnBack.setOnClickListener(listener);
    }

    public void setImageListener(OnClickListener listener) {
        mIvHome.setOnClickListener(listener);
    }
}
- 在主布局中使用刚刚写的标题栏控件
<LinearLayout xmlns:android="http://schemas.android.com/apk/res/android"
    android:layout_width="match_parent"
    android:layout_height="match_parent"
    android:id="@+id/main_layout"
    android:orientation="vertical">

    <com.sky.customapplication.TitleView
        android:id="@+id/title_view"
        android:layout_width="match_parent"
        android:layout_height="wrap_content">

    </com.sky.customapplication.TitleView>
</LinearLayout>
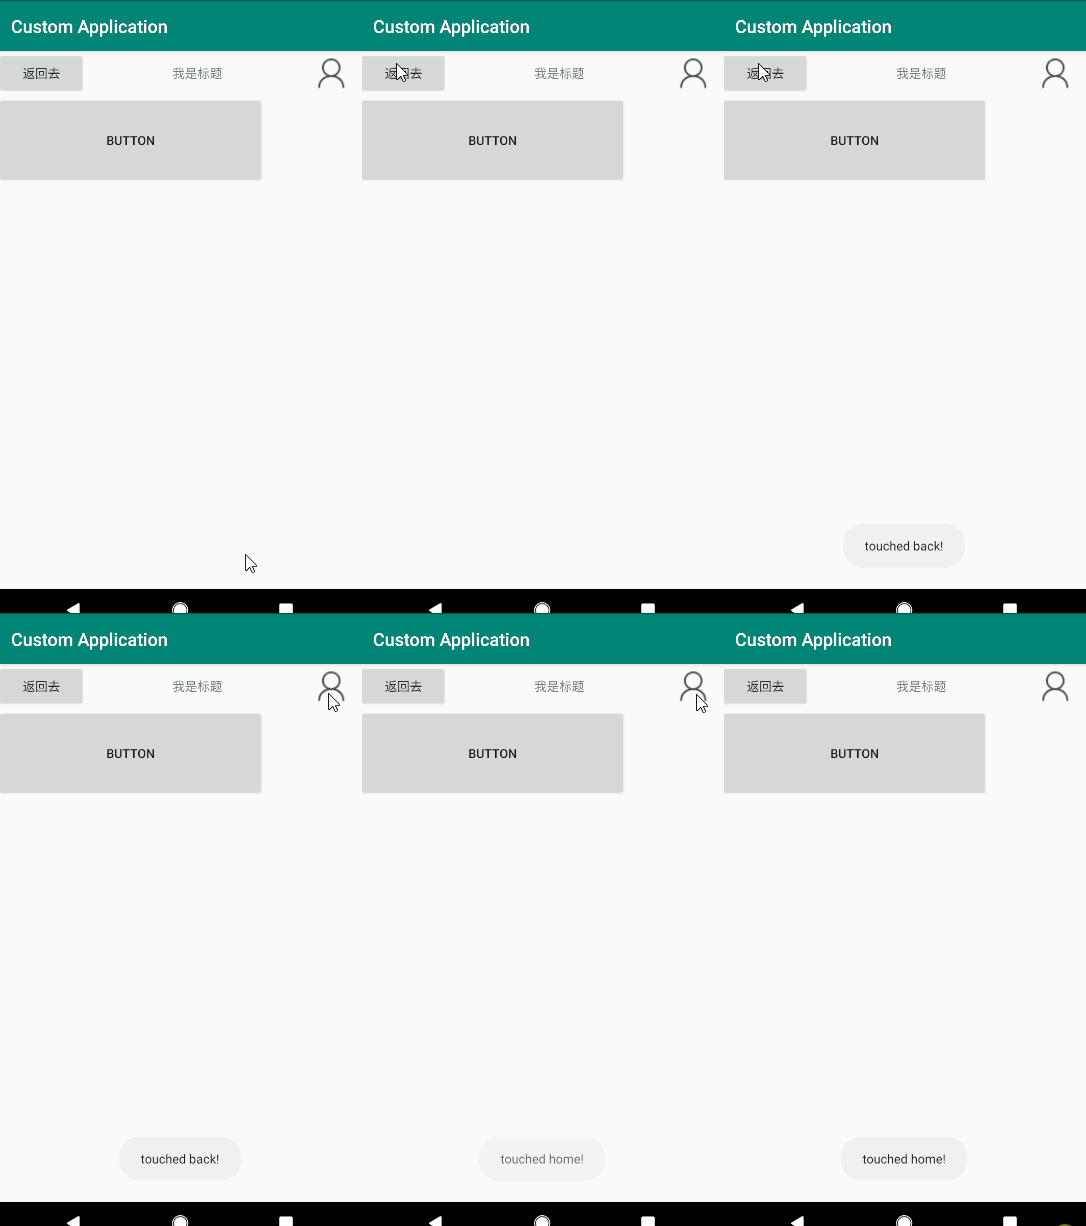
- 在MainActivity中声明、调用控件的方法设置文字和点击事件
public class MainActivity extends AppCompatActivity {

    private TitleView mTitleView;

    @Override
    protected void onCreate(Bundle savedInstanceState) {
        super.onCreate(savedInstanceState);
        setContentView(R.layout.activity_main);

        mTitleView = findViewById(R.id.title_view);
        mTitleView.setBackListener(new View.OnClickListener() {
            @Override
            public void onClick(View view) {
                Toast.makeText(MainActivity.this, "touched back!", Toast.LENGTH_SHORT).show();
            }
        });

        mTitleView.setImageListener(new View.OnClickListener() {
            @Override
            public void onClick(View view) {
                Toast.makeText(MainActivity.this, "touched home!", Toast.LENGTH_SHORT).show();
            }
        });

        mTitleView.setBackText("返回去");
        mTitleView.setTitleText("我是标题");
    }
}
这样,自定义ViewGroup的流程就结束了!让我们点击运行……
什么(O_o)???居然报错了??
![]()
嗯??我的TitleView加载失败了?为啥哟
没办法,一顿查资料问师父……
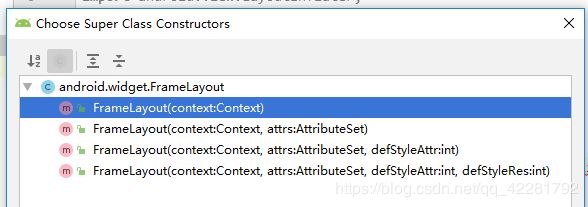
原来问题出在FrameLayout的构造方法上,让我们再回过头看一下,还原案发现场……
当时的情况是这样的:

那我不就alt+enter,创建构造函数

然后选了默认的第一个…问题就出在这里!!
View的构造函数
一般来说,需要写前三个构造函数。那么问题来了,init的内容写在哪里呢?
通常情况下,应该这么写
- 第一个构造函数,在java代码中new这个view的时候会被调用
- 第二个构造函数,在xml中引用这个view的时候会被调用(就是刚刚发生的情况了)。AttributeSet对应的就是设置的属性值集合
- 第三个构造函数,在xml的theme、style中调用。它的作用是当没有为自定义的属性赋值的时候,就可以使用defStyleAttr里面定义的默认属性值。

通过这种写法,可以做到无论系统调用哪个构造函数,最后都会到第三个构造函数里面去,所以我们只要在第三个构造函数里写初始化语句就可以了
    //java代码中new的时候调用
    public TitleView(Context context) {
        this(context, null);
    }

//    xml中引用时调用
    public TitleView(Context context, AttributeSet attrs) {
        this(context, attrs,0);

    }

    //theme、style时调用
    public TitleView(Context context, AttributeSet attrs, int defStyleAttr) {
        super(context, attrs, defStyleAttr);
        LayoutInflater.from(context).inflate(R.layout.view_title, this);
        mBtnBack = findViewById(R.id.btn_back);
        mTvTitle = findViewById(R.id.tv_title);
        mIvHome = findViewById(R.id.iv_home);

        mBtnBack.setOnClickListener(this);
    }
自绘View
![]()
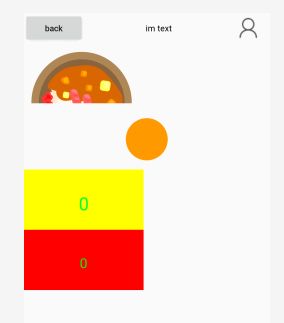
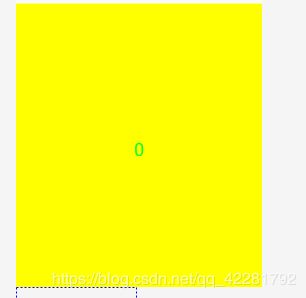
实现这样一个控件,每点击一次显示的数字加1;控件大小适应数字大小,周围可以设置padding。
自定义属性
参考鸿洋大神的Android 深入理解Android中的自定义属性
有以下几个步骤:
- 自定义一个CustomView(extends View )类
- 编写values/attrs.xml,在其中编写styleable和item等标签元素
- 在布局文件中CustomView使用自定义的属性(注意namespace)
- 在CustomView的构造方法中通过TypedArray获取
- 自定义属性的声明文件,在res/values 目录下新建一个 attrs.xml文件
- 如要用系统定义过的android:text"属性,不需要写format
- 可以看一下系统中自定义属性的文件
Sdk/platforms/android-xx/data/res/values/attrs.xml

- 有多个styleable都要用到的共同的属性,在resources开头进行定义,后续引用只需要引用名字就可以了
<?xml version="1.0" encoding="utf-8"?>
<resources>
    <attr name="textColor" format="color"/>
    <attr name="textSize" format="dimension"/>
- 使用系统原有的属性时,在前面加上android命名
    <declare-styleable name="title_attrs">
        <!--尺寸值,格式是dimension-->
        <attr name="width" format="dimension"/>
        <attr name="height" format="dimension"/>
        <attr name="textColor"/>
        <attr name="textSize"/>
        <!--声明需要使用系统定义过的text属性,注意前面需要加上android命名-->
        <attr name="android:text"/>
    </declare-styleable>

    <declare-styleable name="RectangleView">
        <attr name="textColor"/>
        <attr name="textSize"/>
        <attr name="android:text"/>
    </declare-styleable>

</resources>
- 在布局文件中对应的去用
首先需要加上一个命名空间xmlns:title="http://schemas.android.com/apk/res-auto"
然后直接利用这个命名空间title设置属性即可
(所有该项目的自定义属性都可以在title:里获取,一般用app:)
    <com.sky.customapplication.TitleView
        android:id="@+id/title_view"
        android:layout_width="match_parent"
        android:layout_height="wrap_content"
        title:textColor="#000"
        title:textSize="26sp"
        android:text="im text">

    </com.sky.customapplication.TitleView>
- 在自定义控件代码中获取各属性
- R.styleable.RectangleView是刚刚attrs文件中的name

TypedArray array = context.getTheme().obtainStyledAttributes(attrs, R.styleable.RectangleView, defStyleAttr, 0);
        //mText = array.getString(R.styleable.RectangleView_android_text);
        mTextColor = array.getColor(R.styleable.RectangleView_textColor, Color.BLACK);
        mTextSize = array.getDimensionPixelSize(R.styleable.RectangleView_textSize, 40);
        array.recycle();  //注意回收
onDraw()
- 实现三个构造方法,在第三个构造方法中进行初始化、解析自定义属性的值
- 初始化笔刷,mBounds是绘制时控制文本绘制范围的长方形
public class RectangleView extends View implements View.OnClickListener {

    private Paint mPaint;
    private Rect mBounds;
    //private String mText;
    private float mTextSize;
    private int mTextColor;
    private int mCount;
    private String text;

    public RectangleView(Context context) {
        this(context, null);
    }

    public RectangleView(Context context, @Nullable AttributeSet attrs) {
        this(context, attrs, 0);
    }

    public RectangleView(Context context, @Nullable AttributeSet attrs, int defStyleAttr) {
        super(context, attrs, defStyleAttr);
		//新建画笔
        mPaint = new Paint(Paint.ANTI_ALIAS_FLAG);	//抗锯齿
        mBounds = new Rect();

		//加载自定义属性集合
        TypedArray array = context.getTheme().obtainStyledAttributes(attrs, R.styleable.RectangleView, defStyleAttr, 0);
        // 将解析的属性传入到画笔颜色变量当中(本质上是自定义画笔的颜色)
        // 第二个参数是默认设置颜色(即无指定color情况下使用)
        //mText = array.getString(R.styleable.RectangleView_android_text);
        mTextColor = array.getColor(R.styleable.RectangleView_textColor, Color.BLACK);
        mTextSize = array.getDimensionPixelSize(R.styleable.RectangleView_textSize, 40);

        array.recycle();	//记得回收

        setOnClickListener(this);
    }
- 在onDraw中绘制
    @Override
    protected void onDraw(Canvas canvas) {
    	//画笔颜色
        mPaint.setColor(Color.YELLOW);
        //画一个长方形
        canvas.drawRect(0, 0, getWidth(), getHeight(), mPaint);
        //设置画字的颜色
        mPaint.setColor(mTextColor);
        mPaint.setTextSize(mTextSize);
        text = String.valueOf(mCount);
        mPaint.getTextBounds(text, 0, text.length(), mBounds);
        float textWidth = mBounds.width();
        float textHeight = mBounds.height();
        //文字绘制的起点是从文字的左下角开始的,实际看见文字的Y坐标需要加上文字的自身高度
        canvas.drawText(text, getWidth()/2 - textWidth/2, getHeight()/2 + textHeight/2, mPaint);
    }

    @Override
    public void onClick(View v) {
        mCount++;
        invalidate();   //视图重绘,onDraw调用
    }
- 在布局中引用
   <com.sky.customapplication.RectangleView
        android:layout_width="200dp"
        android:layout_height="100dp"
        title:textColor="#00FF33"
        title:textSize="30sp"
        android:padding="15dp"
        />
手动支持wrap_content属性
- 但是此时,如果设置layout_width和layout_height 属性为 wrap_content,并不会适应自身大小,而是填满父控件,和match_parent效果相同。
- 这是因为使用系统的onMeasure方法时,系统帮我们测量的高度和宽度都是MATCH_PARNET,当我们设置明确的宽度和高度时,系统帮我们测量的结果就是我们设置的结果;而当我们设置为WRAP_CONTENT系统帮我们测量的结果也是MATCH_PARENT的长度。
- 所以,当设置了WRAP_CONTENT时,我们需要自己进行测量,即重写onMesure方法:
onMeasure()
重写之前先了解MeasureSpec的specMode,一共三种类型:
- EXACTLY(精确模式):父容器能够计算出自己的大小,一般是设置为match_parent或者固定值的自定义控件。
- AT_MOST(至多不超过模式):父容器指定了一个大小, View 的大小不能大于这个值,也就是父容器不能够直接计算出自己的大小,需要先由它所有的子View自己去计算一下自己大小(measureChildren()),然后再去设置该自定义控件自己的大小(setMeasuredDimension)。一般是设置为wrap_content(最大不能超过父控件)。
- UNSPECIFIED(不确定模式):父容器不对 view 有任何限制,要多大给多大,多见于ListView、scrollView或GridView等。

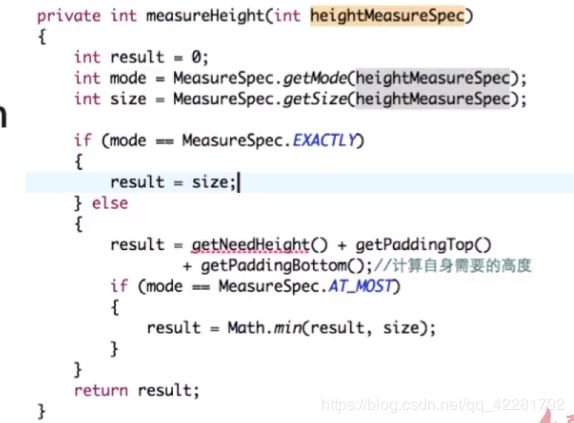
- 如下代码所示,如果模式为Exactly,系统的设定值就会等于size;如果模式为at_most,系统设定的值就会在自身需要的值和size中取最小值
- 重写onMeasure
- 可以看出,这里的padding是自己设置到数据中去的,否则padding值并不生效
    @Override
    protected void onMeasure(int widthMeasureSpec, int heightMeasureSpec) {

        int widthMode = MeasureSpec.getMode(widthMeasureSpec);
        int widthSize = MeasureSpec.getSize(widthMeasureSpec);
        int heightMode = MeasureSpec.getMode(heightMeasureSpec);
        int heightSize = MeasureSpec.getSize(heightMeasureSpec);
        int width;
        int height;

        if (widthMode == MeasureSpec.EXACTLY) {
            width = widthSize;
        } else {
            mPaint.setTextSize(mTextSize);
            text = String.valueOf(mCount);
            mPaint.getTextBounds(text, 0, text.length(), mBounds);
            float textWidth = mBounds.width();
            width = (int) (getPaddingLeft() + textWidth + getPaddingRight());
        }

        if (heightMode == MeasureSpec.EXACTLY)
        {
            height = heightSize;
        } else
        {
            mPaint.setTextSize(mTextSize);
            mPaint.getTextBounds(text, 0, text.length(), mBounds);
            float textHeight = mBounds.height();
            height = (int) (getPaddingTop() + textHeight + getPaddingBottom());
        }

        setMeasuredDimension(width, height);

    }
支持padding属性
padding属性在自定义View中默认也是无效的,如果不重写onMeasure,也需要能够设置padding,可以在onDraw中这样写:
    @Override
    protected void onDraw(Canvas canvas) {
        super.onDraw(canvas);

        //获取传入的padding值(指定padding,否则设置无效)
        final int paddingLeft = getPaddingLeft();
        final int paddingRight = getPaddingRight();
        final int paddingTop = getPaddingTop();
        final int paddingBottom = getPaddingBottom();

        //获取控件的宽高
        int width = getWidth() - paddingLeft - paddingRight;
        int height = getHeight() - paddingTop - paddingBottom;

        //设置半径为宽、高最小值的1/2
        int r = Math.min(width, height)/2;

        //画圆:圆心位置为控件中央,半径,画笔
        canvas.drawCircle(paddingLeft + width/2, paddingTop + height/2, r, mPaint);

    }
padding属性:用于设置控件内容相对控件边缘的边距;
区别与margin属性(同样称为:边距):控件边缘相对父控件的边距(父控件控制),具体区别如下:
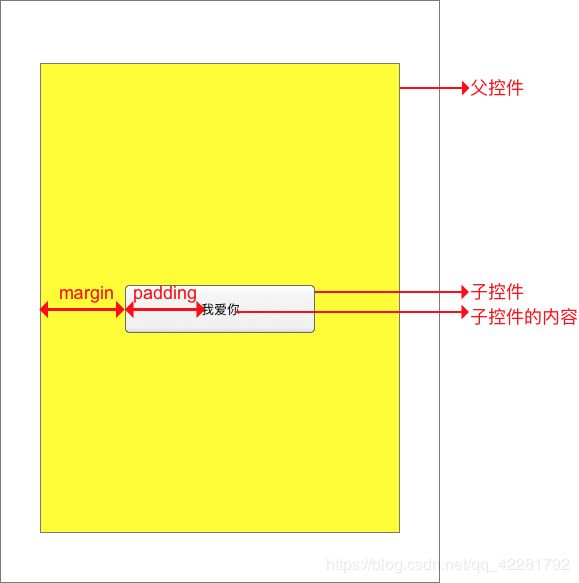
其中,background属性可以直接用android:backgroud来设置,不需要自定义属性
layout_weight
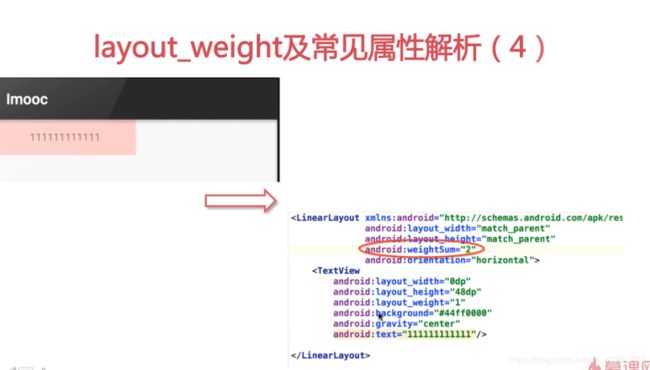
- 可以直接设置总的weight值,只有一个控件也可以使用weight
参考文章:https://blog.csdn.net/lmj623565791/article/details/24252901
https://www.jianshu.com/p/146e5cec4863
https://blog.csdn.net/carson_ho/article/details/62037696
https://blog.csdn.net/guolin_blog/article/details/17357967
https://www.jianshu.com/p/9759a1666494
待学:https://www.jianshu.com/p/0599a90d125a
https://www.jianshu.com/p/9759a1666494
https://www.imooc.com/learn/793
https://www.imooc.com/video/7442
https://blog.csdn.net/xmxkf/article/details/51490283#1_onMeasure_15
https://www.jianshu.com/p/afa06f716ca6
1. canvas api
2. LayoutParams

