自定义ViewGroup-自动换行Layout
一、继承ViewGroup需要做的
- 重写onMeasure()
不仅要完成自己的measure过程,还要完成子View的measure过程。 - 重写onLayout()
用来确定子View的位置。 - 重写generateLayoutParams()
当在LinearLayout中写childView的时候,可以写layout_gravity,layout_weight属性;在 RelativeLayout中的childView有layout_centerInParent属性,却没有 layout_gravity,layout_weight,这是为什么呢?这是因为每个ViewGroup需要指定一个LayoutParams,用于 确定支持childView支持哪些属性,比如LinearLayout指定LinearLayout.LayoutParams等。
二、View的3种测量模式
ViewGroup会为childView指定测量模式,下面简单介绍下三种测量模式:
- EXACTLY:表示设置了精确的值,一般当childView设置其宽、高为精确值、match_parent时,ViewGroup会将其设置为EXACTLY;
- AT_MOST:表示子布局被限制在一个最大值内,一般当childView设置其宽、高为wrap_content时,ViewGroup会将其设置为AT_MOST;
- UNSPECIFIED:表示子布局想要多大就多大,一般出现在AadapterView的item的heightMode中、ScrollView的childView的heightMode中;此种模式比较少见。
三、自动换行Layout
需求:显示个人擅长项目
分析:
用LinearLayout、RelativeLayout动态添加TextView不能控制换行,用GridView不能达到显示效果。
拿来主义:https://github.com/hongyangAndroid/FlowLayout
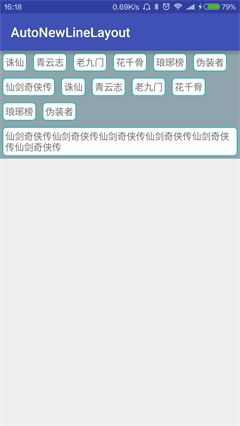
使用鸿洋大神的FlowLayout( Android流式布局,支持单选、多选等,适合用于产品标签等),可以很轻松的实现上面的效果。
如果这样就完了,我就不用自己写了。
问题:
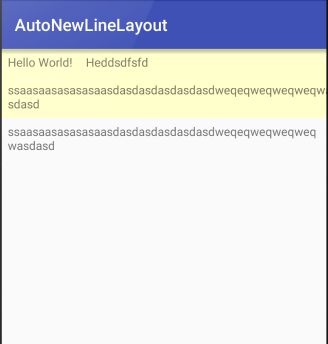
当一个标签字数较多,一行放不下的时候,使用FlowLayout时这个标签显示不完整。
这样的话,我就需要自己重写一个控件了,当然,站在巨人的肩膀上,实现的比较快。
对照着FlowLayout,实现了自己的AutoNewLineLayout,这里只用显示,不需要考虑单选、多选的问题,所以现在最主要的是解决上述问题。
写完AutoNewLineLayout雏形后,测试上面的问题,为了更明显,请看效果图:
可以看到不仅出现了显示问题,连内容都出现了错误。
发现问题
子View的宽度过长导致超出父布局,所以问题肯定是出在onMeasure方法中。
@Override
    protected void onMeasure(int widthMeasureSpec, int heightMeasureSpec) {
        super.onMeasure(widthMeasureSpec, heightMeasureSpec);

        int widthSpecMode = MeasureSpec.getMode(widthMeasureSpec);
        int widthSpecSize = MeasureSpec.getSize(widthMeasureSpec);
        int heightSpecMode = MeasureSpec.getMode(heightMeasureSpec);
        int heightSpecSize = MeasureSpec.getSize(heightMeasureSpec);
        Log.e("====", "onMeasure: widthSpecSize=" + widthSpecSize + ", widthSpecMode=" + widthSpecMode);

        //AT_MOST
        int width = 0;
        int height = 0;
        int rawWidth = 0;//当前行总宽度
        int rawHeight = 0;// 当前行高

        int count = getChildCount();
        for (int i = 0; i < count; i++) {
            View child = getChildAt(i);
            if(child.getVisibility() == GONE){
                if(i == count - 1){
                    //最后一个child
                    height += rawHeight;
                    width = Math.max(width, rawWidth);
                }
                continue;
            }

            measureChild(child, widthMeasureSpec, heightMeasureSpec);
            MarginLayoutParams lp = (MarginLayoutParams) child.getLayoutParams();

            int childWidth = child.getMeasuredWidth()  + lp.leftMargin + lp.rightMargin;
            int childHeight = child.getMeasuredHeight() + lp.topMargin + lp.bottomMargin;
            Log.e("=====", "childWidth 1: " + childWidth);
            if(rawWidth + childWidth > widthSpecSize - getPaddingLeft() - getPaddingRight()){
                //换行
                width = Math.max(width, rawWidth);
                rawWidth = childWidth;
                height += rawHeight;
                rawHeight = childHeight;
            } else {
                rawWidth += childWidth;
                rawHeight = Math.max(rawHeight, childHeight);
            }

            if(i == count - 1){
                width = Math.max(rawWidth, width);
                height += rawHeight;
            }
        }

        setMeasuredDimension(
                widthSpecMode == MeasureSpec.EXACTLY ? widthSpecSize : width + getPaddingLeft() + getPaddingRight(),
                heightSpecMode == MeasureSpec.EXACTLY ? heightSpecSize : height + getPaddingTop() + getPaddingBottom()
        );
    }
onMeasure方法是这样写的。
根据自定义ViewGroup的思想一步一步写出来的,问题到底出在哪里了。
通过打印childView的测量宽度时,在AutoNewLineLayout中的宽度是1080(手机宽度1080),但是下面的TextView显示同样的数据,测量宽度是1032,刚好少了leftMargin 和 rightMargin (16dp X 3 = 48px)说明测量子控件出了差错。
刚开始真的百思不得其解,后来通过查阅资料发现了另一个测量子View的方法,那就是measureChildWithMargins。然后吧上面的measureChild换掉,奇迹般的解决了上面的问题。
这是为什么呢???
走进源码就知道了。
protected void measureChildWithMargins(View child,
        int parentWidthMeasureSpec, int widthUsed,
        int parentHeightMeasureSpec, int heightUsed) {
    final MarginLayoutParams lp = (MarginLayoutParams) child.getLayoutParams();

    final int childWidthMeasureSpec = getChildMeasureSpec(parentWidthMeasureSpec,
            mPaddingLeft + mPaddingRight + lp.leftMargin + lp.rightMargin
                    + widthUsed, lp.width);
    final int childHeightMeasureSpec = getChildMeasureSpec(parentHeightMeasureSpec,
            mPaddingTop + mPaddingBottom + lp.topMargin + lp.bottomMargin
                    + heightUsed, lp.height);

    child.measure(childWidthMeasureSpec, childHeightMeasureSpec);
}
protected void measureChild(View child, int parentWidthMeasureSpec,
int parentHeightMeasureSpec) {
final LayoutParams lp = child.getLayoutParams();
final int childWidthMeasureSpec = getChildMeasureSpec(parentWidthMeasureSpec,
mPaddingLeft + mPaddingRight, lp.width);
final int childHeightMeasureSpec = getChildMeasureSpec(parentHeightMeasureSpec,
mPaddingTop + mPaddingBottom, lp.height);
child.measure(childWidthMeasureSpec, childHeightMeasureSpec);
}
源码很简短,主要区别是measureChildWithMargins得到子控件的MarginLayoutParams ,在调用getChildMeasureSpec时传入了lp.leftMargin, lp.rightMargin, 这样就很好解释出错的测量宽度刚好比正确时的测量宽度多一个lp.leftMargin和一个lp.rightMargin了。
扩展:
在代码中动态添加子View的时候,如果不设置margin属性时,子View会连在一起,不美观。所以添加了horizontalSpace 和 verticalSpace两个属性统一控制子View之间的横向间隙和纵向间隙。这里不详细说明。
效果图:


