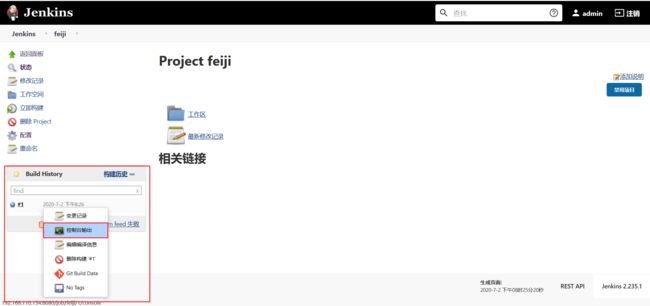
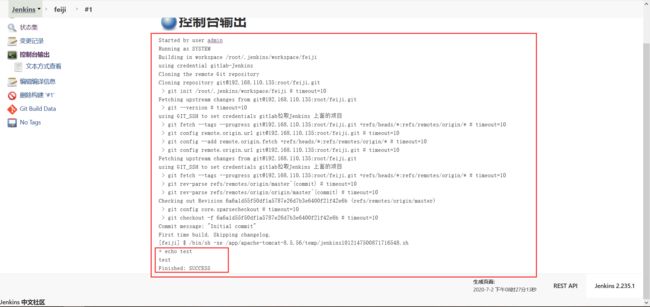
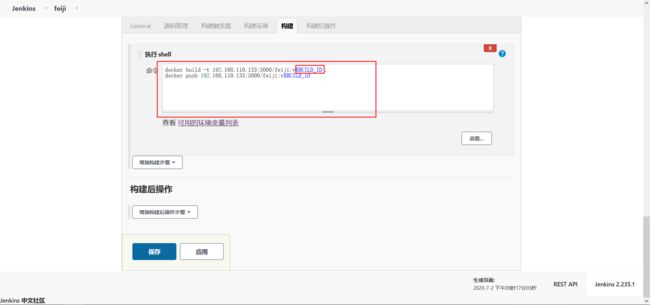
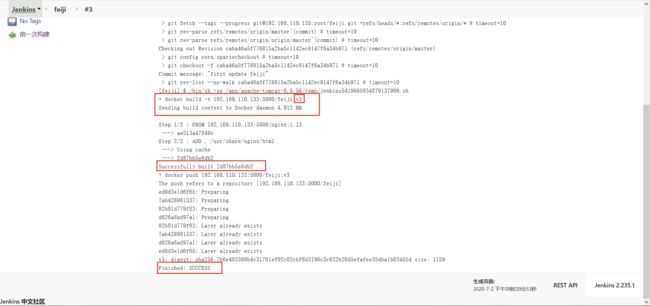
1、集群规划,如下所示:
| 主机名 | ip地址 | 角色 | 端口号 |
| k8s-master | 192.168.110.133 | k8s-master | api-server:8080 |
| k8s-node2 | 192.168.110.134 | k8s-node1,jenkins | tomcat:8080(跑jenkins) |
| k8s-node3 | 192.168.110.135 | k8s-node1,gitlab | gitlab:80,8080 |
2、为了减轻机器压力,将之前部署地Pod节点都删除掉,如下所示:
1 [root@k8s-master ~]# kubectl get all -o wide 2 NAME DESIRED CURRENT READY AGE CONTAINER(S) IMAGE(S) SELECTOR 3 rc/mysql 1 1 1 1d mysql 192.168.110.133:5000/mysql:5.7.30 app=mysql 4 rc/myweb 1 1 1 1d myweb 192.168.110.133:5000/tomcat-book:5.0 app=myweb 5 6 NAME CLUSTER-IP EXTERNAL-IP PORT(S) AGE SELECTOR 7 svc/glusterfs 10.254.182.4149152/TCP 1d 8 svc/kubernetes 10.254.0.1 443/TCP 27d 9 svc/mysql 10.254.126.11 3306/TCP 1d app=mysql 10 svc/myweb 10.254.188.155 8080:30008/TCP 1d app=myweb 11 12 NAME READY STATUS RESTARTS AGE IP NODE 13 po/mysql-wldks 1/1 Running 0 1d 172.16.66.6 k8s-node3 14 po/myweb-c8sf6 1/1 Running 1 1d 172.16.66.5 k8s-node3 15 po/nginx 1/1 Running 0 1d 172.16.66.3 k8s-node3 16 po/nginx2 1/1 Running 0 1d 172.16.74.5 k8s-node2 17 [root@k8s-master ~]# kubectl delete rc --all 18 replicationcontroller "mysql" deleted 19 replicationcontroller "myweb" deleted 20 [root@k8s-master ~]# kubectl delete svc --all 21 service "glusterfs" deleted 22 service "kubernetes" deleted 23 service "mysql" deleted 24 service "myweb" deleted 25 [root@k8s-master ~]# kubectl get all -o wide 26 NAME READY STATUS RESTARTS AGE IP NODE 27 nginx 1/1 Running 0 1d 172.16.66.3 k8s-node3 28 nginx2 1/1 Running 0 1d 172.16.74.5 k8s-node2 29 [root@k8s-master ~]# kubectl delete pod nginx pod nginx2 30 pod "nginx" deleted 31 pod "nginx2" deleted 32 Error from server (NotFound): pods "pod" not found 33 [root@k8s-master ~]# kubectl get all -o wide 34 NAME CLUSTER-IP EXTERNAL-IP PORT(S) AGE SELECTOR 35 svc/kubernetes 10.254.0.1 443/TCP 9s 36 [root@k8s-master ~]#
3、k8s-node3节点安装gitlab,如下所示:
首先需要下载gitlab,如下所示:
 1 [root@k8s-node3 ~]# wget https://mirror.tuna.tsinghua.edu.cn/gitlab-ce/yum/el7/gitlab-ce-11.9.11-ce.0.el7.x86_64.rpm
 2 --2020-07-02 10:22:32--  https://mirror.tuna.tsinghua.edu.cn/gitlab-ce/yum/el7/gitlab-ce-11.9.11-ce.0.el7.x86_64.rpm
 3 Resolving mirror.tuna.tsinghua.edu.cn (mirror.tuna.tsinghua.edu.cn)... 101.6.8.193, 2402:f000:1:408:8100::1
 4 Connecting to mirror.tuna.tsinghua.edu.cn (mirror.tuna.tsinghua.edu.cn)|101.6.8.193|:443... connected.
 5 HTTP request sent, awaiting response... 200 OK
 6 Length: 569408968 (543M) [application/x-redhat-package-manager]
 7 Saving to: ‘gitlab-ce-11.9.11-ce.0.el7.x86_64.rpm’
 8
 9 100%[=======================================================================================================================================================================>] 569,408,968 1.79MB/s   in 7m 19s
10
11 2020-07-02 10:29:54 (1.24 MB/s) - ‘gitlab-ce-11.9.11-ce.0.el7.x86_64.rpm’ saved [569408968/569408968]
12
13 [root@k8s-node3 ~]#
下载完毕,进行安装,安装包比较大,安装速度也取决于硬盘的类型,如下所示:
 1 [root@k8s-node3 ~]# yum localinstall gitlab-ce-11.9.11-ce.0.el7.x86_64.rpm -y
 2 Loaded plugins: fastestmirror, langpacks, product-id, search-disabled-repos, subscription-manager
 3
 4 This system is not registered with an entitlement server. You can use subscription-manager to register.
 5
 6 Examining gitlab-ce-11.9.11-ce.0.el7.x86_64.rpm: gitlab-ce-11.9.11-ce.0.el7.x86_64
 7 Marking gitlab-ce-11.9.11-ce.0.el7.x86_64.rpm to be installed
 8 Resolving Dependencies
 9 --> Running transaction check
10 ---> Package gitlab-ce.x86_64 0:11.9.11-ce.0.el7 will be installed
11 --> Finished Dependency Resolution
12 base/7/x86_64                                                                                                                                                                             | 3.6 kB  00:00:00
13 centos-gluster7/7/x86_64                                                                                                                                                                  | 3.0 kB  00:00:00
14 extras/7/x86_64                                                                                                                                                                           | 2.9 kB  00:00:00
15 updates/7/x86_64                                                                                                                                                                          | 2.9 kB  00:00:00
16 updates/7/x86_64/primary_db                                                                                                                                                               | 3.0 MB  00:00:07
17
18 Dependencies Resolved
19
20 =================================================================================================================================================================================================================
21  Package                                    Arch                                    Version                                            Repository                                                           Size
22 =================================================================================================================================================================================================================
23 Installing:
24  gitlab-ce                                  x86_64                                  11.9.11-ce.0.el7                                   /gitlab-ce-11.9.11-ce.0.el7.x86_64                                  1.5 G
25
26 Transaction Summary
27 =================================================================================================================================================================================================================
28 Install  1 Package
29
30 Total size: 1.5 G
31 Installed size: 1.5 G
32 Downloading packages:
33 Running transaction check
34 Running transaction test
35 Transaction test succeeded
36 Running transaction
37   Installing : gitlab-ce-11.9.11-ce.0.el7.x86_64                                                                                                                                                             1/1
38 It looks like GitLab has not been configured yet; skipping the upgrade script.
39
40        *.                  *.
41       ***                 ***
42      *****               *****
43     .******             *******
44     ********            ********
45    ,,,,,,,,,***********,,,,,,,,,
46   ,,,,,,,,,,,*********,,,,,,,,,,,
47   .,,,,,,,,,,,*******,,,,,,,,,,,,
48       ,,,,,,,,,*****,,,,,,,,,.
49          ,,,,,,,****,,,,,,
50             .,,,***,,,,
51                 ,*,.
52
53
54
55      _______ __  __          __
56     / ____(_) /_/ /   ____ _/ /_
57    / / __/ / __/ /   / __ `/ __ \
58   / /_/ / / /_/ /___/ /_/ / /_/ /
59   \____/_/\__/_____/\__,_/_.___/
60
61
62 Thank you for installing GitLab!
63 GitLab was unable to detect a valid hostname for your instance.
64 Please configure a URL for your GitLab instance by setting `external_url`
65 configuration in /etc/gitlab/gitlab.rb file.
66 Then, you can start your GitLab instance by running the following command:
67   sudo gitlab-ctl reconfigure
68
69 For a comprehensive list of configuration options please see the Omnibus GitLab readme
70 https://gitlab.com/gitlab-org/omnibus-gitlab/blob/master/README.md
71
72   Verifying  : gitlab-ce-11.9.11-ce.0.el7.x86_64                                                                                                                                                             1/1
73
74 Installed:
75   gitlab-ce.x86_64 0:11.9.11-ce.0.el7
76
77 Complete!
78 [root@k8s-node3 ~]#
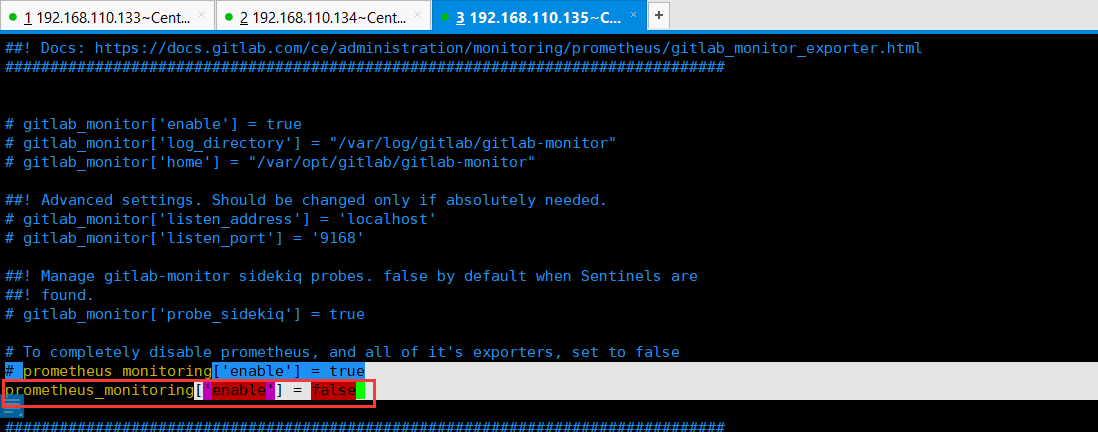
安装完毕,配置gitlab(gitlab是使用ruby编写的一个工具,所以配置文件是rb的后缀),第一点是修改gitlab的访问地址,第二点是修改普罗米修斯的监控关闭掉,节省资源,如下所示:
1 [root@k8s-node3 ~]# vim /etc/gitlab/gitlab.rb
修改内容,修改的时候建议使用域名,方便后期迁移,这里直接使用ip地址了,如下所示:
1 # external_url 'http://gitlab.example.com'
2 external_url 'http://192.168.110.135'
1 # prometheus_monitoring['enable'] = true
2 prometheus_monitoring['enable'] = false
修改完配置之后,需要执行命令让其生效,由于命令太长太长,这里就不贴了,如下所示:
 1 [root@k8s-node3 ~]# gitlab-ctl reconfigure
 2
 3 .
 4 .
 5 .
 6 .
 7 .
 8 .
 9
10 Running handlers:
11 Running handlers complete
12 Chef Client finished, 338/858 resources updated in 02 minutes 26 seconds
13 gitlab Reconfigured!
部署成功之后,就会把应用跑起来,此时可以看下内存,避免内存不够,如下所示:
1 [root@k8s-node3 ~]# free -h
2               total        used        free      shared  buff/cache   available
3 Mem:           2.2G        1.4G        186M         69M        621M        411M
4 Swap:          2.0G         90M        1.9G
5 [root@k8s-node3 ~]#
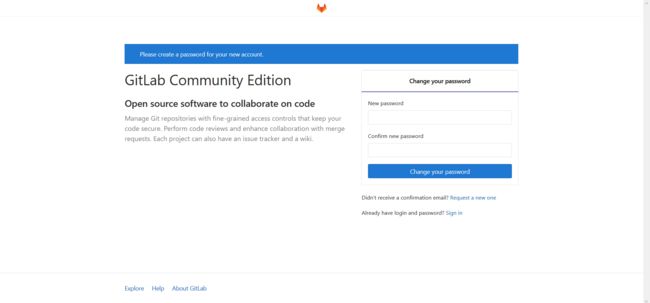
此时就可以访问一下gitlab了,第一次访问gitlab需要设置一个密码,密码长度必须是8位,如下所示:
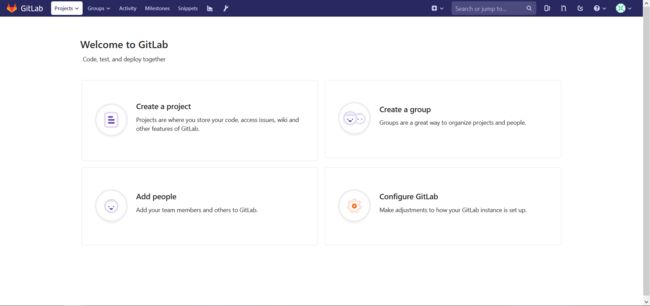
设置完毕密码,就可以进行登录了,如下所示:
gitlab登录成功,如下所示:
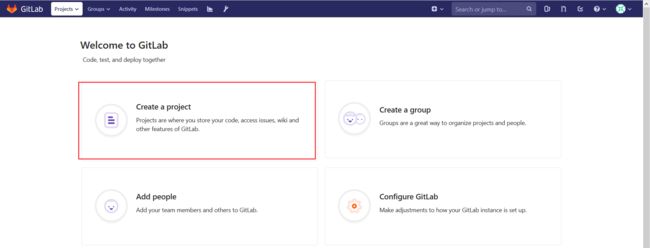
gitlab创建仓库并上传代码,如下所示:
创建一个仓库,指定仓库的名称,可以对此进行描述,如下所示:
私有仓库创建成功是这个样子的,如下所示:
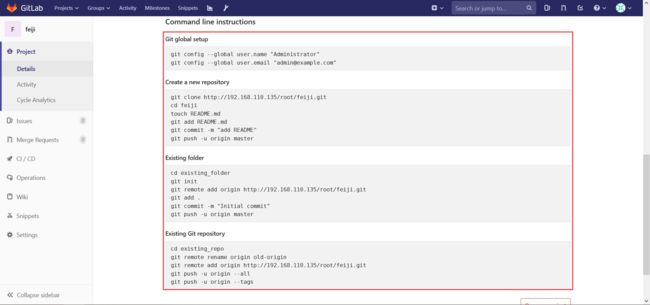
向下滑动,可以看到命令提示,如下所示:
此时,向仓库上传代码,上传代码,需要首先执行下面的命令,配置全局的用户,如下所示:
 1 [root@k8s-node3 ~]# cd /opt/
 2 [root@k8s-node3 opt]# ls
 3 gitlab  myregistry  rh
 4 [root@k8s-node3 opt]# mkdir feiji
 5 [root@k8s-node3 opt]# ls
 6 feiji  gitlab  myregistry  rh
 7 [root@k8s-node3 opt]# cd feiji/
 8 [root@k8s-node3 feiji]# ls
 9 css  img  index.html  js
10 [root@k8s-node3 feiji]# git config --global user.name "Administrator"
11 bash: git: command not found...
12 [root@k8s-node3 feiji]# git config --global user.email "[email protected]"
13 bash: git: command not found...
14 [root@k8s-node3 feiji]# gitlab-
15 gitlab-ctl    gitlab-psql   gitlab-rails  gitlab-rake
16 [root@k8s-node3 feiji]#
我这里还没有git的命令,首先安装一下,如下所示:
 1 [root@k8s-node3 feiji]# yum install git -y
 2 Loaded plugins: fastestmirror, langpacks, product-id, search-disabled-repos, subscription-manager
 3
 4 This system is not registered with an entitlement server. You can use subscription-manager to register.
 5
 6 Loading mirror speeds from cached hostfile
 7  * base: mirrors.tuna.tsinghua.edu.cn
 8  * centos-gluster7: mirrors.huaweicloud.com
 9  * extras: mirror.bit.edu.cn
10  * updates: mirror.bit.edu.cn
11 Resolving Dependencies
12 --> Running transaction check
13 ---> Package git.x86_64 0:1.8.3.1-23.el7_8 will be installed
14 --> Processing Dependency: perl-Git = 1.8.3.1-23.el7_8 for package: git-1.8.3.1-23.el7_8.x86_64
15 --> Processing Dependency: perl(Term::ReadKey) for package: git-1.8.3.1-23.el7_8.x86_64
16 --> Processing Dependency: perl(Git) for package: git-1.8.3.1-23.el7_8.x86_64
17 --> Processing Dependency: perl(Error) for package: git-1.8.3.1-23.el7_8.x86_64
18 --> Running transaction check
19 ---> Package perl-Error.noarch 1:0.17020-2.el7 will be installed
20 ---> Package perl-Git.noarch 0:1.8.3.1-23.el7_8 will be installed
21 ---> Package perl-TermReadKey.x86_64 0:2.30-20.el7 will be installed
22 --> Finished Dependency Resolution
23
24 Dependencies Resolved
25
26 =================================================================================================================================================================================================================
27  Package                                                Arch                                         Version                                                 Repository                                     Size
28 =================================================================================================================================================================================================================
29 Installing:
30  git                                                    x86_64                                       1.8.3.1-23.el7_8                                        updates                                       4.4 M
31 Installing for dependencies:
32  perl-Error                                             noarch                                       1:0.17020-2.el7                                         base                                           32 k
33  perl-Git                                               noarch                                       1.8.3.1-23.el7_8                                        updates                                        56 k
34  perl-TermReadKey                                       x86_64                                       2.30-20.el7                                             base                                           31 k
35
36 Transaction Summary
37 =================================================================================================================================================================================================================
38 Install  1 Package (+3 Dependent packages)
39
40 Total download size: 4.5 M
41 Installed size: 22 M
42 Downloading packages:
43 (1/4): perl-Git-1.8.3.1-23.el7_8.noarch.rpm                                                                                                                                               |  56 kB  00:00:00
44 (2/4): perl-TermReadKey-2.30-20.el7.x86_64.rpm                                                                                                                                            |  31 kB  00:00:00
45 (3/4): perl-Error-0.17020-2.el7.noarch.rpm                                                                                                                                                |  32 kB  00:00:00
46 (4/4): git-1.8.3.1-23.el7_8.x86_64.rpm                                                                                                                                                    | 4.4 MB  00:00:07
47 -----------------------------------------------------------------------------------------------------------------------------------------------------------------------------------------------------------------
48 Total                                                                                                                                                                            588 kB/s | 4.5 MB  00:00:07
49 Running transaction check
50 Running transaction test
51 Transaction test succeeded
52 Running transaction
53   Installing : 1:perl-Error-0.17020-2.el7.noarch                                                                                                                                                             1/4
54   Installing : perl-TermReadKey-2.30-20.el7.x86_64                                                                                                                                                           2/4
55   Installing : perl-Git-1.8.3.1-23.el7_8.noarch                                                                                                                                                              3/4
56   Installing : git-1.8.3.1-23.el7_8.x86_64                                                                                                                                                                   4/4
57   Verifying  : git-1.8.3.1-23.el7_8.x86_64                                                                                                                                                                   1/4
58   Verifying  : 1:perl-Error-0.17020-2.el7.noarch                                                                                                                                                             2/4
59   Verifying  : perl-Git-1.8.3.1-23.el7_8.noarch                                                                                                                                                              3/4
60   Verifying  : perl-TermReadKey-2.30-20.el7.x86_64                                                                                                                                                           4/4
61
62 Installed:
63   git.x86_64 0:1.8.3.1-23.el7_8
64
65 Dependency Installed:
66   perl-Error.noarch 1:0.17020-2.el7                                  perl-Git.noarch 0:1.8.3.1-23.el7_8                                  perl-TermReadKey.x86_64 0:2.30-20.el7
67
68 Complete!
69 [root@k8s-node3 feiji]#
此时,向仓库上传代码,上传代码,需要首先执行下面的命令,配置全局的用户,如下所示:
1 [root@k8s-node3 feiji]# git config --global user.name "Administrator"
2 [root@k8s-node3 feiji]# git config --global user.email "[email protected]"
3 [root@k8s-node3 feiji]#
由于已经在界面创建了仓库,此时可以忽略Create a new repository步骤,下面开始执行Existing folder在已存在的目录中初始化这个仓库,如下所示:
1 cd existing_folder     # 进入到要提交代码的目录
2 git init    # 初始化一个仓库
3 git remote add origin http://192.168.110.135/root/feiji.git        # 添加远程的一个地址,将远程的仓库添加进来
4 git add .    # 提交到远程仓库
5 git commit -m "Initial commit"        # 提交的分支是master
6 git push -u origin master        # 输入gitlab的账号密码即可
具体操作,如下所示:
  1 [root@k8s-node3 feiji]# git init
  2 Initialized empty Git repository in /opt/feiji/.git/
  3 [root@k8s-node3 feiji]# git remote add origin http://192.168.110.135/root/feiji.git
  4 [root@k8s-node3 feiji]# git add .
  5 [root@k8s-node3 feiji]# git commit -m "Initial commit"
  6 [master (root-commit) 6a6a1d5] Initial commit
  7  125 files changed, 588 insertions(+)
  8  create mode 100644 img/.DS_Store
  9  create mode 100644 img/._.DS_Store
 10  create mode 100644 img/._bg.jpg
 11  create mode 100644 img/._bg2.jpg
 12  create mode 100644 img/._bigbg.jpg
 13  create mode 100644 img/._bossbullet.png
 14  create mode 100644 img/._bullet.png
 15  create mode 100644 img/._enemy1.png
 16  create mode 100644 img/._enemy1boom1.png
 17  create mode 100644 img/._enemy1boom2.png
 18  create mode 100644 img/._enemy1boom3.png
 19  create mode 100644 img/._enemy1boom4.png
 20  create mode 100644 img/._enemy1boom5.png
 21  create mode 100644 img/._enemy1boom6.png
 22  create mode 100644 img/._enemy2.png
 23  create mode 100644 img/._enemy2boom1.png
 24  create mode 100644 img/._enemy2boom2.png
 25  create mode 100644 img/._enemy2boom3.png
 26  create mode 100644 img/._enemy2boom4.png
 27  create mode 100644 img/._enemy2boom5.png
 28  create mode 100644 img/._enemy2boom6.png
 29  create mode 100644 img/._enemy3.png
 30  create mode 100644 img/._enemy3boom1.png
 31  create mode 100644 img/._enemy3boom2.png
 32  create mode 100644 img/._enemy3boom3.png
 33  create mode 100644 img/._enemy3boom4.png
 34  create mode 100644 img/._enemy3boom5.png
 35  create mode 100644 img/._enemy3boom6.png
 36  create mode 100644 img/._enemy4.png
 37  create mode 100644 img/._enemy4boom1.png
 38  create mode 100644 img/._enemy4boom2.png
 39  create mode 100644 img/._enemy4boom3.png
 40  create mode 100644 img/._enemy4boom4.png
 41  create mode 100644 img/._enemy4boom5.png
 42  create mode 100644 img/._enemy4boom6.png
 43  create mode 100644 img/._load1.png
 44  create mode 100644 img/._load2.png
 45  create mode 100644 img/._load3.png
 46  create mode 100644 img/._load4.png
 47  create mode 100644 img/._load5.png
 48  create mode 100644 img/._load6.png
 49  create mode 100644 img/._load7.png
 50  create mode 100644 img/._load8.png
 51  create mode 100644 img/._load9.png
 52  create mode 100644 img/._myplane1.png
 53  create mode 100644 img/._myplane1boom1.png
 54  create mode 100644 img/._myplane1boom2.png
 55  create mode 100644 img/._myplane1boom3.png
 56  create mode 100644 img/._myplane1boom4.png
 57  create mode 100644 img/._myplane1boom5.png
 58  create mode 100644 img/._myplane1boom6.png
 59  create mode 100644 img/._myplane1boom7.png
 60  create mode 100644 img/._myplane1boom8.png
 61  create mode 100644 img/._myplane1boom9.png
 62  create mode 100644 img/._myplane2.png
 63  create mode 100644 img/._myplane3.png
 64  create mode 100644 img/._planeboss.png
 65  create mode 100644 img/._starthead.png
 66  create mode 100644 img/._starting.png
 67  create mode 100644 img/._warning1.png
 68  create mode 100644 img/._warning2.png
 69  create mode 100644 img/bg.jpg
 70  create mode 100644 img/bg2.jpg
 71  create mode 100644 img/bigbg.jpg
 72  create mode 100644 img/bossbullet.png
 73  create mode 100644 img/bullet.png
 74  create mode 100644 img/enemy1.png
 75  create mode 100644 img/enemy1boom1.png
 76  create mode 100644 img/enemy1boom2.png
 77  create mode 100644 img/enemy1boom3.png
 78  create mode 100644 img/enemy1boom4.png
 79  create mode 100644 img/enemy1boom5.png
 80  create mode 100644 img/enemy1boom6.png
 81  create mode 100644 img/enemy2.png
 82  create mode 100644 img/enemy2boom1.png
 83  create mode 100644 img/enemy2boom2.png
 84  create mode 100644 img/enemy2boom3.png
 85  create mode 100644 img/enemy2boom4.png
 86  create mode 100644 img/enemy2boom5.png
 87  create mode 100644 img/enemy2boom6.png
 88  create mode 100644 img/enemy3.png
 89  create mode 100644 img/enemy3boom1.png
 90  create mode 100644 img/enemy3boom2.png
 91  create mode 100644 img/enemy3boom3.png
 92  create mode 100644 img/enemy3boom4.png
 93  create mode 100644 img/enemy3boom5.png
 94  create mode 100644 img/enemy3boom6.png
 95  create mode 100644 img/enemy4.png
 96  create mode 100644 img/enemy4boom1.png
 97  create mode 100644 img/enemy4boom2.png
 98  create mode 100644 img/enemy4boom3.png
 99  create mode 100644 img/enemy4boom4.png
100  create mode 100644 img/enemy4boom5.png
101  create mode 100644 img/enemy4boom6.png
102  create mode 100644 img/load1.png
103  create mode 100644 img/load2.png
104  create mode 100644 img/load3.png
105  create mode 100644 img/load4.png
106  create mode 100644 img/load5.png
107  create mode 100644 img/load6.png
108  create mode 100644 img/load7.png
109  create mode 100644 img/load8.png
110  create mode 100644 img/load9.png
111  create mode 100644 img/myplane1.png
112  create mode 100644 img/myplane1boom1.png
113  create mode 100644 img/myplane1boom2.png
114  create mode 100644 img/myplane1boom3.png
115  create mode 100644 img/myplane1boom4.png
116  create mode 100644 img/myplane1boom5.png
117  create mode 100644 img/myplane1boom6.png
118  create mode 100644 img/myplane1boom7.png
119  create mode 100644 img/myplane1boom8.png
120  create mode 100644 img/myplane1boom9.png
121  create mode 100644 img/myplane2.png
122  create mode 100644 img/myplane3.png
123  create mode 100644 img/planeboss.png
124  create mode 100644 img/starthead.png
125  create mode 100644 img/starting.png
126  create mode 100644 img/warning1.png
127  create mode 100644 img/warning2.png
128  create mode 100644 index.html
129  create mode 100644 js/.DS_Store
130  create mode 100644 js/._.DS_Store
131  create mode 100644 js/._index.js
132  create mode 100644 js/index.js
133 [root@k8s-node3 feiji]# git push -u origin master
134 Username for 'http://192.168.110.135': root
135 Password for 'http://[email protected]':
136 Counting objects: 120, done.
137 Delta compression using up to 2 threads.
138 Compressing objects: 100% (120/120), done.
139 Writing objects: 100% (120/120), 2.13 MiB | 0 bytes/s, done.
140 Total 120 (delta 53), reused 0 (delta 0)
141 remote: Resolving deltas: 100% (53/53), done.
142 To http://192.168.110.135/root/feiji.git
143  * [new branch]      master -> master
144 Branch master set up to track remote branch master from origin.
145 [root@k8s-node3 feiji]#
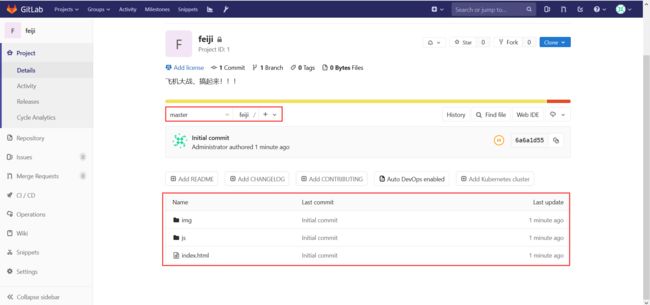
此时,在界面刷新一下项目,如下所示:
4、安装jenkins并拉取代码,需要首先安装jdk,然后安装tomcat,最后安装jenkins的。
首先安装jdk,最好去官方下载吧,根据自己需要的版本,如果官方下载慢(Oracle官方需要登录的哦!),可以找个资源然后上传到自己的服务器上,自己根据需要进行选择即可。
jdk8的下载地址:https://www.oracle.com/java/technologies/javase/javase-jdk8-downloads.html。我这里直接下载好了,通过xftp上传到服务器进行安装了。
 1 [root@k8s-node2 package]# rpm -ivh jdk-8u251-linux-x64.rpm
 2 warning: jdk-8u251-linux-x64.rpm: Header V3 RSA/SHA256 Signature, key ID ec551f03: NOKEY
 3 Preparing...                          ################################# [100%]
 4 Updating / installing...
 5    1:jdk1.8-2000:1.8.0_251-fcs        ################################# [100%]
 6 Unpacking JAR files...
 7     tools.jar...
 8     plugin.jar...
 9     javaws.jar...
10     deploy.jar...
11     rt.jar...
12     jsse.jar...
13     charsets.jar...
14     localedata.jar...
15 [root@k8s-node2 package]# java -version
16 openjdk version "1.8.0_181"
17 OpenJDK Runtime Environment (build 1.8.0_181-b13)
18 OpenJDK 64-Bit Server VM (build 25.181-b13, mixed mode)
19 [root@k8s-node2 package]#
安装tomcat也是可以通过命令下载或者下载好上传的方式,tomcat官网8.x下载:https://tomcat.apache.org/download-80.cgi。
这里通过wget下载了tomcat,然后进行解压缩操作即可。
 1 [root@k8s-node2 package]# ls
 2 jdk-8u251-linux-x64.rpm
 3 [root@k8s-node2 package]# wget https://mirrors.bfsu.edu.cn/apache/tomcat/tomcat-8/v8.5.56/bin/apache-tomcat-8.5.56.tar.gz
 4 --2020-07-02 11:38:35--  https://mirrors.bfsu.edu.cn/apache/tomcat/tomcat-8/v8.5.56/bin/apache-tomcat-8.5.56.tar.gz
 5 Resolving mirrors.bfsu.edu.cn (mirrors.bfsu.edu.cn)... 39.155.141.16, 2001:da8:20f:4435:4adf:37ff:fe55:2840
 6 Connecting to mirrors.bfsu.edu.cn (mirrors.bfsu.edu.cn)|39.155.141.16|:443... connected.
 7 HTTP request sent, awaiting response... 200 OK
 8 Length: 10377460 (9.9M) [application/octet-stream]
 9 Saving to: ‘apache-tomcat-8.5.56.tar.gz’
10
11 100%[=======================================================================================================================================================================>] 10,377,460  2.81MB/s   in 3.5s
12
13 2020-07-02 11:38:38 (2.81 MB/s) - ‘apache-tomcat-8.5.56.tar.gz’ saved [10377460/10377460]
14
15 [root@k8s-node2 package]# ls
16 apache-tomcat-8.5.56.tar.gz  jdk-8u251-linux-x64.rpm
17 [root@k8s-node2 package]# ll
18 total 185404
19 -rw-r--r-- 1 root root  10377460 Jun  4 04:43 apache-tomcat-8.5.56.tar.gz
20 -rw-r--r-- 1 root root 179472367 Jul  2 11:35 jdk-8u251-linux-x64.rpm
21 [root@k8s-node2 package]#
下载好就可以进行安装了,如下所示:
 1 [root@k8s-node2 package]# tar -zxvf apache-tomcat-8.5.56.tar.gz -C /app
 2 tar: /app: Cannot open: No such file or directory
 3 tar: Error is not recoverable: exiting now
 4 [root@k8s-node2 package]# mkdir /app
 5 [root@k8s-node2 package]# ls
 6 apache-tomcat-8.5.56.tar.gz  jdk-8u251-linux-x64.rpm
 7 [root@k8s-node2 package]# ll
 8 total 185404
 9 -rw-r--r-- 1 root root  10377460 Jun  4 04:43 apache-tomcat-8.5.56.tar.gz
10 -rw-r--r-- 1 root root 179472367 Jul  2 11:35 jdk-8u251-linux-x64.rpm
11 [root@k8s-node2 package]# tar -zxvf apache-tomcat-8.5.56.tar.gz -C /app
开始下载和安装jenkins,jenkins官方下载地址:https://www.jenkins.io/download/,如下所示:
安装和启动Jenkins的方式有很多,比如常见的有 Java方式启动、Tomcat启动、Docker启动等,我在这里主要介绍下通过Tomcat的方式启动。
首先将tomcat的webapp目录下面的默认站点目录删除掉,如下所示:
 1 [root@k8s-node2 package]# ls
 2 apache-tomcat-8.5.56.tar.gz  jdk-8u251-linux-x64.rpm
 3 [root@k8s-node2 package]# ls
 4 apache-tomcat-8.5.56.tar.gz  jdk-8u251-linux-x64.rpm
 5 [root@k8s-node2 package]# cd /app/apache-tomcat-8.5.56/webapps/
 6 [root@k8s-node2 webapps]# ls
 7 docs  examples  host-manager  manager  ROOT
 8 [root@k8s-node2 webapps]# rm -rf *
 9 [root@k8s-node2 webapps]# ls
10 [root@k8s-node2 webapps]#
然后将上传到服务器的jenkins.war复制到tomcat的webapp目录下面。
1 [root@k8s-node2 webapps]# cp ~/package/jenkins.war .
2 [root@k8s-node2 webapps]# ls
3 jenkins.war
4 [root@k8s-node2 webapps]#
此时,启动tomcat,如下所示:
 1 [root@k8s-node2 webapps]# cd /app/
 2 [root@k8s-node2 app]# ls
 3 apache-tomcat-8.5.56
 4 [root@k8s-node2 app]# cd apache-tomcat-8.5.56/
 5 [root@k8s-node2 apache-tomcat-8.5.56]# ls
 6 bin  BUILDING.txt  conf  CONTRIBUTING.md  lib  LICENSE  logs  NOTICE  README.md  RELEASE-NOTES  RUNNING.txt  temp  webapps  work
 7 [root@k8s-node2 apache-tomcat-8.5.56]# cd bin/
 8 [root@k8s-node2 bin]# ls
 9 bootstrap.jar  catalina-tasks.xml  commons-daemon.jar            configtest.sh  digest.sh         shutdown.bat  startup.sh            tool-wrapper.bat  version.sh
10 catalina.bat   ciphers.bat         commons-daemon-native.tar.gz  daemon.sh      setclasspath.bat  shutdown.sh   tomcat-juli.jar       tool-wrapper.sh
11 catalina.sh    ciphers.sh          configtest.bat                digest.bat     setclasspath.sh   startup.bat   tomcat-native.tar.gz  version.bat
12 [root@k8s-node2 bin]# ./startup.sh
13 Using CATALINA_BASE:   /app/apache-tomcat-8.5.56
14 Using CATALINA_HOME:   /app/apache-tomcat-8.5.56
15 Using CATALINA_TMPDIR: /app/apache-tomcat-8.5.56/temp
16 Using JRE_HOME:        /usr
17 Using CLASSPATH:       /app/apache-tomcat-8.5.56/bin/bootstrap.jar:/app/apache-tomcat-8.5.56/bin/tomcat-juli.jar
18 Tomcat started.
19 [root@k8s-node2 bin]#
查看8080的端口号,如下所示:
 1 [root@k8s-node2 bin]# netstat -lntup
 2 Active Internet connections (only servers)
 3 Proto Recv-Q Send-Q Local Address           Foreign Address         State       PID/Program name
 4 tcp        0      0 0.0.0.0:24007           0.0.0.0:*               LISTEN      46232/glusterd
 5 tcp        0      0 127.0.0.1:10248         0.0.0.0:*               LISTEN      14838/kubelet
 6 tcp        0      0 127.0.0.1:10249         0.0.0.0:*               LISTEN      6803/kube-proxy
 7 tcp        0      0 192.168.110.134:10250   0.0.0.0:*               LISTEN      14838/kubelet
 8 tcp        0      0 0.0.0.0:42863           0.0.0.0:*               LISTEN      -
 9 tcp        0      0 192.168.110.134:10255   0.0.0.0:*               LISTEN      14838/kubelet
10 tcp        0      0 0.0.0.0:111             0.0.0.0:*               LISTEN      1/systemd
11 tcp        0      0 0.0.0.0:20048           0.0.0.0:*               LISTEN      89395/rpc.mountd
12 tcp        0      0 0.0.0.0:6000            0.0.0.0:*               LISTEN      7030/X
13 tcp        0      0 192.168.122.1:53        0.0.0.0:*               LISTEN      7281/dnsmasq
14 tcp        0      0 0.0.0.0:22              0.0.0.0:*               LISTEN      6804/sshd
15 tcp        0      0 127.0.0.1:631           0.0.0.0:*               LISTEN      6806/cupsd
16 tcp        0      0 127.0.0.1:25            0.0.0.0:*               LISTEN      7142/master
17 tcp        0      0 0.0.0.0:34587           0.0.0.0:*               LISTEN      71097/rpc.statd
18 tcp        0      0 0.0.0.0:49152           0.0.0.0:*               LISTEN      62108/glusterfsd
19 tcp        0      0 0.0.0.0:49153           0.0.0.0:*               LISTEN      62128/glusterfsd
20 tcp        0      0 0.0.0.0:2049            0.0.0.0:*               LISTEN      -
21 tcp6       0      0 :::5000                 :::*                    LISTEN      14488/docker-proxy-
22 tcp6       0      0 :::45450                :::*                    LISTEN      -
23 tcp6       0      0 :::60684                :::*                    LISTEN      71097/rpc.statd
24 tcp6       0      0 :::111                  :::*                    LISTEN      1/systemd
25 tcp6       0      0 :::20048                :::*                    LISTEN      89395/rpc.mountd
26 tcp6       0      0 :::30000                :::*                    LISTEN      6803/kube-proxy
27 tcp6       0      0 :::8080                 :::*                    LISTEN      14838/kubelet
28 tcp6       0      0 :::6000                 :::*                    LISTEN      7030/X
29 tcp6       0      0 :::22                   :::*                    LISTEN      6804/sshd
30 tcp6       0      0 ::1:631                 :::*                    LISTEN      6806/cupsd
31 tcp6       0      0 ::1:25                  :::*                    LISTEN      7142/master
32 tcp6       0      0 :::2049                 :::*                    LISTEN      -
33 tcp6       0      0 127.0.0.1:8005          :::*                    LISTEN      23457/java
34 udp        0      0 0.0.0.0:5353            0.0.0.0:*                           6442/avahi-daemon:
35 udp        0      0 0.0.0.0:44601           0.0.0.0:*                           -
36 udp        0      0 0.0.0.0:52808           0.0.0.0:*                           6442/avahi-daemon:
37 udp        0      0 0.0.0.0:20048           0.0.0.0:*                           89395/rpc.mountd
38 udp        0      0 0.0.0.0:58973           0.0.0.0:*                           71097/rpc.statd
39 udp        0      0 0.0.0.0:2049            0.0.0.0:*                           -
40 udp        0      0 192.168.122.1:53        0.0.0.0:*                           7281/dnsmasq
41 udp        0      0 0.0.0.0:67              0.0.0.0:*                           7281/dnsmasq
42 udp        0      0 192.168.110.134:8285    0.0.0.0:*                           6810/flanneld
43 udp        0      0 0.0.0.0:111             0.0.0.0:*                           1/systemd
44 udp        0      0 0.0.0.0:829             0.0.0.0:*                           89270/rpcbind
45 udp        0      0 127.0.0.1:889           0.0.0.0:*                           71097/rpc.statd
46 udp6       0      0 :::20048                :::*                                89395/rpc.mountd
47 udp6       0      0 :::2049                 :::*                                -
48 udp6       0      0 :::111                  :::*                                1/systemd
49 udp6       0      0 :::43464                :::*                                -
50 udp6       0      0 :::54072                :::*                                71097/rpc.statd
51 udp6       0      0 :::829                  :::*                                89270/rpcbind
由于之前将两个Node节点的CAdvisor启动起来了,占用了8080端口,现在关闭一下,如下所示:
1 [root@k8s-node2 apache-tomcat-8.5.56]# vim /etc/kubernetes/kubelet
2 [root@k8s-node2 apache-tomcat-8.5.56]#
然后重启kubelet服务,如下所示:
1 [root@k8s-node2 apache-tomcat-8.5.56]# systemctl restart kubelet.service
2 [root@k8s-node2 apache-tomcat-8.5.56]#
重启之后,查看8080端口号是开启了什么服务,发现没有了8080端口号了,此时我将tomcat关闭,然后重启,如下所示:
 1 [root@k8s-node2 bin]# ./shutdown.sh
 2 Using CATALINA_BASE:   /app/apache-tomcat-8.5.56
 3 Using CATALINA_HOME:   /app/apache-tomcat-8.5.56
 4 Using CATALINA_TMPDIR: /app/apache-tomcat-8.5.56/temp
 5 Using JRE_HOME:        /usr
 6 Using CLASSPATH:       /app/apache-tomcat-8.5.56/bin/bootstrap.jar:/app/apache-tomcat-8.5.56/bin/tomcat-juli.jar
 7 [root@k8s-node2 bin]# ./startup.sh
 8 Using CATALINA_BASE:   /app/apache-tomcat-8.5.56
 9 Using CATALINA_HOME:   /app/apache-tomcat-8.5.56
10 Using CATALINA_TMPDIR: /app/apache-tomcat-8.5.56/temp
11 Using JRE_HOME:        /usr
12 Using CLASSPATH:       /app/apache-tomcat-8.5.56/bin/bootstrap.jar:/app/apache-tomcat-8.5.56/bin/tomcat-juli.jar
13 Tomcat started.
14 [root@k8s-node2 bin]# cd ../logs/
15 [root@k8s-node2 logs]# tailf catalina.out
16 02-Jul-2020 12:21:37.758 INFO [main] org.apache.catalina.startup.VersionLoggerListener.log Command line argument: -Dcatalina.home=/app/apache-tomcat-8.5.56
17 02-Jul-2020 12:21:37.759 INFO [main] org.apache.catalina.startup.VersionLoggerListener.log Command line argument: -Djava.io.tmpdir=/app/apache-tomcat-8.5.56/temp
18 02-Jul-2020 12:21:37.759 INFO [main] org.apache.catalina.core.AprLifecycleListener.lifecycleEvent The Apache Tomcat Native library which allows using OpenSSL was not found on the java.library.path: [/usr/java/packages/lib/amd64:/usr/lib64:/lib64:/lib:/usr/lib]
19 02-Jul-2020 12:21:37.883 INFO [main] org.apache.coyote.AbstractProtocol.init Initializing ProtocolHandler ["http-nio-8080"]
20 02-Jul-2020 12:21:37.898 INFO [main] org.apache.tomcat.util.net.NioSelectorPool.getSharedSelector Using a shared selector for servlet write/read
21 02-Jul-2020 12:21:37.925 INFO [main] org.apache.catalina.startup.Catalina.load Initialization processed in 877 ms
22 02-Jul-2020 12:21:37.957 INFO [main] org.apache.catalina.core.StandardService.startInternal Starting service [Catalina]
23 02-Jul-2020 12:21:37.957 INFO [main] org.apache.catalina.core.StandardEngine.startInternal Starting Servlet Engine: Apache Tomcat/8.5.56
24 02-Jul-2020 12:21:37.990 INFO [localhost-startStop-1] org.apache.catalina.startup.HostConfig.deployWAR Deploying web application archive [/app/apache-tomcat-8.5.56/webapps/jenkins.war]
25 02-Jul-2020 12:21:41.900 INFO [localhost-startStop-1] org.apache.jasper.servlet.TldScanner.scanJars At least one JAR was scanned for TLDs yet contained no TLDs. Enable debug logging for this logger for a complete list of JARs that were scanned but no TLDs were found in them. Skipping unneeded JARs during scanning can improve startup time and JSP compilation time.
26 02-Jul-2020 12:21:42.339 INFO [localhost-startStop-1] hudson.WebAppMain.contextInitialized Jenkins home directory: /root/.jenkins found at: $user.home/.jenkins
27 02-Jul-2020 12:21:42.573 INFO [localhost-startStop-1] org.apache.catalina.startup.HostConfig.deployWAR Deployment of web application archive [/app/apache-tomcat-8.5.56/webapps/jenkins.war] has finished in [4,582] ms
28 02-Jul-2020 12:21:42.588 INFO [main] org.apache.coyote.AbstractProtocol.start Starting ProtocolHandler ["http-nio-8080"]
29 02-Jul-2020 12:21:42.673 INFO [main] org.apache.catalina.startup.Catalina.start Server startup in 4747 ms
30 02-Jul-2020 12:21:44.841 INFO [pool-6-thread-3] jenkins.InitReactorRunner$1.onAttained Started initialization
31 02-Jul-2020 12:21:44.976 INFO [pool-6-thread-2] jenkins.InitReactorRunner$1.onAttained Listed all plugins
32 02-Jul-2020 12:21:46.758 INFO [pool-6-thread-4] jenkins.InitReactorRunner$1.onAttained Prepared all plugins
33 02-Jul-2020 12:21:46.774 INFO [pool-6-thread-3] jenkins.InitReactorRunner$1.onAttained Started all plugins
34 02-Jul-2020 12:21:46.819 INFO [pool-6-thread-2] jenkins.InitReactorRunner$1.onAttained Augmented all extensions
35 02-Jul-2020 12:21:47.308 INFO [pool-6-thread-2] jenkins.InitReactorRunner$1.onAttained System config loaded
36 02-Jul-2020 12:21:47.309 INFO [pool-6-thread-2] jenkins.InitReactorRunner$1.onAttained System config adapted
37 02-Jul-2020 12:21:47.309 INFO [pool-6-thread-2] jenkins.InitReactorRunner$1.onAttained Loaded all jobs
38 02-Jul-2020 12:21:47.311 INFO [pool-6-thread-4] jenkins.InitReactorRunner$1.onAttained Configuration for all jobs updated
39 02-Jul-2020 12:21:47.330 INFO [Download metadata thread] hudson.model.AsyncPeriodicWork.lambda$doRun$0 Started Download metadata
40 02-Jul-2020 12:21:48.561 INFO [Finalizing set up] org.springframework.context.support.AbstractApplicationContext.prepareRefresh Refreshing org.springframework.web.context.support.StaticWebApplicationContext@22ea1775: display name [Root WebApplicationContext]; startup date [Thu Jul 02 12:21:48 CST 2020]; root of context hierarchy
41 02-Jul-2020 12:21:48.561 INFO [Finalizing set up] org.springframework.context.support.AbstractApplicationContext.obtainFreshBeanFactory Bean factory for application context [org.springframework.web.context.support.StaticWebApplicationContext@22ea1775]: org.springframework.beans.factory.support.DefaultListableBeanFactory@776ad75c
42 02-Jul-2020 12:21:48.575 INFO [Finalizing set up] org.springframework.beans.factory.support.DefaultListableBeanFactory.preInstantiateSingletons Pre-instantiating singletons in org.springframework.beans.factory.support.DefaultListableBeanFactory@776ad75c: defining beans [authenticationManager]; root of factory hierarchy
43 02-Jul-2020 12:21:48.907 INFO [Finalizing set up] org.springframework.context.support.AbstractApplicationContext.prepareRefresh Refreshing org.springframework.web.context.support.StaticWebApplicationContext@3cd7b623: display name [Root WebApplicationContext]; startup date [Thu Jul 02 12:21:48 CST 2020]; root of context hierarchy
44 02-Jul-2020 12:21:48.907 INFO [Finalizing set up] org.springframework.context.support.AbstractApplicationContext.obtainFreshBeanFactory Bean factory for application context [org.springframework.web.context.support.StaticWebApplicationContext@3cd7b623]: org.springframework.beans.factory.support.DefaultListableBeanFactory@2c58a5c2
45 02-Jul-2020 12:21:48.908 INFO [Finalizing set up] org.springframework.beans.factory.support.DefaultListableBeanFactory.preInstantiateSingletons Pre-instantiating singletons in org.springframework.beans.factory.support.DefaultListableBeanFactory@2c58a5c2: defining beans [filter,legacy]; root of factory hierarchy
46 02-Jul-2020 12:21:49.014 INFO [pool-6-thread-1] jenkins.InitReactorRunner$1.onAttained Completed initialization
47 02-Jul-2020 12:21:49.039 INFO [Jenkins initialization thread] hudson.WebAppMain$3.run Jenkins is fully up and running
48 02-Jul-2020 12:21:50.040 INFO [Download metadata thread] hudson.model.DownloadService$Downloadable.load Obtained the updated data file for hudson.tasks.Maven.MavenInstaller
49 02-Jul-2020 12:21:50.041 INFO [Download metadata thread] hudson.model.AsyncPeriodicWork.lambda$doRun$0 Finished Download metadata. 2,693 ms
50 ^C
51 [root@k8s-node2 logs]#
此时,查看端口号,如下所示:
 1 [root@k8s-node2 logs]# netstat -lntup
 2 Active Internet connections (only servers)
 3 Proto Recv-Q Send-Q Local Address           Foreign Address         State       PID/Program name
 4 tcp        0      0 0.0.0.0:24007           0.0.0.0:*               LISTEN      46232/glusterd
 5 tcp        0      0 127.0.0.1:10248         0.0.0.0:*               LISTEN      30748/kubelet
 6 tcp        0      0 127.0.0.1:10249         0.0.0.0:*               LISTEN      6803/kube-proxy
 7 tcp        0      0 192.168.110.134:10250   0.0.0.0:*               LISTEN      30748/kubelet
 8 tcp        0      0 192.168.110.134:10255   0.0.0.0:*               LISTEN      30748/kubelet
 9 tcp        0      0 0.0.0.0:42863           0.0.0.0:*               LISTEN      -
10 tcp        0      0 0.0.0.0:111             0.0.0.0:*               LISTEN      1/systemd
11 tcp        0      0 0.0.0.0:20048           0.0.0.0:*               LISTEN      89395/rpc.mountd
12 tcp        0      0 0.0.0.0:6000            0.0.0.0:*               LISTEN      7030/X
13 tcp        0      0 192.168.122.1:53        0.0.0.0:*               LISTEN      7281/dnsmasq
14 tcp        0      0 0.0.0.0:22              0.0.0.0:*               LISTEN      6804/sshd
15 tcp        0      0 127.0.0.1:631           0.0.0.0:*               LISTEN      6806/cupsd
16 tcp        0      0 127.0.0.1:25            0.0.0.0:*               LISTEN      7142/master
17 tcp        0      0 0.0.0.0:34587           0.0.0.0:*               LISTEN      71097/rpc.statd
18 tcp        0      0 0.0.0.0:49152           0.0.0.0:*               LISTEN      62108/glusterfsd
19 tcp        0      0 0.0.0.0:49153           0.0.0.0:*               LISTEN      62128/glusterfsd
20 tcp        0      0 0.0.0.0:2049            0.0.0.0:*               LISTEN      -
21 tcp6       0      0 :::5000                 :::*                    LISTEN      14488/docker-proxy-
22 tcp6       0      0 :::45450                :::*                    LISTEN      -
23 tcp6       0      0 :::60684                :::*                    LISTEN      71097/rpc.statd
24 tcp6       0      0 :::111                  :::*                    LISTEN      1/systemd
25 tcp6       0      0 :::8080                 :::*                    LISTEN      32474/java
26 tcp6       0      0 :::20048                :::*                    LISTEN      89395/rpc.mountd
27 tcp6       0      0 :::30000                :::*                    LISTEN      6803/kube-proxy
28 tcp6       0      0 :::6000                 :::*                    LISTEN      7030/X
29 tcp6       0      0 :::22                   :::*                    LISTEN      6804/sshd
30 tcp6       0      0 ::1:631                 :::*                    LISTEN      6806/cupsd
31 tcp6       0      0 ::1:25                  :::*                    LISTEN      7142/master
32 tcp6       0      0 :::2049                 :::*                    LISTEN      -
33 tcp6       0      0 :::4194                 :::*                    LISTEN      30748/kubelet
34 tcp6       0      0 127.0.0.1:8005          :::*                    LISTEN      32474/java
35 udp        0      0 0.0.0.0:5353            0.0.0.0:*                           6442/avahi-daemon:
36 udp        0      0 0.0.0.0:44601           0.0.0.0:*                           -
37 udp        0      0 0.0.0.0:52808           0.0.0.0:*                           6442/avahi-daemon:
38 udp        0      0 0.0.0.0:20048           0.0.0.0:*                           89395/rpc.mountd
39 udp        0      0 0.0.0.0:58973           0.0.0.0:*                           71097/rpc.statd
40 udp        0      0 0.0.0.0:2049            0.0.0.0:*                           -
41 udp        0      0 192.168.122.1:53        0.0.0.0:*                           7281/dnsmasq
42 udp        0      0 0.0.0.0:67              0.0.0.0:*                           7281/dnsmasq
43 udp        0      0 192.168.110.134:8285    0.0.0.0:*                           6810/flanneld
44 udp        0      0 0.0.0.0:111             0.0.0.0:*                           1/systemd
45 udp        0      0 0.0.0.0:829             0.0.0.0:*                           89270/rpcbind
46 udp        0      0 127.0.0.1:889           0.0.0.0:*                           71097/rpc.statd
47 udp6       0      0 :::20048                :::*                                89395/rpc.mountd
48 udp6       0      0 :::2049                 :::*                                -
49 udp6       0      0 :::111                  :::*                                1/systemd
50 udp6       0      0 :::43464                :::*                                -
51 udp6       0      0 :::54072                :::*                                71097/rpc.statd
52 udp6       0      0 :::829                  :::*                                89270/rpcbind
53 [root@k8s-node2 logs]#
访问地址http://192.168.110.134:8080/,报错了,老问题了,但是呢,这次是我没有将jenkins.war解压缩正确导致的。
这次我将刚才解压缩的jenkins.war包和解压缩后的文件删除掉,如下所示:
1 [root@k8s-node2 webapps]# ls
2 jenkins  jenkins.war
3 [root@k8s-node2 webapps]# rm -rf *
4 [root@k8s-node2 webapps]# ls
然后执行关闭tomcat命令,如下所示:
1 [root@k8s-node2 bin]# ./shutdown.sh
2 Using CATALINA_BASE:   /app/apache-tomcat-8.5.56
3 Using CATALINA_HOME:   /app/apache-tomcat-8.5.56
4 Using CATALINA_TMPDIR: /app/apache-tomcat-8.5.56/temp
5 Using JRE_HOME:        /usr
6 Using CLASSPATH:       /app/apache-tomcat-8.5.56/bin/bootstrap.jar:/app/apache-tomcat-8.5.56/bin/tomcat-juli.jar
最后使用下面的拷贝方式,将jenkins.war包改成了ROOT.war放到webapp目录下面。
1 [root@k8s-node2 webapps]# cd ~/package/
2 [root@k8s-node2 package]# ls
3 apache-tomcat-8.5.56  apache-tomcat-8.5.56.tar.gz  jdk-8u251-linux-x64.rpm  jenkins.war
4 [root@k8s-node2 package]# cp jenkins.war /app/apache-tomcat-8.5.56/webapps/ROOT.war
5 [root@k8s-node2 package]#
查看拷贝后的webapp目录下面的文件,如下所示:
[root@k8s-node2 webapps]# ls
ROOT.war
[root@k8s-node2 webapps]# ls
ROOT  ROOT.war
[root@k8s-node2 webapps]#
启动tomcat并查看日志,并查看端口号,如下所示:
 1 [root@k8s-node2 bin]# ./startup.sh
 2 Using CATALINA_BASE:   /app/apache-tomcat-8.5.56
 3 Using CATALINA_HOME:   /app/apache-tomcat-8.5.56
 4 Using CATALINA_TMPDIR: /app/apache-tomcat-8.5.56/temp
 5 Using JRE_HOME:        /usr
 6 Using CLASSPATH:       /app/apache-tomcat-8.5.56/bin/bootstrap.jar:/app/apache-tomcat-8.5.56/bin/tomcat-juli.jar
 7 Tomcat started.
 8 [root@k8s-node2 bin]# cd ../logs/
 9 [root@k8s-node2 logs]# tailf catalina.out
10 02-Jul-2020 12:32:04.341 WARNING [http-nio-8080-exec-2] org.apache.catalina.webresources.Cache.getResource Unable to add the resource at [/help/user/fullName_pt_BR.html] to the cache for web application [] because there was insufficient free space available after evicting expired cache entries - consider increasing the maximum size of the cache
11 02-Jul-2020 12:32:04.341 WARNING [http-nio-8080-exec-2] org.apache.catalina.webresources.Cache.getResource Unable to add the resource at [/help/user/description_de.html] to the cache for web application [] because there was insufficient free space available after evicting expired cache entries - consider increasing the maximum size of the cache
12 02-Jul-2020 12:32:04.341 WARNING [http-nio-8080-exec-2] org.apache.catalina.webresources.Cache.getResource Unable to add the resource at [/help/user/fullName.html] to the cache for web application [] because there was insufficient free space available after evicting expired cache entries - consider increasing the maximum size of the cache
13 02-Jul-2020 12:32:04.341 WARNING [http-nio-8080-exec-2] org.apache.catalina.webresources.Cache.getResource Unable to add the resource at [/help/user/description_ru.html] to the cache for web application [] because there was insufficient free space available after evicting expired cache entries - consider increasing the maximum size of the cache
14 02-Jul-2020 12:32:04.342 WARNING [http-nio-8080-exec-2] org.apache.catalina.webresources.Cache.getResource Unable to add the resource at [/help/user/fullName_it.html] to the cache for web application [] because there was insufficient free space available after evicting expired cache entries - consider increasing the maximum size of the cache
15 02-Jul-2020 12:32:04.342 WARNING [http-nio-8080-exec-2] org.apache.catalina.webresources.Cache.getResource Unable to add the resource at [/bootstrap/config.json] to the cache for web application [] because there was insufficient free space available after evicting expired cache entries - consider increasing the maximum size of the cache
16 02-Jul-2020 12:32:04.342 WARNING [http-nio-8080-exec-2] org.apache.catalina.webresources.Cache.getResource Unable to add the resource at [/bootstrap/css/bootstrap.min.css] to the cache for web application [] because there was insufficient free space available after evicting expired cache entries - consider increasing the maximum size of the cache
17 02-Jul-2020 12:32:04.343 WARNING [http-nio-8080-exec-2] org.apache.catalina.webresources.Cache.getResource Unable to add the resource at [/bootstrap/css/bootstrap.css] to the cache for web application [] because there was insufficient free space available after evicting expired cache entries - consider increasing the maximum size of the cache
18 02-Jul-2020 12:32:04.343 WARNING [http-nio-8080-exec-2] org.apache.catalina.webresources.Cache.getResource Unable to add the resource at [/bootstrap/css/bootstrap-theme.css] to the cache for web application [] because there was insufficient free space available after evicting expired cache entries - consider increasing the maximum size of the cache
19 02-Jul-2020 12:32:04.343 WARNING [http-nio-8080-exec-2] org.apache.catalina.webresources.Cache.getResource Unable to add the resource at [/bootstrap/css/bootstrap-theme.min.css] to the cache for web application [] because there was insufficient free space available after evicting expired cache entries - consider increasing the maximum size of the cache
20 02-Jul-2020 12:32:05.779 INFO [pool-6-thread-3] jenkins.InitReactorRunner$1.onAttained Started initialization
21 02-Jul-2020 12:32:05.871 INFO [pool-6-thread-1] jenkins.InitReactorRunner$1.onAttained Listed all plugins
22 02-Jul-2020 12:32:07.634 INFO [pool-6-thread-2] jenkins.InitReactorRunner$1.onAttained Prepared all plugins
23 02-Jul-2020 12:32:07.639 INFO [pool-6-thread-2] jenkins.InitReactorRunner$1.onAttained Started all plugins
24 02-Jul-2020 12:32:07.667 INFO [pool-6-thread-1] jenkins.InitReactorRunner$1.onAttained Augmented all extensions
25 02-Jul-2020 12:32:08.103 INFO [pool-6-thread-1] jenkins.InitReactorRunner$1.onAttained System config loaded
26 02-Jul-2020 12:32:08.103 INFO [pool-6-thread-1] jenkins.InitReactorRunner$1.onAttained System config adapted
27 02-Jul-2020 12:32:08.103 INFO [pool-6-thread-1] jenkins.InitReactorRunner$1.onAttained Loaded all jobs
28 02-Jul-2020 12:32:08.105 INFO [pool-6-thread-2] jenkins.InitReactorRunner$1.onAttained Configuration for all jobs updated
29 02-Jul-2020 12:32:08.155 INFO [Download metadata thread] hudson.model.AsyncPeriodicWork.lambda$doRun$0 Started Download metadata
30 02-Jul-2020 12:32:08.171 INFO [Download metadata thread] hudson.model.AsyncPeriodicWork.lambda$doRun$0 Finished Download metadata. 3 ms
31 02-Jul-2020 12:32:09.264 INFO [Finalizing set up] org.springframework.context.support.AbstractApplicationContext.prepareRefresh Refreshing org.springframework.web.context.support.StaticWebApplicationContext@6a8c7465: display name [Root WebApplicationContext]; startup date [Thu Jul 02 12:32:09 CST 2020]; root of context hierarchy
32 02-Jul-2020 12:32:09.264 INFO [Finalizing set up] org.springframework.context.support.AbstractApplicationContext.obtainFreshBeanFactory Bean factory for application context [org.springframework.web.context.support.StaticWebApplicationContext@6a8c7465]: org.springframework.beans.factory.support.DefaultListableBeanFactory@3f36fb00
33 02-Jul-2020 12:32:09.276 INFO [Finalizing set up] org.springframework.beans.factory.support.DefaultListableBeanFactory.preInstantiateSingletons Pre-instantiating singletons in org.springframework.beans.factory.support.DefaultListableBeanFactory@3f36fb00: defining beans [authenticationManager]; root of factory hierarchy
34 02-Jul-2020 12:32:09.641 INFO [Finalizing set up] org.springframework.context.support.AbstractApplicationContext.prepareRefresh Refreshing org.springframework.web.context.support.StaticWebApplicationContext@5b72f3ef: display name [Root WebApplicationContext]; startup date [Thu Jul 02 12:32:09 CST 2020]; root of context hierarchy
35 02-Jul-2020 12:32:09.642 INFO [Finalizing set up] org.springframework.context.support.AbstractApplicationContext.obtainFreshBeanFactory Bean factory for application context [org.springframework.web.context.support.StaticWebApplicationContext@5b72f3ef]: org.springframework.beans.factory.support.DefaultListableBeanFactory@7af1238d
36 02-Jul-2020 12:32:09.642 INFO [Finalizing set up] org.springframework.beans.factory.support.DefaultListableBeanFactory.preInstantiateSingletons Pre-instantiating singletons in org.springframework.beans.factory.support.DefaultListableBeanFactory@7af1238d: defining beans [filter,legacy]; root of factory hierarchy
37 02-Jul-2020 12:32:09.711 INFO [pool-6-thread-3] jenkins.InitReactorRunner$1.onAttained Completed initialization
38 02-Jul-2020 12:32:09.732 INFO [Jenkins initialization thread] hudson.WebAppMain$3.run Jenkins is fully up and running
39 02-Jul-2020 12:32:13.581 INFO [ContainerBackgroundProcessor[StandardEngine[Catalina]]] org.apache.catalina.webresources.Cache.backgroundProcess The background cache eviction process was unable to free [10] percent of the cache for Context [] - consider increasing the maximum size of the cache. After eviction approximately [9,361] KB of data remained in the cache.
40 ^C
41 [root@k8s-node2 logs]# netstat -nlutp
42 Active Internet connections (only servers)
43 Proto Recv-Q Send-Q Local Address           Foreign Address         State       PID/Program name
44 tcp        0      0 0.0.0.0:24007           0.0.0.0:*               LISTEN      46232/glusterd
45 tcp        0      0 127.0.0.1:10248         0.0.0.0:*               LISTEN      30748/kubelet
46 tcp        0      0 127.0.0.1:10249         0.0.0.0:*               LISTEN      6803/kube-proxy
47 tcp        0      0 192.168.110.134:10250   0.0.0.0:*               LISTEN      30748/kubelet
48 tcp        0      0 192.168.110.134:10255   0.0.0.0:*               LISTEN      30748/kubelet
49 tcp        0      0 0.0.0.0:42863           0.0.0.0:*               LISTEN      -
50 tcp        0      0 0.0.0.0:111             0.0.0.0:*               LISTEN      1/systemd
51 tcp        0      0 0.0.0.0:20048           0.0.0.0:*               LISTEN      89395/rpc.mountd
52 tcp        0      0 0.0.0.0:6000            0.0.0.0:*               LISTEN      7030/X
53 tcp        0      0 192.168.122.1:53        0.0.0.0:*               LISTEN      7281/dnsmasq
54 tcp        0      0 0.0.0.0:22              0.0.0.0:*               LISTEN      6804/sshd
55 tcp        0      0 127.0.0.1:631           0.0.0.0:*               LISTEN      6806/cupsd
56 tcp        0      0 127.0.0.1:25            0.0.0.0:*               LISTEN      7142/master
57 tcp        0      0 0.0.0.0:34587           0.0.0.0:*               LISTEN      71097/rpc.statd
58 tcp        0      0 0.0.0.0:49152           0.0.0.0:*               LISTEN      62108/glusterfsd
59 tcp        0      0 0.0.0.0:49153           0.0.0.0:*               LISTEN      62128/glusterfsd
60 tcp        0      0 0.0.0.0:2049            0.0.0.0:*               LISTEN      -
61 tcp6       0      0 :::5000                 :::*                    LISTEN      14488/docker-proxy-
62 tcp6       0      0 :::45450                :::*                    LISTEN      -
63 tcp6       0      0 :::60684                :::*                    LISTEN      71097/rpc.statd
64 tcp6       0      0 :::111                  :::*                    LISTEN      1/systemd
65 tcp6       0      0 :::8080                 :::*                    LISTEN      39956/java
66 tcp6       0      0 :::20048                :::*                    LISTEN      89395/rpc.mountd
67 tcp6       0      0 :::30000                :::*                    LISTEN      6803/kube-proxy
68 tcp6       0      0 :::6000                 :::*                    LISTEN      7030/X
69 tcp6       0      0 :::22                   :::*                    LISTEN      6804/sshd
70 tcp6       0      0 ::1:631                 :::*                    LISTEN      6806/cupsd
71 tcp6       0      0 ::1:25                  :::*                    LISTEN      7142/master
72 tcp6       0      0 :::2049                 :::*                    LISTEN      -
73 tcp6       0      0 :::4194                 :::*                    LISTEN      30748/kubelet
74 tcp6       0      0 127.0.0.1:8005          :::*                    LISTEN      39956/java
75 udp        0      0 0.0.0.0:5353            0.0.0.0:*                           6442/avahi-daemon:
76 udp        0      0 0.0.0.0:44601           0.0.0.0:*                           -
77 udp        0      0 0.0.0.0:52808           0.0.0.0:*                           6442/avahi-daemon:
78 udp        0      0 0.0.0.0:20048           0.0.0.0:*                           89395/rpc.mountd
79 udp        0      0 0.0.0.0:58973           0.0.0.0:*                           71097/rpc.statd
80 udp        0      0 0.0.0.0:2049            0.0.0.0:*                           -
81 udp        0      0 192.168.122.1:53        0.0.0.0:*                           7281/dnsmasq
82 udp        0      0 0.0.0.0:67              0.0.0.0:*                           7281/dnsmasq
83 udp        0      0 192.168.110.134:8285    0.0.0.0:*                           6810/flanneld
84 udp        0      0 0.0.0.0:111             0.0.0.0:*                           1/systemd
85 udp        0      0 0.0.0.0:829             0.0.0.0:*                           89270/rpcbind
86 udp        0      0 127.0.0.1:889           0.0.0.0:*                           71097/rpc.statd
87 udp6       0      0 :::20048                :::*                                89395/rpc.mountd
88 udp6       0      0 :::2049                 :::*                                -
89 udp6       0      0 :::111                  :::*                                1/systemd
90 udp6       0      0 :::43464                :::*                                -
91 udp6       0      0 :::54072                :::*                                71097/rpc.statd
92 udp6       0      0 :::829                  :::*                                89270/rpcbind
93 [root@k8s-node2 logs]#
访问地址http://192.168.110.134:8080,发现已经出现了界面了,如下所示:
如果之前安装过Jenkins,可以将之前安装过的/root/.jenkins/,放置到这个目录/root目录下面,减少安装时间。如果没有安装过程,这里执行上面的步骤即可。
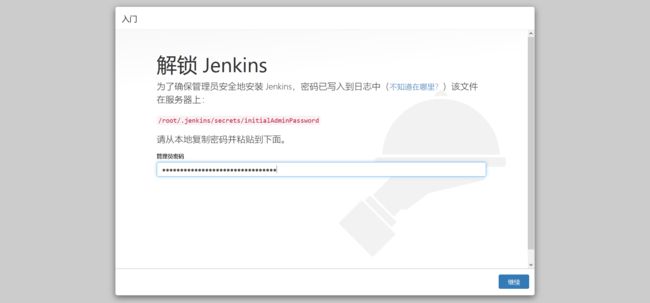
根据界面的提示,到路径 /root/.jenkins/secrets/initialAdminPassword 下找出密码,然后复制填入即可。
1 [root@k8s-node2 package]# cat /root/.jenkins/secrets/initialAdminPassword
2 1ddc1bf154b24b34bd20a10d36f6c87f
3 [root@k8s-node2 package]#
点击继续,出现下面的步骤,如下所示:
选择左侧安装推荐的插件,等待安装即可,出现下面的界面。
注意:安装插件有时下载速度奇慢,导致可能出现安装失败的情况,建议大家参考网上的这篇博客:https://www.cnblogs.com/hellxz/p/jenkins_install_plugins_faster.html。 我一开始没有使用,但是安装失败了,算了,还是抓紧搞一下。
default.json其实在Jenkins的工作目录中,其实就是在/root/.jenkins/updates/default.json,如下所示:
 1 [root@k8s-node2 .jenkins]# cd ~
 2 [root@k8s-node2 ~]# cd /root/.jenkins/
 3 [root@k8s-node2 .jenkins]#
 4 [root@k8s-node2 .jenkins]# ls
 5 config.xml                     identity.key.enc                               jenkins.install.UpgradeWizard.state  jobs  nodeMonitors.xml  plugins        secret.key                secrets  userContent
 6 hudson.model.UpdateCenter.xml  jenkins.install.InstallUtil.installingPlugins  jenkins.telemetry.Correlator.xml     logs  nodes             queue.xml.bak  secret.key.not-so-secret  updates  users
 7 [root@k8s-node2 .jenkins]# cd updates/
 8 [root@k8s-node2 updates]# ls
 9 default.json  hudson.tasks.Maven.MavenInstaller
10 [root@k8s-node2 updates]# pwd
11 /root/.jenkins/updates
12 [root@k8s-node2 updates]#
这里为了避免搞错了,先备份一下default.json配置文件,方便后来使用。这里使用参考连接里面的第二个方法,第一个再搞错了不好办了。
1 [root@k8s-node2 updates]# sed -i 's/http:\/\/updates.jenkins-ci.org\/download/https:\/\/mirrors.tuna.tsinghua.edu.cn\/jenkins/g' default.json && sed -i 's/http:\/\/www.google.com/https:\/\/www.baidu.com/g' default.json
2 [root@k8s-node2 updates]#
重启Jenkins,安装插件试试,访问http://192.168.110.134:8080/。输入密钥解锁Jenkins点击继续。
我这里之前没有使用加速安装了,导致有两个安装失败了,其他安装速度很快很快。我这里将之前安装的删除掉了,重新安装试一下,如下所示:
 1 [root@k8s-node2 ~]# ll .jenkins/
 2 total 52
 3 -rw-r-----  1 root root  475 Jul  2 17:36 com.cloudbees.hudson.plugins.folder.config.AbstractFolderConfiguration.xml
 4 -rw-r-----  1 root root 1654 Jul  2 17:39 config.xml
 5 -rw-r-----  1 root root  156 Jul  2 17:36 hudson.model.UpdateCenter.xml
 6 -rw-r-----  1 root root  370 Jul  2 17:39 hudson.plugins.git.GitTool.xml
 7 -rw-------  1 root root 1712 Jul  2 12:09 identity.key.enc
 8 -rw-r-----  1 root root    7 Jul  2 12:09 jenkins.install.UpgradeWizard.state
 9 -rw-r-----  1 root root  171 Jul  2 12:09 jenkins.telemetry.Correlator.xml
10 drwxr-x---  2 root root    6 Jul  2 12:09 jobs
11 drwxr-x---  3 root root   19 Jul  2 12:09 logs
12 -rw-r-----  1 root root  907 Jul  2 17:36 nodeMonitors.xml
13 drwxr-x---  2 root root    6 Jul  2 12:09 nodes
14 drwxr-x--- 76 root root 8192 Jul  2 17:39 plugins
15 -rw-r-----  1 root root  129 Jul  2 17:36 queue.xml.bak
16 -rw-r-----  1 root root   64 Jul  2 12:09 secret.key
17 -rw-r-----  1 root root    0 Jul  2 12:09 secret.key.not-so-secret
18 drwx------  4 root root  265 Jul  2 12:09 secrets
19 drwxr-x---  2 root root  206 Jul  2 17:39 updates
20 drwxr-x---  2 root root   24 Jul  2 12:09 userContent
21 drwxr-x---  3 root root   56 Jul  2 12:09 users
22 drwxr-x---  2 root root    6 Jul  2 17:39 workflow-libs
23 [root@k8s-node2 ~]# ls
24 anaconda-ks.cfg  Desktop  Documents  Downloads  initial-setup-ks.cfg  Music  package  Pictures  Public  Templates  Videos  桌面
25 [root@k8s-node2 ~]# rm -rf .jenkins/
26 [root@k8s-node2 ~]# ll .j
27 .java/    .jenkins/
28 [root@k8s-node2 ~]# ll .j
29 .java/    .jenkins/
30 [root@k8s-node2 ~]# ll .jenkins/
31 total 4
32 -rw-r----- 1 root root 29 Jul  2 17:42 failed-boot-attempts.txt
33 [root@k8s-node2 ~]#
关闭tomcat,然后将tomcat的webapp下面的ROOT删除掉。建议的顺序是首先关闭tomcat,然后将tomcat的webapp下面的ROOT删除掉,然后删除掉rm -rf /root/.jenkins/,不然会有残余文件。重新安装,由于我是将Jenkins的包打成了ROOT的包了,所以直接启动tomcat即可,然后访问http://192.168.110.134:8080。输入密钥解锁Jenkins点击继续。注意:记得修改default.json配置文件哈,不然等会下载还是很慢。
下载安装很快,大概不到一分钟,这里建议直接使用加速安装插件,不然会走弯路的,如下所示:
经历了机器重启,才搞到这一步,所以一定要进行加速安装插件哦,不然瞎折腾。
创建用户登录Jenkins,上面安装完插件之后,需要设置一个管理员用户。
填写信息之后,可以选择使用admin账户继续,也可以直接选择 保存并完成,根据自己情况选择。我这里点击保存并完成,然后出现下面的界面:
点击保存并完成,出现如下界面:
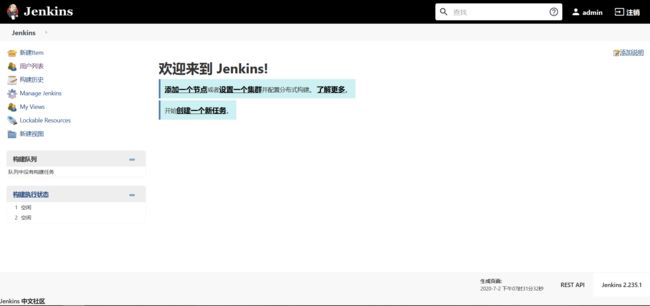
点击开始使用jenkins,如下所示:
在jenkins上创建构建项目,目的就是可以拉取自己在gitlab创建的项目,jenkins想要从gitlab上拉取项目,需要一个凭据,这里生成一个密钥对,如下所示:
 1 [root@k8s-node2 ~]# ssh-keygen -t rsa
 2 Generating public/private rsa key pair.
 3 Enter file in which to save the key (/root/.ssh/id_rsa):
 4 Created directory '/root/.ssh'.
 5 Enter passphrase (empty for no passphrase):
 6 Enter same passphrase again:
 7 Your identification has been saved in /root/.ssh/id_rsa.
 8 Your public key has been saved in /root/.ssh/id_rsa.pub.
 9 The key fingerprint is:
10 SHA256:Adk+pA0k3pYeTdy7rPW8kpG8RiXJsFKCsofEzh0Apqo root@k8s-node2
11 The key's randomart image is:
12 +---[RSA 2048]----+
13 |.+...oo+..       |
14 |o +.oo+=* .      |
15 |.+ =..=Oo+ o     |
16 |. = ooo.=.= .    |
17 |.  .  ..S+ =     |
18 |.         O      |
19 |E        + *     |
20 |        . = o    |
21 |         . ...   |
22 +----[SHA256]-----+
23 [root@k8s-node2 ~]#
此时,将公钥复制下来配置到gitlab上面,如下所示:
1 [root@k8s-node2 ~]# cat /root/.ssh/id_rsa.pub
2 ssh-rsa AAAAB3NzaC1yc2EAAAADAQABAAABAQDxL6Uzp8DoprShlTJZwtYg3+8/LS+FO+I+Gb8k4I8hRO1Q6nURUtjujgY1pSgS5j3D0XV4Ei4rwEcpNAxMlu7bQmZM1YQ+g7ot/rgBOEsveEYg1bDYiKVjPHQXv6Nulv9F+Cw5mK8NSdxeXmO1OVs42+/SFYzTCuQxBP1/b0tDRKXNIZIUKWbKHF6gpx8mmwkSy342n02AFB4L29S7KbN4U4t05LnL4UYZByAZbUG3YB9YAPs/h7IRrO0vWmbDPKlMqmGLCqYDlO1In4RTshHp05SHhjxM6Y7eYZvGTMG9ev2iJnbkDpclAnEuHZPMm+O56RwGw6HrG9ACR98s8nSJ root@k8s-node2
3 [root@k8s-node2 ~]#
将公钥配置到gltlab的settings位置,如下所示:
将公钥复制到ssh keys的位置,如下所示:
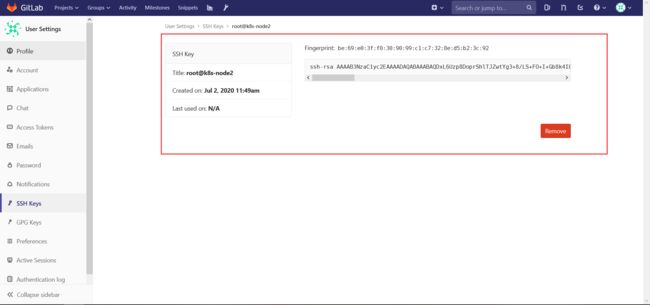
添加完公钥是这样的,如下所示:
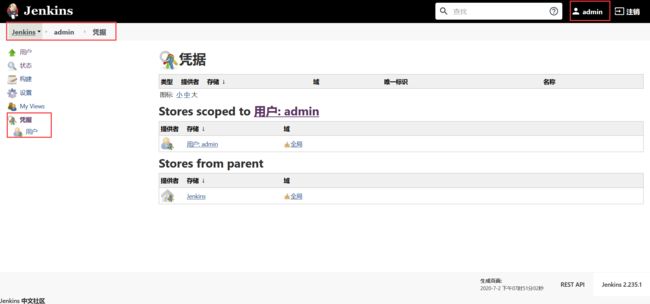
现在开始配置Jenkins的凭据,如果看不到凭据,可以点下右上角的admin哦,如下所示:
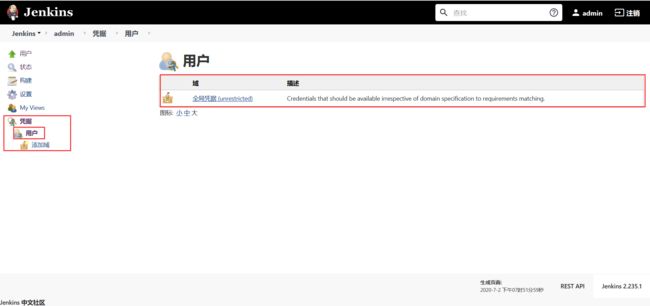
然后点击用户,看到全局凭据,点击全局凭据,如下所示:
点击全局凭据,如下所示:
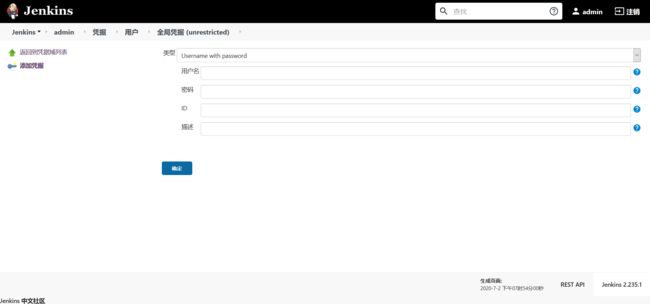
然后点击添加凭据,如下所示:
添加凭据,就是添加私钥,方便拉取 gitlab上面的代码,查看私钥并进行复制,如下所示:
 1 [root@k8s-node2 ~]# cat /root/.ssh/id_rsa
 2 -----BEGIN RSA PRIVATE KEY-----
 3 MIIEpAIBAAKCAQEA8S+lM6fA6Ka0oZUyWcLWIN/vPy0vhTviPhm/JOCPIUTtUOp1
 4 EVLY7o4GNaUoEuY9w9F1eBIuK8BHKTQMTJbu20JmTNWEPoO6Lf64AThLL3hGINWw
 5 2IilYzx0F7+jbpb/RfgsOZivDUncXl5jtTlbONvv0hWM0wrkMQT9f29LQ0SlzSGS
 6 FClmyhxeoKcfJpsJEst+Np9NgBQeC9vUuymzeFOLdOS5y+FGGQcgGW1Bt2AfWAD7
 7 P4eyEaztL1pmwzypTKphiwqmA5TtSJ+EU7IR6dOUh4Y8TOmO3mGbxkzBvXr9oiZ2
 8 5A6XJQJxLh2TzJvjuekcBsOh6xvQAkffLPJ0iQIDAQABAoIBADcfDoCJvFrvjqTH
 9 NmSxVMLaqxEjQJMQpppOxBKnh86wtBQkIXE+H/oVV3H3Nvtqx37zZgd1EDxLi3ft
10 P0pZzGkr+blhqwGmlWxhpKgSt4w3zr8+V1aFlFbjwByVXcKum9Tf7SuUq5073jNr
11 GxqV6zVJfrvi1PZ+rLxPSahQRUEwA6DI3yeokPLP5voJITcbGMSPmUfy4avAk9RP
12 /fsjPomYOBKy51zj72Bj88t8g6Qta89ttKYcdaQSJ4VkEJ8fGcNy47w6fQLlwV4y
13 kdig4CQVQrKAbTgb3wBh6KPQLfb1ATWGQ7QT1NeEISckobllOIHjG76dan6XfkKr
14 1bT5sAkCgYEA/jJko0p8NaKxvgDjymDVf0dqcFbt94VHsXhRibQSzRwOi4spKv79
15 aIn/oqbjgzugGA8FIQsL2bBz1KSyN5LHzgegg5G2TAT6XJLHnbmDP0Sp3I2IYwAp
16 vGqZ6vARYMDeJI9rML7RbXOaSV9WNdJrPQxo3ilkWxjYXKUkVXtEDIMCgYEA8uWg
17 HfxxmY+X2xQwqaVlAZ0FIzZG06CViFou8ygoeceGOjbeOAMVOMnwWDswkwY+TWpA
18 qZCoWzmbnp3xirZbnS7gYd5sXIAcoPuCpX8Y5eiDvpy4Sk0bT+95diYJTcpYrup4
19 7+UM4U22FRZuVqldOl2WKNi80V3nNYXrBrBtRQMCgYBbbZys7tmGISJ1CLTl0bZ4
20 tSMfjOTCpnmG55PMR6yLgY/puP/xqw1SUHBV/FjQlt2aSay6mdKFVeYTkblYK78Z
21 57xgFkTPSusR6OlLXbJLS1MdNPrdQO3CC0WZLwfRGQ3NcJhJTBjfmTjhMx069pgD
22 uTbu0Ux7R5BqoitTY6ayKQKBgQDPOHWEf4TO9EEiZzQo1vC4EqR6aOi9zSclH4Mk
23 cOMvGbh626pzcLXfL/C65SxIki/+zaICx2XKBfistqSFqZO5Im/NLvuVYrqJ4GiS
24 Fj9AjUAwEvXqdaPSa0RdNpADbJiCCYlJaEi3whuQHAXgKzdc/tCHYnibyZfiArEC
25 kOt3zwKBgQCy3O4dFyHRxMlbxxd/Kdapa4HjQ/dCcEX5+IqXEGe5e07lKH+UnCtt
26 km94rYbS66BppGuBoDbH9t8fmDaXWDkVPxmnMkGsNh1yG99PX5MWAj9qh4BKCnAU
27 +hXD4qmYgTCL2CiNjj+Wbk6gIxy16wKn29ARdCseDRGj0AFe6I9itg==
28 -----END RSA PRIVATE KEY-----
29 [root@k8s-node2 ~]#
点击确定之后,如下所示:
此时,在jenkins新建一个任务,如下所示:
点击创建一个新任务,如下所示:
创建一个自由风格的项目,如下所示:
可以写下描述,如下所示:
源码管理,选择git,如下所示:
将gitlab的项目地址复制过来,这里郁闷的是全局凭据无法选择,这里再配置一下吧。
报错了,无法连接仓库:Error performing git command: git ls-remote -h [email protected]:root/feiji.git HEAD。
解决方法,Jenkins服务器上查看git是否已安装及安装位置。
 1 git:[root@k8s-node2 ~]# yum install git
 2 Loaded plugins: fastestmirror, langpacks, product-id, search-disabled-repos, subscription-manager
 3
 4 This system is not registered with an entitlement server. You can use subscription-manager to register.
 5
 6 Loading mirror speeds from cached hostfile
 7 epel/x86_64/metalink                                                                                                                                                                      | 8.7 kB  00:00:00
 8  * base: mirror.bit.edu.cn
 9  * centos-gluster7: mirrors.huaweicloud.com
10  * epel: mirror.lzu.edu.cn
11  * extras: mirrors.huaweicloud.com
12  * updates: mirrors.huaweicloud.com
13 base                                                                                                                                                                                      | 3.6 kB  00:00:00
14 centos-gluster7                                                                                                                                                                           | 3.0 kB  00:00:00
15 epel                                                                                                                                                                                      | 4.7 kB  00:00:00
16 extras                                                                                                                                                                                    | 2.9 kB  00:00:00
17 updates                                                                                                                                                                                   | 2.9 kB  00:00:00
18 (1/3): epel/x86_64/updateinfo                                                                                                                                                             | 1.0 MB  00:00:00
19 (2/3): epel/x86_64/primary_db                                                                                                                                                             | 6.8 MB  00:00:02
20 (3/3): updates/7/x86_64/primary_db                                                                                                                                                        | 3.0 MB  00:00:07
21 Resolving Dependencies
22 --> Running transaction check
23 ---> Package git.x86_64 0:1.8.3.1-23.el7_8 will be installed
24 --> Processing Dependency: perl-Git = 1.8.3.1-23.el7_8 for package: git-1.8.3.1-23.el7_8.x86_64
25 --> Processing Dependency: perl(Term::ReadKey) for package: git-1.8.3.1-23.el7_8.x86_64
26 --> Processing Dependency: perl(Git) for package: git-1.8.3.1-23.el7_8.x86_64
27 --> Processing Dependency: perl(Error) for package: git-1.8.3.1-23.el7_8.x86_64
28 --> Running transaction check
29 ---> Package perl-Error.noarch 1:0.17020-2.el7 will be installed
30 ---> Package perl-Git.noarch 0:1.8.3.1-23.el7_8 will be installed
31 ---> Package perl-TermReadKey.x86_64 0:2.30-20.el7 will be installed
32 --> Finished Dependency Resolution
33
34 Dependencies Resolved
35
36 =================================================================================================================================================================================================================
37  Package                                                Arch                                         Version                                                 Repository                                     Size
38 =================================================================================================================================================================================================================
39 Installing:
40  git                                                    x86_64                                       1.8.3.1-23.el7_8                                        updates                                       4.4 M
41 Installing for dependencies:
42  perl-Error                                             noarch                                       1:0.17020-2.el7                                         base                                           32 k
43  perl-Git                                               noarch                                       1.8.3.1-23.el7_8                                        updates                                        56 k
44  perl-TermReadKey                                       x86_64                                       2.30-20.el7                                             base                                           31 k
45
46 Transaction Summary
47 =================================================================================================================================================================================================================
48 Install  1 Package (+3 Dependent packages)
49
50 Total download size: 4.5 M
51 Installed size: 22 M
52 Is this ok [y/d/N]: y
53 Downloading packages:
54 (1/4): perl-Error-0.17020-2.el7.noarch.rpm                                                                                                                                                |  32 kB  00:00:00
55 (2/4): perl-TermReadKey-2.30-20.el7.x86_64.rpm                                                                                                                                            |  31 kB  00:00:00
56 (3/4): perl-Git-1.8.3.1-23.el7_8.noarch.rpm                                                                                                                                               |  56 kB  00:00:02
57 (4/4): git-1.8.3.1-23.el7_8.x86_64.rpm                                                                                                                                                    | 4.4 MB  00:00:03
58 -----------------------------------------------------------------------------------------------------------------------------------------------------------------------------------------------------------------
59 Total                                                                                                                                                                            1.2 MB/s | 4.5 MB  00:00:03
60 Running transaction check
61 Running transaction test
62 Transaction test succeeded
63 Running transaction
64 Warning: RPMDB altered outside of yum.
65   Installing : 1:perl-Error-0.17020-2.el7.noarch                                                                                                                                                             1/4
66   Installing : perl-TermReadKey-2.30-20.el7.x86_64                                                                                                                                                           2/4
67   Installing : perl-Git-1.8.3.1-23.el7_8.noarch                                                                                                                                                              3/4
68   Installing : git-1.8.3.1-23.el7_8.x86_64                                                                                                                                                                   4/4
69   Verifying  : git-1.8.3.1-23.el7_8.x86_64                                                                                                                                                                   1/4
70   Verifying  : 1:perl-Error-0.17020-2.el7.noarch                                                                                                                                                             2/4
71   Verifying  : perl-Git-1.8.3.1-23.el7_8.noarch                                                                                                                                                              3/4
72   Verifying  : perl-TermReadKey-2.30-20.el7.x86_64                                                                                                                                                           4/4
73
74 Installed:
75   git.x86_64 0:1.8.3.1-23.el7_8
76
77 Dependency Installed:
78   perl-Error.noarch 1:0.17020-2.el7                                  perl-Git.noarch 0:1.8.3.1-23.el7_8                                  perl-TermReadKey.x86_64 0:2.30-20.el7
79
80 Complete!
81 [root@k8s-node2 ~]# git version
82 git version 1.8.3.1
83 [root@k8s-node2 ~]#
构建选择执行shell命令,如下所示:
先执行命令,看看是否可以拉取成功,如下所示:
点击保存,如下所示:
然后点击立即构建,如下所示:
然后可以看到控制台输出,已经执行成功了,如下所示:
也可以去jenkins的目录查看,可以看到已经将项目代码拉取下来了,此时说明jenkins已经没有问题了,如下所示:
 1 [root@k8s-node2 ~]# cd /root/.jenkins/
 2 [root@k8s-node2 .jenkins]# ls
 3 com.cloudbees.hudson.plugins.folder.config.AbstractFolderConfiguration.xml  hudson.plugins.git.GitTool.xml                  jenkins.telemetry.Correlator.xml  plugins                   secrets        workspace
 4 config.xml                                                                  identity.key.enc                                jobs                              queue.xml                 updates
 5 credentials.xml                                                             jenkins.install.InstallUtil.lastExecVersion     logs                              queue.xml.bak             userContent
 6 fingerprints                                                                jenkins.install.UpgradeWizard.state             nodeMonitors.xml                  secret.key                users
 7 hudson.model.UpdateCenter.xml                                               jenkins.model.JenkinsLocationConfiguration.xml  nodes                             secret.key.not-so-secret  workflow-libs
 8 [root@k8s-node2 .jenkins]# cd workspace/
 9 [root@k8s-node2 workspace]# ls
10 feiji  feiji@tmp
11 [root@k8s-node2 workspace]# cd feiji
12 [root@k8s-node2 feiji]# ls
13 img  index.html  js
14 [root@k8s-node2 feiji]#
5、构建docker镜像并测试,生产环境中,点击一下立即构建,可以立马打包一个docker镜像,可以这样做在gitlab上面提交一份Dockerfile,直接点击一下立即构建,Jenkins就执行了docker build就可以构建出了Docker镜像。现在手动写一下Dockerfile。
1 [root@k8s-node3 feiji]# vim dockerfile
2 [root@k8s-node3 feiji]#
配置内容,如下所示:
1 FROM 192.168.110.133:5000/nginx:1.13
2
3 # 将本目录下面的所有文件都加入进来
4 ADD . /usr/share/nginx/html
如果直接执行,会将dockerfile放入进去,这里将dockerfile排除掉,如下所示:
1 [root@k8s-node3 feiji]# vim .dockerignore
2 [root@k8s-node3 feiji]#
配置内容,如下所示:
1 [root@k8s-node3 feiji]# cat .dockerignore
2 dockerfile
3 [root@k8s-node3 feiji]#
构建镜像,并进行查看,如下所示:
 1 [root@k8s-node3 feiji]# docker build -t feiji:v1 .
 2 Sending build context to Docker daemon 5.057 MB
 3 Step 1/2 : FROM 192.168.110.133:5000/nginx:1.13
 4 Trying to pull repository 192.168.110.133:5000/nginx ...
 5 sha256:e4f0474a75c510f40b37b6b7dc2516241ffa8bde5a442bde3d372c9519c84d90: Pulling from 192.168.110.133:5000/nginx
 6 f2aa67a397c4: Pull complete
 7 3c091c23e29d: Pull complete
 8 4a99993b8636: Pull complete
 9 Digest: sha256:e4f0474a75c510f40b37b6b7dc2516241ffa8bde5a442bde3d372c9519c84d90
10 Status: Downloaded newer image for 192.168.110.133:5000/nginx:1.13
11  ---> ae513a47849c
12 Step 2/2 : ADD . /usr/share/nginx/html
13  ---> b33766b3a721
14 Removing intermediate container 50b188475556
15 Successfully built b33766b3a721
16 [root@k8s-node3 feiji]# docker images | grep feiji
17 feiji                                             v1                  b33766b3a721        13 seconds ago      114 MB
18 [root@k8s-node3 feiji]#
现在开始进行测试看看是否正常,直接启动一个容器,想自动构建镜像,首先看看手动是否可以成功,如下所示:
1 # 88端口映射到80端口号上
2 [root@k8s-node3 feiji]# docker run -d -p 88:80 feiji:v1
3 9a068575fdc98a7bd195fae564bc6645cca356982f95cb58eb97522cba9e3f18
4 [root@k8s-node3 feiji]#
访问地址,http://192.168.110.135:88/
此时项目已经构建成功了,手动构建项目是ok的。现在将刚才的命令结合jenkins进行实现,此时将这两个文件dockerfile、.dockerignore添加到我们的仓库里面去。
 1 [root@k8s-node3 feiji]# ls
 2 css  dockerfile  img  index.html  js
 3 [root@k8s-node3 feiji]# git add .
 4 [root@k8s-node3 feiji]# git commit -m 'first update feiji'
 5 [master caba46a] first update feiji
 6  2 files changed, 9 insertions(+)
 7  create mode 100644 .dockerignore
 8  create mode 100644 dockerfile
 9 [root@k8s-node3 feiji]# git push -u origin master
10 Username for 'http://192.168.110.135': root
11 Password for 'http://[email protected]':
12 Counting objects: 5, done.
13 Delta compression using up to 2 threads.
14 Compressing objects: 100% (3/3), done.
15 Writing objects: 100% (4/4), 507 bytes | 0 bytes/s, done.
16 Total 4 (delta 0), reused 0 (delta 0)
17 To http://192.168.110.135/root/feiji.git
18    6a6a1d5..caba46a  master -> master
19 Branch master set up to track remote branch master from origin.
20 [root@k8s-node3 feiji]#
此时,来gitlab进行查看,已经发生了改变,已经将两个文件dockerfile、.dockerignore上传上去了,如下所示:
此时,gitlab已经修改了,此时需要更新Jenkins,点击项目的设置,如下所示:
1 # 代码拉取下来之后,执行构建镜像,构建仓库的时候写上私有仓库的地址
2 docker build -t 192.168.110.133:5000/feiji:v1 .
3 # 上传到私有仓库里面
4 docker push 192.168.110.133:5000/feiji:v1
此时,再次点击立即构建,等会查看私有仓库是否有该镜像,如下所示:
此时,发现已经构建成功了。此时存在的问题就是,如果再次点击立即构建,代码版本还是v1版本,会将之前的历史版本替换了,此时如何做到保留历史版本,这里每次立即构建的时候,需要每次更新Vx的版本,修改项目配置里面的变量。使用jenkins环境变量BUILD_ID。
这样就保证每次的版本就会更新的了,这样就解决了版本更新的问题。
此时,还有一个问题,除了版本更新的问题之外,还有一个问题就是每次更新并没有进行代码的更新,如果代码没有发生变化,此时不应该生成新的镜像。
1 #!/bin/bash
2 if [ $GIT_PREVIOUS_SUCCESSFUL_COMMIT == $GIT_COMMIT ];then
3     echo "no change,skip build"
4     exit 0
5 else
6     echo "git pull commit id not equals to current commit id trigger build"
7 fi
此时,尝试立即构建,但是没有进行任何更新,如下所示:

