Android8.0源码解析——Activity的启动过程
前言
1、Activity的生命周期:
2、Activity的启动模式
3、Activity的启动进程
4、Intent 启动 Activity
5、Activity启动源码分析
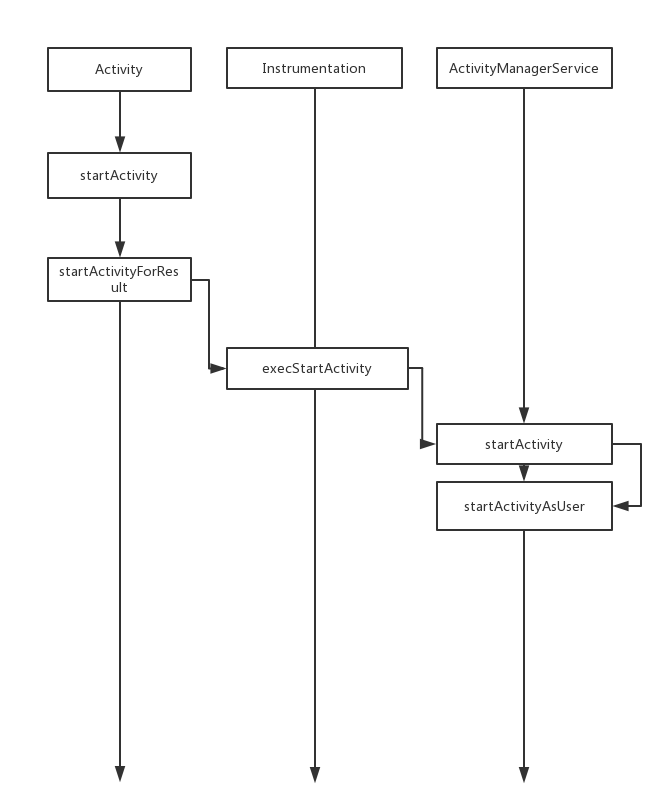
1、从Activity到ActivityManagerService。

@Override
public void startActivity(Intent intent) {
    this.startActivity(intent, null);
}@Override
public void startActivity(Intent intent, @Nullable Bundle options) {
if (options != null) {
startActivityForResult(intent, -1, options);
} else {
// Note we want to go through this call for compatibility with
// applications that may have overridden the method.
startActivityForResult(intent, -1);
}
}public void startActivityForResult(@RequiresPermission Intent intent, int requestCode) {
startActivityForResult(intent, requestCode, null);
}public void startActivityForResult(@RequiresPermission Intent intent, int requestCode,
@Nullable Bundle options) {
if (mParent == null) {
options = transferSpringboardActivityOptions(options);
Instrumentation.ActivityResult ar =
mInstrumentation.execStartActivity(
this, mMainThread.getApplicationThread(), mToken, this,
intent, requestCode, options);
if (ar != null) {
mMainThread.sendActivityResult(
mToken, mEmbeddedID, requestCode, ar.getResultCode(),
ar.getResultData());
}
if (requestCode >= 0) {
// If this start is requesting a result, we can avoid making
// the activity visible until the result is received. Setting
// this code during onCreate(Bundle savedInstanceState) or onResume() will keep the
// activity hidden during this time, to avoid flickering.
// This can only be done when a result is requested because
// that guarantees we will get information back when the
// activity is finished, no matter what happens to it.
mStartedActivity = true;
}
cancelInputsAndStartExitTransition(options);
// TODO Consider clearing/flushing other event sources and events for child windows.
} else {
if (options != null) {
mParent.startActivityFromChild(this, intent, requestCode, options);
} else {
// Note we want to go through this method for compatibility with
// existing applications that may have overridden it.
mParent.startActivityFromChild(this, intent, requestCode);
}
}
} /**
* This method throws {@link android.content.ActivityNotFoundException}
* if there was no Activity found to run the given Intent.
*
* @param who The Context from which the activity is being started.(Activity对象)
* @param contextThread The main thread of the Context from which the activity
* is being started.(Binder对象,是主进程的context对象)
* @param token Internal token identifying to the system who is starting
* the activity; may be null.(也是一个Binder对象,指向了服务端一个ActivityRecord对象)
* @param target Which activity is performing the start (and thus receiving
* any result); may be null if this call is not being made
* from an activity.(为启动的Activity)
* @param intent The actual Intent to start.(启动的Intent对象)
* @param requestCode Identifier for this request's result; less than zero
* if the caller is not expecting a result.(请求码)
* @param options Addition options.(参数)
*
* @return To force the return of a particular result, return an
* ActivityResult object containing the desired data; otherwise
* return null. The default implementation always returns null.
*
* @throws android.content.ActivityNotFoundException
*
* @see Activity#startActivity(Intent)
* @see Activity#startActivityForResult(Intent, int)
* @see Activity#startActivityFromChild
*
* {@hide}
*/
public ActivityResult execStartActivity(
Context who, IBinder contextThread, IBinder token, Activity target,
Intent intent, int requestCode, Bundle options) {
IApplicationThread whoThread = (IApplicationThread) contextThread;
Uri referrer = target != null ? target.onProvideReferrer() : null;
if (referrer != null) {
intent.putExtra(Intent.EXTRA_REFERRER, referrer);
}
......
try {
intent.migrateExtraStreamToClipData();
intent.prepareToLeaveProcess(who);
int result = ActivityManager.getService()
.startActivity(whoThread, who.getBasePackageName(), intent,
intent.resolveTypeIfNeeded(who.getContentResolver()),
token, target != null ? target.mEmbeddedID : null,
requestCode, 0, null, options);
checkStartActivityResult(result, intent);
} catch (RemoteException e) {
throw new RuntimeException("Failure from system", e);
}
return null;
}
public static IActivityManager getService() {
    return IActivityManagerSingleton.get();
}private static final Singleton IActivityManagerSingleton =
new Singleton() {
@Override
protected IActivityManager create() {
final IBinder b = ServiceManager.getService(Context.ACTIVITY_SERVICE);
final IActivityManager am = IActivityManager.Stub.asInterface(b);
return am;
}
}; public class ActivityManagerService extends IActivityManager.Stub
implements Watchdog.Monitor, BatteryStatsImpl.BatteryCallback {
......
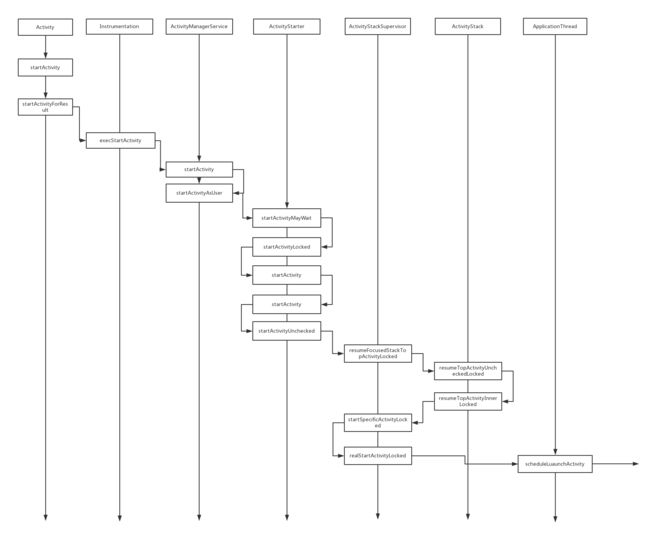
}2、从ActivityManagerService 到ApplicationThread
@Override
public final int startActivity(IApplicationThread caller, String callingPackage,
        Intent intent, String resolvedType, IBinder resultTo, String resultWho, int requestCode,
        int startFlags, ProfilerInfo profilerInfo, Bundle bOptions) {
    return startActivityAsUser(caller, callingPackage, intent, resolvedType, resultTo,
            resultWho, requestCode, startFlags, profilerInfo, bOptions,
            UserHandle.getCallingUserId());
}@Override
public final int startActivityAsUser(IApplicationThread caller, String callingPackage,
Intent intent, String resolvedType, IBinder resultTo, String resultWho, int requestCode,
int startFlags, ProfilerInfo profilerInfo, Bundle bOptions, int userId) {
enforceNotIsolatedCaller("startActivity");
userId = mUserController.handleIncomingUser(Binder.getCallingPid(), Binder.getCallingUid(),
userId, false, ALLOW_FULL_ONLY, "startActivity", null);
// TODO: Switch to user app stacks here.
return mActivityStarter.startActivityMayWait(caller, -1, callingPackage, intent,
resolvedType, null, null, resultTo, resultWho, requestCode, startFlags,
profilerInfo, null, null, bOptions, false, userId, null, null,
"startActivityAsUser");
} final int startActivityMayWait(IApplicationThread caller, int callingUid,
String callingPackage, Intent intent, String resolvedType,
IVoiceInteractionSession voiceSession, IVoiceInteractor voiceInteractor,
IBinder resultTo, String resultWho, int requestCode, int startFlags,
ProfilerInfo profilerInfo, WaitResult outResult,
Configuration globalConfig, Bundle bOptions, boolean ignoreTargetSecurity, int userId,
IActivityContainer iContainer, TaskRecord inTask, String reason) {
.........code............
synchronized (mService) {
......code...............
//启动Activity
int res = startActivityLocked(caller, intent, ephemeralIntent, resolvedType,
aInfo, rInfo, voiceSession, voiceInteractor,
resultTo, resultWho, requestCode, callingPid,
callingUid, callingPackage, realCallingPid, realCallingUid, startFlags,
options, ignoreTargetSecurity, componentSpecified, outRecord, container,
inTask, reason);
Binder.restoreCallingIdentity(origId);
//如果配置Configration发生变化,则调用AMS的updateConfigurationLocked进行处理
if (stack.mConfigWillChange) {
// If the caller also wants to switch to a new configuration,
// do so now. This allows a clean switch, as we are waiting
// for the current activity to pause (so we will not destroy
// it), and have not yet started the next activity.
//如果调用方也希望切换到新配置
//现在就这样做。这允许一个干净的开关,因为我们正在等待
//为当前活动暂停(因此我们不会破坏)
//它还没有启动下一个活动。
mService.enforceCallingPermission(android.Manifest.permission.CHANGE_CONFIGURATION,
"updateConfiguration()");
stack.mConfigWillChange = false;
if (DEBUG_CONFIGURATION) Slog.v(TAG_CONFIGURATION,
"Updating to new configuration after starting activity.");
mService.updateConfigurationLocked(globalConfig, null, false);
}
..........code..........
mSupervisor.mActivityMetricsLogger.notifyActivityLaunched(res, outRecord[0]);
return res;
}
}int startActivityLocked(IApplicationThread caller, Intent intent, Intent ephemeralIntent,
String resolvedType, ActivityInfo aInfo, ResolveInfo rInfo,
IVoiceInteractionSession voiceSession, IVoiceInteractor voiceInteractor,
IBinder resultTo, String resultWho, int requestCode, int callingPid, int callingUid,
String callingPackage, int realCallingPid, int realCallingUid, int startFlags,
ActivityOptions options, boolean ignoreTargetSecurity, boolean componentSpecified,
ActivityRecord[] outActivity, ActivityStackSupervisor.ActivityContainer container,
TaskRecord inTask, String reason) {
//判断启动的理由不为空
if (TextUtils.isEmpty(reason)) {
throw new IllegalArgumentException("Need to specify a reason.");
}
mLastStartReason = reason;
mLastStartActivityTimeMs = System.currentTimeMillis();
mLastStartActivityRecord[0] = null;
mLastStartActivityResult = startActivity(caller, intent, ephemeralIntent, resolvedType,
aInfo, rInfo, voiceSession, voiceInteractor, resultTo, resultWho, requestCode,
callingPid, callingUid, callingPackage, realCallingPid, realCallingUid, startFlags,
options, ignoreTargetSecurity, componentSpecified, mLastStartActivityRecord,
container, inTask);
if (outActivity != null) {
// mLastStartActivityRecord[0] is set in the call to startActivity above.
outActivity[0] = mLastStartActivityRecord[0];
}
return mLastStartActivityResult;
}private int startActivity(IApplicationThread caller, Intent intent, Intent ephemeralIntent,
String resolvedType, ActivityInfo aInfo, ResolveInfo rInfo,
IVoiceInteractionSession voiceSession, IVoiceInteractor voiceInteractor,
IBinder resultTo, String resultWho, int requestCode, int callingPid, int callingUid,
String callingPackage, int realCallingPid, int realCallingUid, int startFlags,
ActivityOptions options, boolean ignoreTargetSecurity, boolean componentSpecified,
ActivityRecord[] outActivity, ActivityStackSupervisor.ActivityContainer container,
TaskRecord inTask) {
int err = ActivityManager.START_SUCCESS;
// Pull the optional Ephemeral Installer-only bundle out of the options early.
final Bundle verificationBundle
= options != null ? options.popAppVerificationBundle() : null;
ProcessRecord callerApp = null;
if (caller != null) {
//获取launcher进程
callerApp = mService.getRecordForAppLocked(caller);
if (callerApp != null) {
//获取launcher进程的pid 和Uid并赋值
callingPid = callerApp.pid;
callingUid = callerApp.info.uid;
} else {
Slog.w(TAG, "Unable to find app for caller " + caller
+ " (pid=" + callingPid + ") when starting: "
+ intent.toString());
err = ActivityManager.START_PERMISSION_DENIED;
}
}
..............code.................
//创建将要启动的Activity的描述类ActivityRecord
ActivityRecord r = new ActivityRecord(mService, callerApp, callingPid, callingUid,
callingPackage, intent, resolvedType, aInfo, mService.getGlobalConfiguration(),
resultRecord, resultWho, requestCode, componentSpecified, voiceSession != null,
mSupervisor, container, options, sourceRecord);
if (outActivity != null) {
outActivity[0] = r;
}
..........code...............
doPendingActivityLaunchesLocked(false);
return startActivity(r, sourceRecord, voiceSession, voiceInteractor, startFlags, true,
options, inTask, outActivity);
}private int startActivity(final ActivityRecord r, ActivityRecord sourceRecord,
IVoiceInteractionSession voiceSession, IVoiceInteractor voiceInteractor,
int startFlags, boolean doResume, ActivityOptions options, TaskRecord inTask,
ActivityRecord[] outActivity) {
int result = START_CANCELED;
try {
mService.mWindowManager.deferSurfaceLayout();
result = startActivityUnchecked(r, sourceRecord, voiceSession, voiceInteractor,
startFlags, doResume, options, inTask, outActivity);
} finally {
// If we are not able to proceed, disassociate the activity from the task. Leaving an
// activity in an incomplete state can lead to issues, such as performing operations
// without a window container.
if (!ActivityManager.isStartResultSuccessful(result)
&& mStartActivity.getTask() != null) {
mStartActivity.getTask().removeActivity(mStartActivity);
}
mService.mWindowManager.continueSurfaceLayout();
}
postStartActivityProcessing(r, result, mSupervisor.getLastStack().mStackId, mSourceRecord,
mTargetStack);
return result;
}// Note: This method should only be called from {@link startActivity}.
private int startActivityUnchecked(final ActivityRecord r, ActivityRecord sourceRecord,
IVoiceInteractionSession voiceSession, IVoiceInteractor voiceInteractor,
int startFlags, boolean doResume, ActivityOptions options, TaskRecord inTask,
ActivityRecord[] outActivity) {
......code......
// Should this be considered a new task?
int result = START_SUCCESS;
if (mStartActivity.resultTo == null && mInTask == null && !mAddingToTask
&& (mLaunchFlags & FLAG_ACTIVITY_NEW_TASK) != 0) {//
newTask = true;
//创建新的TaskRecord
result = setTaskFromReuseOrCreateNewTask(
taskToAffiliate, preferredLaunchStackId, topStack);
} else if (mSourceRecord != null) {
result = setTaskFromSourceRecord();
} else if (mInTask != null) {
result = setTaskFromInTask();
} else {
// This not being started from an existing activity, and not part of a new task...
// just put it in the top task, though these days this case should never happen.
setTaskToCurrentTopOrCreateNewTask();
}
if (result != START_SUCCESS) {
return result;
}
......code......
if (mDoResume) {
final ActivityRecord topTaskActivity =
mStartActivity.getTask().topRunningActivityLocked();
if (!mTargetStack.isFocusable()
|| (topTaskActivity != null && topTaskActivity.mTaskOverlay
&& mStartActivity != topTaskActivity)) {
mTargetStack.ensureActivitiesVisibleLocked(null, 0, !PRESERVE_WINDOWS);
mWindowManager.executeAppTransition();
} else {
if (mTargetStack.isFocusable() && !mSupervisor.isFocusedStack(mTargetStack)) {
mTargetStack.moveToFront("startActivityUnchecked");
}
mSupervisor.resumeFocusedStackTopActivityLocked(mTargetStack, mStartActivity,
mOptions);
}
} else {
mTargetStack.addRecentActivityLocked(mStartActivity);
}
mSupervisor.updateUserStackLocked(mStartActivity.userId, mTargetStack);
mSupervisor.handleNonResizableTaskIfNeeded(mStartActivity.getTask(), preferredLaunchStackId,
preferredLaunchDisplayId, mTargetStack.mStackId);
return START_SUCCESS;
} boolean resumeFocusedStackTopActivityLocked(
ActivityStack targetStack, ActivityRecord target, ActivityOptions targetOptions) {
if (targetStack != null && isFocusedStack(targetStack)) {
return targetStack.resumeTopActivityUncheckedLocked(target, targetOptions);
}
final ActivityRecord r = mFocusedStack.topRunningActivityLocked();
if (r == null || r.state != RESUMED) {
mFocusedStack.resumeTopActivityUncheckedLocked(null, null);
} else if (r.state == RESUMED) {
// Kick off any lingering app transitions form the MoveTaskToFront operation.
mFocusedStack.executeAppTransition(targetOptions);
}
return false;
} boolean resumeTopActivityUncheckedLocked(ActivityRecord prev, ActivityOptions options) {
if (mStackSupervisor.inResumeTopActivity) {
// Don't even start recursing.
return false;
}
boolean result = false;
try {
// Protect against recursion.
mStackSupervisor.inResumeTopActivity = true;
result = resumeTopActivityInnerLocked(prev, options);
} finally {
mStackSupervisor.inResumeTopActivity = false;
}
// When resuming the top activity, it may be necessary to pause the top activity (for
// example, returning to the lock screen. We suppress the normal pause logic in
// {@link #resumeTopActivityUncheckedLocked}, since the top activity is resumed at the end.
// We call the {@link ActivityStackSupervisor#checkReadyForSleepLocked} again here to ensure
// any necessary pause logic occurs.
mStackSupervisor.checkReadyForSleepLocked();
return result;
}private boolean resumeTopActivityInnerLocked(ActivityRecord prev, ActivityOptions options) {
......code......
mStackSupervisor.startSpecificActivityLocked(next, true, true);
}
if (DEBUG_STACK) mStackSupervisor.validateTopActivitiesLocked();
return true;
} void startSpecificActivityLocked(ActivityRecord r,
boolean andResume, boolean checkConfig) {
// Is this activity's application already running?获取将要启动Activity所在应用程序的进程
ProcessRecord app = mService.getProcessRecordLocked(r.processName,
r.info.applicationInfo.uid, true);
r.getStack().setLaunchTime(r);
if (app != null && app.thread != null) {
try {
if ((r.info.flags&ActivityInfo.FLAG_MULTIPROCESS) == 0
|| !"android".equals(r.info.packageName)) {
// Don't add this if it is a platform component that is marked
// to run in multiple processes, because this is actually
// part of the framework so doesn't make sense to track as a
// separate apk in the process.
app.addPackage(r.info.packageName, r.info.applicationInfo.versionCode,
mService.mProcessStats);
}
realStartActivityLocked(r, app, andResume, checkConfig);
return;
} catch (RemoteException e) {
Slog.w(TAG, "Exception when starting activity "
+ r.intent.getComponent().flattenToShortString(), e);
}
// If a dead object exception was thrown -- fall through to
// restart the application.
}
mService.startProcessLocked(r.processName, r.info.applicationInfo, true, 0,
"activity", r.intent.getComponent(), false, false, true);
}final boolean realStartActivityLocked(ActivityRecord r, ProcessRecord app,
boolean andResume, boolean checkConfig) throws RemoteException {
...
app.thread.scheduleLaunchActivity(new Intent(r.intent), r.appToken,
System.identityHashCode(r), r.info, new Configuration(mService.mConfiguration),
new Configuration(task.mOverrideConfig), r.compat, r.launchedFromPackage,
task.voiceInteractor, app.repProcState, r.icicle, r.persistentState, results,
newIntents, !andResume, mService.isNextTransitionForward(), profilerInfo);
...
return true;
}总结
