之前写过一个基于反射的IOCdemo,可以免去findViewById代码,但是效率较低,今天介绍一下基于AbstractProcessor的实现方案,类似于ButterKnife
原理
在编译时,搜索所有被BindView注解的字段,然后解析注解,根据注解值动态生成java代码,并编译成class文件,这样就不会有运行时反射来拖低效率了。
创建4个module
- app(android library)主工程,框架使用者
- annotation-lib(java library)定义注解
- butterknifelib(android library)向使用者暴露方法
- annotation-compile(java library)注解处理,生成代码
Module——annotation-lib
定义一个注解,如下,表示是作用在field上的,并且在编译时保留,运行时丢弃
@Target(ElementType.FIELD)
@Retention(RetentionPolicy.CLASS)
public @interface BindView {
    int value();
}
Module——annotation-compile
- 该库中定义了注解处理器,注解处理器在使用前需要先向JVM注册,在module的META-INF目录下新建services目录,并创建一个名为javax.annotation.processing.Processor的文件,在此文件内逐行声明注解处理器。同样地,此处需要声明的也是处理器类的完全限定名。
- 另一个简便的方法是使用Google提供的auto-services库,在build.gradle中引入com.google.auto.service:auto-service:1.0-rc2,并在处理器类上添加注解@AutoService(Processor.class),auto-services也是一个注解处理器,会在编译时为该module生成声明文件。
这个库是专门用来处理注解的,所以不需要打包到apk中,所以依赖这个库的时候,用annotationProcessor依赖即可,当然用compile或implementation也可以,只不过最后会被打包在apk中,build一下,看看apk就知道了
dependencies {
    ...
    //这个库只在编译时用,所以应该用annotationProcessor(apt停止更新,用google的这个来代替)
    //如果这里用implementation也可以,只不过是最后会被打包到apk
    annotationProcessor project(':annotation-compile')
}
注解处理器
继承自AbstractProcessor,并且向JVM注册(注册方法上面说了),此时,在编译期间,就会遍历AbstractProcessor的所有子类,把这些类可接受的注解所有对应TypeElement(注意是TypeElement,即class这个节点)传到process方法
Element表示一个节点,可以是方法、字段、类等,类的继承结构如图:
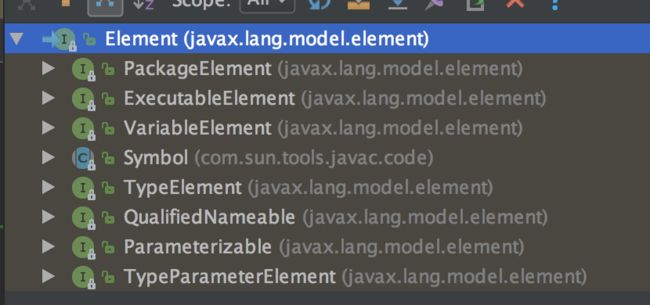
| Element的子类 | 介绍 |
|---|---|
| ExecutableElement | 表示某个类或接口的方法、构造方法或初始化程序(静态或实例),包括注释类型元素。 |
| PackageElement | 表示一个包程序元素。 |
| TypeElement | 表示一个类或接口程序元素。 |
| TypeParameterElement | 表示一般类、接口、方法或构造方法元素的形式类型参数。 |
| VariableElement | 表示一个字段、enum 常量、方法或构造方法参数、局部变量或异常参数。 |
用代码来说明一下
package com.example;    // PackageElement
public class Demo {        // TypeElement
    private int a;      // VariableElement
    private Demo other;  // VariableElement
    public Demo () {}    // ExecuteableElement
    public void setA (  // ExecuteableElement
        int newA   // TypeParameterElement
    ) {}
}
以下是注解处理器的定义方式
/**
 * Created by xuekai on 2017/11/20.
 */
@AutoService(Processor.class)//该注解是为了在编译时为该module生成声明文件。
//使用它需要在build.gradle中指定compile 'com.google.auto.service:auto-service:1.0-rc3'
public class BindViewProcessor extends AbstractProcessor {
    @Override
    public Set getSupportedAnnotationTypes() {
        //可处理的注解的集合
        HashSet annotations = new HashSet<>();
        String canonicalName = BindView.class.getCanonicalName();
        annotations.add(canonicalName);
        return annotations;
    }

    @Override
    public SourceVersion getSupportedSourceVersion() {
        return SourceVersion.latestSupported();
    }

    @Override
    public boolean process(Set annotations, RoundEnvironment roundEnv) {
        // TODO: by xk 2017/11/20 17:52 处理注解
        return false;
    }
}
接下来,我们要在process()方法中进行代码的生成,ButterKnife框架会对每个Activity生成一个对应的类,所以,我们创建一个map,key为Activity的标识,value为该类内部的所有被BindView注解标注的字段的信息,然后给这个map中填充数据,填充完毕之后,就可以根据这个map来生成对应的class了,一个key对应一个class。
/**
 * 一个被bindview注解的view字段的信息
 */
 class BindViewInfo {
        int id;
        String name;
        TypeMirror typeMirror;

        public BindViewInfo(int id, String name, TypeMirror typeMirror) {
            this.id = id;
            this.name = name;
            this.typeMirror = typeMirror;
        }

        @Override
        public String toString() {
            return "BindViewInfo{" +
                    "id=" + id +
                    ", name='" + name + '\'' +
                    ", typeMirror=" + typeMirror +
                    '}';
        }
}
@Override
    public boolean process(Set annotations, RoundEnvironment roundEnv) {
        System.err.println("process");
        //key为一个类(typeElement)Activity,value为这个类里被BindView注解的view的信息
        Map> bindViewMap = new HashMap<>();
        for (Element element : roundEnv.getElementsAnnotatedWith(BindView.class)) {
            if (element.getKind() != ElementKind.FIELD) {
                error("注解必须要在field上", element);
                return false;
            }
            //注解上的value
            int viewId = element.getAnnotation(BindView.class).value();
            VariableElement viewElement = (VariableElement) element;
            //该注解所属的类(该方法可以获取到包裹这个Element的往外一层的element,变量外层即类)
            TypeElement typeElement = ((TypeElement) viewElement.getEnclosingElement());
            if (!bindViewMap.containsKey(typeElement)) {
                bindViewMap.put(typeElement, new ArrayList<>());
            }
            List bindViewInfos = bindViewMap.get(typeElement);
            bindViewInfos.add(new BindViewInfo(viewId,viewElement.getSimpleName().toString(),viewElement.asType()));
        }
        bindViewMap.forEach((typeElement, bindViewInfos) -> {
            System.err.println("↓↓↓↓↓↓↓↓"+typeElement);
            for (BindViewInfo bindViewInfo : bindViewInfos) {
                System.err.println("bindViewInfo"+bindViewInfo);
            }
        });
        return false;
    }
以上,就把所有的bindview注解的view收集起来了,并且按照所属的activity分开了,接下来就是通过这个map集合,生成对应的java代码了。
下面是一个要生成的代码模板
package com.xk.butterknifedemo;

import com.xk.butterknifelib.ViewBinder;

/**
 * Created by xuekai on 2017/11/21.
 */

public class AutoSampleCode implements ViewBinder{
    @Override
    public void bind(T activity) {
        activity.textView=activity.findViewById(R.id.textView);
    }
}
根据以上模板生成对于的代码,这里有两种方法
- 直接用拼接字符串的方法,拼接java代码,然后通过Filer对象生成。
@Override
    public boolean process(Set annotations, RoundEnvironment roundEnv) {
    ....
    generateCodeByStringBuffer(bindViewMap);
    return false;
    }
    private void generateCodeByStringBuffer(Map> bindViewMap) {
        //遍历map,对于每个key,都生成一个java文件
        bindViewMap.forEach((typeElement, bindViewInfos) -> {
            generateJavaClassBySb(typeElement, bindViewInfos);
        });
    }
    //根据typeElement(activity的element)和他所对应的所有的被注解的字段,生成java文件
    private void generateJavaClassBySb(TypeElement typeElement, List bindViewInfos) {
        try {
            StringBuffer sb = new StringBuffer();
            sb.append("package ");
            sb.append(elementUtils.getPackageOf(typeElement).getQualifiedName()+";\n");
            sb.append("import com.xk.butterknifelib.ViewBinder;\n");
            sb.append("public class "+typeElement.getSimpleName()+"$$ViewBinder implements ViewBinder {\n");
            sb.append("@Override\n");
            sb.append("public void bind(T activity) {\n");

            for (BindViewInfo bindViewInfo : bindViewInfos) {
                sb.append("activity."+bindViewInfo.name+"=activity.findViewById("+bindViewInfo.id+");\n");

            }
            sb.append("}\n}");
            JavaFileObject sourceFile = filer.createSourceFile(typeElement.getQualifiedName().toString() + "$$ViewBinder");
            Writer writer = sourceFile.openWriter();
            writer.write(sb.toString());
            writer.close();
        } catch (IOException e) {
            e.printStackTrace();
        }
    }
- 利用JavaPoet框架生成,需要依赖
implementation 'com.squareup:javapoet:1.7.0',通过这篇文章可以学习该框架
附上一张图
 image.png
private void generateJavaClassByJavaPoet(TypeElement typeElement, List bindViewInfos) {
        String packageName = elementUtils.getPackageOf(typeElement).getQualifiedName().toString();

        ClassName t = ClassName.bestGuess("T");
        ClassName viewBinder = ClassName.bestGuess("com.xk.butterknifelib.ViewBinder");
//        ParameterSpec.builder(Typen)
        //方法
        MethodSpec.Builder methodSpecBuilder = MethodSpec.methodBuilder("bind")
                .addAnnotation(Override.class)
                .addModifiers(Modifier.PUBLIC)
                .returns(void.class)
                .addParameter(t, "activity");
        MethodSpec methodSpec;
        for (BindViewInfo bindViewInfo : bindViewInfos) {
            methodSpecBuilder.addStatement("activity.$L=activity.findViewById($L)", bindViewInfo.name,bindViewInfo.id);
        }
        methodSpec = methodSpecBuilder.build();
        //类
        TypeSpec typeSpec = TypeSpec.classBuilder(typeElement.getSimpleName() + "$$ViewBinder")//设置类名
                .addModifiers(Modifier.PUBLIC)//添加修饰符
                .addTypeVariable(TypeVariableName.get("T", TypeName.get(typeElement.asType())))//添加泛型声明
                .addMethod(methodSpec)//添加方法
                .addSuperinterface(ParameterizedTypeName.get(viewBinder, t))//添加实现接口
                .build();


        //通过包名和TypeSpec(类)生成一个java文件
        JavaFile build = JavaFile.builder(packageName, typeSpec).build();
        try {
            //写入到filer中
            build.writeTo(filer);
        } catch (IOException e) {
            e.printStackTrace();
        }
    }