JavaNIO 学习笔记(一) Buffer类源码解读
一、简介
最近在学习javaNIO的知识,为了加深理解,借用此篇文章巩固所学。
Java NIO 相关的类在 JDK1.4 中被引入,用于提高IO的效率。实际上,旧的I/O包已经使用NIO重新实现过,因此我们不显示使用NIO编程,也能从中受益。Java NIO包含了许多东西,但核心的东西主要是 Buffer、Channel、Selector。本文将重点介绍这几部分。
速度的提高源于其使用的结构更像操作系统的执行I/O的方式:通道和缓冲器。我们可以将通道想象成一个矿藏,而缓冲器则是派送到矿藏的卡车。卡车载满矿石,我们在从卡车上获取矿石。也就是说我们没有直接与矿藏进行交互。通道要么向缓冲器发送数据,要么从缓冲器获取数据。
二、Buffer
唯一与通道进行交互的的缓冲器是ByteBuffer。
1、继承体系
Buffer的子类允许以原始字节形式或者基本数据类型输出和读取数据。但是没有办法输出或者读取对象,即使是字符串也不行。

2、源码分析以及相关的操作
2.1 ByteBuffer初始化
bytebuffer初始话可以通过allocate()、allocateDirect()、wrap()方法,这里以allocate()源码为例。其实ByteBuffer底层就是字节数组。
// ByteBuffer为抽象类,无法实例化
public abstract class ByteBuffer
    extends Buffer
    implements Comparable
{
	。。。
}

// 调用ByteBuffer.allocate()方法后,返回其子类HeapByteBuffer实例,即实际创建的是其子类HeapByteBuffer类。

 public static ByteBuffer allocate(int capacity) {
        if (capacity < 0)
            throw new IllegalArgumentException();
        return new HeapByteBuffer(capacity, capacity);
    }

// HeapByteBuffer的构造函数中创建字节数组
 HeapByteBuffer(int cap, int lim) {            // package-private
        super(-1, 0, lim, cap, new byte[cap], 0);
        /*
        hb = new byte[cap];
        offset = 0;
        */
    }

// 上面代码的super() 调用的即这里的方法
ByteBuffer(int mark, int pos, int lim, int cap,   // package-private
                 byte[] hb, int offset)
    {
        super(mark, pos, lim, cap);
        this.hb = hb;
        this.offset = offset;
    }

// 上面super再中转一次,将值赋给Buffer中。至此,bytebuffer初始化结束。
Buffer(int mark, int pos, int lim, int cap) {       // package-private
        if (cap < 0)
            throw new IllegalArgumentException("Negative capacity: " + cap);
        this.capacity = cap;
        limit(lim);
        position(pos);
        if (mark >= 0) {
            if (mark > pos)
                throw new IllegalArgumentException("mark > position: ("
                                                   + mark + " > " + pos + ")");
            this.mark = mark;
        }
    }
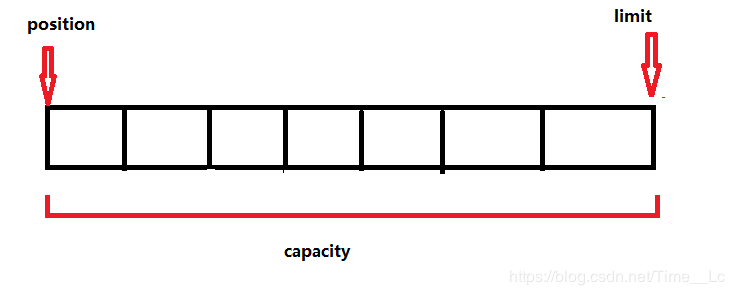
Buffer创建完成后,其数组的结构信息如下:
2.2 ByteBuffer属性以及读写操作
(1)源码分析
byteBuffer 的读写操作通过get() 、put()完成。
get()源码分析
 public ByteBuffer put(byte x) {
 		// 这里的 hb 即为buffer子类HeadByteBuffer的实例
        hb[ix(nextPutIndex())] = x;
        return this;
    }

// 这里的 offset 初始化为0
 protected int ix(int i) {
        return i + offset;
    }

// 将position的值返回
final int nextPutIndex() {                          // package-private
        if (position >= limit)
            throw new BufferOverflowException();
        return position++;
    }

 通过上述分析,其原理就是给数组依次赋值。
同理,put()源码操作也相似
 public byte get() {
        return hb[ix(nextGetIndex())];
    }

 protected int ix(int i) {
        return i + offset;
    }

 final int nextGetIndex() {                          // package-private
        if (position >= limit)
            throw new BufferUnderflowException();
        return position++;
    }
注意:每次读写的是position的下一个位置,并且可以通过position(int newposition) 和limit(int newlimit方法修改position和limit的值)
    public final Buffer flip() {
        limit = position;
        position = 0;
        mark = -1;
        return this;
    }
(2)实例演示
package chapter18_io;

import java.nio.ByteBuffer;

/**
 * @author Time
 * @created 2019/8/20
 * 缓冲区 :Java Nio中负责数据的存取,其实就是数组,用于存储不同类型的数据
 *
 * 属性:
 *      (1)capacity:容量,buffer所能容纳数据元素的最大数量,也就是底层数组的容量,创建时被指定,不可修改
 *      (2)position: 下一个被读或者写的位置
 *      (3)limit: 可供读写的最大位置,
 *      (4)mark: 位置标记,记录某一次读写的位置,可用reset()回到该位置
 */
public class TestBuffer {
    public static void main(String[] args) {
        // 1. 分配一个指定大小的缓冲区
        ByteBuffer byteBuffer = ByteBuffer.allocate(1024);
        // 2. 查看以下属性
        System.out.println(byteBuffer.position());  // 输出结果:0
        System.out.println(byteBuffer.capacity());  // 输出结果:1024
        System.out.println(byteBuffer.limit());  // 输出结果:1024

        String str = "abc";
        byteBuffer.put(str.getBytes());
        //  flip() 方法内部原理 limit = position; position = 0
        byteBuffer.flip();
        System.out.println(byteBuffer.position()); // 输出结果:0
        System.out.println(byteBuffer.capacity()); // 输出结果:1024
        System.out.println(byteBuffer.limit()); // 输出结果:3

    }
}
2.3 DirectBuffer
除了ByteBufffer.allocate()方法创建HeapByteBuffer以外,ByteBuffer还有一个方法allocateDirect()。这个方法创建的是DirectByteBuffer对象。两者的区别是allocate方法请求的空间是在jvm堆上进行分配的,而allocateDirect()方法请求的空间是在JVM堆外进行分配的,不被JVM管理,其他的属性和方法两个都一样,这里就不再进行分析了。
3 总结
Buffer是JavaNIO中一个重要的辅助类,使用比较频繁。在不熟悉的情况下,很容易忘记调用flip()方法而导致程序出错。


