Spring5源码阅读--环境搭建和测试
一、必要工具
-
JDK:1.8.0_241
-
下载地址:https://www.oracle.com/java/technologies/javase-downloads.html
注意:JDK1.8.0_25建议不要使用,本人亲测编译spring-context时报错
-
IntelliJ IDEA版本:IntelliJ IDEA 2019.3.3 (Ultimate Edition)
- 下载地址:https://www.jetbrains.com/idea/download/
-
GRADLE版本:4.9
- 下载地址:https://gradle.org/releases/
-
Spring版本:5.1.12.BUILD-SNAPSHOT
- 下载地址:https://github.com/spring-projects/spring-framework
二、Spring源码下载、gradle配置
1. spring源码下载及说明
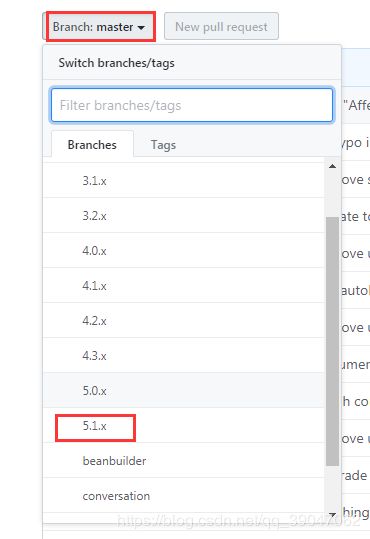
- 选择SpringFramework版本:
- 下载ZIP:

- 解压源码:

上图红框中文件解释: - build.gradle :放依赖配置,类似Mavend的pom文件
- gradle.properties: 当前SpringFramework版本号
- import-into-idea.md :Spring导入IDEA的说明文件,可以根据里面的步骤去导入
2.gradle配置
- 下载解压:


将zip文件解压到自己喜欢的目录和文件夹,只要自己能找到就行 - 配置:
系统变量添加:变量名:GRADLE_HOME 变量值:为解压的路径

系统变量添加:变量名:GRADLE_USER_HOME 变量值:某个文件夹,类似maven本地仓库,用来存储gradle构建的jar包

环境变量path添加:%GRADLE_HOME%\bin;

打开cmd窗口,输入:gradle -v , 出现如下图,则表示配置成功

三、Spring源码导入IntelliJ IDEA
1.Spring导入


- IntelliJ IDEA gradle项配置:

上图中1处:表示gradle本地仓库,所下载的jar等文件保存到此文件夹;2处:先选择 Specified location,跟着在后面选择gradle安装目录。
接下来就是漫长的等待,idea会自动Build,此过程会下载很多的文件,如果中途有失败,请重新刷新后,让他继续下载,一般失败都是网络问题。此过程需要十足的耐心,如果网络好或可以科学上网,那一定很快
- Build成功

build成功后,左侧Spring子模块文件夹右下角会有蓝色小方块,右侧点击Gradle会所有已构建出来Spring子模块
2.docs.gradle文件修改
- 文件位置:

- 注释dokka和asciidoctor
这两个任务主要是用来生成文档使用,对主流程并没有任何影响,有可能不注释在重新构建的时候,也不报错,但建议注释。

- 修改task schemaZip(type: Zip) 任务:
在gradle的构建脚本,只针对Linux系统做了适配,需要把task schemaZip替换成下面代码,因为原有代码的路径符号“/”是针对Linux的,windows使用会有问题,在windows环境需要替换成"\",否则会出现如下异常
所以注释掉原来的,修改如下:
task schemaZip(type: Zip) {
	group = "Distribution"
	baseName = "spring-framework"
	classifier = "schema"
	description = "Builds -${classifier} archive containing all " +
			"XSDs for deployment at http://springframework.org/schema."
	duplicatesStrategy 'exclude'
	moduleProjects.each { subproject ->
		def Properties schemas = new Properties();
		subproject.sourceSets.main.resources.find {
			it.path.endsWith("META-INF\\spring.schemas")
		}?.withInputStream { schemas.load(it) }
		for (def key : schemas.keySet()) {
			def shortName = key.replaceAll(/http.*schema.(.*).spring-.*/, '$1')
			assert shortName != key
			File xsdFile = subproject.sourceSets.main.resources.find {
				it.path.endsWith(schemas.get(key).replaceAll('\\/', '\\\\'))
			}
			assert xsdFile != null
			into(shortName) {
				from xsdFile.path
			}
		}
	}
}
四、oxm、core模块预编译、总体编译和单元测试
1.spring-oxm、spring-ore模块预编译
根据import-into-idea.md文档里面介绍,需要先预编译spring-oxm和spring-core,因为重新打包的时候需要依赖他们。
![]()
预编译有idea这么强大的工具,就不需要输入命令编译了,预编译如下:


编译成功!
Spring-oxm预编译成功后,按照同样的方法预编译Spring-core.
2.终极构建
最后一步,此过程也比较慢,如果有异常会抛出到控制台。

构建成功后可以进行单元测试
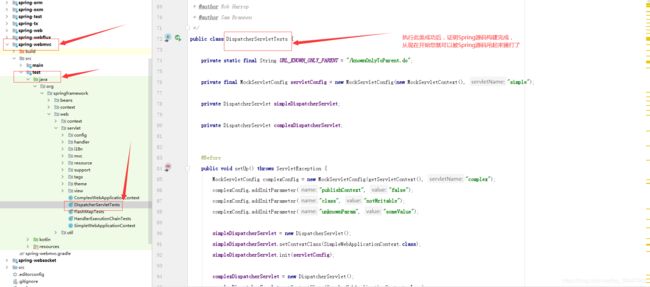
3.单元测试
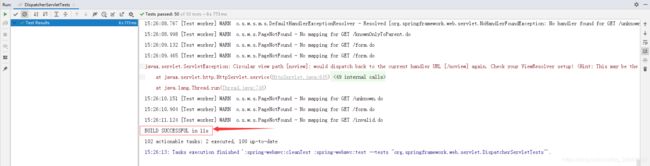
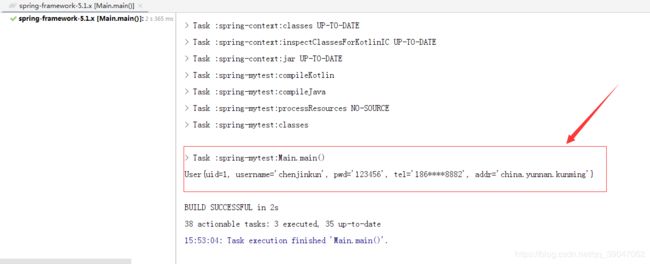
使用DispatcherServletTests进行单元测试,测试执行,证明Spring源码阅读环境搭建成功
测试成功!
五、Spring源码中创建项目测试
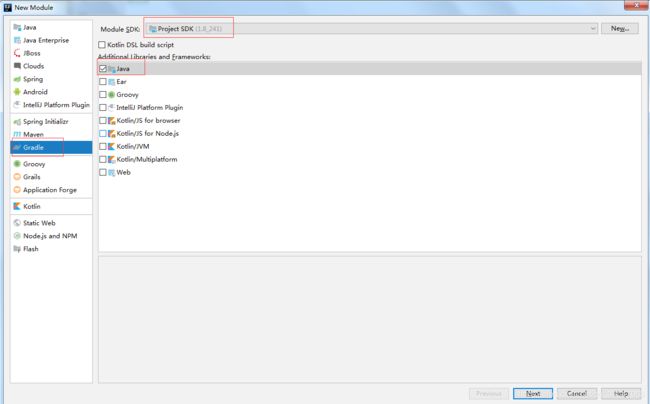
- 创建模块
项目根目录右键 -> new -> module -> gradle

修改 .gradle脚本文件名,建议改为新建模块的名称

在spring-mytest.gradle中添加Spring模块依赖

	compile(project(":spring-context"))
    compile(project(":spring-beans"))
    compile(project(":spring-core"))
    compile(project(":spring-aop"))
创建测试类
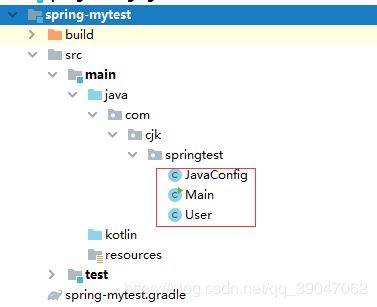
创建用户类
package com.cjk.springtest;

public class User {
	private int uid;
	private String username;
	private String pwd;
	private String tel;
	private String addr;
	public User(int uid, String username, String pwd, String tel, String addr) {
		this.uid = uid;
		this.username = username;
		this.pwd = pwd;
		this.tel = tel;
		this.addr = addr;
	}

	@Override
	public String toString() {
		return "User{" +
				"uid=" + uid +
				", username='" + username + '\'' +
				", pwd='" + pwd + '\'' +
				", tel='" + tel + '\'' +
				", addr='" + addr + '\'' +
				'}';
	}
}
创建javaConfig类
package com.cjk.springtest;
import org.springframework.context.annotation.Bean;
import org.springframework.context.annotation.ComponentScan;
import org.springframework.context.annotation.Configuration;

@Configuration
@ComponentScan
public class JavaConfig {
	@Bean
	public User user(){
		return new User(1,"chenjinkun","123456","186****8882","china.yunnan.kunming");
	}
}
创建测试入口类
package com.cjk.springtest;

import org.springframework.context.ApplicationContext;
import org.springframework.context.annotation.AnnotationConfigApplicationContext;
public class Main {
	public static void main(String[] args){
		ApplicationContext ac =new AnnotationConfigApplicationContext(JavaConfig.class);
		User user = (User) ac.getBean("user");
		System.out.println(user.toString());
	}

}
执行结果
六、构建中可能遇到的问题
- 构建成功没报错,但运行单元测试有异常 ,提示类找不到
- 方案1:尝试点击右边菜单栏projects刷新项目,然后对Spring(Root)模块先clean再build一次
- 方案2:针对找不到类的模块重新build一次
- 方案3:点击Spring(root)模块下的Tasks->other->compileTestJava 执行一遍,针对test类编译一次即可
- 构建失败,缺少依赖包
- 方案1:对Spring(Root)模块先clean再build一次(建议打开VPN,有可能存在某些包下载不成功导致)
- 方案2:尝试针对当前模块执行buildDependents
- 构建失败,执行gradle task失败
- 方案1:可能是当前运行环境版本不支持问题,如果不重要的问题,可以注释掉,保证构建正常
- 构建失败,编码异常
- 方案1:可以通过idea工具设置:Editor-File encodings 全部设置为UTF-8
七、总结
在其他地方看到别人说构建报错或者是运行报错,把spring-aspects或者是其他报错的模块删除。不需要删除任何模块,按照上述方法就可以构建成功,上述方法未删除过任何模块,只添加过一个测试模块:spring-mytest。上述方法我在公司和家里都测试过(除IDEA外其他工具、源码版本都相同)。
我觉得构建和编译能否成功的主要因素还是网络。
至此源码构建、编译、测试成功!各位请准备好被源码吊起来捶打吧,当然呢也会有不菲的收获。
祝好运!