应用编程接口(API)
Web API,具体说就是为我们写好的网站内容开发出可供第三方使用的API接口。书中提到了一个概念:REST(Representational State Transfer)——表现层状态转移。这是一种Web服务架构。它具有6个特征:
- 客户端-服务器
- 无状态
- 缓存
- 接口统一
- 系统分层
- 按需代码
1. REST API
1.1 资源
资源是 REST 架构方式的核心概念。在 REST 架构中,资源是程序中你要着重关注的事物。例如,在博客程序中,用户、博客文章和评论都是资源。
每个资源都要使用唯一的 URL 表示。
还是以博客程序为例,一篇博客文章可以使用 URL /api/posts/12345 表示,其中 12345 是这篇文章的唯一标识符,使用文章在数据库中的主键表示。
URL 的格式或内容无关紧要,只要资源的 URL 只表示唯一的一个资源即可。
某一类资源的集合也要有一个 URL。博客文章集合的 URL 可以是 /api/posts/,评论集合的URL 可以是 /api/comments/。
API 还可以为某一类资源的逻辑子集定义集合 URL。例如,编号为 12345 的博客文章,其中的所有评论可以使用 URL /api/posts/12345/comments/ 表示。
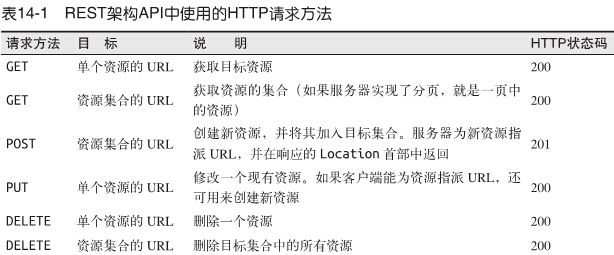
1.2 请求方法
如果资源不支持客户端使用的请求方法,响应的状态码为 405,返回“不允许使用的方法”。Flask 会自动处理这种错误。
1.3 请求和响应主体
一篇博客文章对应的资源可以使用如下的JSON表示:
{
    "url": "http://www.example.com/api/posts/12345",
    "title": "Writing RESTful APIs in Python",
    "author": "http://www.example.com/api/users/2",
    "body": "... text of the article here ...",
    "comments": "http://www.example.com/api/posts/12345/comments"
}
在这篇博客文章中,url、author 和 comments 字段都是完整的资源 URL。这是很重要的表示方法,因为客户端可以通过这些 URL 发掘新资源。
在设计良好的 REST API 中,客户端只需知道几个顶级资源的 URL,其他资源的 URL 则从响应中包含的链接上发掘。
1.4 版本
版本区分 Web 服务所处理的 URL。例如,首次发布的博客 Web 服务可以通过 /api/v1.0/posts/ 提供博客文章的集合。
2. 使用Flask提供 REST Web 服务
使用 Flask 创建 REST Web 服务很简单。
使用熟悉的 route() 修饰器及其 methods 可选参数可以声明服务所提供资源 URL 的路由。
处理 JSON 数据同样简单,因为请求中包含的JSON 数据可通过 request.json 这个 Python 字典获取,并且需要包含 JSON 的响应可以使用 Flask 提供的辅助函数 jsonify() 从 Python 字典中生成。
2.1 创建API蓝本
REST API 相关的路由是一个自成一体的程序子集,所以为了更好地组织代码,最好把这些路由放到独立的蓝本中。
API 蓝本的结构
|-flasky
    |-app/
    |-api_1_0
        |-__init__.py
        |-users.py
        |-posts.py
        |-comments.py
        |-authentication.py
        |-errors.py
        |-decorators.py
API 包的名字中有一个版本号。如果需要创建一个向前兼容的 API 版本,可以添加一个版本号不同的包,让程序同时支持两个版本的 API。
app/api_1_0/__init__.py:API 蓝本的构造文件
from flask import Blueprint

api = Blueprint(‘api‘, __name__)

from . import authentication, posts, users, comments, errors
app/__init__.py: 注册API蓝本
def create_app(config_name):
    # ...
    form .api_1_0 import api as api_1_0_blueprint
    app.register_blueprint(api_1_0_blueprint, url_prefix=‘/api/v1.0‘)
    # ...
2.2 错误处理
处理 404 和 500 状态码时会有点小麻烦,因为这两个错误是由 Flask 自己生成的,而且一般会返回 HTML 响应,这很可能会让 API 客户端困惑。为所有客户端生成适当响应的一种方法是,在错误处理程序中根据客户端请求的格式改写响应,这种技术称为内容协商。改进后的 404 错误处理程序,它向 Web 服务客户端发送 JSON 格式响应,除此之外都发送 HTML 格式响应。
app/main/errors.py: 使用HTTP内容协商处理错误
@main.app_errorhandler(404)
def page_not_found(e):
    if request.accept_mimetypes.accept_json and not request.accept_mimetypes.accept_html:
        res = jsonify({‘error‘: ‘not found‘})
        res.status_code = 404
        return res
    return render_template(‘404.html‘), 404
这个新版错误处理程序检查 Accept 请求首部(Werkzeug 将其解码为 request.accept_mimetypes),根据首部的值决定客户端期望接收的响应格式。
其他状态码都由 Web 服务生成,因此可在蓝本的 errors.py 模块作为辅助函数实现。
app/api_1_0/errors.py: API蓝本中403状态码的错误处理
def forbidden(message):
    response = jsonify({‘error‘: ‘forbidden‘, ‘message‘: message})
    response.status_code = 403
    return response
2.3 使用Flask-HTTPAuth认证用户
和普通的 Web 程序一样,Web 服务也需要保护信息,确保未经授权的用户无法访问。为此,RIA 必须询问用户的登录密令,并将其传给服务器进行验证。
REST Web 服务的特征之一是无状态,即服务器在两次请求之间不能“记住”客户端的任何信息。客户端必须在发出的请求中包含所有必要信息,因此所有请求都必须包含用户密令。
但在 RESTWeb 服务中使用 cookie 有点不现实,因为 Web 浏览器之外的客户端很难提供对 cookie 的支持。鉴于此,使用 cookie 并不是一个很好的设计选择。
因为 REST 架构基于 HTTP 协议,所以发送密令的最佳方式是使用 HTTP 认证,基本认证和摘要认证都可以。在 HTTP 认证中,用户密令包含在请求的 Authorization 首部中。
HTTP 认证协议很简单,可以直接实现,不过 Flask-HTTPAuth 扩展提供了一个便利的包装,可以把协议的细节隐藏在修饰器之中,类似于 Flask-Login 提供的 login_required 修饰器。
Flask-HTTPAuth 使用 pip 安装
(venv) $ pip install flask-httpauth
app/api_1_0/authentication.py: 初始化Flask-HTTPAuth
from flask.ext.httpauth import HTTPBasicAuth
auth = HTTPBasicAuth()

@auth.verify_password
def verify_password(email, password):
    if email == ‘‘:
        g.current_user = AnonymousUser()
        return True
    user = User.query.filter_by(email=email).first()
    if not user:
        return False
    g.current_user = user
    return user.verify_password(password)
由于这种用户认证方法只在API蓝本中使用,所以Flask-HTTPAuth只在蓝本包中初始化,而不是像其他扩展那样在app包中初始化。
把通过认证的用户保存在 Flask 的全局对象 g 中,如此一来,视图函数便能进行访问。
如果认证密令不正确,服务器向客户端返回 401 错误。默认情况下,Flask-HTTPAuth 自动生成这个状态码,但为了和 API 返回的其他错误保持一致,我们可以自定义这个错误响应。
app/api_1_0/authentication.py:Flask-HTTPAuth 错误处理程序
@auth.error_handler
def auth_error():
    return unauthorized(‘Invalid credentials‘)
这个蓝本中的所有路由都要进行保护,所以我们可以在 before_request 处理程序中使用一次 login_required 修饰器,应用到整个蓝本。
app/api_1_0/authentication.py:在 before_request 处理程序中进行认证
from .errors import forbidden_error

@api.before_request
@auth.login_required
def before_request():
    if not g.current_user.is_annoymous and not g.current_user.confirmed:
        return forbidden(‘Unconfirmed accout‘)
2.4 基于token的认证
每次请求时,客户端都要发送认证密令。为了避免总是发送敏感信息,我们可以提供一种基于token的认证方案。
app/models.py:支持基于令牌的认证
class User(db.Model):
    # ...
    def generate_auth_token(self, expiration):
        s = Serializer(current_app.config[‘SECRET_KEY‘],
            expires_in=expiration)
        return s.dumps({‘id‘: self.id})

    @staticmethod
    def verify_auth_token(token):
        s = Serializer(current_app.config[‘SECRET_KEY‘])
        try:
            data = s.loads(token)
        except:
            return None
        return User.query.get(data[‘id‘])
修改之前的verify_password函数
app/api_1_0/authentication.py: 支持 token
@auth.verify_password
def verify_password(email_or_token, password):
    if email_or_token == ‘‘:
        g.current_user = AnonymousUser()
        return True
    if password == ‘‘:
        g.current_user = User.verify_auth_token(email_or_token)
        g.token_used = True
        return g.current_user is not None
    user = User.query.filter_by(email=email_or_token).first()
    if not user:
        return False
    g.current_user = user
    g.token_used = False
    return user.verify_password(password)
api/api_1_0/authentication.py: 生成认证 token
@api.route(‘/token‘)
def get_token():
    if g.current_user.is_annoymous() or g.token_used:
        return return unauthorized(‘Invalid credentials‘)
    return jsonify({‘token‘: g.current_user.generate_auth_token(
        expiration=3600), ‘expiration‘: 3600})
2.5 资源和 json 转化
app/models.py:把文章转换成 JSON 格式的序列化字典
class Post(db.Model):
    # ...
    def to_json(self):
        json_post = {
            ‘url‘: url_for(‘api.get_post‘, id=self.id, _external=True),
            ‘body‘: self.body,
            ‘body_html‘: self.body_html,
            ‘timestamp‘: self.timestamp,
            ‘author‘: url_for(‘api.get_user‘, id=self.author_id, _external=True),
            ‘comments‘: url_for(‘api.get_post_comments‘, id=self.id, _external=True),
            ‘comment_count‘: self.comments.count()
        }
    return json_post
url、author 和 comments 字段要分别返回各自资源的 URL,因此它们使用 url_for() 生成,所调用的路由即将在 API 蓝本中定义。注意,所有 url_for() 方法都指定了参数 _external=True,这么做是为了生成完整的 URL,而不是生成传统 Web 程序中经常使用的相对 URL。
这段代码还说明表示资源时可以使用虚构的属性。comment_count 字段是博客文章的评论数量,并不是模型的真实属性,它之所以包含在这个资源中是为了便于客户端使用。
把 JSON 转换成模型时面临的问题是,客户端提供的数据可能无效、错误或者多余。
app/models.py:从 JSON 格式数据创建一篇博客文章
from app.exceptions import ValidationError

class Post(db.Model):
    # ...
    @staticmethod
    def from_json(json_post):
        body = json_post.get(‘body‘)
        if body is None or body == ‘‘:
            raise ValidationError(‘post does not have a body‘)
        return Post(body=body)
上述代码在实现过程中只选择使用 JSON 字典中的 body 属性,而把 body_html属性忽略了,因为只要 body 属性的值发生变化,就会触发一个 SQLAlchemy 事件,自动在服务器端渲染 Markdown。除非允许客户端倒填日期(这个程序并不提供此功能),否则无需指定 timestamp 属性。由于客户端无权选择博客文章的作者,所以没有使用 author 字段。
注意上面如何检查错误。
在这种情况下,抛出异常才是处理错误的正确方式,因为 from_json()方法并没有掌握处理问题的足够信息,唯有把错误交给调用者,由上层代码处理这个错误。
ValidationError 类是 Python 中 ValueError 类的简单子类。
app/exceptions.py:ValidationError 异常
class ValidationError(ValueError):
    pass
现在,程序需要向客户端提供适当的响应以处理这个异常。为了避免在视图函数中编写捕获异常的代码,我们可创建一个全局异常处理程序。
api/api_1_0/errors.py: API 中 ValidationError 异常的处理程序
@api.errorhandler(ValidationError)
def validation_error(e):
    return bad_request(e.args[0])
这里使用的 errorhandler 修饰器和注册 HTTP 状态码处理程序时使用的是同一个,只不过此时接收的参数是 Exception 类,只要抛出了指定类的异常,就会调用被修饰的函数。
注意,这个修饰器从API 蓝本中调用,所以只有当处理蓝本中的路由时抛出了异常才会调用这个处理程序。
使用这个技术时,视图函数中得代码可以写得十分简洁明,而且无需检查错误。
2.6 实现资源端点
app/api_1_0/posts.py: 文章资源GET请求的处理程序
@api.route(‘/posts/‘)
@auth.login_required
def get_posts():
posts = Post.query.all()
return jsonify({‘posts‘: [post.to_json() for post in posts]})
@api.route(‘/posts/
ps:404 错误的处理程序在程序层定义,如果客户端请求 JSON 格式,就要返回JSON 格式响应。如果要根据 Web 服务定制响应内容,也可在 API 蓝本中重新定义 404 错误处理程序。
博客文章资源的 POST 请求处理程序把一篇新博客文章插入数据库。
app/api_1_0/posts.py:文章资源 POST 请求的处理程序
@api.route(‘/posts/‘, methods=[‘POST‘])
@permission_required(Permission.WRITE_ARTICLES)
def new_post():
    post = Post.from_json(request.json)
    post.author = g.current_user
    db.session.add(post)
    db.session.commit()
    return jsonify(post.to_json()), 201,             {‘Location‘: url_for(‘api.get_post‘, id=post.id, _external=True)}
得益于前面实现的错误处理程序,创建博客文章的过程变得很直观。
博客文章从 JSON 数据中创建,其作者就是通过认证的用户。这个模型写入数据库之后,会返回 201 状态码,并把 Location 首部的值设为刚创建的这个资源的 URL。
注意,为便于客户端操作,响应的主体中包含了新建的资源( Location 首部)。如此一来,客户端就无需在创建资源后再立即发起一个 GET 请求以获取资源。
用来防止未授权用户创建新博客文章的 permission_required 修饰器和程序中使用的类似,但会针对 API 蓝本进行自定义。
app/api_1_0/decorators.py:permission_required 修饰器
def permission_required(permission):
    def decorator(f):
        @wraps(f)
            def decorated_function(*args, **kwargs):
            if not g.current_user.can(permission):
                return forbidden(‘Insufficient permissions‘)
            return f(*args, **kwargs)
        return decorated_function
    return decorator
2.7 分页大型资源集合
和Web程序一样,Web服务也可以对集合进行分页。
app/api_1_0/posts.py:分页文章资源
@api.route(‘/posts/‘)
    def get_posts():
    page = request.args.get(‘page‘, 1, type=int)
    pagination = Post.query.paginate(
        page, per_page=current_app.config[‘FLASKY_POSTS_PER_PAGE‘],
        error_out=False)
    posts = pagination.items
    prev = None
    if pagination.has_prev:
        prev = url_for(‘api.get_posts‘, page=page-1, _external=True)
    next = None
    if pagination.has_next:
        next = url_for(‘api.get_posts‘, page=page+1, _external=True)
    return jsonify({
        ‘posts‘: [post.to_json() for post in posts],
        ‘prev‘: prev,
        ‘next‘: next,
        ‘count‘: pagination.total
    })
2.8 使用 HTTPie 测试Web服务
pip安装 HTTPie
(venv) $ pip install httpie
发起GET请求
(venv) $ http --json --auth : GET > http://127.0.0.1:5000/api/v1.0/posts
HTTP/1.0 200 OK
Content-Length: 7018
Content-Type: application/json
Date: Sun, 22 Dec 2013 08:11:24 GMT
Server: Werkzeug/0.9.4 Python/2.7.3

{
    "posts": [
    ...
    ],
    "prev": null
    "next": "http://127.0.0.1:5000/api/v1.0/posts/?page=2",
    "count": 150
}
匿名用户可发送空邮件地址和密码以发起相同的请求
(venv) $ http --json --auth : GET http://127.0.0.1:5000/api/v1.0/posts/
发送 POST 请求以添加一篇新博客文章
(venv) $ http --auth : --json POST > http://127.0.0.1:5000/api/v1.0/posts/ > "body=I‘m adding a post from the *command line*."
HTTP/1.0 201 CREATED
Content-Length: 360
Content-Type: application/json
Date: Sun, 22 Dec 2013 08:30:27 GMT
Location: http://127.0.0.1:5000/api/v1.0/posts/111
Server: Werkzeug/0.9.4 Python/2.7.3
{
"author": "http://127.0.0.1:5000/api/v1.0/users/1",
"body": "I‘m adding a post from the *command line*.",
"body_html": "I‘m adding a post from the command line.
",
"comments": "http://127.0.0.1:5000/api/v1.0/posts/111/comments",
"comment_count": 0,
"timestamp": "Sun, 22 Dec 2013 08:30:27 GMT",
"url": "http://127.0.0.1:5000/api/v1.0/posts/111"
}
要想使用token,可向 /api/v1.0/token 发送请求
(venv) $ http --auth : --json GET > http://127.0.0.1:5000/api/v1.0/token
HTTP/1.0 200 OK
Content-Length: 162
Content-Type: application/json
Date: Sat, 04 Jan 2014 08:38:47 GMT
Server: Werkzeug/0.9.4 Python/3.3.3

{
    "expiration": 3600,
    "token": "eyJpYXQiOjEzODg4MjQ3MjcsImV4cCI6MTM4ODgyODMyNywiYWxnIjoiSFMy..."
}
然后就可以用 token 访问API
(venv) $ http --json --auth eyJpYXQ...: GET http://127.0.0.1:5000/api/v1.0/posts/
原文:http://www.cnblogs.com/whuyt/p/4537122.html
