简单线程池的实现--JAVA/Python
学过JAVA的人都知道多线程,即继承Thread或是实现了Runnable的类都可以做到多线程并发。最近吾因为工作原因,要用到线程池,遂自己研究学习了一阵子,十分粗浅,仅供参考。我是个初学者,刚刚开始也是在网上百度看博客,但是博客里的并不权威,反而越看越疑惑,在同事的建议下直接学习官方JDK源码,总算有了头绪。
首先介绍JDK自带的线程池,在java.util.cocurrent下和类Executors和ExecutorService里,刚刚开始不要直接扎进JDK源代码里,否则怕出不来了,还看不出个所以然。
java.util.cocurrent里列出了四种线程池:
1. CachedThreadPool--可缓存线程池
2. FixedThreadPool--定长线程池
3. ScheduledThreadPool--定长线程池,支持周期性的任务执行(定时任务)
4. SingledThreadExecutor--单线程化的线程池,只有一个线程,只能支持一个一个去执行任务,支持FIFO性质的任务
说了这么多,那为什么要用线程池呢?我个人觉得有两点原因:
1. 在资源足够的情况下,比如有2000个任务,如果不用线程池,一个任务创建一个线程去执行,但是线程的创建和销毁也是要耗费时间的,
如果线程的创建和销毁所占的时间比运行线程的时间还要多的话,这个程序几乎没有效率。
2. 在资源不够的情况,同上,2000个任务,但是机器只支持100个任务,无法一个一个线程执行一个任务,只能利用这100个线程支完成工作,
这样也可以提高效率,因为这100个线程一旦空闲下来就会立即分配任务(在用了线程池的前提),每个线程都充分被利用,不会出现线程运行的时间
小于线程创建和销毁的时间之和,效率这样就上来了。
现在吾就把以上四种线程池的初始用法的代码贴出来,我也是在网上找的,体贴吧!
package om.fancy.cachedthreadpool;

import java.util.concurrent.ExecutorService;
import java.util.concurrent.Executors;
/**
 * Created by fancy on 2017/9/13.
 * 创建一个可缓存线程池,如果线程池长度超过处理需要,可灵活回收空闲线程,若无可回收,则新建线程
 */
public class CachedThreadPool {
    public static void main(String[] args) {
        ExecutorService cachedThreadPool = Executors.newCachedThreadPool();
        for (int i = 0; i < 10; i++) {
            final int index = i;
            try {
                Thread.sleep(index * 1000);
            } catch (InterruptedException e) {
                e.printStackTrace();
            }
            cachedThreadPool.execute(new Runnable() {
                public void run() {
                    System.out.println(index);
                    System.out.println("the thread name is "+Thread.currentThread().getName());
                }
            });
        }
    }

}
package om.fancy.cachedthreadpool;
import java.util.concurrent.ExecutorService;
import java.util.concurrent.Executors;
/**
* Created by fancy on 2017/9/13.
* 创建一个定长线程池,可控制线程最大并发数,超出的线程会在队列中等待
*/
public class FixedThreadPool {
public static void main(String[] args) {
ExecutorService fixedThreadPool = Executors.newFixedThreadPool(3);
for (int i = 0; i < 10; i++) {
final int index = i;
fixedThreadPool.execute(new Runnable() {
public void run() {
try {
System.out.println(index);
System.out.println("the thread name is "+Thread.currentThread().getName());
Thread.sleep(2000);
} catch (InterruptedException e) {
e.printStackTrace();
}
}
});
}
}
}
package om.fancy.cachedthreadpool;

import java.util.concurrent.Executors;
import java.util.concurrent.ScheduledExecutorService;
import java.util.concurrent.TimeUnit;
/**
 * Created by fancy on 2017/9/13.
 * 创建一个定长线程池,支持定时及周期性任务执行
 */
public class ScheduledThreadPool {
    public static void main(String[] args) {
        ScheduledExecutorService scheduledThreadPool = Executors.newScheduledThreadPool(5);
        scheduledThreadPool.scheduleAtFixedRate(new Runnable() {
            public void run() {
                System.out.println("delay 1 seconds, and excute every 3 seconds");
                System.out.println("the thread name is "+Thread.currentThread().getName());
            }
        },1, 3, TimeUnit.SECONDS);
    }
}
package om.fancy.cachedthreadpool;

import java.util.concurrent.ExecutorService;
import java.util.concurrent.Executors;

/**
 * Created by fancy on 2017/9/13.
 * 创建一个单线程化的线程池,它只会用唯一的工作线程来执行任务,保证所有任务按照指定顺序(FIFO, LIFO, 优先级)执行
 */
public class SingleThreadExecutor {
    public static void main(String[] args) {
        ExecutorService singleThreadExecutor = Executors.newSingleThreadExecutor();
        for (int i = 0; i < 10; i++) {
            final int index = i;
            singleThreadExecutor.execute(new Runnable() {
                public void run() {
                    try {
                        System.out.println(index);
                        System.out.println("the thread name is "+Thread.currentThread().getName());
                        Thread.sleep(2000);
                    } catch (InterruptedException e) {
                        e.printStackTrace();
                    }
                }
            });
        }
    }
}
到了这里也对这些个线程池有了初步的认识了,直接跟进源码,学习吧,当然晕还是会的,这里吾的体贴又来了,在此处转载
一个大牛的链接,可以参考,手把手教你读源码
http://www.importnew.com/19011.html
当然学习代码是一个很痛苦的事情,没事慢慢来,有注释就已经很不错了,吾还看过通篇没有一丝注释的代码呢!
学习过源码之后,明白了线程池的工作原理,可以自己写一个简单的线程池。
我在网上找了很多,但是吾觉得说的最透彻的还是以下这个:
package om.fancy.cachedthreadpool;

import java.util.concurrent.LinkedBlockingQueue;
import java.util.concurrent.TimeUnit;
import java.util.concurrent.locks.Condition;
import java.util.concurrent.locks.Lock;
import java.util.concurrent.locks.ReentrantLock;

/**
 * Created fancy on 2017/9/18.
 * 要自定义一个线程池,首先要有存固定的线程数目的阻塞队列,还要有个存放任务的阻塞队列。
 * 如果任务放入时有线程为空闲直接交付于它执行否则就放入任务队列中
 * 在内部有个线程会不断的扫描任务队列如果既有空闲任务又有空闲线程就执行。
 */
public class MyThreadPool {

    private int coreCount;
    private int maxCount;
    private long waitTime;
    private TimeUnit unit;
    private boolean start = true;
    private boolean end;

    //任务队列
    private LinkedBlockingQueue queue = new LinkedBlockingQueue<>();
    /*
        用来保存创建自定义的Thread这里最好使用阻塞式队列因为你添加和移除是在不同线程中操作
        我的想法是从队列移除来一个Thread对象运行完后再添加进去
     */
    private LinkedBlockingQueue tl = new LinkedBlockingQueue();

    public MyThreadPool(int coreCount, int maxCount, long waitTime, TimeUnit unit) {
        super();
        this.coreCount = coreCount;
        this.maxCount = maxCount;
        this.waitTime = waitTime;
        this.unit = unit;//时间单位

        // 创造核心数目线程数量
        for (int i = 0; i < coreCount; i++) {
            tl.add(new MyThread());
        }
    }

    // 改进
    public void execute(Runnable runnable) {
        if (start) {
            runInQueueTask();
            start = false;
        }
        if (tl.size() > 0) {// 如果还有线程空闲就直接执行
            runTask(runnable);
        } else {
            queue.add(runnable);// 添加到任务队列
        }
    }

    private void runInQueueTask() {//这个方法主要是用来开启一个线程来不断扫描任务队列中是否有任务
        new Thread(new Runnable() {

            @Override
            public void run() {
                while (true) {//这里让它不断扫描
                    if (end)//如果结受到结束标记就结束
                        break;
                    if (queue.size() > 0 && tl.size() > 0) {//如果任务队列不为空并且线程队列也不为空
                        MyThread thread = tl.remove();//从线程阻塞队列中获取一个线程来执行任务
                        thread.setRunnable(queue.remove());
                    } else {
                        try {
                            Thread.sleep(10);
                        } catch (InterruptedException e) {
                            // TODO 自动生成的 catch 块
                            e.printStackTrace();
                        }
                    }
                }
            }
        }).start();

    }

    private void runTask(Runnable runnable) {
        MyThread thread = tl.remove();// 从线程列中获取空余线程

        thread.setRunnable(runnable);// 设置任务到线程上
        if (thread.first)// 如果是第一次执行启动start方法
            thread.start();
    }

    public void shutDown() throws InterruptedException{//关闭线程池中所有的资源来停止运行
        while (true) {
            if (tl.size() == coreCount && queue.size() == 0) {//只有当任务执行完才关闭它们
                end = true;// 修改标记使扫描任务队列的线程停止
                for (MyThread thread : tl) {// 循环关闭每个线程及让它的start方法执行完
                    thread.closeThread();
                }

            } else {
                try {
                    Thread.sleep(20);
                } catch (InterruptedException e) {
                    // TODO 自动生成的 catch 块
                    e.printStackTrace();
                }
            }
        }
    }

    // 改造Thread方法由于调用start方法不能调用多次
    private class MyThread extends Thread {
        private Runnable runnable;
        private Lock lock = new ReentrantLock();
        private Condition condition = lock.newCondition();
        private boolean first = true;
        private boolean shutdown;

        public MyThread() {
        }

        public void setRunnable(Runnable runnable) {//设置任务,到线程中
            lock.lock();
            try {
                this.runnable = runnable;//修改任务
                condition.signal();//唤醒start方法
            } finally {
                lock.unlock();
            }
        }

        public void closeThread() {
            lock.lock();
            try {
                condition.signal();
                shutdown = true;
            } finally {
                lock.unlock();
            }
        }

        @Override
        public void run() {
            lock.lock();
            try {
                first = false;
                while (true) {
                    runnable.run();//运行传入的任务
                    tl.add(this);//任务执行完把线程自己回添加线程阻塞队列中方便其它任务用

                    condition.await();//在没有接到任务时让起阻塞住
                    if (shutdown)
                        break;
                }
            } catch (Exception e) {
                e.printStackTrace();
            } finally {
                lock.unlock();
            }

        }
    }
}
以下是测试自定义线程池的代码:
package om.fancy.cachedthreadpool;

import java.util.concurrent.TimeUnit;

/**
 * Created by fancy on 2017/9/18.
 */
public class TestPool {

    public static void main(String[] args) throws InterruptedException {
        MyThreadPool pool = new MyThreadPool(3, 5, 20, TimeUnit.SECONDS);
        for (int i = 0; i < 6; i++) {
            pool.execute(new Runnable() {
                @Override
                public void run() {
                    System.out.println(Thread.currentThread().getName());
                }
            });
        }
        pool.shutDown();

    }
}
测试效果:
是不是很简单?
同时,顺带讲讲python的线程池,当然原理肯定上一样的,但是python和JAVA一样有了threadpool模块,所以根据以下步骤:
1. pip install threadpool
2. import threadpool
3. 定义线程函数
4. 创建需要线程池处理的任务
5. 将这些任务put到池中
6. 等待任务的结束
以下是没有用线程池的代码
import time
import sys


def sayhello(str):
    print "Hello ",str
    time.sleep(2)

name_list =['kk','aa','bb','cc']
start_time = time.time()

for req in name_list:
    sayhello(req)

print '%d second'% (time.time()-start_time)
# encoding: utf-8
import time
import sys
sys.path.append('/Library/Python/2.7/site-packages/')
#(1)引入threadpool模块
import threadpool
#(2)定义线程函数
def sayhello(str):
    print "Hello ",str
    time.sleep(2)

name_list =['kk','aa','bb','cc']
start_time = time.time()
#(3)创建线程 池threadpool.ThreadPool()
pool = threadpool.ThreadPool(10)
#(4)创建需要线程池处理的任务即threadpool.makeRequests()
requests = threadpool.makeRequests(sayhello, name_list)
#(5)将创建的多个任务put到线程池中,threadpool.putRequest
for req in requests:
    pool.putRequest(req)
#(6)等到所有任务处理完毕theadpool.poll()或wait()
pool.wait()
print '%d second'% (time.time()-start_time)
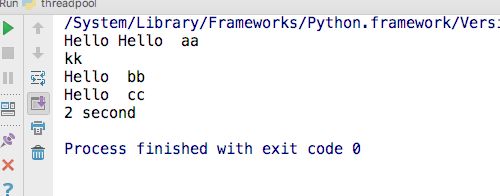
看看两个程序的运行对比:
效率明显加快,但是要注意同步性,可以看到多线程后,线程安全性也变的必要!所以代码要变更:
# encoding: utf-8
import time
import sys
sys.path.append('/Library/Python/2.7/site-packages/')
#(1)引入threadpool模块
import threadpool
import  threading

counter_lock=threading.Lock()
#(2)定义线程函数
def sayhello(str):
    # 锁定
    counter_lock.acquire()
    print "Hello ",str
    # 解锁
    counter_lock.release()
    time.sleep(2)


name_list =['kk','aa','bb','cc']
start_time = time.time()
#(3)创建线程 池threadpool.ThreadPool()
pool = threadpool.ThreadPool(10)
#(4)创建需要线程池处理的任务即threadpool.makeRequests()
requests = threadpool.makeRequests(sayhello, name_list)
#(5)将创建的多个任务put到线程池中,threadpool.putRequest
for req in requests:
    pool.putRequest(req)
#(6)等到所有任务处理完毕theadpool.poll()或wait()
pool.wait()
print '%d second'% (time.time()-start_time)
再看运行效果:
没有错乱,证明加锁有效!


