学习 Neutron 系列文章:
(1)Neutron 所实现的虚拟化网络
(2)Neutron OpenvSwitch + VLAN 虚拟网络
(3)Neutron OpenvSwitch + GRE/VxLAN 虚拟网络
(4)Neutron OVS OpenFlow 流表 和 L2 Population
(5)Neutron DHCP Agent
(6)Neutron L3 Agent
(7)Neutron LBaas
(8)Neutron Security Group
(9)Neutron FWaas 和 Nova Security Group
(10)Neutron VPNaas
(11)Neutron DVR
(12)Neutron VRRP
(13)High Availability (HA)
(14)Linux bridge + VXLAN
(15)Neutron Linux Bridge + VLAN/VXLAN 虚拟网络
虽然大部分的OpenStack 部署环境中,都会使用 Open vSwitch 来作为虚拟交换机来实现二层网络功能,但是Neutron 仍然支持使用 Linux bridge 作为虚拟交换机来实现二层网络。本文就此做些分析和说明。
同时要指出的是,OpenStack 官方已经把 linux bridge 实现标记为 legacy 的了,文档从 2016 年后也没怎么更新了。这是因为,linux bridge 和 OVS 相比,只支持基本的网络功能即二层交换,但不支持VLAN 标签和隧道。因此,linux bridge agent 利用linux 内核功能(VLAN 子接口和 VXLAN 接口)来实现VLAN 标签和隧道。
1. 测试环境
以下面的环境为例(网络节点上):
(1)linux bridge
root@controller:/home/sammy# brctl show
bridge name     bridge id               STP enabled     interfaces
brq85925305-b4          8000.563534c8d02d       no              tap0bb8efeb-10
                                                        tap798c87d1-a2
                                                        vxlan-25
brq96609bfa-0e          8000.0050569c4d94       no              ens224
                                                        tap60dbdc2f-a0
brq971ffda2-e5          8000.a6acb08e4fd6       no              tapb1eaae00-e5
                                                        tapf70543dd-0f
                                                        vxlan-10
(2)OpenStack 网络和 network namespace:
root@controller:/home/sammy# neutron net-list
+--------------------------------------+---------+-----------------------------------------------------+
| id                                   | name    | subnets                                             |
+--------------------------------------+---------+-----------------------------------------------------+
| 96609bfa-0e22-4bb7-8dba-6ef532ea6076 | extnet  | afa7d205-3026-439f-aca7-295a9f9b2a71 10.62.227.0/24 |
| 971ffda2-e567-40a0-a2c8-b31a577fd4d3 | appnet  | 4c68eacb-bf3e-408a-a941-94e93eddb22b 11.0.0.0/24    |
|                                      |         | 3d596991-de8f-4ae4-8913-89426a8abbd7 10.0.0.0/24    |
| 85925305-b477-4cc6-9654-67d9bf1e7cd8 | appnet2 | 4575c7f1-7f08-4917-9904-ec65af38619b 20.0.0.0/24    |
+--------------------------------------+---------+-----------------------------------------------------+
root@controller:/home/sammy# ip netns
qdhcp-85925305-b477-4cc6-9654-67d9bf1e7cd8 (id: 2)
qdhcp-971ffda2-e567-40a0-a2c8-b31a577fd4d3 (id: 1)
qrouter-39a77439-8a28-49c1-bf97-ac931510631b (id: 0)
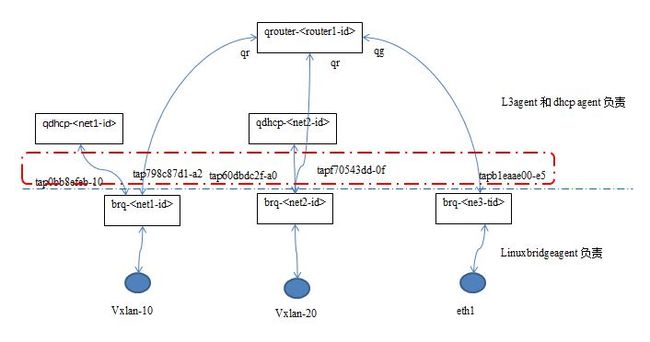
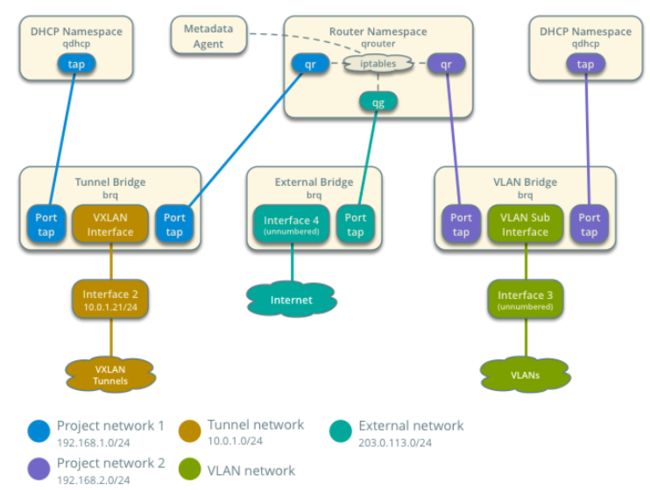
(3)示意图:
(4)说明:
- qdhcp 和 qrouter 都是 linux network namespace 实例
- qdhcp network namespace 的数量等于启用了 DHCP 的 Neutron network 的数量。
- 当一个 network 中存在至少一个 subnet 启用了 DHCP 之后,会有一个 qdhcp network namespace 被创建出来;
- 当一个 network 中多个 subnet 启用了 DHCP 时,它们共用一个 qdhcp,以及 dnsmasq。
- 其 name 使用 network id,比如 qdhcp-85925305-b477-4cc6-9654-67d9bf1e7cd8
- qrouter network namespace 的数目等于 router 的数目,也就是说,系统中一共有几个 router,那么就存在几个 qrouter network namespace
- brq linux bridge 的数目等于 neutron network 的数目,其 name 是 network id 的前几位,比如 brq96609bfa-0e
- 一个 network 的 qdhcp network namespace 和其 brq linux bridge 一定有连接
- qrouter 之内的 network interface 分两种,一种是 qr 开头的,每个连接到 router 之上的 subnet 都有一个;还有一个是 qg,每个连接到 router 的 external subnetwork 有一个
- qrouter 的每个 network interface 都通过 veth 连接到所在网络的 qbr linux bridge 上
- qbr linux bridge 连连接两种物理设备,一种是 vxlan interface,每个 tenant network 有一个,另一种是在 physical network 对应的物理网卡上创建的子接口(sub-interface)
- 对于 physical network 的 qbr 来说,用户可以指定它,并且在linuxbridge_agent.ini 中通过 bridge_mappings = List of
: 进行配置;也可以不指定,此时 agent 会创建它。当同时配置了 physical bridge 和 physical interface 时,前者优先。
如果 external network 中有多个 subnet 的话:
(1)每个 qrouter 只允许有一个 External Gateway,也就是说它只有一个 qg network interface。当 external network 添加多个 subnet 之后,只有第一个被当作 external subnet,其余的都会被当作 internal subnet。
(2)在 qrouter 的路由表之中,
root@controller:/home/sammy# ip netns exec qrouter-39a77439-8a28-49c1-bf97-ac931510631b route
Kernel IP routing table
Destination     Gateway         Genmask         Flags Metric Ref    Use Iface
default         10.62.227.1     0.0.0.0         UG    0      0        0 qg-e09fce07-cd
10.0.0.0        *               255.255.255.0   U     0      0        0 qr-b1eaae00-e5
10.62.227.0     *               255.255.255.0   U     0      0        0 qg-e09fce07-cd
10.62.228.0     *               255.255.255.0   U     0      0        0 qg-e09fce07-cd
10.62.228.0     *               255.255.255.0   U     0      0        0 qr-124ff148-b7
11.0.0.0        *               255.255.255.0   U     0      0        0 qr-16d9b0cc-38
20.0.0.0        *               255.255.255.0   U     0      0        0 qr-0bb8efeb-10
2. linux-bridge-agent 工作过程分析
(1)linuxbridge-agent 会启动一个循环,不断扫描上面红框中的 tap 设备
    def daemon_loop(self):
...
        while True:
            start = time.time()
. ..

            device_info = self.scan_devices(previous=device_info, sync=sync)
            sync = False

            if (self._device_info_has_changes(device_info)
                or self.sg_agent.firewall_refresh_needed()):
                LOG.debug("Agent loop found changes! %s", device_info)
                try:
                    sync = self.process_network_devices(device_info)
                except Exception:
                    LOG.exception(_LE("Error in agent loop. Devices info: %s"),
                                  device_info)
                    sync = True
这是它首先找到的 devices:
(Pdb) p bridge_lib.get_bridge_names()
['brq85925305-b4', 'virbr0', 'brq971ffda2-e5', 'virbr0-nic', 'tapb1eaae00-e5', 'tapf70543dd-0f', 'vxlan-25', 'vxlan-10', 'tap0bb8efeb-10', 'lo', 'tap60dbdc2f-a0', 'tap795e6e86-94', 'ens224', 'ens192', 'ens160', 'tap798c87d1-a2']
然后过滤出 tap 设备:
get_all_devices()->set(['tap0bb8efeb-10', 'tap60dbdc2f-a0', 'tap795e6e86-94', 'tap798c87d1-a2', 'tapb1eaae00-e5', 'tapf70543dd-0f'])
(2)根据 previous 中保存的历史数据,再接合服务器端和本地更新时间,计算出需要更新的tap设备列表:
{'current': set(['tapf70543dd-0f', 'tap60dbdc2f-a0', 'tapb1eaae00-e5', 'tap795e6e86-94', 'tap0bb8efeb-10', 'tap798c87d1-a2']), 'timestamps': {'tapf70543dd-0f': 1476956816.672447, 'tap60dbdc2f-a0': None, 'tapb1eaae00-e5': 1476956816.672447, 'tap795e6e86-94': None, 'tap0bb8efeb-10': 1476689797.1378036, 'tap798c87d1-a2': 1476689701.1349163}, 'removed': set([]), 'added': set(['tapf70543dd-0f', 'tap60dbdc2f-a0', 'tapb1eaae00-e5', 'tap795e6e86-94', 'tap0bb8efeb-10', 'tap798c87d1-a2']), 'updated': set([])}
(3) 通过 RPC 获取 tap 设备的详细信息
(Pdb) p devices
set(['tapf70543dd-0f', 'tap60dbdc2f-a0', 'tapb1eaae00-e5', 'tap795e6e86-94', 'tap798c87d1-a2', 'tap0bb8efeb-10'])


devices_details_list = self.plugin_rpc.get_devices_details_list

(Pdb) p devices_details_list
[{u'profile': {}, u'network_qos_policy_id': None, u'qos_policy_id': None, u'allowed_address_pairs': [], u'admin_state_up': True, u'network_id': u'971ffda2-e567-40a0-a2c8-b31a577fd4d3', u'segmentation_id': 10, u'device_owner': u'network:dhcp', u'physical_network': None, u'mac_address': u'fa:16:3e:5c:bf:11', u'device': u'tapf70543dd-0f', u'port_security_enabled': False, u'port_id': u'f70543dd-0f1b-4e1d-93c7-33f4f3d7a709', u'fixed_ips': [{u'subnet_id': u'3d596991-de8f-4ae4-8913-89426a8abbd7', u'ip_address': u'10.0.0.10'}], u'network_type': u'vxlan', u'security_groups': []}, {u'profile': {}, u'network_qos_policy_id': None, u'qos_policy_id': None, u'allowed_address_pairs': [], u'admin_state_up': True, u'network_id': u'96609bfa-0e22-4bb7-8dba-6ef532ea6076', u'segmentation_id': None, u'device_owner': u'network:router_gateway', u'physical_network': u'provider', u'mac_address': u'fa:16:3e:77:78:86', u'device': u'tap60dbdc2f-a0', u'port_security_enabled': False, u'port_id': u'60dbdc2f-a01b-446d-bb5b-26ffac19a045', u'fixed_ips': [{u'subnet_id': u'afa7d205-3026-439f-aca7-295a9f9b2a71', u'ip_address': u'10.62.227.151'}], u'network_type': u'flat', u'security_groups': []}, {u'profile': {}, u'network_qos_policy_id': None, u'qos_policy_id': None, u'allowed_address_pairs': [], u'admin_state_up': True, u'network_id': u'971ffda2-e567-40a0-a2c8-b31a577fd4d3', u'segmentation_id': 10, u'device_owner': u'network:router_interface', u'physical_network': None, u'mac_address': u'fa:16:3e:81:1b:37', u'device': u'tapb1eaae00-e5', u'port_security_enabled': False, u'port_id': u'b1eaae00-e504-41f8-93a4-643687155bea', u'fixed_ips': [{u'subnet_id': u'3d596991-de8f-4ae4-8913-89426a8abbd7', u'ip_address': u'10.0.0.1'}], u'network_type': u'vxlan', u'security_groups': []}, {u'profile': {}, u'network_qos_policy_id': None, u'qos_policy_id': None, u'allowed_address_pairs': [], u'admin_state_up': True, u'network_id': u'96609bfa-0e22-4bb7-8dba-6ef532ea6076', u'segmentation_id': None, u'device_owner': u'network:dhcp', u'physical_network': u'provider', u'mac_address': u'fa:16:3e:5f:94:7d', u'device': u'tap795e6e86-94', u'port_security_enabled': False, u'port_id': u'795e6e86-94af-4b72-ae1a-5a324a017774', u'fixed_ips': [{u'subnet_id': u'afa7d205-3026-439f-aca7-295a9f9b2a71', u'ip_address': u'10.62.227.150'}], u'network_type': u'flat', u'security_groups': []}, {u'profile': {}, u'network_qos_policy_id': None, u'qos_policy_id': None, u'allowed_address_pairs': [], u'admin_state_up': True, u'network_id': u'85925305-b477-4cc6-9654-67d9bf1e7cd8', u'segmentation_id': 25, u'device_owner': u'network:dhcp', u'physical_network': None, u'mac_address': u'fa:16:3e:25:27:99', u'device': u'tap798c87d1-a2', u'port_security_enabled': False, u'port_id': u'798c87d1-a2d8-4df7-b7fc-5ab30918a0de', u'fixed_ips': [{u'subnet_id': u'4575c7f1-7f08-4917-9904-ec65af38619b', u'ip_address': u'20.0.0.100'}], u'network_type': u'vxlan', u'security_groups': []}, {u'profile': {}, u'network_qos_policy_id': None, u'qos_policy_id': None, u'allowed_address_pairs': [], u'admin_state_up': True, u'network_id': u'85925305-b477-4cc6-9654-67d9bf1e7cd8', u'segmentation_id': 25, u'device_owner': u'network:router_interface', u'physical_network': None, u'mac_address': u'fa:16:3e:9f:18:a9', u'device': u'tap0bb8efeb-10', u'port_security_enabled': False, u'port_id': u'0bb8efeb-108f-409a-82e7-c4c20f0d4f69', u'fixed_ips': [{u'subnet_id': u'4575c7f1-7f08-4917-9904-ec65af38619b', u'ip_address': u'20.0.0.1'}], u'network_type': u'vxlan', u'security_groups': []}]
(4) 对需要处理的设备,调用 self.process_network_devices(device_info) 函数进行处理
(5). 调用 plug_interface
interface_plugged = self.mgr.plug_interface(network_id, segment,device, device_details['device_owner'])
(6). 需要的话,使用已经配置的或者新建 linux brige,并将 physical interface 设备加入其中
bridge_name = self.get_existing_bridge_name(physical_network) #获取为 physical network 配置的 linux bridge
bridge_name = self.get_bridge_name(network_id) #或者根据 network id 生成 bridge name
(7).根据不同的网络类型,分别处理 vxlan bridge,flat bridge 和 vlan bridge
    def ensure_physical_in_bridge(self, network_id,
                                  network_type,
                                  physical_network,
                                  segmentation_id):
        if network_type == p_const.TYPE_VXLAN:
            if self.vxlan_mode == lconst.VXLAN_NONE:
                LOG.error(_LE("Unable to add vxlan interface for network %s"),
                          network_id)
                return
            return self.ensure_vxlan_bridge(network_id, segmentation_id)

        # NOTE(nick-ma-z): Obtain mappings of physical bridge and interfaces
        physical_bridge = self.get_existing_bridge_name(physical_network)
        physical_interface = self.interface_mappings.get(physical_network)
        if not physical_bridge and not physical_interface:
            LOG.error(_LE("No bridge or interface mappings"
                          " for physical network %s"),
                      physical_network)
            return
        if network_type == p_const.TYPE_FLAT:
            return self.ensure_flat_bridge(network_id, physical_bridge,
                                           physical_interface)
        elif network_type == p_const.TYPE_VLAN:
            return self.ensure_vlan_bridge(network_id, physical_bridge,
                                           physical_interface,
                                           segmentation_id)
对于 flat 类型的网络,调用 ensure_physical_in_bridge
def ensure_physical_in_bridge(self, network_id,network_type,physical_network,segmentation_id)
  if network_type == p_const.TYPE_FLAT:
    return self.ensure_flat_bridge(network_id, physical_bridge,physical_interface)
如果有配置 physical bridge 的话,使用它;否则创建 bridge,并将物理网卡配置的 ip 地址和 gateway 从网卡挪到 linux bridge
def ensure_flat_bridge(self, network_id, phy_bridge_name,physical_interface):
  """Create a non-vlan bridge unless it already exists."""
  if phy_bridge_name:
    return self.ensure_bridge(phy_bridge_name) #获取预先配置好的 linux bridge
  else:
    bridge_name = self.get_bridge_name(network_id)
    ips, gateway = self.get_interface_details(physical_interface)
    if self.ensure_bridge(bridge_name, physical_interface, ips,gateway): #创建 bridge
    return physical_interface
对于 vxlan 类型的 network,需要创建 vxlan interface
    def ensure_vxlan_bridge(self, network_id, segmentation_id):
        """Create a vxlan and bridge unless they already exist."""
        interface = self.ensure_vxlan(segmentation_id)
        if not interface:
            LOG.error(_LE("Failed creating vxlan interface for "
                          "%(segmentation_id)s"),
                      {segmentation_id: segmentation_id})
            return
        bridge_name = self.get_bridge_name(network_id)
        self.ensure_bridge(bridge_name, interface)
        return interface
创建 vxlan interface:
    def ensure_vxlan(self, segmentation_id):
        """Create a vxlan unless it already exists."""
        interface = self.get_vxlan_device_name(segmentation_id)
        if not ip_lib.device_exists(interface):
            LOG.debug("Creating vxlan interface %(interface)s for "
                      "VNI %(segmentation_id)s",
                      {'interface': interface,
                       'segmentation_id': segmentation_id})
            args = {'dev': self.local_int}
            if self.vxlan_mode == lconst.VXLAN_MCAST:
                args['group'] = self.get_vxlan_group(segmentation_id)
            if cfg.CONF.VXLAN.ttl:
                args['ttl'] = cfg.CONF.VXLAN.ttl
            if cfg.CONF.VXLAN.tos:
                args['tos'] = cfg.CONF.VXLAN.tos
            if cfg.CONF.VXLAN.l2_population:
                args['proxy'] = cfg.CONF.VXLAN.arp_responder
            try:
                int_vxlan = self.ip.add_vxlan(interface, segmentation_id,
                                              **args)
(8). 将 tap 设备加入到 linux bridge 中
bridge_lib.BridgeDevice(bridge_name).addif(tap_device_name)
(9). 如果将一个 tap 设备被删除,那么 linux-bridge-agent 会发现:
2016-10-26 10:29:58.347 30219 INFO neutron.agent.securitygroups_rpc [req-e3264065-6414-4b5a-8d2b-dfafad6fdde8 - - - - -] Remove device filter for set(['tap60dbdc2f-a0'])
2016-10-26 10:29:58.433 30219 INFO neutron.plugins.ml2.drivers.agent._common_agent [req-e3264065-6414-4b5a-8d2b-dfafad6fdde8 - - - - -] Attachment tap60dbdc2f-a0 removed
2016-10-26 10:29:58.536 30219 INFO neutron.plugins.ml2.drivers.agent._common_agent [req-e3264065-6414-4b5a-8d2b-dfafad6fdde8 - - - - -] Port tap60dbdc2f-a0 updated.
3. 关于上述工作过程的简单结论
3.1 简单结论
- l3agent 和 dhcpagent 创建 network namespace 时创建 tap 设备,和 network namespace 中的 interface 是一对 veth pair。当手工删除 tap 设备时,相应的 veth endpoint 也会被删除。
- linuxbridgeagent 不断扫描服务器端和本地的 tap 设备
- linuxbridgeagent 获取需要增加和修改的tap设备列表
- 对于需要增加的 tap 设备,获取其详细信息,主要是 network_id,network_type,physical_network,segmentation_id,device_owner 等,然后根据这些信息,创建 linux bridge,并加入所需要的 interface
- 创建所需要的 linux bridge,并将 physical interface (provider network 的 physical interface 或者 tenant network 的 vxlan interface)加入 bridge,并且将 tap 设备也加入该 bridge
- 如果发现某个 linux bridge 没有创建出来,首先需要查看有没有相应的 tap 设备存在;如果 tap 设备不存在,则查看相应的 qdhcp 或者 qrouter 中时候有interface
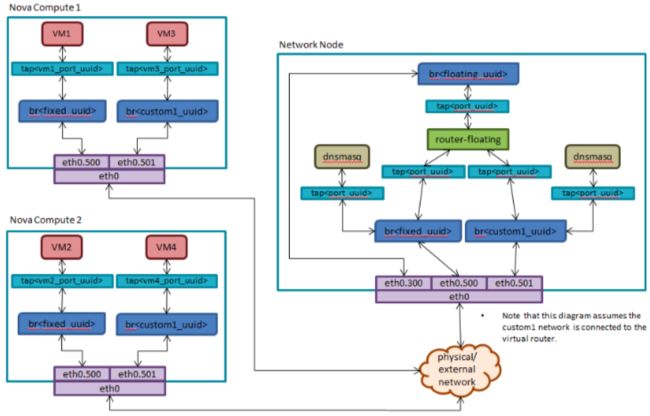
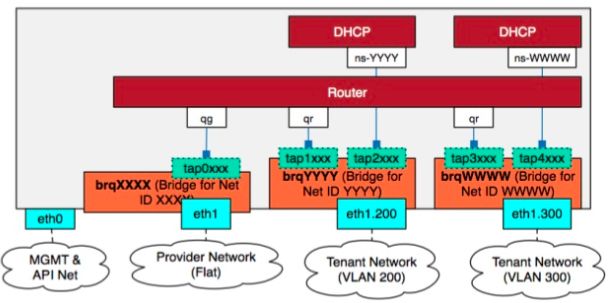
具有多个 VLAN 租户网络时候的网络元素示意图:
3.2 关于 unnumber interface
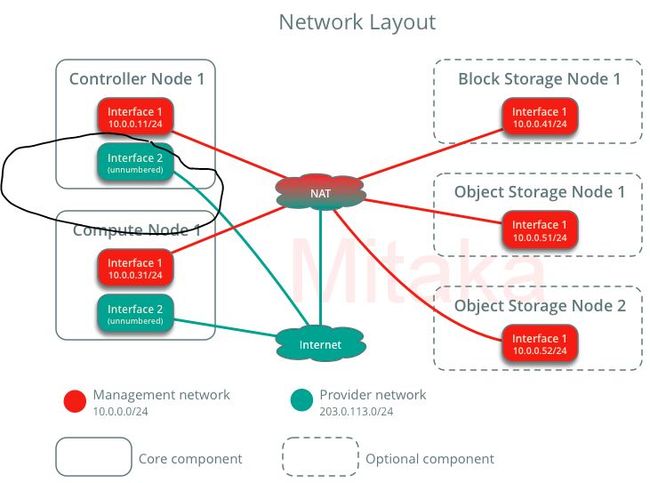
OpenStack 官方的 host networking 配置中,连接外网的 interface 可以是 unnumbered 的,从字面意思理解,就是该 interface 上不需要配置 IP 地址。
配置的时候,修改 /etc/network/interfaces:
# The provider network interface
auto ens224
iface ens224 inet manual
up ip link set dev $IFACE up
down ip link set dev $IFACE down
配置好以后:
root@controller:/home/sammy# ifconfig ens224
ens224    Link encap:Ethernet  HWaddr 00:50:56:9c:4d:94
          UP BROADCAST RUNNING MULTICAST  MTU:1500  Metric:1
          RX packets:27300737 errors:0 dropped:0 overruns:0 frame:0
          TX packets:61547 errors:0 dropped:0 overruns:0 carrier:0
          collisions:0 txqueuelen:1000
          RX bytes:31951077598 (31.9 GB)  TX bytes:5966060 (5.9 MB)

root@controller:/home/sammy# ifconfig brq96609bfa-0e
brq96609bfa-0e Link encap:Ethernet  HWaddr 00:50:56:9c:4d:94
          UP BROADCAST RUNNING MULTICAST  MTU:1500  Metric:1
          RX packets:32855 errors:0 dropped:0 overruns:0 frame:0
          TX packets:2 errors:0 dropped:0 overruns:0 carrier:0
          collisions:0 txqueuelen:1000
          RX bytes:2731030 (2.7 MB)  TX bytes:84 (84.0 B)
具体原理不详,但是应该是因为 qrouter 的 qg network interface 和物理网络中的路由器的网卡之间是网络二层,因此中间的设备都是属于二层的,因此不需要处于网络三层的 IP 地址。
4. 使用 linux bridge 时的拓扑结构
4.1 网络节点上
为了更清楚,我们来对比着看 linux bridge 和 ovs 的两种方案:
linux 方案:
网络服务:
- Linux bridge agent
- L3 agent
- DHCP agent
- Metadata agent
Linux bridge agent 会为每个 VLAN 虚拟网络创建一个 VLAN Bridge,它连接多个网元:
- VLAN 子接口,从物理网卡(图中的 interface3)上创建,每个子接口对应一个VLAN ID,其名称格式为 device.sid,其中 device 是物理网卡名字比如 eth0,sid 是 vlan id。
- 连接虚拟机的 tap 接口
- 和 qrouter 连接的 tap 接口
- 和该网络的 qdhcp 连接的 tap 接口
如果同时有 VXLAN 虚拟网络的话(linux-bridge 不支持GRE 隧道模式),会为每个 VLAN 虚拟网络创建一个 Tunnel bridge。它连接多个网元:
- vxlan interface,这种接口每个虚拟网络一个,名字格式为 vxlan-sid,其中 sid 是分段ID。
- 连接虚拟机的 tap 接口
- 和 qrouter 连接的 tap 接口
- 和该网络的 qdhcp 连接的 tap 接口
安全组规则在 tunnel bridge 和 vlan bridge 上。
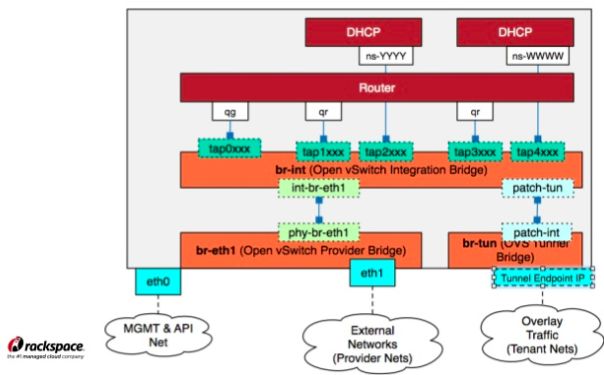
OVS 方案:
这里面,br-int 会负责加本地 VLAN 标签,br-tun 会负责将 VLAN ID 转换为 VXLAN ID。
4.2 计算节点上
同样来对比着看。
linux bridge:
网络服务:
- Linux bridge agent
和网络节点类似,只不过没有 qrouter 和 qdhcp,不在赘述。
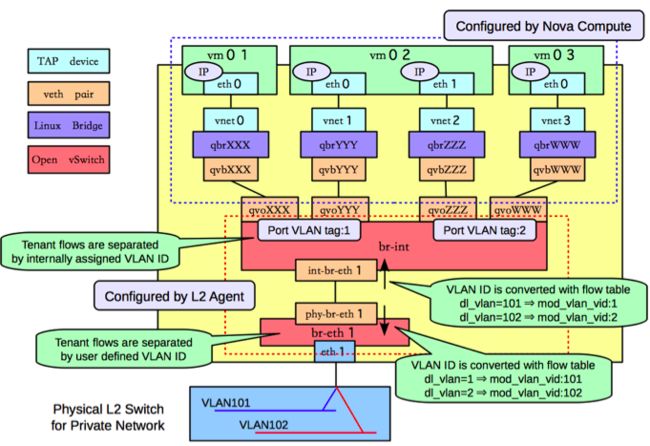
OVS:
OVS 放在在 br-int 上实现 VLAN 标签,在 br-tun 上实现隧道,在 qbr linux bridge 上实现安全组。
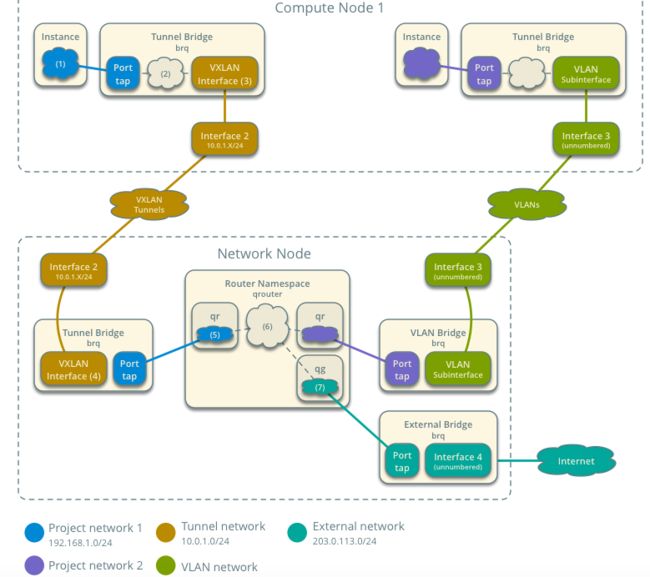
4.3 网络路径 - 南北向网络流向
VLAN 网络和VXLAN 网络井水不犯河水。这图上的配置中,计算节点和网络节点上的物理网卡都分开了。
4.4 网络路径 - 东西向(不同网络)
4.5 网络路径 - 东西向(同一个网络)
请详细说明和配置,请参阅参考文档。
5. 一点结论
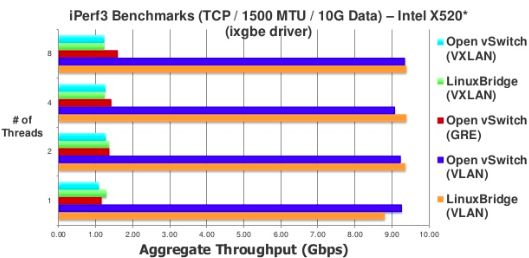
和基于 OVS 的二层网络相比,
- 功能和架构上:基于 linux bridge 的实现还是有一些短处,比如每个虚拟网络就需要一个网桥,这在大规模环境中会带领资源使用和管理上的问题。其好处是本身架构比较清晰。
- 性能上:基本上差不多,如下图所示,不管是 vxlan 还是 vlan。
参考资料:
- https://docs.openstack.org/kilo/networking-guide/scenario_legacy_lb.html
- https://www.slideshare.net/JamesDenton1/2014-openstack-summit-neutron-ovs-to-linuxbridge-migration
- https://robhirschfeld.com/2013/10/16/openstack-neutron-using-linux-bridges-technical-explanation/
欢迎大家关注我的个人公众号:
![]()
