OpenCV学习笔记(一)——体验OpenCV
前言:
一、图像数字化
OpenCV中声明了一个读取本地磁盘中的灰度图像并转换为Mat的函数:
Mat imread(const string\& filename, int flags=1)
在OpenCV 3.1版本中,其参数和解释如下所示:
filename:表示图像文件名(可以包括路径)
flags:IMREAD_COLOR表示彩色图像,等价于 flags=-1
IMREAD_ GRAYSCALE表示灰度图像,等价于 flags=0
IMREAD_ ANYCOLOR表示任意图像,等价于 flags=1
既然可以将一张图像转换为一个数字矩阵Mat,那么,当然也可以将矩阵Mat对象作为一个图像进行显示啦,在OpeCV中的highgui模块中定义了imshow函数来完成该功能。
void imshow(const string\& winname, InputAraay mat)
其参数解释如下所示:
winname:表示显示图像的窗口的名字
mat:mat对象
有了 imread和 imshow这两个函数以后,我们就可以完成读取并显示图像的操作了,我们写下如下代码:
#include
#include


using namespace cv;
using namespace std;
int main()
{
	Mat img = imread("test.jpg");
	if (img.empty())
	{
		printf("could not load the image..");
		return -1;
	}
	namedWindow("原始图像", CV_WINDOW_AUTOSIZE);
	imshow("原始图像", img);
	waitKey(0);

	system("PAUSE");
	return 0;

}
运行程序,结果如下:

我们知道,图像在计算机看来就是一个数字矩阵,即mat,现在我们来打印一下imread另外一张图片test1.jpg(因为test.jpg背景为纯白,打印后的255值太多不好观察)后的mat对象,我们将代码修改如下:
#include
#include


using namespace cv;
using namespace std;
int main()
{
	Mat img = imread("test1.jpg");
	if (img.empty())
	{
		printf("could not load the image..");
		return -1;
	}

	//使用指针读取
	for (int r = 0; r < img.rows; ++r)
	{
		const uchar* ptr = img.ptr(r);
		for (int c = 0; c < img.cols; ++c)
		{
			printf("%2d ", ptr[c]);
		}
		printf("\n");
	}
展示mat对象的前两行元素值如下:

二、简单的平滑处理
利用矩阵的卷积运算的定义,我们接下来利用一个大小为3*3的卷积核对原图像做平滑处理,原理如下所示:

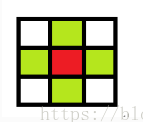
接下来我们手动编写该过程的实现代码:
#include
#include
#define kernel_rows 3
using namespace cv;
using namespace std;
int main()
{
Mat img = imread("test.jpg");
if (img.empty())
{
printf("could not load the image..");
return -1;
}
int cols = (img.cols - 1) * img.channels();
int rows = img.rows;
int gap_col = img.channels();
Mat dst = Mat::zeros(img.size(), img.type());
for (int row = ((kernel_rows - 1) / 2); row <= rows - ((kernel_rows - 1) / 2); ++row)
{
// Mat.ptr(int i = 0) 获取像素矩阵的指针,索引i表示第几行,从0开始计行数。
// 获得当前行指针const uchar* current = img.ptr(row);
// 获取当前像素点P(row, col)的像素值 p(row, col) = current[col]
const uchar* current_row = img.ptr(row);
const uchar* prior_row = img.ptr(row);
const uchar* next_row = img.ptr(row);
uchar* dst_row = dst.ptr(row);
for (int col = 0 + img.channels(); col <= cols; ++col)
{
dst_row[col] = saturate_cast(4 * current_row[col] - current_row[col - gap_col] - current_row[col + gap_col] - prior_row[col] - next_row[col]);
//像素范围处理saturate_cast
// saturate_cast( - 100),返回 0。
// saturate_cast(288),返回255
// saturate_cast(100),返回100
// 这个函数的功能是确保RGB值得范围在0~255之间
}
}
namedWindow("原始图像", CV_WINDOW_AUTOSIZE);
imshow("原始图像", img);
waitKey(0);
namedWindow("修改后图像", CV_WINDOW_AUTOSIZE);
imshow("修改后图像", dst);
waitKey(0);
system("PAUSE");
return 0;
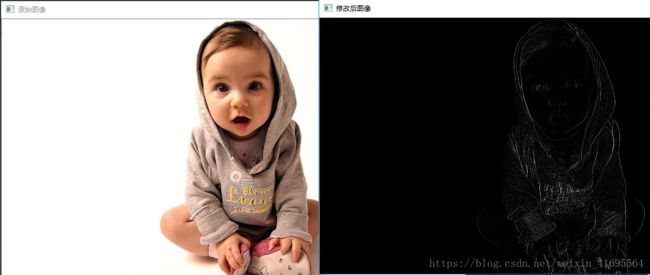
} 运行程序,得到结果如下:
三、调用API接口实现上述过程
其实OpenCV中就内置了相关的函数实现上述功能,自己手动编写实现代码是为了加深自己对算法原理的理解,接下来我们调用API——filter2D( )来达到相同的效果。
#include
#include
#define   kernel_rows 3

using namespace cv;
using namespace std;
int main()
{
	Mat img = imread("test.jpg");
	if (img.empty())
	{
		printf("could not load the image..");
		return -1;
	}
	// 打印卷积核
	Mat kernel = (Mat_(3, 3) << 0, -1, 0, -1, 4, -1, 0, -1, 0);   //初始化一个卷积核
	for (int i = 0; i < kernel.rows; ++i)
	{
	for (int j = 0; j < kernel.cols; ++j)
	{
	printf("%2d ", kernel.at(i,j));
	}
	printf("\n");
	}

	Mat dst = Mat::zeros(img.size(),img.type());
	// 函数调用filter2D功能
	// 定义掩膜:Mat kernel = (Mat_(3, 3) << 0, -1, 0, -1, 5, -1, 0, -1, 0);
	// filter2D(src, dst, src.depth(), kernel);
	// 其中src与dst是Mat类型变量、src.depth表示位图深度,有32、24、8等。
	filter2D(img,dst,img.depth(),kernel);
	namedWindow("原始图像", CV_WINDOW_AUTOSIZE);
	imshow("原始图像", img);
	waitKey(0);
	namedWindow("修改后图像", CV_WINDOW_AUTOSIZE);
	imshow("修改后图像", dst);
	waitKey(0);
	system("PAUSE");
	return 0;

}
运行程序,结果如下所示: