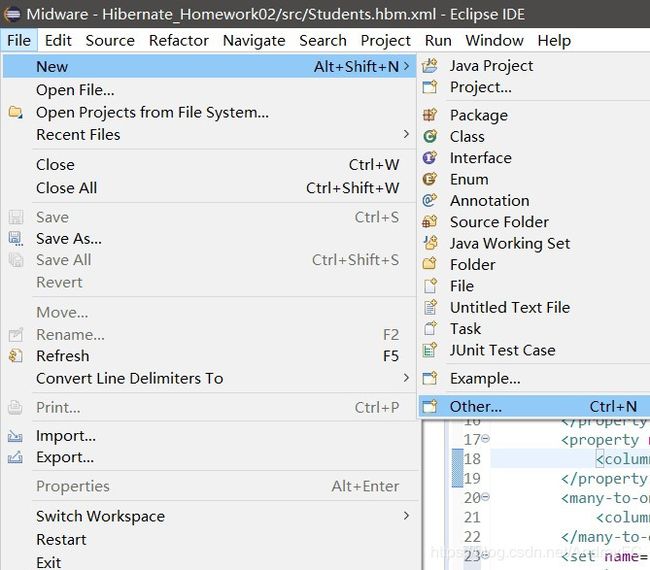
有关Hibernate和JDBC的一点总结
其实是我的中间件实验内容的总结哈哈哈
- 使用Hibernate和JDBC所需的jar包和驱动
- 总体分析代码
- 总结
使用Hibernate和JDBC所需的jar包和驱动
在这之前要给eclipse装上hibernate tools,在官网里找到跟自己eclipse相匹配的JBoss Tools,我的是2019-06版本的eclipse,所以我选的是

而后进行下载

因为众所周知,eclipse直接通过在线下载的速度实在不敢恭维,所以我还是离线完成的。至于为什么是叫JBoss Tools,而不是Hibernate Tools,百度一下你就知道嘻嘻~
装完后看看是否成功就:
看看有没有可以新建的hibernate文件,如果有就说明装好了,没有就emmmm再找找问题吧。。。
【注】其实myeclipse不用这么麻烦,它有支持hibernate的环境,但我用eclipse用惯了,就不换了。
安装完后,就是一下的jar包啦:
hibernate-release-5.3.10.Final\hibernate-release-5.3.10.Final\lib\required里的jar包是hibernate的核心
我用的mysql,JABC驱动是mysql-connector-java-5.1.48-bin.jar
以及Junit测试junit-4.10.jar
以上官网里都有下载的资源
导包:
首先在自己的库里导包,这样以后要用的话比较容易build path
在Window->Prefences->Java->Build Path->User Libraries

分别建立好这三个库后,从文件夹里把上述的jar包复制到库内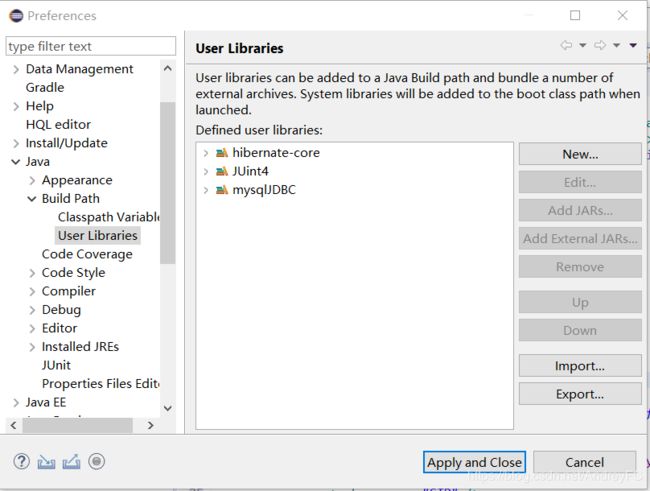
总体分析代码
以上完成后,终于来到正题啦!
新建一个Java文件,给这个文件build path


康图就好,不解释了
而后,写我们的实体类
总共四张表,Student,Class,Course,Score。
我的理解是Student的外键是Class的主键,Score是Student和Course多对多关联的中间表,但是这个中间表有除了两个外键以外的字段。
有关实体类需要强调的几点:
- 公有类
- 提供公有的不带参数的默认构造方法
- 属性必须私有
- 属性必须使用setter和getter封装
首先解决简单的Class和Student的一对多的关系
//Class信息表
public class Classes implements Serializable {
	private static final long serialVersionUID = 1L;
	private int ClassId;
	private String ClassName;
	private Set<Students> students = new HashSet<Students>();

	//默认构造、setter和getter省略
}
//学生类
public class Students {
	private int sid;//学号
	private String sname;//名字
	private String gender;//性别
	private Date birthday;//出生日期
	private Classes classes;//班级

	//默认构造、setter和getter省略
}
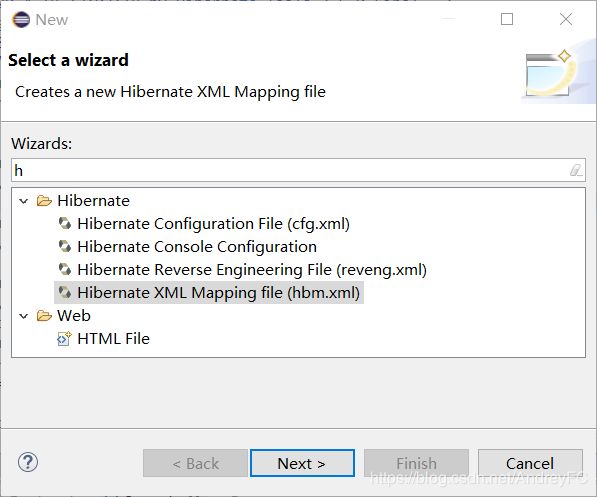
而后生成对应的Classes.hbm.xml和Students.hbm.xml
<hibernate-mapping>
    <class name="Classes" table="CLASSES">
        <id name="ClassId" type="int">
            <column name="CLASSID" />
            <generator class="assigned" />
        </id>
        <property name="ClassName" type="java.lang.String">
            <column name="CLASSNAME" />
        </property>
        <set name="students" table="STUDENTS"  inverse="false" lazy="true">
            <key>
                <column name="CLASSID" />
            </key>
            <one-to-many class="Students" />
        </set>
    </class>
</hibernate-mapping>
<hibernate-mapping>
    <class name="Students" table="STUDENTS">
        <id name="sid" type="int">
            <column name="SID" />
            <generator class="assigned" />
        </id>
        <property name="sname" type="java.lang.String">
            <column name="SNAME" />
        </property>
        <property name="gender" type="java.lang.String">
            <column name="GENDER" />
        </property>
        <property name="birthday" type="date">
            <column name="BIRTHDAY" />
        </property>
        <many-to-one name="classes" class="Classes" access="field" fetch="join">
            <column name="CLASSID" />
        </many-to-one>
    </class>
</hibernate-mapping>
上述代码是编译器自动生成的,那我们要进行级联的话,就需要在一对多的“一”方加入cascade="all"(图方便写的all)。代码如下:
<hibernate-mapping>
    <class name="Classes" table="CLASSES">
        <id name="ClassId" type="int">
            <column name="CLASSID" />
            <generator class="assigned" />
        </id>
        <property name="ClassName" type="java.lang.String">
            <column name="CLASSNAME" />
        </property>
        <set name="students" table="STUDENTS" cascade="all" inverse="false" lazy="true">
            <key>
                <column name="CLASSID" />
            </key>
            <one-to-many class="Students" />
        </set>
    </class>
</hibernate-mapping>
再来解决多对多的问题
首先看Course,还是先写好实体类
//课程信息表
public class Courses {
	private String CourseID;
	private String CourseName;
	private int CoureseTime;
	private int CourseGrade;

	//默认构造、setter和getter省略
}
那么,Course表和Student表是多对多的关系,从而生成Score表,一个学生可以上多门课,每门课有每门课的成绩,一门课可以容纳多个学生。
之前在网上看到manytomany的写法,这样貌似只能生成仅有两个外键的中间表,但我们需要加入成绩这一新字段,所以解决方法是:把manytomany改成两个onetomany,并且Score也得有一个实体
首先Student的实体类代码如下:
public class Students {
	private int sid;//学号
	private String sname;//名字
	private String gender;//性别
	private Date birthday;//出生日期
	private Classes classes;//班级
	private Set<Score> scores = new HashSet<Score>();
	//默认构造、setter和getter省略
Course实体类代码如下:
//课程信息表
public class Courses {
	private String CourseID;
	private String CourseName;
	private int CoureseTime;
	private int CourseGrade;
	private Set<Score> scores = new HashSet<Score>();
	//默认构造、setter和getter省略
}
Score实体类代码如下:
//成绩表
public class Score {
	private int scoreId;
	Students students;
	Courses courses;
	private int grade;
	//默认构造、setter和getter省略
}
而后生成对应的Students.hbm.xml和Courses.hbm.xml和Score.hbm.xml配置文件代码如下:
//Students.hbm.xml
<hibernate-mapping>
    <class name="Students" table="STUDENTS">
        <id name="sid" type="int">
            <column name="SID" />
            <generator class="assigned" />
        </id>
        <property name="sname" type="java.lang.String">
            <column name="SNAME" />
        </property>
        <property name="gender" type="java.lang.String">
            <column name="GENDER" />
        </property>
        <property name="birthday" type="date">
            <column name="BIRTHDAY" />
        </property>
        <many-to-one name="classes" class="Classes" access="field" fetch="join">
            <column name="CLASSID" />
        </many-to-one>
        <set name="scores" table="SCORE" inverse="false" lazy="false">
            <key>
                <column name="SID" />
            </key>
            <one-to-many class="Score" />
        </set>
    </class>
</hibernate-mapping>
//Courses.hbm.xml
<hibernate-mapping>
    <class name="Courses" table="COURSES">
        <id name="CourseID" type="java.lang.String">
            <column name="COURSEID" />
            <generator class="assigned" />
        </id>
        <property name="CourseName" type="java.lang.String">
            <column name="COURSENAME" />
        </property>
        <property name="CoureseTime" type="int">
            <column name="COURESETIME" />
        </property>
        <property name="CourseGrade" type="int">
            <column name="COURSEGRADE" />
        </property>
        <set name="scores" table="SCORE" inverse="true" lazy="false">
            <key>
                <column name="COURSEID" />
            </key>
            <one-to-many class="Score" />
        </set>
    </class>
</hibernate-mapping>
//Score.hbm.xml
<hibernate-mapping>
    <class name="Score" table="SCORE">
        <id name="scoreId" type="int">
            <column name="SCOREID" />
            <generator class="native" />
        </id>
        <many-to-one name="students" cascade="all" class="Students" fetch="join">
            <column name="SID" />
        </many-to-one>
        <many-to-one name="courses" cascade="all" class="Courses" fetch="join">
            <column name="COURSEID" />
        </many-to-one>
        <property name="grade" type="int">
            <column name="GRADE" />
        </property>
    </class>
</hibernate-mapping>
测试代码如下:
import java.text.ParseException;
import java.text.SimpleDateFormat;
import java.util.Date;
import java.util.HashSet;
import java.util.Set;

import org.hibernate.Session;
import org.hibernate.SessionFactory;
import org.hibernate.Transaction;
import org.hibernate.cfg.Configuration;

import org.hibernate.service.ServiceRegistry;
import org.hibernate.service.ServiceRegistryBuilder;
import org.junit.After;
import org.junit.Before;
import org.junit.Test;

//测试类
public class StudentsTest {

	private SessionFactory sessionFactory;
	private Session session;
	private Transaction transaction;

	@Before
	public void init() {
		// 创建配置对象
		Configuration config = new Configuration().configure();
		// 创建服务注册对象
		ServiceRegistry serviceRegistry = new ServiceRegistryBuilder().applySettings(config.getProperties())
				.buildServiceRegistry();
		// 创建会话工厂对象
		sessionFactory = config.buildSessionFactory(serviceRegistry);
		// 会话对象
		session = sessionFactory.openSession();
		// 开启事物
		transaction = session.beginTransaction();

	}

	@After
	public void destory() {
		transaction.commit();// 提交事务
		session.close();// 关闭会话
		sessionFactory.close();// 关闭会话工厂
	}

	@Test
	public void TestSaveStudents() throws ParseException {
		// 生成学生对象
		String date1 = "1987.04.15";
		String date2 = "1988.10.29";
		String date3 = "1989.05.20";
		String date4 = "1986.07.13";
		Date datea = new SimpleDateFormat("yyyy.MM.dd").parse(date1);
		// 生成4个学生对象
		Students student1 = new Students();
		student1.setSid(201401001);
		student1.setSname("令狐冲");
		student1.setBirthday(datea);
		student1.setGender("男");

		Date dateb = new SimpleDateFormat("yyyy.MM.dd").parse(date2);
		Students student2 = new Students();
		student2.setSid(201405026);
		student2.setSname("任盈盈");
		student2.setBirthday(dateb);
		student2.setGender("女");

		Date datec = new SimpleDateFormat("yyyy.MM.dd").parse(date3);
		Students student3 = new Students();
		student3.setSid(201402003);
		student3.setSname("林平之");
		student3.setBirthday(datec);

		Date dated = new SimpleDateFormat("yyyy.MM.dd").parse(date4);
		Students student4 = new Students();
		student4.setSid(201420005);
		student4.setSname("风清扬");
		student4.setBirthday(dated);
		student4.setGender("男");

		Set<Students> students = new HashSet<Students>();
		students.add(student1);
		students.add(student3);

		Set<Students> students2 = new HashSet<Students>();
		students2.add(student2);
		Set<Students> students3 = new HashSet<Students>();
		students3.add(student4);

		// 生成班级信息
		Classes classes1 = new Classes();
		classes1.setClassId(1001);
		classes1.setClassName("软件1班");
		Classes classes2 = new Classes();
		classes2.setClassId(1002);
		classes2.setClassName("软件2班");
		Classes classes3 = new Classes();
		classes3.setClassId(1003);
		classes3.setClassName("软件3班");
		Classes classes4 = new Classes();
		classes4.setClassId(1004);
		classes4.setClassName("软件4班");

		// 向班级信息里添加学生信息
		classes1.setStudents(students);
		classes2.setStudents(students2);
		classes4.setStudents(students3);

		//因为使用级联,故此处无需save student


		// 生成课程信息
		Courses course1 = new Courses();
		course1.setCourseID("C1101");
		course1.setCourseName("中间件");
		course1.setCoureseTime(48);
		course1.setCourseGrade(3);

		Courses course2 = new Courses();
		course2.setCourseID("C1102");
		course2.setCourseName("Oracle数据库");
		course2.setCoureseTime(22);
		course2.setCourseGrade(2);

		Courses course3 = new Courses();
		course3.setCourseID("C1103");
		course3.setCourseName("数据结构");
		course3.setCoureseTime(40);
		course3.setCourseGrade(3);

		Courses course4 = new Courses();
		course4.setCourseID("C1104");
		course4.setCourseName("设计模式");
		course4.setCoureseTime(40);
		course4.setCourseGrade(3);

		/*
		 * session.save(course1); session.save(course2); session.save(course3);
		 * session.save(course4);
		 */

		/*
		 * Set coursesSet1 = new HashSet(); Set coursesSet2 =
		 * new HashSet(); Set coursesSet3 = new HashSet();
		 * coursesSet1.add(course1); coursesSet1.add(course4); coursesSet2.add(course1);
		 * coursesSet3.add(course1); coursesSet3.add(course3); coursesSet3.add(course4);
		 */

		//生成成绩表信息
		Score score1 = new Score();
		Score score2 = new Score();
		Score score3 = new Score();

		Score score4 = new Score();
		Score score5 = new Score();
		Score score6 = new Score();


		//学生1有2条课程成绩记录
		score1.setStudents(student1);
		score1.setCourses(course1);
		score1.setGrade(60);

		score2.setStudents(student1);
		score2.setCourses(course4);
		score2.setGrade(75);

		student1.getScores().add(score1);
		student1.getScores().add(score2);

		//学生3有1条课程成绩记录
		score3.setStudents(student3);
		score3.setCourses(course1);
		score3.setGrade(90);
		student3.getScores().add(score3);

		//学生4有3条课程成绩记录
		score4.setStudents(student4);
		score4.setCourses(course1);
		score4.setGrade(85);

		score5.setStudents(student4);
		score5.setCourses(course3);
		score5.setGrade(90);

		score6.setStudents(student4);
		score6.setCourses(course4);
		score6.setGrade(88);

		student4.getScores().add(score4);
		student4.getScores().add(score5);
		student4.getScores().add(score6);


		session.save(score1);
		session.save(score2);
		session.save(score3);
		session.save(score4);
		session.save(score5);
		session.save(score6);


		session.save(classes1);
		session.save(classes2);
		session.save(classes3);
		session.save(classes4);
		session.flush();

	}

	@Test
	public void testUpdateStudents() {
		Students students = (Students) session.get(Students.class, 201402003);
		students.setGender("男");
		session.update(students);
		System.out.println(students);
	}

	@Test
	public void testDeleteClasses() {
		//删除班级,同时根据级联也删除了该班级的学生
		Classes classes = (Classes) session.get(Classes.class, 1001);
		session.delete(classes);
		// System.out.println(students);
	}
}

/* 看网课老师说的:
 * get和load的区别 :
 * 1. 在不考虑缓存的情况下,get方法会在调用后立刻向数据库发出sql语句,
 * 返回持久化对象 load方法在调用后返回一个代理对象,该代理对象只保存
 * 了实体对象的id,直到使用对象的非主键属性时才会发出sql语句
 * 2. 查询数据库中不存在的数据时,get方法返回null,load方法抛出异常
 * org.hibernate.ObjectNotFoundException
 */
测试应该是没问题的,如果有问题希望大佬们多多指教呀!
总结
- 级联cascade要记得用!
- inverse的使用是在manytomany的时候,某一方需要放弃维护外键时注意。inverse="true"表示放弃
就酱啦!~希望觉得对自己有帮助的朋友们点个赞留个言再走吧嘻嘻嘻