C++ — 类型萃取
类型萃取
在编程中我们可能时常会听到类型萃取这个高大上的"学术名词",我们今天来探究一下这个高大上的学术名词
到底是何方神圣,先看看官方的解释类型萃取使用模板技术来萃取类型(包含自定义类型和内置类型)的某些特
性,用以判断该类型是否含有某些特性,从而在泛型算法中来对该类型进行特殊的处理用来提高效率或者其他。
例如:在STL中的destory算法根据函数的参数类型的特性:是否有trivial destructor来选择对应的策略来进行
destory,如果为内置类型,则不调用该类型的destructor,否则对迭代器范围内的对象调用destructor来进行
destory。
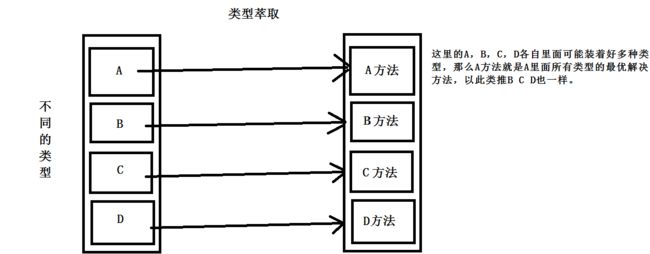
类型萃取的意思其实一点都不难,就是兵来将挡,水来土掩的意思,也就是我根据你传递过来的类型,我再决定
调用那种方法.举个例子吧,当你在使用STL的顺序表的时,当类型为内置类型的时候系统程序使用realloc开辟
空间很有效率,当时当类型为自定义类型时,用realloc显然不可以的,这个时候又用new的方式来。
首先我们应该明白,类型萃取原理是什么??它是依据什么来实现的??
特化==>
类型萃取依靠的就是 模板的特化
模板特化分为两种: 全特化和偏特化
模板为什么要特化?
因为编译器认为,对于特定的类型,如果你能对某一功能更好的实现,那么就该听你的。
今天我简单认识一下特化怎么使用就好,这个我会有一个博客专门写:
现在我们介绍一下全特化:
看下面的例子:
template
class A
{
public:
	A()
	:a(0)
	{}
	~A()
	{
		cout << "这里走了原始的模板"<< endl;
	}
protected:
	T a;
};

template<>
class A
{
public:
	A()
	:a(0)
	{}
	~A()
	{
		cout << "这里走了全特化后int的版本" << endl;
	}
protected:
	int a;
};

void test2()
{
	A a;
	A b;
}
我们先看看程序运行的结果:
我们发现按照我们的意思解释这个就很通顺,a先实例化然后它后析构,b发生了全特化,所以它调用的
是int的模板版本。
下面是我调试时实例化b的时候,发生的事情,程序走的是int类型特化版本,有图有真相:
今天用的全特化就够用了,我们重点是理解类型萃取,好了既然我们了解到类型萃取的原理,现在我们看类型
萃取怎么使用的!
应用实例:
今天我就从顺序表SeqList这里入手:
注意这个顺序表是我们自己写的一个模板类,他现在有一个问题我们需要的是一个动态存储的顺序表,所以
这里会有一个扩容的情况,但是因为模板里面你接收到的类型千奇百怪,所以不可能你只有一种扩容方法,一
个是效率低,其次有的类型你用这种方法又不行,这时候就是类型萃取大展身手的时候了。在顺序表中,当你
使用内置类型时使用realloc扩容空间能好点,当你是自定义类型时你就得老老实实的使用别的方法了。
我先把扩容的那个函数拿出来:
void _CheckCapacity()
	{
		if (_size >= _capacity)
		{
			if (TypeTraits ::__IsPODType().Get())
			{
				cout << "这里是内置类型扩容的情况" << endl;
				_a = (T*)realloc(_a, (_capacity * 2 + 3)*sizeof(T));
				_capacity = _capacity * 2 + 3;
			}
			else
			{
				if (_a == NULL)
				{
					_a = new T[3];
				}
				cout << "这里是非内置类型扩容的情况" << endl;
				_capacity = _capacity * 2 + 3;
				T* tmp  = new T[_capacity];
				if (_a)
				{
					for (size_t i = 0; i < _size; ++i)
					{
						tmp[i] = _a[i];
					}
					delete[] _a;
					_a = tmp;
				}
			}
		}
	}
看到这里大家可能都会发现这里 if (TypeTraits ::__IsPODType().Get()) 这句其实是最关键的,用这句来区别调用
的是哪个方法。
但是这句里面的
__IsPODType()和Get()是哪里来的呢?
struct __TrueType
{
	bool Get()
	{
		return true;
	}
};

struct __FalseType
{
	bool Get()
	{
		return false;
	}
};
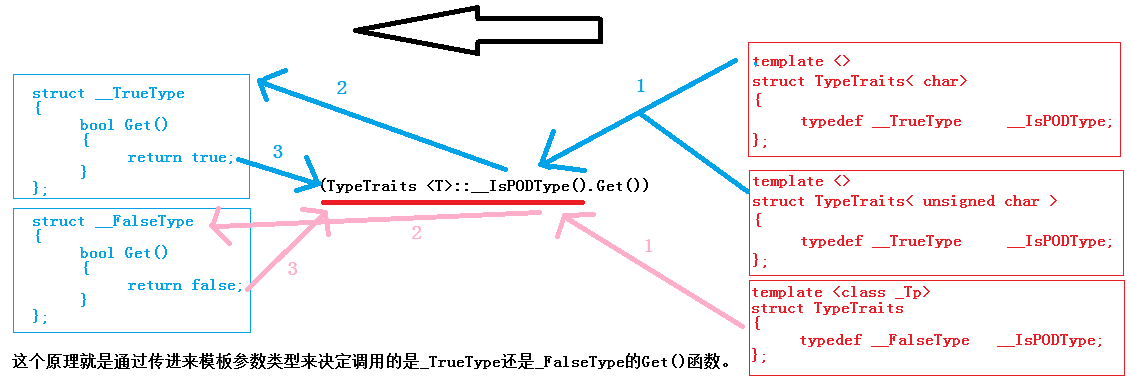
这个是TypeTraits的模板本体,默认__IsPODType为_FalseType.当它为内置类型的特化时
__IsPODType为_TureType
template
struct TypeTraits
{
	typedef __FalseType   __IsPODType;
};
//从这开始都是特化版本(类型萃取的开始)
template <>
struct TypeTraits< char>
{
	typedef __TrueType     __IsPODType;
};

template <>
struct TypeTraits< unsigned char >
{
	typedef __TrueType     __IsPODType;
};
为了类型萃取,我们把所有的内置类型进行特化,
当然这里我只是把内置类型特化的前两个拿了出来,当T为内置
类型
时
让
_IsPODType为_TureType,所以
if (TypeTraits ::__IsPODType().Get())表达为真,走的是realloc的方
法。下面看看这些代码的调用理解图:
默认的_TureType为 _FalseType,所以当T为非内置类型时就走的是另外的方法,这就是类型萃取思想,有木有觉得
突然不够高大上了呢。。 虽然它可能不是多么的难,但是我们不能够否认它的实用性和可操作性。
最关键的地方既然我们已经理解了,那么我把代码贴出来,大家根据代码再自己理解一下:
//***********************************************************************************************************//
                                                类型萃取
//***********************************************************************************************************//
struct __TrueType
{
	bool Get()
	{
		return true;
	}
};

struct __FalseType
{
	bool Get()
	{
		return false;
	}
};

template
struct TypeTraits
{
	typedef __FalseType   __IsPODType;
};

template <>
struct TypeTraits< char>
{
	typedef __TrueType     __IsPODType;
};

template <>
struct TypeTraits< unsigned char >
{
	typedef __TrueType     __IsPODType;
};

template <>
struct TypeTraits< bool>
{
	typedef __TrueType     __IsPODType;
};

template <>
struct TypeTraits< short>
{
	typedef __TrueType     __IsPODType;
};

template <>
struct TypeTraits< unsigned short >
{
	typedef __TrueType     __IsPODType;
};

template <>
struct TypeTraits< int>
{
	typedef __TrueType     __IsPODType;
};

template <>
struct TypeTraits< unsigned int >
{
	typedef __TrueType     __IsPODType;
};

template <>
struct TypeTraits< long>
{
	typedef __TrueType     __IsPODType;
};

template <>
struct TypeTraits< unsigned long >
{
	typedef __TrueType     __IsPODType;
};

template <>
struct TypeTraits< long long >
{
	typedef __TrueType     __IsPODType;
};

template <>
struct TypeTraits< unsigned long long>
{
	typedef __TrueType     __IsPODType;
};

template <>
struct TypeTraits< float>
{
	typedef __TrueType     __IsPODType;
};

template <>
struct TypeTraits< double>
{
	typedef __TrueType     __IsPODType;
};

template <>
struct TypeTraits< long double >
{
	typedef __TrueType     __IsPODType;
};

template
struct TypeTraits< _Tp*>
{
	typedef __TrueType     __IsPODType;
};

typedef int DataType;
template
class SeqList
{
public:
	SeqList()
		:_a(NULL)
		, _capacity(0)
		, _size(0)
	{

	}

	SeqList(const SeqList& s)
	{
		_a = new T[s._size];
		memcpy(_a, s._a, sizeof(T)*s._size);
		_size = s._size;
		_capacity = s._size;
	}

	SeqList& operator= (SeqList s)
	{
		swap(_size, s._size);
		swap(_capacity, s._capacity);
		swap(_a, s._a);
		return *this;
	}

	~SeqList()
	{
		if (TypeTraits ::__IsPODType().Get())
		{
			free(_a);
			_capacity = _size = 0;
		}
		else
		{
			delete[] _a;
			_capacity = _size = 0;
		}
	}

	void PushBack(const T& x)
	{
		_CheckCapacity();

		_a[_size] = x;
		++_size;
	}

	void PopBack()
	{
		if (_size > 0)
			--_size;
	}

	T& Back()
	{
		assert(_size > 0);
		return _a[_size - 1];
	}

	size_t Size()
	{
		return _size;
	}

	bool Empty()
	{
		return _size == 0;
	}
	void Print();
	void _CheckCapacity()
	{
		if (_size >= _capacity)
		{
			if (TypeTraits ::__IsPODType().Get())
			{
				cout << "这里是内置类型扩容的情况" << endl;
				_a = (T*)realloc(_a, (_capacity * 2 + 3)*sizeof(T));
				_capacity = _capacity * 2 + 3;
			}
			else
			{
				if (_a == NULL)
				{
					_a = new T[3];
				}
				cout << "这里是非内置类型扩容的情况" << endl;
				_capacity = _capacity * 2 + 3;
				T* tmp  = new T[_capacity];
				if (_a)
				{
					for (size_t i = 0; i < _size; ++i)
					{
						tmp[i] = _a[i];
					}
					delete[] _a;
					_a = tmp;
				}
			}
		}
	}
protected:
	T* _a;
	size_t _size;
	size_t _capacity;
};
template
void SeqList::Print()
{
	for (size_t i = 0; i < _size; ++i)
	{
		cout << _a[i] << " ";
	}
	cout << endl;
}

void  Test()
{
	SeqList a;
	a.PushBack(1);
	a.PushBack(2);
	a.PushBack(3);
	a.PushBack(9999999);
	a.Print();


	SeqList b;
	b.PushBack("a");
	b.PushBack("b");
	b.PushBack("c");
	b.PushBack("zhangchenliang");
	b.Print();
}
现在我们再从调试的角度来看,程序的调用过程:
我的第一个断点打到需要扩容开始的地方:
现在走到这里,走进扩容函数:
因为开辟的是一个内置类型的空间,在if语句里程序跳转到了_TureTyped的Get()函数里面。
现在已经知道表达式为真,所以走的是if里面的开辟空间的方法。
这就是程序的基本运行过程,当模板参数为自定义类型时过程也是相似的,只不过最后走的是else里面的代码而已。
这就是一个最简单的类型萃取思想,你只要理解它在以后的各种各样的场合碰到,不同类型不同方法的时候能够
想到
类型萃取并灵活运用它,这就算你学会它了~ 它的思想很简单,就是兵来将挡,水来土掩。使用了类型萃取
让你代码
多一丝从容.(这里的特化一定要理解清楚,里面还有偏特化也很重要)。


