CUDA: (十) 使用 CUDA C/C++ 统一内存和 nvprof 管理加速应用程序内存 (NVIDIA 课程 Part three)

使用 CUDA C/C++ 统一内存和 nvprof 管理加速应用程序内存

对于本实验和其他 CUDA 基础实验,我们强烈建议您遵循 CUDA 最佳实践指南,其中推荐一种称为 APOD 的设计周期:评估并行化优化部署。简言之,APOD 规定一个迭代设计过程,开发人员能够在该过程中对其加速应用程序性能施以渐进式改进,并发布代码。随着开发人员的 CUDA 编程能力愈渐增强,他们已能在加速代码库中应用更先进的优化技术。

本实验将支持这种迭代开发风格。您将使用 NVIDIA 命令行分析器定性衡量应用程序性能及确定优化机会,之后您将应用渐进式改进,最后您会学习新技术并重复该周期。需重点关注的是,您将在本实验中学习及应用的众多技术均会涉及 CUDA 统一内存工作原理的具体细节。理解统一内存行为是 CUDA 开发人员的一项基本技能,同时也可作为多项更先进内存管理技术的先决条件。


Prerequisites

如要充分利用本实验,您应已能胜任如下任务:

  • 编写、编译及运行既可调用 CPU 函数也可启动 GPU 核函数的 C/C++ 程序。
  • 使用执行配置控制并行线程层次结构。
  • 重构串行循环以在 GPU 上并行执行其迭代。
  • 分配和释放统一内存。

Objectives

当您在本实验完成学习后,您将能够:

  • 使用 NVIDIA 命令行分析器 (nvprof) 分析加速应用程序的性能。
  • 利用对流多处理器的理解优化执行配置。
  • 理解统一内存在页错误和数据迁移方面的行为。
  • 使用异步内存预取减少页错误和数据迁移以提高性能。
  • 采用迭代开发周期快速加速和部署应用程序。

Iterative Optimizations with the NVIDIA Command Line Profiler

如要确保优化加速代码库的尝试真正取得成功,唯一方法便是分析应用程序以获取有关其性能的定量信息。nvprof 是指 NVIDIA 命令行分析器。该分析器附带于CUDA工具包中,能为加速应用程序分析提供强大功能。

nvprof 使用起来十分简单,最基本用法是向其传递使用 nvcc 编译的可执行文件的路径。随后 nvprof 会继续执行应用程序,并在此之后打印应用程序 GPU 活动的摘要输出、CUDA API 调用以及统一内存活动的相关信息。我们稍后会在本实验中详细介绍这一主题。

在加速应用程序或优化已经加速的应用程序时,应该采用科学的迭代方法。作出更改后需分析应用程序、做好记录并记录任何重构可能会对性能造成何种影响。尽早且频繁进行此类观察通常会让您轻松获得足够的性能提升,以助您发布加速应用程序。此外,频繁分析应用程序将使您了解到对 CUDA 代码库作出的特定更改会对其实际性能造成何种影响:而当只在代码库中进行多种更改后再分析应用程序时,将很难得知这一点。

Exercise: Profile an Application with nvprof

01-vector-add.cu是一个简单易用的加速向量加法程序。使用下方两个代码执行单元(按住 CTRL 并点击即可)。第一个代码执行单元将编译(及运行)向量加法程序。第二个代码执行单元将运用 nvprof 分析刚编译好的可执行文件。

#include 

/*
 * Host function to initialize vector elements. This function
 * simply initializes each element to equal its index in the
 * vector.
 */

void initWith(float num, float *a, int N)
{
  for(int i = 0; i < N; ++i)
  {
    a[i] = num;
  }
}

/*
 * Device kernel stores into `result` the sum of each
 * same-indexed value of `a` and `b`.
 */

__global__
void addVectorsInto(float *result, float *a, float *b, int N)
{
  int index = threadIdx.x + blockIdx.x * blockDim.x;
  int stride = blockDim.x * gridDim.x;

  for(int i = index; i < N; i += stride)
  {
    result[i] = a[i] + b[i];
  }
}

/*
 * Host function to confirm values in `vector`. This function
 * assumes all values are the same `target` value.
 */

void checkElementsAre(float target, float *vector, int N)
{
  for(int i = 0; i < N; i++)
  {
    if(vector[i] != target)
    {
      printf("FAIL: vector[%d] - %0.0f does not equal %0.0f\n", i, vector[i], target);
      exit(1);
    }
  }
  printf("Success! All values calculated correctly.\n");
}

int main()
{
  const int N = 2<<24;
  size_t size = N * sizeof(float);

  float *a;
  float *b;
  float *c;

  cudaMallocManaged(&a, size);
  cudaMallocManaged(&b, size);
  cudaMallocManaged(&c, size);

  initWith(3, a, N);
  initWith(4, b, N);
  initWith(0, c, N);

  size_t threadsPerBlock;
  size_t numberOfBlocks;

  /*
   * nvprof should register performance changes when execution configuration
   * is updated.
   */

  threadsPerBlock = 1;
  numberOfBlocks = 1;

  cudaError_t addVectorsErr;
  cudaError_t asyncErr;

  addVectorsInto<<<numberOfBlocks, threadsPerBlock>>>(c, a, b, N);

  addVectorsErr = cudaGetLastError();
  if(addVectorsErr != cudaSuccess) printf("Error: %s\n", cudaGetErrorString(addVectorsErr));

  asyncErr = cudaDeviceSynchronize();
  if(asyncErr != cudaSuccess) printf("Error: %s\n", cudaGetErrorString(asyncErr));

  checkElementsAre(7, c, N);

  cudaFree(a);
  cudaFree(b);
  cudaFree(c);
}

应用程序分析完毕后,请使用分析输出中显示的信息回答下列问题:

  • 此应用程序中唯一调用的 CUDA 核函数的名称是什么?
  • 此应用程序中唯一调用的 CUDA 核函数的名称是什么?
  • 此核函数的运行时间为?在某处记录此时间:您将优化此应用程序,还会希望得知所能取得的最大优化速度。
!nvcc -arch=sm_70 -o single-thread-vector-add 01-vector-add/01-vector-add.cu -run
!nvprof ./single-thread-vector-add

运行结果:
CUDA: (十) 使用 CUDA C/C++ 统一内存和 nvprof 管理加速应用程序内存 (NVIDIA 课程 Part three)_第1张图片

Exercise: Optimize and Profile

请抽出一到两分钟时间,更新 01-vector-add.cu 的执行配置以对其进行简单优化,以便其能在单个线程块中的多个线程上运行。请使用下方的代码执行单元重新编译并借助 nvprof 进行分析。使用分析输出检查核函数的运行时。此优化带来多大的速度提升?请务必在某处记录您的结果。

!nvcc -arch=sm_70 -o multi-thread-vector-add 01-vector-add/01-vector-add.cu -run
!nvprof ./multi-thread-vector-add

运行结果:
CUDA: (十) 使用 CUDA C/C++ 统一内存和 nvprof 管理加速应用程序内存 (NVIDIA 课程 Part three)_第2张图片

可以看到API calls的时间有了明显的提升,LZ把thread_per_block修改为1024,即每个Block有1024个线程。

Exercise: Optimize Iteratively

在本练习中,您将经历数个周期,具体包括:编辑 01-vector-add.cu 的执行配置、开展分析及记录结果以查看影响。开展操作时请依循以下指南:

  • 首先列出您将用于更新执行配置的 3 至 5 种不同方法,确保涵盖一系列不同的网格和线程块大小组合。
  • 使用所列的其中一种方法编辑 01-vector-add.cu 程序。
  • 使用下方的两个代码执行单元编译和分析更新后的代码。
  • 记录核函数执行的运行时,应与分析输出中给出的相同。
  • 对以上列出的每个可能实现的优化重复执行编辑/分析/记录循环

在您尝试的执行配置中,哪个经证明最快?

!nvcc -arch=sm_70 -o iteratively-optimized-vector-add 01-vector-add/01-vector-add.cu -run
!nvprof ./iteratively-optimized-vector-add

这个小伙伴们可以自行尝试,不一定block和thread的数量越大越好的!


Streaming Multiprocessors and Querying the Device

本节将探讨了解 GPU 硬件的特定功能如何可以促进优化。学习完流多处理器后,您将尝试进一步优化自己一直执行的加速向量加法程序。

以下幻灯片将直观呈现即将发布的材料的概要信息。点击浏览一遍这些幻灯片,然后再继续深入了解以下章节中的主题。

%%HTML

<div align="center"><iframe src="https://view.officeapps.live.com/op/view.aspx?src=https://developer.download.nvidia.com/training/courses/C-AC-01-V1/AC_UM_NVPROF-zh/NVPROF_UM_1-zh.pptx" frameborder="0" width="900" height="550" allowfullscreen="true" mozallowfullscreen="true" webkitallowfullscreen="true"></iframe></div>

流多处理器: NVIDIA GPU包含称为流多处理器或SM的功能单元,线程块均可安排在SM上运行,根据GPU上的SM数量以及线程块要求,可在SM上安排运行多个线程块,如果网络维度能被GPU上的SM数量整除,则可充分提高SM的利用率。

Streaming Multiprocessors and Warps

运行 CUDA 应用程序的 GPU 具有称为流多处理器(或 SM)的处理单元。在核函数执行期间,将线程块提供给 SM 以供其执行。为支持 GPU 执行尽可能多的并行操作,您通常可以选择线程块数量数倍于指定 GPU 上 SM 数量的网格大小来提升性能。

此外,SM 会在一个名为线程束的线程块内创建、管理、调度和执行包含 32 个线程的线程组。本课程将不会更深入探讨 SM 和线程束,但值得注意的是,您也可选择线程数量数倍于 32 的线程块大小来提升性能。

Programmatically Querying GPU Device Properties

由于 GPU 上的 SM 数量会因所用的特定 GPU 而异,因此为支持可移植性,您不得将 SM 数量硬编码到代码库中。相反,应该以编程方式获取此信息。

以下所示为在 CUDA C/C++ 中获取 C 结构的方法,该结构包含当前处于活动状态的 GPU 设备的多个属性,其中包括设备的 SM 数量:

int deviceId;
cudaGetDevice(&deviceId);                  // `deviceId` now points to the id of the currently active GPU.

cudaDeviceProp props;
cudaGetDeviceProperties(&props, deviceId); // `props` now has many useful properties about
                                           // the active GPU device.

Exercise: Query the Device

目前,01-get-device-properties.cu 包含众多未分配的变量,并将打印一些无用信息,这些信息用于描述当前处于活动状态的 GPU 设备的详细信息。
扩建 01-get-device-properties.cu 以打印源代码中指示的所需设备属性的实际值。为获取操作支持并查看相关介绍,请参阅 CUDA 运行时文档 以帮助识别设备属性结构中的相关属性。
直接给出修改完的代码:

#include 

int main()
{
  /*
   * Assign values to these variables so that the output string below prints the
   * requested properties of the currently active GPU.
   */

  int deviceId;
  
  cudaGetDevice(&deviceId);                 

  cudaDeviceProp props;
  cudaGetDeviceProperties(&props, deviceId);
  
  int computeCapabilityMajor = props.major;
  int computeCapabilityMinor = props.minor;
  int multiProcessorCount = props.multiProcessorCount;
  int warpSize = props.warpSize;


  /*
   * There should be no need to modify the output string below.
   */

  printf("Device ID: %d\nNumber of SMs: %d\nCompute Capability Major: %d\nCompute Capability Minor: %d\nWarp Size: %d\n", deviceId, multiProcessorCount, computeCapabilityMajor, computeCapabilityMinor, warpSize);
}

!nvcc -arch=sm_70 -o get-device-properties 04-device-properties/01-get-device-properties.cu -run

运行得到的参数结果:
在这里插入图片描述

Exercise: Optimize Vector Add with Grids Sized to Number of SMs

通过查询设备的 SM 数量重构您一直在 01-vector-add.cu 内执行的 addVectorsInto 核函数,以便其启动时的网格包含数倍于设备上 SM 数量的线程块数。

根据您所编写代码中的其他特定详细信息,此重构可能会或不会提高或大幅改善核函数的性能。因此,请务必始终使用 nvprof,以便定量评估性能变化。根据分析输出,记录目前所得结果和其他发现。

!nvcc -arch=sm_70 -o sm-optimized-vector-add 01-vector-add/01-vector-add.cu -run
!nvprof ./sm-optimized-vector-add

运行结果如下,虽然性能没有显著提升,但是addVectorsInto 核函数消耗的时间还是减少的。
CUDA: (十) 使用 CUDA C/C++ 统一内存和 nvprof 管理加速应用程序内存 (NVIDIA 课程 Part three)_第3张图片

Unified Memory Details

您一直使用 cudaMallocManaged 分配旨在供主机或设备代码使用的内存,并且现在仍在享受这种方法的便利之处,即在实现自动内存迁移且简化编程的同时,而无需深入了解 cudaMallocManaged 所分配统一内存 (UM) 实际工作原理的详细信息。nvprof 提供有关加速应用程序中 UM 管理的详细信息,并在利用这些信息的同时结合对 UM 工作原理的更深入理解,进而为优化加速应用程序创造更多机会。

以下幻灯片将直观呈现即将发布的材料的概要信息。点击浏览一遍这些幻灯片,然后再继续深入了解以下章节中的主题。

%%HTML

<div align="center"><iframe src="https://view.officeapps.live.com/op/view.aspx?src=https://developer.download.nvidia.com/training/courses/C-AC-01-V1/AC_UM_NVPROF-zh/NVPROF_UM_2-zh.pptx" frameborder="0" width="900" height="550" allowfullscreen="true" mozallowfullscreen="true" webkitallowfullscreen="true"></iframe></div>

统一内存行为: 分配UM时,它最初可能并未驻留在CPU或GPU上,当某些任务首次请求内存时,将会发生错误,分页错误将触发所请求的内存发生迁移,只要在系统中并未驻留内存的位置请求内存,此过程便会重复,如果已知将在未驻留内存的位置访问内存,则可使用异步预取,异步预取能以更大批量移动内存并且防止发生分页错误

Unified Memory Migration

分配 UM 时,内存尚未驻留在主机或设备上。主机或设备尝试访问内存时会发生 页错误,此时主机或设备会批量迁移所需的数据。同理,当 CPU 或加速系统中的任何 GPU 尝试访问尚未驻留在其上的内存时,会发生页错误并触发迁移。

能够执行页错误并按需迁移内存对于在加速应用程序中简化开发流程大有助益。此外,在处理展示稀疏访问模式的数据时(例如,在应用程序实际运行之前无法得知需要处理的数据时),以及在具有多个 GPU 的加速系统中,数据可能由多个 GPU 设备访问时,按需迁移内存将会带来显著优势。

有些情况下(例如,在运行时之前需要得知数据,以及需要大量连续的内存块时),我们还能有效规避页错误和按需数据迁移所产生的开销。

本实验的后续内容将侧重于对按需迁移的理解,以及如何在分析器输出中识别按需迁移。这些知识可让您在享受按需迁移优势的同时,减少其产生的开销。

Exercise: Explore UM Page Faulting

nvprof 会提供描述所分析应用程序 UM 行为的输出。在本练习中,您将对一款简易应用程序作出一些修改,并会在每次更改后利用 nvprof 的统一内存输出部分,探讨 UM 数据迁移的行为方式。

01-page-faults.cu 包含 hostFunctiongpuKernel 函数,我们可以通过这两个函数并使用数字 1 初始化 2<<24 单元向量的元素。主机函数和 GPU 核函数目前均未使用。

__global__
void deviceKernel(int *a, int N)
{
  int idx = threadIdx.x + blockIdx.x * blockDim.x;
  int stride = blockDim.x * gridDim.x;

  for (int i = idx; i < N; i += stride)
  {
    a[i] = 1;
  }
}

void hostFunction(int *a, int N)
{
  for (int i = 0; i < N; ++i)
  {
    a[i] = 1;
  }
}

int main()
{

  int N = 2<<24;
  size_t size = N * sizeof(int);
  int *a;
  cudaMallocManaged(&a, size);

  /*
   * Conduct experiments to learn more about the behavior of
   * `cudaMallocManaged`.
   *
   * What happens when unified memory is accessed only by the GPU?
   * What happens when unified memory is accessed only by the CPU?
   * What happens when unified memory is accessed first by the GPU then the CPU?
   * What happens when unified memory is accessed first by the CPU then the GPU?
   *
   * Hypothesize about UM behavior, page faulting specificially, before each
   * experiement, and then verify by running `nvprof`.
   */

  cudaFree(a);
}

对于以下 4 个问题中的每一问题,请根据您对 UM 行为的理解,首先假设应会发生何种页错误,然后使用代码库中所提供 2 个函数中的其中一个或同时使用这两个函数编辑 01-page-faults.cu 以创建场景,以便您测试假设。

如要测试您的假设,请使用下方的代码执行单元编译及分析您的代码。请务必针对您正进行的 4 个实验,记录您的假设以及从 nvprof 输出中获取的结果,尤其是 CPU 和 GPU 页错误。如您遇到问题,可点击以下链接获取 4 个实验中每个实验的参考解决方案。

!nvcc -arch=sm_70 -o page-faults 06-unified-memory-page-faults/01-page-faults.cu -run
!nvprof ./page-faults
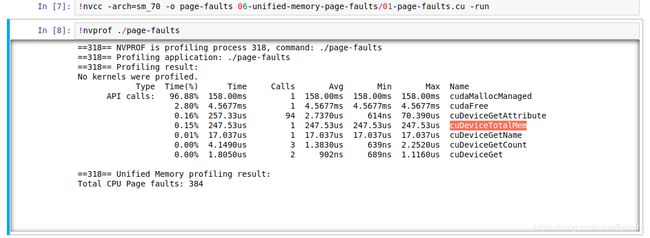
  • 当统一内存仅由 CPU 访问时会出现什么情况?
    CUDA: (十) 使用 CUDA C/C++ 统一内存和 nvprof 管理加速应用程序内存 (NVIDIA 课程 Part three)_第4张图片

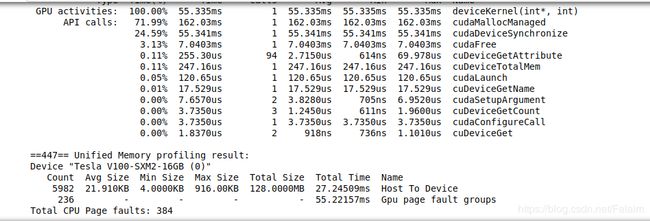
  • 当统一内存仅由 GPU 访问时会出现什么情况?

CUDA: (十) 使用 CUDA C/C++ 统一内存和 nvprof 管理加速应用程序内存 (NVIDIA 课程 Part three)_第5张图片

  • 当统一内存先由 CPU 访问后由 GPU 访问时会出现什么情况?
    CUDA: (十) 使用 CUDA C/C++ 统一内存和 nvprof 管理加速应用程序内存 (NVIDIA 课程 Part three)_第6张图片

  • 当统一内存先由 GPU 访问后由 CPU 访问时会出现什么情况?

CUDA: (十) 使用 CUDA C/C++ 统一内存和 nvprof 管理加速应用程序内存 (NVIDIA 课程 Part three)_第7张图片

Exercise: Revisit UM Behavior for Vector Add Program

返回您一直在本实验中执行的 01-vector-add.cu 程序,查看程序在当前状态下的代码库,并假设您期望发生何种页错误。查看上一个重构的分析输出(可通过向上滚动查找输出或通过执行下方的代码执行单元进行查看),并观察分析器输出的统一内存部分。您可否根据代码库的内容对页错误描述作一解释?

!nvprof ./sm-optimized-vector-add

CUDA: (十) 使用 CUDA C/C++ 统一内存和 nvprof 管理加速应用程序内存 (NVIDIA 课程 Part three)_第8张图片

Exercise: Initialize Vector in Kernel

nvprof 给出核函数所需的执行时间时,则在此函数执行期间发生的主机到设备页错误和数据迁移都会包含在所显示的执行时间中。

带着这样的想法来将 [01-vector-add.cu] 程序中的 initWith 主机函数重构为 CUDA 核函数,以便在 GPU 上并行初始化所分配的向量。成功编译及运行重构的应用程序后,但在对其进行分析之前,请假设如下内容:

  • 您期望重构会对 UM 页错误行为产生何种影响?
  • 您期望重构会对所报告的 addVectorsInto 运行时产生何种影响?
#include 

/*
 * Refactor host function to run as CUDA kernel
 */

__global__
void initWith(float num, float *a, int N)
{
  int index = threadIdx.x + blockIdx.x * blockDim.x;
  int stride = blockDim.x * gridDim.x;

  for(int i = index; i < N; i += stride)
  {
    a[i] = num;
  }
}

__global__
void addArraysInto(float *result, float *a, float *b, int N)
{
  int index = threadIdx.x + blockIdx.x * blockDim.x;
  int stride = blockDim.x * gridDim.x;

  for(int i = index; i < N; i += stride)
  {
    result[i] = a[i] + b[i];
  }
}

void checkElementsAre(float target, float *array, int N)
{
  for(int i = 0; i < N; i++)
  {
    if(array[i] != target)
    {
      printf("FAIL: array[%d] - %0.0f does not equal %0.0f\n", i, array[i], target);
      exit(1);
    }
  }
  printf("Success! All values calculated correctly.\n");
}

int main()
{
  int deviceId;
  int numberOfSMs;

  cudaGetDevice(&deviceId);
  cudaDeviceGetAttribute(&numberOfSMs, cudaDevAttrMultiProcessorCount, deviceId);
  printf("Device ID: %d\tNumber of SMs: %d\n", deviceId, numberOfSMs);

  const int N = 2<<24;
  size_t size = N * sizeof(float);

  float *a;
  float *b;
  float *c;

  cudaMallocManaged(&a, size);
  cudaMallocManaged(&b, size);
  cudaMallocManaged(&c, size);

  size_t threadsPerBlock;
  size_t numberOfBlocks;

  threadsPerBlock = 256;
  numberOfBlocks = 32 * numberOfSMs;

  cudaError_t addArraysErr;
  cudaError_t asyncErr;

  /*
   * Launch kernels.
   */

  initWith<<<numberOfBlocks, threadsPerBlock>>>(3, a, N);
  initWith<<<numberOfBlocks, threadsPerBlock>>>(4, b, N);
  initWith<<<numberOfBlocks, threadsPerBlock>>>(0, c, N);

  /*
   * Now that initialization is happening on a GPU, host code
   * must be synchronized to wait for its completion.
   */

  cudaDeviceSynchronize();

  addArraysInto<<<numberOfBlocks, threadsPerBlock>>>(c, a, b, N);

  addArraysErr = cudaGetLastError();
  if(addArraysErr != cudaSuccess) printf("Error: %s\n", cudaGetErrorString(addArraysErr));

  asyncErr = cudaDeviceSynchronize();
  if(asyncErr != cudaSuccess) printf("Error: %s\n", cudaGetErrorString(asyncErr));

  checkElementsAre(7, c, N);

  cudaFree(a);
  cudaFree(b);
  cudaFree(c);
}

!nvcc -arch=sm_70 -o initialize-in-kernel 01-vector-add/01-vector-add.cu -run
!nvprof ./initialize-in-kernel

运行结果:
CUDA: (十) 使用 CUDA C/C++ 统一内存和 nvprof 管理加速应用程序内存 (NVIDIA 课程 Part three)_第9张图片

Asynchronous Memory Prefetching

在主机到设备和设备到主机的内存传输过程中,我们使用一种技术来减少页错误和按需内存迁移成本,此强大技术称为异步内存预取。通过此技术,程序员可以在应用程序代码使用统一内存 (UM) 之前,在后台将其异步迁移至系统中的任何 CPU 或 GPU 设备。此举可以减少页错误和按需数据迁移所带来的成本,并进而提高 GPU 核函数和 CPU 函数的性能。

此外,预取往往会以更大的数据块来迁移数据,因此其迁移次数要低于按需迁移。此技术非常适用于以下情况:在运行时之前已知数据访问需求且数据访问并未采用稀疏模式。

CUDA 可通过 cudaMemPrefetchAsync 函数,轻松将托管内存异步预取到 GPU 设备或 CPU。以下所示为如何使用该函数将数据预取到当前处于活动状态的 GPU 设备,然后再预取到 CPU:

int deviceId;
cudaGetDevice(&deviceId);                                         // The ID of the currently active GPU device.

cudaMemPrefetchAsync(pointerToSomeUMData, size, deviceId);        // Prefetch to GPU device.
cudaMemPrefetchAsync(pointerToSomeUMData, size, cudaCpuDeviceId); // Prefetch to host. `cudaCpuDeviceId` is a
                                                                  // built-in CUDA variable.

Exercise: Prefetch Memory

此时,实验中的 01-vector-add.cu程序不仅应启动 CUDA 核函数以将 2 个向量添加到第三个解向量(所有向量均通过 cudaMallocManaged 函数进行分配),还应在 CUDA 核函数中并行初始化其中的每个向量,并更新自己的代码库以反映其当前功能。

在 [01-vector-add.cu]应用程序中使用 cudaMemPrefetchAsync 函数开展 3 个实验,以探究其会对页错误和内存迁移产生何种影响。

  • 当您将其中一个初始化向量预取到主机时会出现什么情况?
  • 当您将其中两个初始化向量预取到主机时会出现什么情况?
  • 当您将三个初始化向量全部预取到主机时会出现什么情况?

在进行每个实验之前,请先假设 UM 的行为表现(尤其就页错误而言),以及其对所报告的初始化核函数运行时会产生何种影响,然后运行 nvprof 进行验证。

#include 

void initWith(float num, float *a, int N)
{
  for(int i = 0; i < N; ++i)
  {
    a[i] = num;
  }
}

__global__
void addVectorsInto(float *result, float *a, float *b, int N)
{
  int index = threadIdx.x + blockIdx.x * blockDim.x;
  int stride = blockDim.x * gridDim.x;

  for(int i = index; i < N; i += stride)
  {
    result[i] = a[i] + b[i];
  }
}

void checkElementsAre(float target, float *vector, int N)
{
  for(int i = 0; i < N; i++)
  {
    if(vector[i] != target)
    {
      printf("FAIL: vector[%d] - %0.0f does not equal %0.0f\n", i, vector[i], target);
      exit(1);
    }
  }
  printf("Success! All values calculated correctly.\n");
}

int main()
{
  int deviceId;
  int numberOfSMs;

  cudaGetDevice(&deviceId);
  cudaDeviceGetAttribute(&numberOfSMs, cudaDevAttrMultiProcessorCount, deviceId);
  printf("Device ID: %d\tNumber of SMs: %d\n", deviceId, numberOfSMs);

  const int N = 2<<24;
  size_t size = N * sizeof(float);

  float *a;
  float *b;
  float *c;

  cudaMallocManaged(&a, size);
  cudaMallocManaged(&b, size);
  cudaMallocManaged(&c, size);

  initWith(3, a, N);
  initWith(4, b, N);
  initWith(0, c, N);

  /*
   * Add asynchronous prefetching after the data is initialized,
   * and before launching the kernel, to avoid host to GPU page
   * faulting.
   */

  cudaMemPrefetchAsync(a, size, deviceId);
  cudaMemPrefetchAsync(b, size, deviceId);
  cudaMemPrefetchAsync(c, size, deviceId);

  size_t threadsPerBlock;
  size_t numberOfBlocks;

  threadsPerBlock = 256;
  numberOfBlocks = 32 * numberOfSMs;

  cudaError_t addVectorsErr;
  cudaError_t asyncErr;

  addVectorsInto<<<numberOfBlocks, threadsPerBlock>>>(c, a, b, N);

  addVectorsErr = cudaGetLastError();
  if(addVectorsErr != cudaSuccess) printf("Error: %s\n", cudaGetErrorString(addVectorsErr));

  asyncErr = cudaDeviceSynchronize();
  if(asyncErr != cudaSuccess) printf("Error: %s\n", cudaGetErrorString(asyncErr));

  checkElementsAre(7, c, N);

  cudaFree(a);
  cudaFree(b);
  cudaFree(c);
}

!nvcc -arch=sm_70 -o prefetch-to-gpu 01-vector-add/01-vector-add.cu -run
!nvprof ./prefetch-to-gpu

Exercise: Prefetch Memory Back to the CPU

请为该函数添加额外的内存预取回 CPU,以验证 addVectorInto 核函数的正确性。然后再次假设 UM 所受影响,并在 nvprof 中进行分析确认。

#include 

void initWith(float num, float *a, int N)
{
  for(int i = 0; i < N; ++i)
  {
    a[i] = num;
  }
}

__global__
void addVectorsInto(float *result, float *a, float *b, int N)
{
  int index = threadIdx.x + blockIdx.x * blockDim.x;
  int stride = blockDim.x * gridDim.x;

  for(int i = index; i < N; i += stride)
  {
    result[i] = a[i] + b[i];
  }
}

void checkElementsAre(float target, float *vector, int N)
{
  for(int i = 0; i < N; i++)
  {
    if(vector[i] != target)
    {
      printf("FAIL: vector[%d] - %0.0f does not equal %0.0f\n", i, vector[i], target);
      exit(1);
    }
  }
  printf("Success! All values calculated correctly.\n");
}

int main()
{
  int deviceId;
  int numberOfSMs;

  cudaGetDevice(&deviceId);
  cudaDeviceGetAttribute(&numberOfSMs, cudaDevAttrMultiProcessorCount, deviceId);
  printf("Device ID: %d\tNumber of SMs: %d\n", deviceId, numberOfSMs);

  const int N = 2<<24;
  size_t size = N * sizeof(float);

  float *a;
  float *b;
  float *c;

  cudaMallocManaged(&a, size);
  cudaMallocManaged(&b, size);
  cudaMallocManaged(&c, size);

  initWith(3, a, N);
  initWith(4, b, N);
  initWith(0, c, N);

  /*
   * Add asynchronous prefetching after the data is initialized,

   */

  cudaMemPrefetchAsync(a, size, cudaCpuDeviceId);
  cudaMemPrefetchAsync(b, size, cudaCpuDeviceId);
  cudaMemPrefetchAsync(c, size, cudaCpuDeviceId);

  size_t threadsPerBlock;
  size_t numberOfBlocks;

  threadsPerBlock = 256;
  numberOfBlocks = 32 * numberOfSMs;

  cudaError_t addVectorsErr;
  cudaError_t asyncErr;

  addVectorsInto<<<numberOfBlocks, threadsPerBlock>>>(c, a, b, N);

  addVectorsErr = cudaGetLastError();
  if(addVectorsErr != cudaSuccess) printf("Error: %s\n", cudaGetErrorString(addVectorsErr));

  asyncErr = cudaDeviceSynchronize();
  if(asyncErr != cudaSuccess) printf("Error: %s\n", cudaGetErrorString(asyncErr));

  checkElementsAre(7, c, N);

  cudaFree(a);
  cudaFree(b);
  cudaFree(c);
}

!nvcc -arch=sm_70 -o prefetch-to-cpu 01-vector-add/01-vector-add.cu -run
!nvprof ./prefetch-to-cpu

运行结果:
CUDA: (十) 使用 CUDA C/C++ 统一内存和 nvprof 管理加速应用程序内存 (NVIDIA 课程 Part three)_第10张图片

Summary

此时,您在实验中能够执行以下操作:

  • 使用 NVIDIA 命令行分析器 (nvprof) 分析加速应用程序性能。
  • 利用对流多处理器的理解优化执行配置。
  • 理解统一内存在页错误和数据迁移方面的行为。
  • 使用异步内存预取减少页错误和数据迁移以提高性能。
  • 采用迭代开发周期快速加速和部署应用程序。

为巩固您的学习成果,并加强您通过迭代方式加速、优化及部署应用程序的能力,请继续完成本实验的最后一个练习。完成后,时间富余并有意深究的学习者可以继续学习高阶内容部分。


Final Exercise: Iteratively Optimize an Accelerated SAXPY Application

为您提供一个基本的 SAXPY 加速应用程序。该程序目前包含一些您需要找到并修复的错误,在此之后您才能使用 nvprof 成功对其进行编译、运行和分析。

在修复完错误并对应用程序进行分析后,您需记录 saxpy 核函数的运行时,然后采用迭代方式优化应用程序,并在每次迭代后使用 nvprof 进行分析验证,以便了解代码更改对核函数性能和 UM 行为产生的影响。

运用本实验提供的各项技术。为获取学习支持,请充分利用 提取努力 技术,而不要急于在本课程开始之初查阅技术细节。

您的最终目标是在不修改 N 的情况下分析准确的 saxpy 核函数,以便在 50us 内运行。

#include 

#define N 2048 * 2048 // Number of elements in each vector
#define stride 256*32*80
  

/*
 * Optimize this already-accelerated codebase. Work iteratively,
 * and use nvprof to support your work.
 *
 * Aim to profile `saxpy` (without modifying `N`) running under
 * 20us.
 *
 * Some bugs have been placed in this codebase for your edification.
 */

__global__ void saxpy(int * a, int * b, int * c)
{
    int tid = blockIdx.x * blockDim.x + threadIdx.x;
   
    for (int i = tid; i < N; i += stride)
      c[i] = 2 * a[i] + b[i];
}

int main()
{

    int deviceId;
    int numberOfSMs;

    cudaGetDevice(&deviceId);
    cudaDeviceGetAttribute(&numberOfSMs, cudaDevAttrMultiProcessorCount, deviceId);
    printf("Device ID: %d\tNumber of SMs: %d\n", deviceId, numberOfSMs);
  
    int *a, *b, *c;

    int size = N * sizeof (int); // The total number of bytes per vector

    
    cudaError_t cudaMallocErr;
    cudaMallocErr = cudaMallocManaged(&a, size);
    if(cudaMallocErr != cudaSuccess) printf("Error a: %s\n", cudaGetErrorString(cudaMallocErr));
    
    cudaMallocErr = cudaMallocManaged(&b, size);
    if(cudaMallocErr != cudaSuccess) printf("Error a: %s\n", cudaGetErrorString(cudaMallocErr));
    
    cudaMallocErr = cudaMallocManaged(&c, size);
    if(cudaMallocErr != cudaSuccess) printf("Error a: %s\n", cudaGetErrorString(cudaMallocErr));


    cudaMemPrefetchAsync(a, size, cudaCpuDeviceId);
    cudaMemPrefetchAsync(b, size, cudaCpuDeviceId);
    cudaMemPrefetchAsync(c, size, cudaCpuDeviceId);
    // Initialize memory
    for( int i = 0; i < N; ++i )
    {
        a[i] = 2;
        b[i] = 1;
        c[i] = 0;
    }
    
    cudaMemPrefetchAsync(a, size, deviceId);
    cudaMemPrefetchAsync(b, size, deviceId);
    cudaMemPrefetchAsync(c, size, deviceId);


    int threads_per_block = 128;
    int number_of_blocks = 32*numberOfSMs;
       
    cudaError_t saxpyErr;
    cudaError_t asyncErr;

    saxpy <<< number_of_blocks, threads_per_block >>> ( a, b, c );
    
    saxpyErr = cudaGetLastError();
    if(saxpyErr != cudaSuccess)printf("Error: %s\n", cudaGetErrorString(saxpyErr));
    
    asyncErr = cudaDeviceSynchronize();
    if(asyncErr != cudaSuccess) printf("Error: %s\n", cudaGetErrorString(asyncErr));


    // Print out the first and last 5 values of c for a quality check
    for( int i = 0; i < 5; ++i )
        printf("c[%d] = %d, ", i, c[i]);
    printf ("\n");
    for( int i = N-5; i < N; ++i )
        printf("c[%d] = %d, ", i, c[i]);
    printf ("\n");

    cudaFree( a ); cudaFree( b ); cudaFree( c );
}

!nvcc -arch=sm_70 -o saxpy 09-saxpy/01-saxpy.cu -run
!nvprof ./saxpy

运行结果:
CUDA: (十) 使用 CUDA C/C++ 统一内存和 nvprof 管理加速应用程序内存 (NVIDIA 课程 Part three)_第11张图片

最后进行不懈努力,最后优化到41um,好像有一点点理解了,这个课程确实还不错呢。

PS:

今天已经68584了,但是全国的增速都在减缓,还算是个好消息吧!
CUDA: (十) 使用 CUDA C/C++ 统一内存和 nvprof 管理加速应用程序内存 (NVIDIA 课程 Part three)_第12张图片

CUDA: (十) 使用 CUDA C/C++ 统一内存和 nvprof 管理加速应用程序内存 (NVIDIA 课程 Part three)_第13张图片
革命尚未成功,同志仍需努力!

你可能感兴趣的:(CUDA)