uiautomator使用总结
uiautomator是Android提供的一个UI自动化测试框架,一般与AndroidJUnit4单元测试框架配合使用。
一、首先我们来编写一个demo:
1.目录结构
使用Android Studio创建新的project时,在app/src/目录下会自动创建三个子目录:
androidTest、main、test。
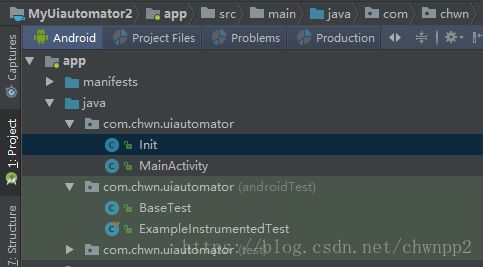
如上图所示,我们将在androidTest目录下编写测试用例。
2.gradle配置
Module APP的build.gradle中需要添加如下配置
android {
    ......
    defaultConfig {
        applicationId "com.chwn.uiautomator"
        ......
        //Studio会自动配置该项,必配项
        testInstrumentationRunner "android.support.test.runner.AndroidJUnitRunner"
        //测试包的包名,可修改
        testApplicationId 'com.chwn.uiautomator.test'
    }
}
dependencies {
    implementation fileTree(dir: 'libs', include: ['*.jar'])
    ......
    //UI用例所依赖的,必配项
    compile 'com.android.support.test.uiautomator:uiautomator-v18:2.1.3'
    compile 'com.android.support.test:runner:1.0.1'
}
备注:build.gradle中我们使用的是”compile”,而不是”androidTestCompile”,是因为示例中,我们是把主体逻辑放在了main目录下,如Init.java。在Init.java类中我们会初始化这些值:
package com.chwn.uiautomator;

import android.app.Instrumentation;
import android.content.Context;
import android.support.test.InstrumentationRegistry;
import android.support.test.uiautomator.UiDevice;

public class Init {

    public static UiDevice device;

    public static Instrumentation instrumentation;

    public static Context context;

    public static Context targetContext;

    public static void work() {
        instrumentation = InstrumentationRegistry.getInstrumentation();
        device = UiDevice.getInstance(instrumentation);
        context = instrumentation.getContext();//指向测试包testApplicationId
        targetContext = instrumentation.getTargetContext(); //指向宿主applicationId
    }
}
3.用例的编写和执行
以用例类ExampleInstrumentedTest.java为例,代码如下:
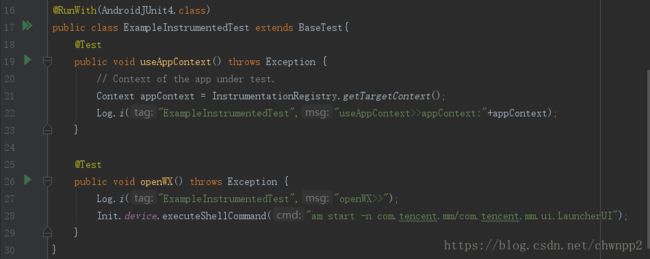
其中BaseTest的代码如下:
package com.chwn.uiautomator;

import android.util.Log;

import org.junit.After;
import org.junit.AfterClass;
import org.junit.Before;
import org.junit.BeforeClass;

/**
 * Created by changwenna on 2018/4/3.
 */

public class BaseTest {
    @BeforeClass
    public static void beforeClass(){
        Log.i("BaseTest","beforeClass");
        Init.work();
    }
    @Before
    public void before(){
        Log.i("BaseTest","before");
    }

    @After
    public void after(){
        Log.i("BaseTest","after");
    }

    @AfterClass
    public static void afterClass(){
        Log.i("BaseTest","afterClass");
    }
测试用例的执行流程如下:
17841-17855/? I/TestRunner: run started: 1 tests
17841-17855/? I/BaseTest: beforeClass
17841-17855/? I/TestRunner: started: useAppContext(com.chwn.uiautomator.ExampleInstrumentedTest)
17841-17841/? I/MonitoringInstr: Activities that are still in CREATED to STOPPED: 0
17841-17855/? I/BaseTest: before
17841-17855/? I/ExampleInstrumentedTest: useAppContext>>appContext:android.app.ContextImpl@577079b
17841-17855/? I/BaseTest: after
17841-17855/? I/TestRunner: finished: useAppContext(com.chwn.uiautomator.ExampleInstrumentedTest)
17841-17841/? I/MonitoringInstr: Activities that are still in CREATED to STOPPED: 0
17841-17855/? I/BaseTest: afterClass
17841-17855/? I/TestRunner: run finished: 1 tests, 0 failed, 0 ignored
从日志中可以看出,方法的执行顺序为:
@BeforeClass –> @Before –> @Test –> @After –> @AfterClass
总结:
3.1 我们可以按单个@Test方法的方式运行用例,也可以以类的方式运行该类中所有@Test用例。
3.2 我们一般会写一个BaseTest的基类,把各用例都需执行的一些公共配置和逻辑写进基类中。这里@BeforeClass和@Before的区别是,当以类的方式运行该类中所有@Test用例时,@BeforeClass只调用一次,而@Before则在执行每个@Test用例时都会调用。
4.用例执行的线程
4.1 每个@Test用例都是在系统提供的线程”android.support.test.runner.AndroidJUnitRunner”中运行的;因此在用例的执行逻辑中,Toast是不可直接调用的。
4.2 androidTest、main会以两个app的形式被安装进手机中,因为它们有各自的applicationId。但是,两者又有关联。
当运行完androidTest中的一次用例执行时,宿主main所对应的app会被系统杀掉。也就是说宿主app与测试用例执行线程是同生共死的。
二.UI测试用例的编写
不可缺少的工具是:uiautomatorviewer.bat,位置在你电脑上android sdk目录下的tools目录下。
操作界面如下:
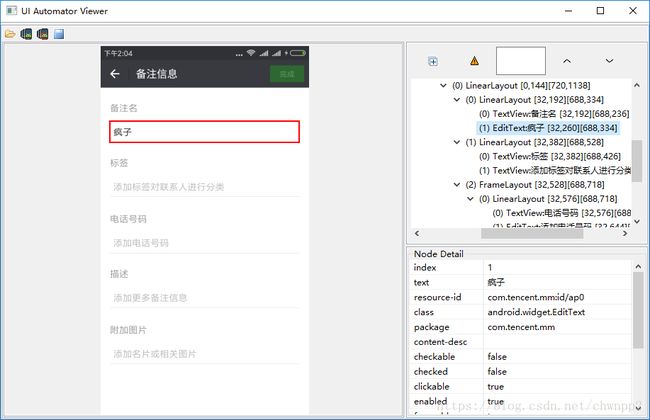
2.1 定位UI元素的方式
从上图可以看出,要在界面上唯一锁定一个元素,通常有如下途径:
2.1.1 通过元素值
1.By.text;
2.By.desc;
3.By.clazz;
如果通过单一途径不能唯一锁定,可以组合起来使用。如:
UiObject2 uiObject2 = Init.getDevice().findObject(By.text("xxx").clazz("android.widget.TextView"));2.1.2 通过布局结构
这种方式通常在定位列表的孩子节点元素时常用。如页面:
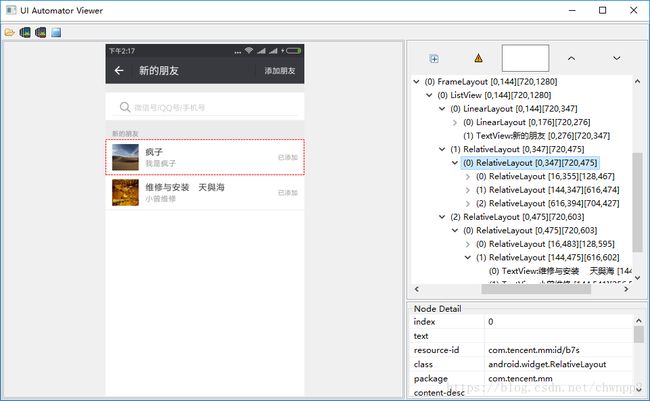
如果想获取到每个Item的红框位置的元素,可以这样写:
    public List getNewFriendsList(){
        UiObject2 container = getBySelector(By.clazz("android.widget.ListView"));
        return getChildren(container, By.clazz("android.widget.RelativeLayout"),2);
    }

    public UiObject2 getBySelector(BySelector selector)
    {
        return Init.getDevice().findObject(selector);
    }

    /**
     * 获取指定深度的子对象
     *
     * @param parent
     * @param selector
     * @return
     */
    public List getChildren(UiObject2 parent, BySelector selector, int depth) {
        List children = parent.findObjects(selector.depth(depth));
        return children;
    }
2.1.3 通过属性关系
UiObject2 tagUiObj  = getBySelector(By.text("xxx")); //可以在界面上唯一确定的
UiObject2 valueObj = tagUiObj.getParent().findObject(By.clazz("yyy")); //与tagUiObj是兄弟关系
2.1.4 通过坐标位置
UiObject2有一系列Visible api,可以获取元素的坐标信息。可以基于此,封装一些通用方法,供业务逻辑使用。
如图:想找到小程序首页title栏的more按钮,并点击。
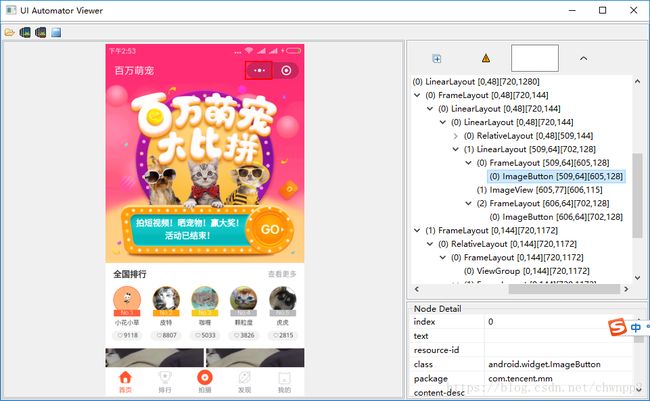
    public void popMainMenu() {
        List imageButtons = getBySelector(By.clazz("android.widget.ImageButton"));
        UiObject2 topMoreBtn = getLeftTopInList(imageButtons);
        topMoreBtn.click();
        sleep(5000);
    }

public UiObject2 getLeftTopInList(List list) {
        int xf = 0;
        int yf = 0;
        UiObject2 target = null;
        List tempList = new ArrayList<>();
        for (UiObject2 obj : list) {
            int x = obj.getVisibleCenter().x;
            if (xf == 0 || x <= xf) {
                xf = x;
                tempList.add(obj);
            }
        }

        if (tempList.size() > 1) {
            for (UiObject2 obj : tempList) {
                int y = obj.getVisibleCenter().y;
                if (yf == 0 || y <= yf) {
                    yf = y;
                    target = obj;
                }
            }
        }

        return target == null ? tempList.get(0) : target;
    }
2.2 基本操作
2.2.1. 点击click
2.2.2. 长按
UiObject2没有长按的api,所以只能是自行模拟。
    //原地swipe可以用来模拟长按
    Init.getDevice().swipe(centerX, centerY, centerX, centerY, 100);
2.2.3.滑动/ 拖动
框架提供了swipe方法和drag方法
//UiDevice
public boolean swipe(int startX, int startY, int endX, int endY, int steps)
public boolean drag(int startX, int startY, int endX, int endY, int steps)
这里要注意几点:
3.1.起点和终点的坐标在手机屏幕上要位于可滑动的区域内;不应该超出屏幕之外;
3.2.steps指的是总滑动距离分多少步执行完,只不要过大,否则也会引起滑动动作无效。
2.2.4. 等待
4.1 等待元素出现
Init.getDevice().wait(Until.hasObject(bySelector), time)4.2 等待新页面出现
    public static void clickWaitForNewWindow(UiObject2 object){
        object.clickAndWait(Until.newWindow(), 2000);
    }
4.3 Thread.sleep()
除了以上通过api,还可以通过sleep线程,然后再进行后续的页面操作
2.3 总结
1.在查找元素时,优先通过元素值来定位,其次再通过布局结构来定位;第三再通过界面坐标来定位;尽量不要通过属性关系来定位,已发现getParent()方法有时不管用。
2.按页面和功能封装方法,并且尽可能封装一些常用操作,这样可以极大减少重复代码,快速完成新的测试用例;
3.对于页面重要的元素,要通过循环多次查找的方式来定位该元素;