CentOS Docker使用ELK监听日志
前面我们学习如何搭建httpd服务:https://blog.csdn.net/daily886/article/details/103694649
下面我们ELK开源的日志管理来管理httpd日志
ELK介绍
在开源的日志管理方案中,最出名的莫过于 ELK 了。ELK 是三个软件的合称:Elasticsearch、Logstash、Kibana。
Elasticsearch
一个近乎实时查询的全文搜索引擎。Elasticsearch 的设计目标就是要能够处理和搜索巨量的日志数据。
Logstash
读取原始日志,并对其进行分析和过滤,然后将其转发给其他组件(比如 Elasticsearch)进行索引或存储。Logstash 支持丰富的 Input 和 Output 类型,能够处理各种应用的日志。
Kibana
一个基于 JavaScript 的 Web 图形界面程序,专门用于可视化 Elasticsearch 的数据。Kibana 能够查询 Elasticsearch 并通过丰富的图表展示结果。用户可以创建 Dashboard 来监控系统的日志。
首先,我们使用后台方式运行httpd
# 因为我们在启动日志的时候没有用-d 参数,httpd 容器以前台方式启动,日志会直接打印在当前的终端窗口。
# 如果加上-d 参数以后台方式运行容器,我们就看不到输出的日志了。

[root@localhost docker]# docker run -p 32763:80 -v $PWD/apache2/conf/httpd.conf:/usr/local/apache2/conf/httpd.conf -v $PWD/apache2/htdocs/:/usr/local/apache2/htdocs/ -v $PWD/apache2/logs/:/usr/local/apache2/logs/ -d httpd

[root@localhost docker]# docker ps -a
CONTAINER ID        IMAGE               COMMAND              CREATED             STATUS              PORTS                   NAMES
a9731278177d        httpd               "httpd-foreground"   20 minutes ago      Up 20 minutes       0.0.0.0:32763->80/tcp   magical_brown
容器后台运行后,查看容器日志推荐的方法是用docker logs命令。
# docker logs能够打印出自容器启动以来完整的日志,并且-f 参数可以继续打印出新产生的日志,效果上与 Linux 命令tail -f 一样。
[root@localhost docker]# docker logs -f a9731278177d
[Thu Dec 26 01:03:29.572256 2019] [mpm_event:notice] [pid 1:tid 139793505739904] AH00489: Apache/2.4.41 (Unix) configured -- resuming normal operations
[Thu Dec 26 01:03:29.578104 2019] [mpm_event:info] [pid 1:tid 139793505739904] AH00490: Server built: Nov 23 2019 00:34:14
[Thu Dec 26 01:03:29.578111 2019] [core:notice] [pid 1:tid 139793505739904] AH00094: Command line: 'httpd -D FOREGROUND'
[Thu Dec 26 01:03:29.578114 2019] [core:debug] [pid 1:tid 139793505739904] log.c(1571): AH02639: Using SO_REUSEPORT: yes (1)
[Thu Dec 26 01:03:29.574053 2019] [mpm_event:debug] [pid 7:tid 139793504249600] event.c(2315): AH02471: start_threads: Using epoll (wakeable)
[Thu Dec 26 01:03:29.574142 2019] [mpm_event:debug] [pid 8:tid 139793504249600] event.c(2315): AH02471: start_threads: Using epoll (wakeable)
[Thu Dec 26 01:03:29.574196 2019] [mpm_event:debug] [pid 9:tid 139793504249600] event.c(2315): AH02471: start_threads: Using epoll (wakeable)
Docker 提供了多种日志机制帮助用户从运行的容器中提取日志信息。这些机制被称作 logging driver。
Docker 的默认 logging driver 是json-file。
[root@localhost docker]# docker info | grep "Logging Driver"
 Logging Driver: json-file

# 查看容器日志文件位置
[root@localhost docker]# find / -name *-json.log
/var/lib/docker/containers/a9731278177d05d4d6db1013387eb580cb7e923ab9dc9cfb6f10fb9958dfab91/a9731278177d05d4d6db1013387eb580cb7e923ab9dc9cfb6f10fb9958dfab91-json.log


# jason-file会将容器的日志保存在 json 文件中,Docker 负责格式化其内容并输出到 STDOUT 和 STDERR。
# 我们可以在 Host 的容器目录中找到这个文件,器路径为 /var/lib/docker/containers//-json.log
ELK日志处理流程
Logstash 负责从各个 Docker 容器中提取日志,Logstash将日志转发到 Elasticsearch 进行索引和保存,Kibana 分析和可视化数据。
部署ELK
安装java环境
yum install java-1.8.0* -y安装elk,请预留2.5G的硬盘空间,如果没有该镜像,系统自动搜索安装
[root@localhost ~]# docker run -p 5601:5601 -p 9200:9200 -p 5044:5044 -d --name elk sebp/elk
Unable to find image 'sebp/elk:latest' locally
Digest: sha256:6763f8c63cd7c858b527b831e5f67e803652cc229118aeaf23b32549f7f14032
Status: Downloaded newer image for sebp/elk:latest
0075dfdc191bd972560a59fac16aacc41f85aa26fd4837819fb190f82f947f16


# 如果没有启动成功,重新启动一次
[root@localhost docker]# docker start elk
elk

# 查看日志
[root@localhost docker]# docker logs -f 0075dfdc191b

{"type":"log","@timestamp":"2019-12-27T04:39:47Z","tags":["info","http","server","Kibana"],"pid":274,"message":"http server running at http://0.0.0.0:5601"}


############### 注意如果主机配置较低,ELK启动需要多一点的时间,请耐心等待直到出现 http server running at http://0.0.0.0:5601 ,即启动成功

# 查看是否启动成功
[root@localhost ~]# docker ps
CONTAINER ID        IMAGE               COMMAND                  CREATED             STATUS              PORTS                                                                              NAMES
0075dfdc191b        sebp/elk            "/usr/local/bin/star…"   40 seconds ago      Up 39 seconds       0.0.0.0:5044->5044/tcp, 0.0.0.0:5601->5601/tcp, 0.0.0.0:9200->9200/tcp, 9300/tcp   elk
如果出现下面的错误
max virtual memory areas vm.max_map_count [65530] is too low, increase to at least [262144]执行下面的命令后,再重新启动 ELK
sysctl -w vm.max_map_count=262144如果出现下面错误,刷新后再试
Kibana server is not ready yet
启动成功后,访问:http://10.10.87.244:5601 即可看到效果:
当前 Kibana 没有可显示的数据,因为当前 Elasticsearch 还没有任何日志数据。
接下来的工作就是将 Docker 的日志导入 ELK
下载安装filebeat
前面我们已经知道 Docker 会将容器日志记录到 /var/lib/docker/containers/
要实现这一步其实不难,因为 ELK 提供了一个配套小工具 Filebeat,它能将指定路径下的日志文件转发给 ELK。同时 Filebeat 很聪明,它会监控日志文件,当日志更新时,Filebeat 会将新的内容发送给 ELK。
filebeat下载地址:https://www.elastic.co/cn/downloads/beats/filebeat ,选择你合适的版本下载安装
下面我们安装 linux64版本:https://artifacts.elastic.co/downloads/beats/filebeat/filebeat-7.5.1-linux-x86_64.tar.gz
注意:有时在创建index的时候会提示Couldn’t find any Elasticsearch data
可以删除yum remove filebeat,然后重新下载配置即可
# 下载
[root@localhost docker]# wget https://artifacts.elastic.co/downloads/beats/filebeat/filebeat-7.5.1-linux-x86_64.tar.gz
--2019-12-26 11:45:59--  https://artifacts.elastic.co/downloads/beats/filebeat/filebeat-7.5.1-linux-x86_64.tar.gz
Resolving artifacts.elastic.co (artifacts.elastic.co)... 151.101.110.222, 2a04:4e42:36::734
Connecting to artifacts.elastic.co (artifacts.elastic.co)|151.101.110.222|:443... connected.
HTTP request sent, awaiting response... 200 OK
Length: 24317087 (23M) [application/x-gzip]
Saving to: ‘filebeat-7.5.1-linux-x86_64.tar.gz’

100%[================================================================================================>] 24,317,087   321KB/s   in 40s

2019-12-26 11:46:39 (595 KB/s) - ‘filebeat-7.5.1-linux-x86_64.tar.gz’ saved [24317087/24317087]

# 查看
[root@localhost docker]# ll
total 23756
drwxr-xr-x. 12 root root      139 Nov 23 08:36 apache2
-rw-r--r--.  1 root root       56 Dec 26 10:19 daemon.json
-rw-r--r--.  1 root root 24317087 Dec 19 01:42 filebeat-7.5.1-linux-x86_64.tar.gz
-rw-------.  1 root root      244 Dec 26 10:00 key.json

# 解压
[root@localhost docker]# tar -zxvf filebeat*

# 切换到filebeat解压后的文件夹里面
[root@localhost docker]# cd filebeat*

# filebeat就是可允许程序了
[root@localhost filebeat-7.5.1-linux-x86_64]# ll
total 74792
-rw-r--r--.  1 root root   317651 Dec 17 05:56 fields.yml
-rwxr-xr-x.  1 root root 75834640 Dec 17 05:57 filebeat
-rw-r--r--.  1 root root    83274 Dec 17 05:56 filebeat.reference.yml
-rw-------.  1 root root     8236 Dec 17 05:56 filebeat.yml
drwxr-xr-x.  3 root root       15 Dec 17 05:56 kibana
-rw-r--r--.  1 root root    13675 Dec 17 05:15 LICENSE.txt
drwxr-xr-x. 38 root root     4096 Dec 17 05:56 module
drwxr-xr-x.  2 root root     4096 Dec 17 05:56 modules.d
-rw-r--r--.  1 root root   302830 Dec 17 05:16 NOTICE.txt
-rw-r--r--.  1 root root      802 Dec 17 05:58 README.md
第二步:配置filebeat
Filebeat 的配置文件为 filebeat.yml,我们需要告诉 Filebeat 两件事:
- 监控哪些日志文件?
- 将日志发送到哪里?
修改监控日志文件路径,编辑filebeat.yml
[root@localhost filebeat-7.5.1-linux-x86_64]# vi filebeat.yml

# 大概21行左右的内容,修改如下

- type: log

  # Change to true to enable this input configuration.
  enabled: true

  # Paths that should be crawled and fetched. Glob based paths.
  paths:
    - /var/lib/docker/containers/*/*.log
    - /var/log/*.log
    #- c:\programdata\elasticsearch\logs\*


###########################
:wq 保存退出
把type 设置为 log
把enabled 修改为 true
在 paths 中我们配置了两条路径:
/var/lib/docker/containers/*/*.log 是所有容器的日志文件。
/var/log/*.log 是 Host 操作系统的 log。
接下来告诉 Filebeat 将这些日志发送给 ELK。
Filebeat 可以将日志发送给 Elasticsearch 进行索引和保存;也可以先发送给 Logstash 进行分析和过滤,然后由 Logstash 转发给 Elasticsearch。
为了不引入过多的复杂性,我们这里将日志直接发送给 Elasticsearch。
编辑filebeat.yml
[root@localhost filebeat-7.5.1-linux-x86_64]# vi filebeat.yml

# 大概 149 行左右的内容,修改如下

output.elasticsearch:
  # Array of hosts to connect to.
  hosts: ["localhost:9200"]


###########################
:wq 保存退出
启动filebeat
# nohup命令:如果你正在运行一个进程,而且你觉得在退出帐户时该进程还不会结束,那么可以使用nohup命令。该命令可以在你退出帐户/关闭终端之后继续运行相应的进程。nohup就是不挂断的意思( no hang up)。
# 该命令的一般形式为:nohup 你的命令 &

[root@localhost filebeat-7.5.1-linux-x86_64]# nohup ./filebeat -e -c filebeat.yml -d publish >/dev/null 2>./filebeat.log &


############################ nohup例子 ############################################
nohup command > myout.file 2>&1 &
在上面的例子中,0 – stdin (standard input),1 – stdout (standard output),2 – stderr (standard error)
2>&1是将标准错误(2)重定向到标准输出(&1),标准输出(&1)再被重定向输入到myout.file文件中。
############################
配置ELK并查看filebeat日志
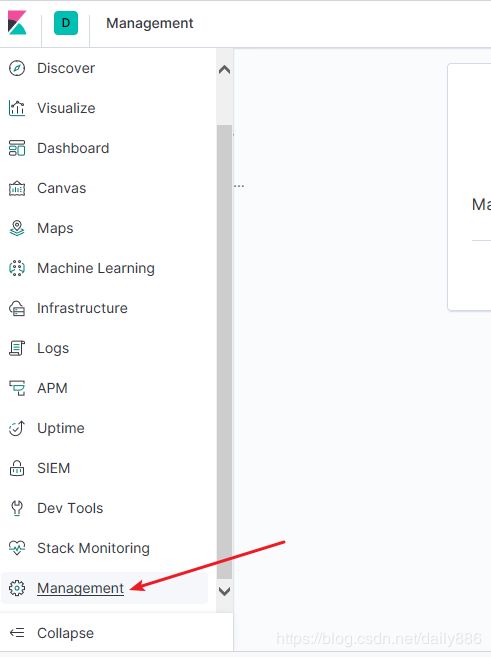
访问我们的ELK网页端 http://10.10.87.244:5601 ,菜单选择 Management
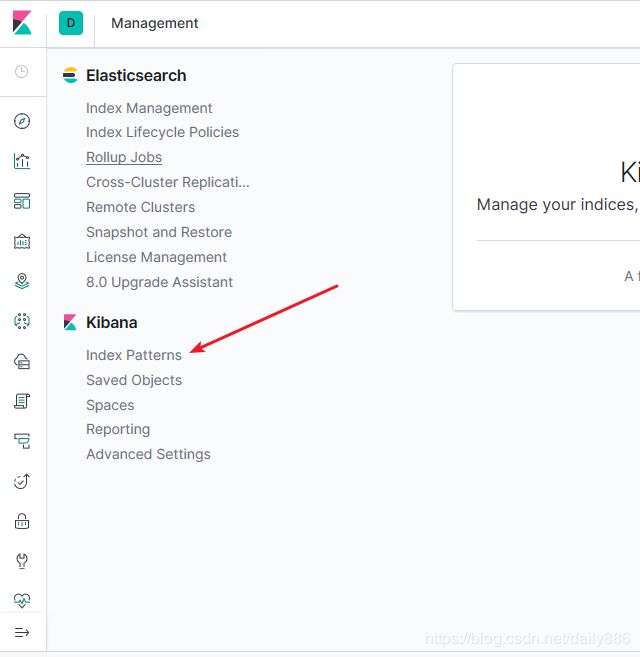
选择 Kibana 中的 Index Patterns
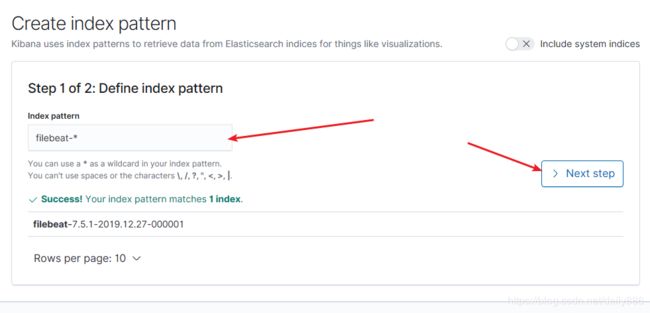
选择 Create index pattern,创建索引模式
输入框填写 filebeat-* ,点击 Next step
选中 @timestamp , 点击 Create index pattern
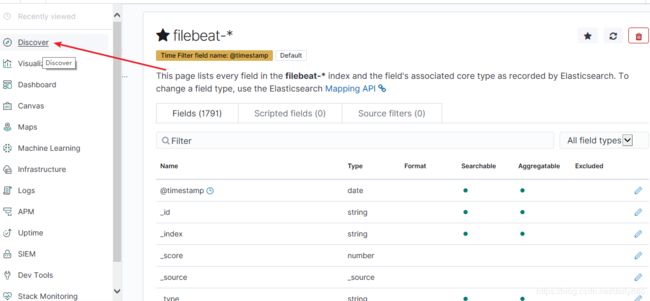
创建索引成功后,点击左侧主菜单中的 Discover
在详情页 点击选中 filebeat-* ,即可看到 容器和 syslog 日志信息。
测试filebeat日志
[root@localhost filebeat-7.5.1-linux-x86_64]# docker run busybox sh -c 'while true; do echo "This is a log message from container busybox!"; sleep 10; done;'
Unable to find image 'busybox:latest' locally
latest: Pulling from library/busybox
bdbbaa22dec6: Pull complete
Digest: sha256:6915be4043561d64e0ab0f8f098dc2ac48e077fe23f488ac24b665166898115a
Status: Downloaded newer image for busybox:latest
This is a log message from container busybox!
This is a log message from container busybox!
This is a log message from container busybox!
This is a log message from container busybox!
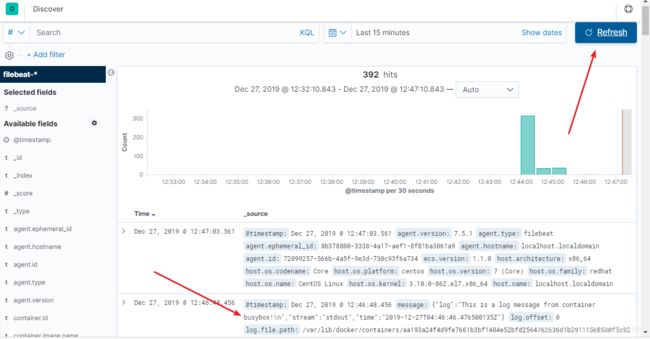
我们点击Refresh 即可看新的日志记录
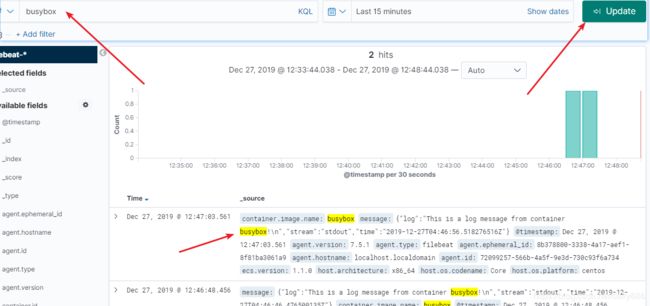
也可以搜索关键字 busybox ,点击 Update ,搜索关键字
错误问题汇总
1、Unable to connect to Elasticsearch at http://localhost:9200错误解决方案:
需要修改elasticsearch.yml文件增加network.bind_host: 0.0.0.0。
参考:https://www.cnblogs.com/itzhao/p/11368765.html
参考:https://blog.csdn.net/wu2700222/article/details/85044117
参考:https://elasticsearch.cn/question/5496

