Robot Framework + Appium测试Android设备
最近的一些项目需要使用Robot Framework测试Android设备,Appium则是目前测试移动设备最合适的library.
在搭建环境的过程中,选择的PC主机环境是Ubuntu,当然大家也可以选择Windows或者MAC。
不过,这篇小文章的安装篇是以Ubutu 14.04为例来测试的。
本文分为以下部分,
一。初识Robot Framework
二。再识Appium
三。Robot Framework 和 Appium -- 鸳鸯一对
四。编译环境安装步骤
五。案例一:测试Android计算器
六。案例二:测试Build Number
七。关键字(keyword) "Open Application"初探
八。撩起你的红盖头 -- 让uiautomatorviewer解析Anroid当前视窗下的各控件属性
下面我们边走边看,逐一窥探每一部分的奥秘。
(只是走马观花式的看哦,如果要想深入,各位看官还要身体力行,在实际的项目中提高)
一。初识Robot Framework
Robot Framework仅仅是一个通用的框架,他的名字就很好地体现了他的特征(Robot代表自动化,Framework代表框架)。
让Robot Framework丰富多彩的是各种各种各样的Library, 有些library是Robot Framework自带的(如String/XML等),还有更到的是第三方开发的,然后开源供社区所有人一起开发和使用。Appium就是属于第三方开发的library,目前社区有很多的无名英雄一直默默地为Appium做着巨大的贡献。
Robot Framework有很多优点,我们作一些介绍,
1. “关键字”(Keyword)驱动,这是Robot Framework最重要的特性;另外,支持表格化的编程,大大降低了编程的难度;语法也简单灵活,十分容易理解;
2. 新创建的“关键字”(keyword)可以使用之前定义的“关键字”(keyword);
3. 允许用户自己创建定义“关键字”(Keyword);
4. 程序的可移植性好,和主机环境(PC端,如Ubuntu, Windows, MAC)无关,和测试程序无关(如测试 Chrome, IE, firefox);
5. 丰富的类库(library)支持,有Robot Framework自带的,也有第三方的类库(library),也可以自己定制;
6. 便签(Tag)分类功能,可以用于选择某些便签(Tag)的测试案例,或者结果生成之后,查看某些类别的便签(Tag)测试案例的结果;
7. 生成HTML格式的报告(report)和日志(Log),便于阅读查看;
Robot Framwork遵守Apache License 2.0协议,在此协议下所有人都可以免费开发和使用,更多详细内容可以参考官方网http://robotframework.org/
二。再识Appium
Appium是第三方开发的类库(library),主要目的是测试移动设备,目前支持 Android/iOS/Firefox/Windows Phone.
Appium的长处如下,
1. 无需获得待测试程序的源代码;
2. 无需修改或者重新编译待测试程序;
3. Appium支持多种语言,如Python,Java,robot framework等;
关于Appium更多内容,可以参考官方网站 http://appium.io/
Appium中文文档 http://appium.io/slate/cn/master/
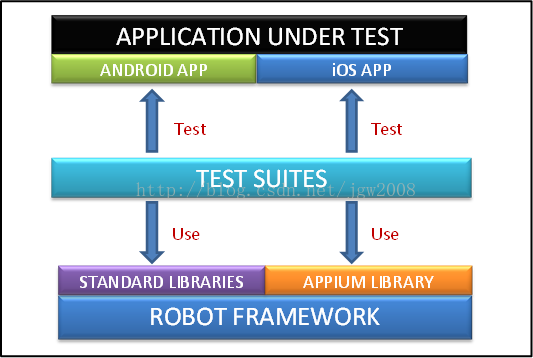
三。Robot Framework 和 Appium -- 鸳鸯一对
下图是Robot Framework + Appium的框图,
下图是使用Robot Framework + Appium测试移动设备的时序图,
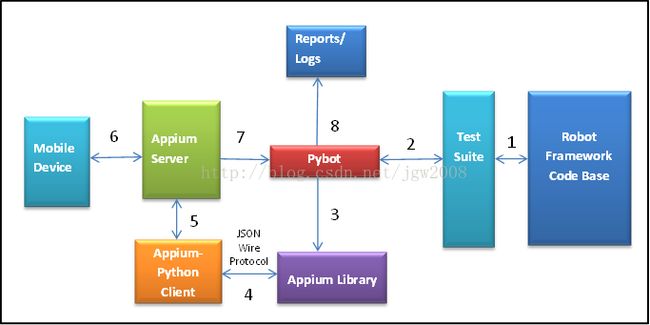
Appium Server:运行在Node.js上,负责处理移动设备的UI和Appium的交互。Appium Server在背景一直运行,来响应Appium Library传过来的命令。
Appium-Python Client: 使用JSON Wire Protocol实现与Appium Library和Appium Server的交互,Appium Library通过Appiium-Python Client请求Appium Server初始化一个Session,请求成功后,Appium Server分配给Appium-Python Client一个Session ID, 后续所有的交互都是通过这个Session完成。
Pybot: 读取测试文件脚本,控制Appium Library; 之后把产生的结果生产Report和Log。
四。编译环境安装步骤(Ubuntu)
1. Appium环境安装
1.1 安装node.js
从下面的链接下载,解压,把bin目录添加到环境变量中
https://nodejs.org/download/release/v5.6.0/
验证node.js是否配置成功,运行下列命令检查版本号码是否正确,
$ node -v
   v5.6.0
$ npm -v
3.6.0$ npm install -g appium
$ npm install -g appium-doctor1.3 安装Android SDK并配置环境变量如下,
export ANDROID_HOME=your_android_sdk_path/sdk
PATH=$PATH:$ANDROID_HOME/tools/:$ANDROID_HOME/platform-tools$ pip install Appium-Python-Client
2. 安装Robot Framwork
2.1 安装pip工具
$ sudo apt install python-pip$ sudo pip install robotframework$ sudo apt install python-wxgtk2.8$ echo "deb http://archive.ubuntu.com/ubuntu wily main universe" | sudo tee /etc/apt/sources.list.d/wily-copies.list
$ sudo apt update
$ sudo apt install python-wxgtk2.8
$ sudo rm /etc/apt/sources.list.d/wily-copies.list
$ sudo apt update
$ sudo pip install robotframework-ride
$ sudo pip install robotframework-appiumlibrary
$ ride.py五。案例一:测试Android计算器
这个测试的主要目的是测试两个数的相加和相减,然后校验结果。
下面是在Ride编辑器上写的代码,
*** Settings ***
Suite Setup       Open Calculator App
Suite Teardown    Close Application
Library           AppiumLibrary

*** Variables ***
# Appium Configurations
# Element locators for various objects on calculator app
${DISPLAYED_RESULT}    xpath=//*[contains(@resource-id, 'id/result')]
# Test Data
${td_Digit1}      5
${td_Digit2}      2
${td_Expected_Addition_Result}    7
${td_Expected_Subtraction_Result}    3

*** Test Cases ***
Test Case 1: Addition
    [Documentation]    Tests addition of two numbers on calculator app
    [Tags]    android    addition
    Log    "STEP 1: Enter two digits to add."
    Enter Digits And Operator    ${td_Digit1}    ${td_Digit2}    +
    Log    "STEP 2: View result"
    View Result
    Log    "STEP 3: Verify result"
    Verify Result    ${td_Expected_Addition_Result}

Test Case 2: Subtraction
    [Documentation]    Tests subtraction of two numbers on calculator app
    [Tags]    android    subtraction
    Log    "STEP 1: Enter two digits to subtract."
    Enter Digits And Operator    ${td_Digit1}    ${td_Digit2}    −
    Log    "STEP 2: View result"
    View Result
    Log    "STEP 3: Verify result"
    Verify Result    ${td_Expected_Subtraction_Result}

*** Keywords ***
Open Calculator App
    [Documentation]    Opens the calculator app with a new appium session.
    Open Application    http://localhost:4723/wd/hub    platformName=Android    platformVersion=6.0.1
    ...    deviceName=falcon_ironman_mvS    appPackage=com.android.calculator2    appActivity=.Calculator

Enter Digits And Operator
    [Arguments]    ${digit1}    ${digit2}    ${operator}
    [Documentation]    Taks two single digit numbers and the operator as input and presses the correspinding buttons on the calcualtor keypad.
    Click Element    xpath=//*[contains(@text, '${digit1}')]
    Click Element    xpath=//*[contains(@text, '${operator}')]
    Click Element    xpath=//*[contains(@text, '${digit2}')]

View Result
    [Documentation]    Presses the equal to button to view the result of the operation
    Click Element    xpath=//*[contains(@text, '=')]

Verify Result
    [Arguments]    ${expected_result}
    [Documentation]    Verifies the result displayed with the expected answer.
    ${displayed_result} =    Get Element Attribute    ${DISPLAYED_RESULT}    text
    Should Be Equal    ${displayed_result}    ${expected_result}
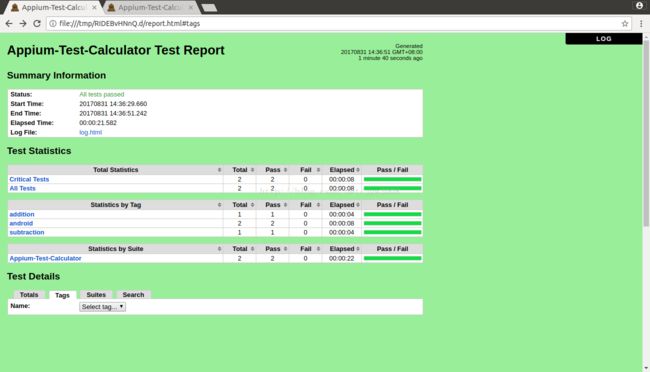
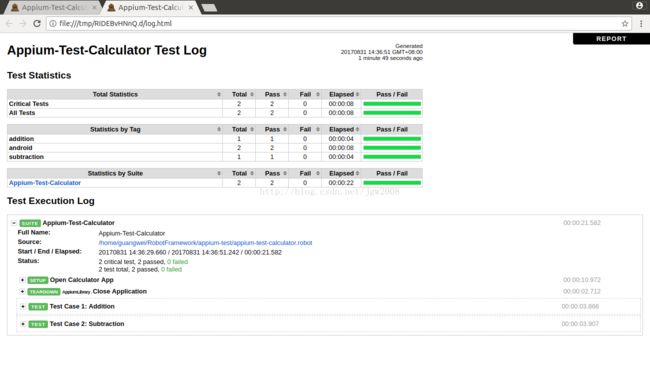
下面是测试产生的Report和Log,
六。案例二:测试Build Number
这个测试的主要目的是测试在Settings中的Build Number是否是正确的,读取Build Number并验证结果。
代码如下,
*** Settings ***
Suite Setup       Open Settings App
Suite Teardown    Close Application
Library           AppiumLibrary

*** Variables ***
${EXPECTED_BUILD_NUMBER}    91-12-04-MN-MV-111516

*** Test Cases ***
Test Case 1: Build Number Test
    [Documentation]    Compare the "Build Number" is expected or not.
    Verify Build Number    ${EXPECTED_BUILD_NUMBER}

*** Keywords ***
Open Settings App
    [Documentation]    Opens the Settings app with a new appium session.
    Open Application    http://localhost:4723/wd/hub    platformName=Android    platformVersion=6.0.1
    ...    deviceName=falcon_ironman_mvS    appPackage=com.android.settings    appActivity=.Settings

Verify Build Number
    [Arguments]    ${expected_build_number}
    [Documentation]    Verify the "Build Number" Correct or not
    Log    Step 1: Swipe to the end of page
    Swipe    0    1000    0    500    300
    Swipe    0    1000    0    500    300
    Swipe    0    1000    0    500    300
    Swipe    0    1000    0    500    300
    Sleep    2s
    Log    Step 2: Click the "About Phone" Label
    Click Element    xpath=//*[contains(@text, 'About phone')]
    Sleep    2s
    Log    Step 3: Swipe to the end of page
    Swipe    0    1000    0    500    300
    Swipe    0    1000    0    500    300
    Sleep    2s
    Log    Step 4: Verify the Page if contains the right build number
    Page Should Contain Text    ${expected_build_number}    INFO
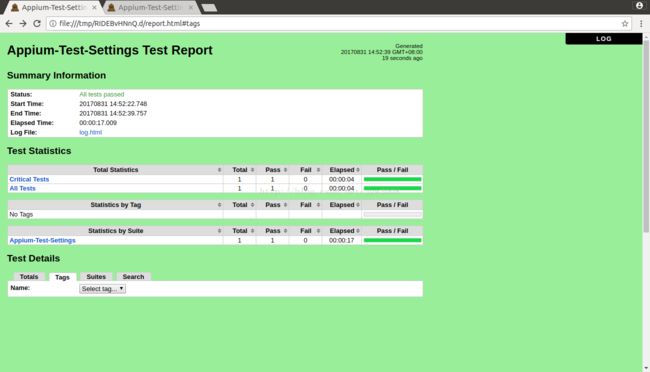
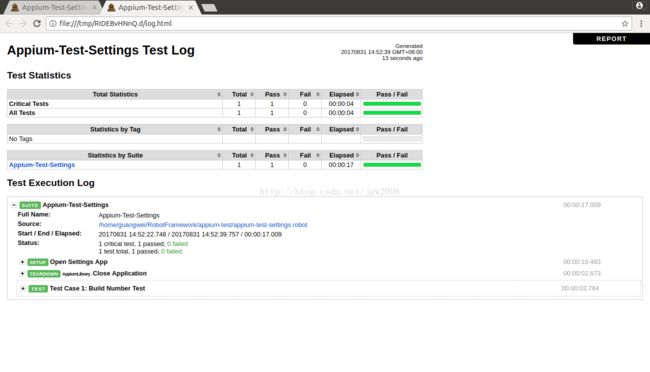
测试Report和Log如下,
七。关键字(keyword) "Open Application"初探
这是我在启动Android是常用的几个栏位,下面的英文比较简单,就不再翻译成中文了。
注意,我在使用RIDE编译的时候,"Open Application"的这几个栏位居然都不能用变量,大家做的时候如果遇到问题,可以试着不用变量的方式,直接在相应栏位赋值。

八。撩起你的红盖头 -- 让uiautomatorviewer解析Anroid当前视窗下的各控件属性
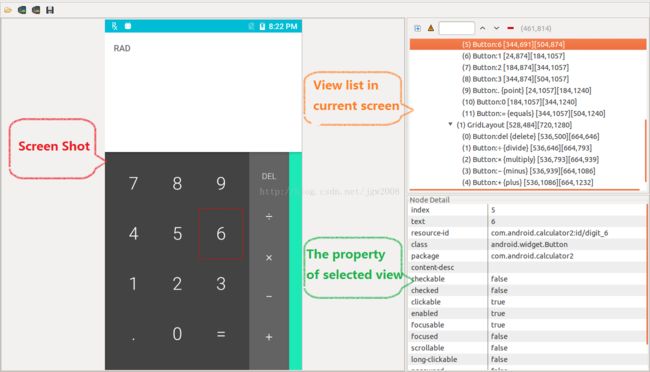
最后我们再看看神奇的uiautomatorviewer,这个工具居然可以把当前页面的所有控件的属性全部都抓出来,真是神奇。
有了这个申请的工具,我们及时没有app的源码,也可以窥看app里各个控件的属性。
在Ubuntu下,这个工具位于Sdk/tools/bin/uiautomatorviewer
它分为3个部分,
1. 左侧为屏幕截图;
2. 右侧上方为所有控件的列表,注意,只能抓到当前页面的控件;
3. 右侧下方为选定控件的属性,比如常用的resource-id, text等。
其他注意事项,
1. adb 显示“insufficient permissions for device”
请更改/etc/udev/rules.d/51-android.rules,在文件中添加如下语句,注意“idVendor”每个device都不一样,可以用命令“lsusb”获得
SUBSYSTEM=="usb", ATTR{idVendor}=="05C6", MODE="0666", GROUP="plugdev"参考资料
文末列出最近整理的Robot Framework相关的文章,
1.Robot Framework 介绍
2.Robot Framework + Appium测试Android设备
3. Robot Framework如何向Android发送keycode键盘事件
4.Robot Framework如何判断Android屏幕是否含有某个控件
5.Robot Framework如何等待Android屏幕中的某个控件出现
6.Robot Framework如何在Android中实现滚屏
7.Robot Framework如何对Android的控件定位
8.Robot Framework+Appium案例分享一: 验证版本信息
9.Robot Framework+Appium案例分享二: Camera测试
10.Robot Framework+Appium案例分享三: WiFi测试
11.Robot Framework+Appium案例分享四: Bluetooth测试
12.RobotFramework AppiumLibrary 用户关键字